Create asset lifecycle models
When you have created the lifecycle states that are required for your assets, you can then bundle them into groups called models.
Asset management > Setup > Assets > Lifecycle models

This method helps you create a lifecycle workflow that can be used for different types of assets. We recommend that you have at least one standard asset lifecycle model created.
- Go to Asset management > Setup > Assets > Lifecycle models.
- Select New to create a new asset lifecycle model.
- In the Lifecycle model field, enter the lifecycle model ID, such as Active.
- In the Name field, enter a descriptive name for the asset lifecycle model such as Active – asset.
- Save the new model.
- Under the Details FastTab, the Asset types and Lifecycle states fields automatically populate and display the number of Asset types and asset Lifecycle states that are using the current Lifecycle model. Because this model is new, Assets types will not have any Asset types associated to this model. Lifecycle states will populate when the Lifecycle states FastTab is updated on this page. Under the Lifecycle states FastTab, the active lifecycle states appear in the Lifecycle states remaining section at the left. These states are available to be included in the new asset lifecycle model group.
- To move a specific lifecycle state to the Lifecycle states selected section, choose the state in the Lifecycle states remaining section to be moved and then select the right arrow button.
- To choose all of the lifecycle states to be included in model, select the right move all arrow button to move the entire selection from the Lifecycle states remaining section over to the Lifecycle states selected section.
- To remove a specific lifecycle state from the model, choose the lifecycle state to be removed from the Lifecycle states selected section and then select the left arrow button to move it back to the Lifecycle states remaining section.
- To remove the entire selection from the model, select the left move all arrow button. All lifecycle states in the Lifecycle states selected section are then moved back to the Lifecycle states remaining section.
- The order of the Lifecycle states in the Lifecycle states selected tab defines the workflow. To move the states into the desired workflow order, select the state and use the arrows located to the right of the Lifecycle states selected section to move the state up or down in the workflow order.
- Use the Asset state FastTab to assign the Lifecycle state that the asset is in when Active or, when in a Loan status, what state should be assigned for the Lifecycle state in storage and the Lifecycle state on loan.
- Save the new lifecycle model.
Lifecycle state updates
When the lifecycle model is created, you must define how the states can flow in the system. This definition is determined by your company’s process flow and design.
While in the Asset location lifecycle models page, select Lifecycle state updates on the Action Pane.
Next to each lifecycle state, select the status that the state can be changed to. For example:
- Active can be changed to On Hold or In Repair.
- On Hold can be changed to Active only.
- In Repair can be changed to Active, On Hold, or Scrapped.
- Scrapped can only be changed to Active.
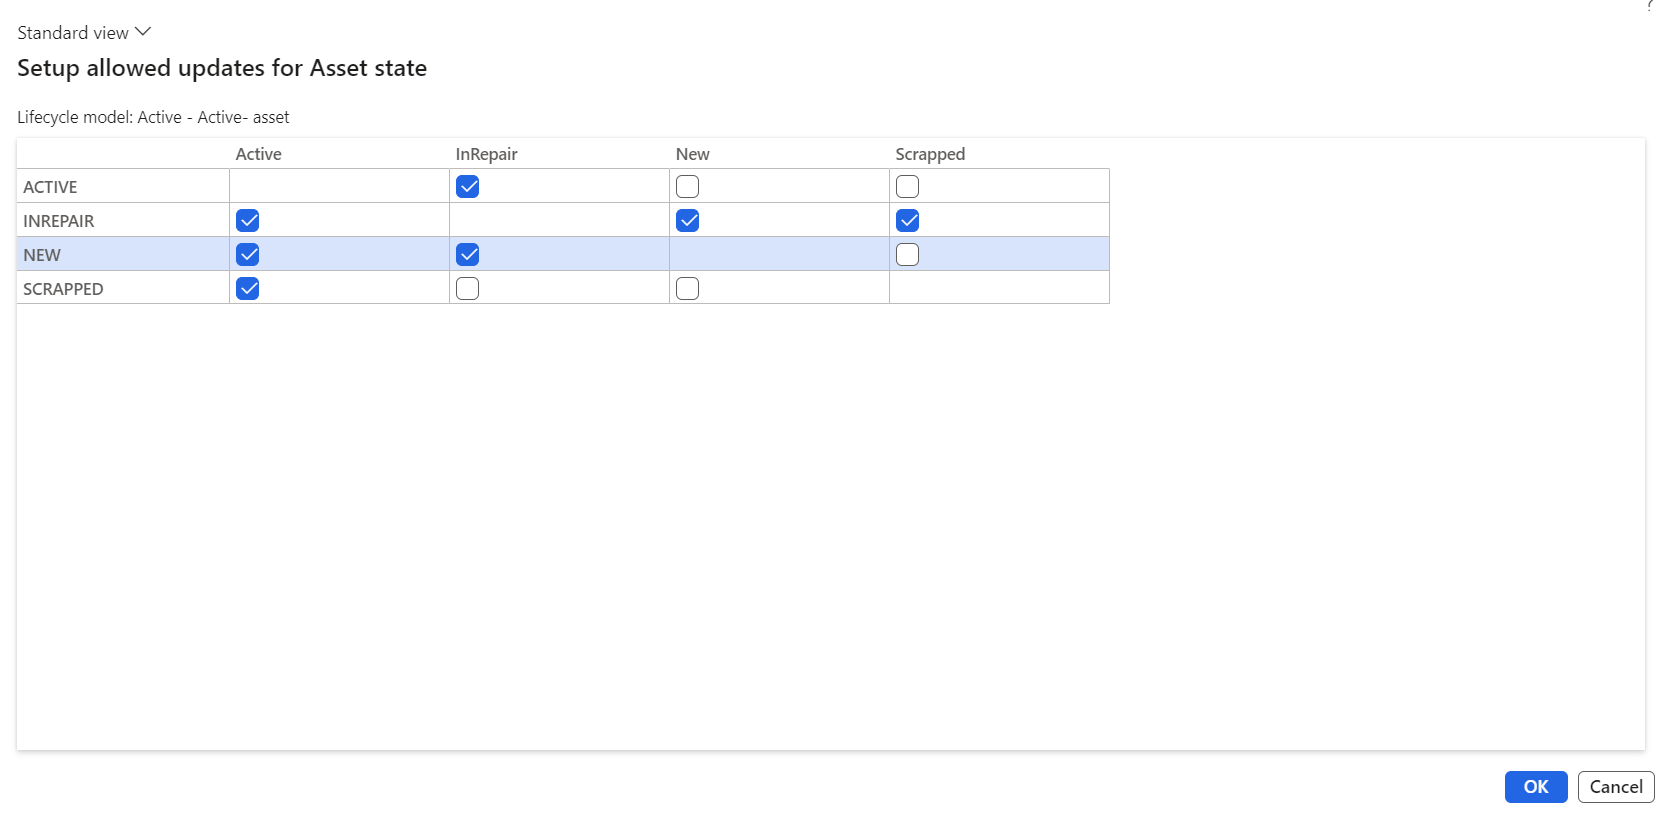
Select OK to save the updates.