Exercise - Create an SPFx Image Card ACE displaying image carousel
In this exercise, you'll create a SharePoint Framework (SPFx) Adaptive Card Extension (ACE) with the Image Card template that displays images taken by one of the cameras on the selected Mars rover.
Prerequisites
Developing ACEs for Viva Connections requires a Microsoft 365 tenant, SharePoint Online, and Viva Connections set up in your tenant. Use the following resources to prepare your tenant:
- Viva Connections enabled in the Microsoft 365 tenant
- SharePoint Framework: Set up your Microsoft 365 tenant
You also need the necessary developer tools installed on your workstation:
Important
In most cases, installing the latest version of the following tools is the best option. The versions listed here were used when this module was published and last tested.
- Node.js - v16.*
- Gulp-cli - v2.3.*
- Yeoman - v4.3.*
- Yeoman Generator for SharePoint - v1.17.1
- Visual Studio Code
Create the SPFx project
Open a command prompt, move to a folder where you want to create the SPFx project. Then, run the SharePoint Yeoman generator by executing the following command:
yo @microsoft/sharepoint
Use the following to complete the prompt that's displayed:
- What is your solution name?: AceImageViewer
- Which type of client-side component to create?: Adaptive Card Extension
- Which template would you like to use?: Image Card Template
- What is your Adaptive Card Extension name?: AceImageViewer
After provisioning the folders required for the project, the generator will install all the dependency packages by running npm install automatically. When npm completes downloading all dependencies, open the project in Visual Studio Code.
Add public properties to ACE component
The ACE component you'll create in this exercise will retrieve and display images taken by a Mars rover using one of the NASA Open API endpoints.
To call the API, we'll need to set three values:
- API key
- the Mars rover to retrieve photos for
- the Mars sol, a solar day on Mars, to retrieve the images for
All these will be public and configurable properties for on the ACE component.
Note
The NASA Open APIs support using a demo API key, or creating a free API key. This exercise will assume you're using the demo key.
The demo key has rate limits such as maximum number of requests per IP address in an hour and in a day. If you exceed the demo API key limits, you can create a key linked to your email address. To learn more, refer to the NASA Open APIs site.
Start by adding the properties to the ACE component.
Locate the ACE class in the file ./src/adaptiveCardExtensions/aceImageViewer/AceImageViewerAdaptiveCardExtension.ts and open it in VS Code.
Locate the
IAceImageViewerAdaptiveCardExtensionPropsinterface and update it to contain the following properties:export interface IAceImageViewerAdaptiveCardExtensionProps { title: string; nasa_api_key: string; nasa_rover: string; mars_sol: number; }
Next, add the properties to the property pane:
Locate the class in the file ./src/adaptiveCardExtensions/aceImageViewer/AceImageViewerPropertyPane.ts and open it in VS Code.
Locate the
importstatement that imports thePropertyPaneTextFieldmethod. Add a listing to thePropertyPaneDropdownmethod to thisimportstatement.import { IPropertyPaneConfiguration, PropertyPaneTextField, PropertyPaneDropdown // << add } from '@microsoft/sp-property-pane';Update the existing
getPropertyPaneConfiguration()method to accept a single parameter that specifies the selected rover:public getPropertyPaneConfiguration(selectedRover: string = 'curiosity'): IPropertyPaneConfiguration { .. }Add the following fields to the array of
groupFieldsin the object returned in thegetPropertyPaneConfiguration()method:PropertyPaneTextField('nasa_api_key', { label: 'NASA API key' }), PropertyPaneDropdown('nasa_rover', { label: 'NASA Mars rover', options: [ { index: 0, key: 'curiosity', text: 'Curiosity' }, { index: 1, key: 'opportunity', text: 'Opportunity' }, { index: 2, key: 'spirit', text: 'Spirit' } ], selectedKey: selectedRover }), PropertyPaneTextField('mars_sol', { label: 'Display photos from Mars day (Sol)' })
Let's add a small enhancement to the property pane: the drop-down selector for the Mars rover should default to the currently selected rover. The signature of the getPropertyPaneConfiguration() method accepts an input parameter that we can use to set it:
Go back to the
AceImageViewerAdaptiveCardExtensionclass and locate thegetPropertyPaneConfiguration()method. Replace the existingreturnstatement with the following:return this._deferredPropertyPane?.getPropertyPaneConfiguration(this.properties.nasa_rover);
Finally, add set some default values for the properties when the ACE component is added to the page:
Locate the ACE class in the file ./src/adaptiveCardExtensions/aceImageViewer/AceImageViewerAdaptiveCardExtension.manifest.json and open it in VS Code.
Add the following properties to the existing list of properties in the
preconfiguredEntries.propertiesobject:"nasa_api_key": "DEMO_KEY", "nasa_rover": "curiosity", "nasa_sol": 1000
Add NASA REST API service helper
Let's add a service to the project to handle all reading from the NASA REST Open API.
Create a new file ./src/adaptiveCardExtensions/aceImageViewer/nasa.service.ts in the project and add the following code to it:
import { AdaptiveCardExtensionContext } from '@microsoft/sp-adaptive-card-extension-base';
import { HttpClient } from '@microsoft/sp-http';

export interface IMarsRoverCamera {
  id: number;
  name: string;
  rover_id: number;
  full_name: string;
}

export interface IMarsRoverVehicle {
  id: number;
  name: string;
  landing_date: Date;
  launch_date: Date;
  status: string;
}

export interface IMarsRoverPhoto {
  id: number;
  sol: number;
  camera: IMarsRoverCamera;
  rover: IMarsRoverVehicle;
  img_src: string;
  earth_date: Date;
}

export const fetchRoverPhotos = async (
  spContext: AdaptiveCardExtensionContext,
  apiKey: string,
  rover: string,
  mars_sol: number): Promise<IMarsRoverPhoto[]> => {
  const results: { photos: IMarsRoverPhoto[] } = await (
    await spContext.httpClient.get(
      `https://api.nasa.gov/mars-photos/api/v1/rovers/${rover}/photos?sol=${mars_sol}&page=1&api_key=${apiKey}`,
      HttpClient.configurations.v1
    )
  ).json();

  return Promise.resolve(results.photos);
}
Update the state of the ACE component
With the public properties and helper service created, let's now update the component's state that's used to display data in the component.
Locate the ACE class in the file ./src/adaptiveCardExtensions/aceImageViewer/AceImageViewerAdaptiveCardExtension.ts and open it in VS Code.
Add the following
importstatement after the existingimportstatements:import { isEmpty } from '@microsoft/sp-lodash-subset' import { fetchRoverPhotos, IMarsRoverPhoto } from './nasa.service';Locate the
IAceImageViewerAdaptiveCardExtensionStateinterface and update it to contain the following properties:export interface IAceImageViewerAdaptiveCardExtensionState { currentIndex: number; roverPhotos: IMarsRoverPhoto[]; }Next, update the
onInit()method in theAceImageViewerAdaptiveCardExtensionclass to initialize these two properties to empty values:this.state = { currentIndex: 0, roverPhotos: [] };In the
onInit(), add the following code to retrieve images from the NASA API if minimum properties are set. This should be placed immediately before the existingreturn Promise.resolve();if (!isEmpty(this.properties.nasa_api_key) && !isEmpty(this.properties.nasa_rover) && !isEmpty(this.properties.mars_sol)){ this.setState({ roverPhotos: await fetchRoverPhotos( this.context, this.properties.nasa_api_key, this.properties.nasa_rover, this.properties.mars_sol) }); }The last statement uses the
awaitkeyword, so you need to add theasynckeyword to theonInit()method's declaration:public async onInit(): Promise<void> {
Let's handle one more scenario: if the user changes the selected nasa_rover or mars_sol in the property pane, we want to update the images in the state. Do this by adding the following code to the AceImageViewerAdaptiveCardExtension class. It will run when a property changes in the property pane:
protected onPropertyPaneFieldChanged(propertyPath: string, oldValue: any, newValue: any): void {
  if (propertyPath === 'nasa_rover' && newValue !== oldValue) {
    (async () => {
      this.setState({ roverPhotos: await fetchRoverPhotos(
        this.context,
        this.properties.nasa_api_key,
        newValue,
        this.properties.mars_sol)
      });
    })
  }

  if (propertyPath === 'mars_sol' && newValue !== oldValue) {
    (async () => {
      this.setState({ roverPhotos: await fetchRoverPhotos(
        this.context,
        this.properties.nasa_api_key,
        this.properties.nasa_rover,
        newValue)
      });
    })
  }
}
Update the CardView
Now that the component is set up to get photos from the REST API and store them in the state, you can update the rendering to display the photos. Start by updating the CardView.
Locate and open the ./src/adaptiveCardExtensions/aceImageViewer/cardView/CardView.ts file in VS Code.
Add a reference to the
IActionArgumentsinterface imported from the@microsoft/sp-adaptive-card-extension-basepackage:import { BaseImageCardView, IImageCardParameters, IExternalLinkCardAction, IQuickViewCardAction, ICardButton, IActionArguments // << add } from '@microsoft/sp-adaptive-card-extension-base';Next, update the buttons displayed on the CardView. The CardView can return zero, one, or two buttons. You want to show two buttons, previous and next buttons, when you aren't at the start or end of the collection of photos. Add this by replacing the contents of the
cardButtons()accessor method with the following code:const cardButtons: ICardButton[] = []; if (this.state.currentIndex !== 0) { cardButtons.push(<ICardButton>{ title: '<', id: '-1', action: { type: 'Submit', parameters: {} } }); } if (this.state.currentIndex !== (this.state.roverPhotos.length - 1)) { cardButtons.push(<ICardButton>{ title: '>', id: '1', action: { type: 'Submit', parameters: {} } }); } return (cardButtons.length === 0) ? undefined : (cardButtons.length === 1) ? [cardButtons[0]] : [cardButtons[0], cardButtons[1]];Next, replace the contents of the
data()accessor method with the following code. This will return a default image of Mars with some instructions if either the rover or Mars sol isn't specified. Otherwise, it will show the current image:if (!this.properties.nasa_rover || !this.properties.mars_sol) { return { primaryText: `Select Mars rover and sol to display photos...`, imageUrl: 'https://upload.wikimedia.org/wikipedia/commons/thumb/0/0e/Tharsis_and_Valles_Marineris_-_Mars_Orbiter_Mission_%2830055660701%29.png/240px-Tharsis_and_Valles_Marineris_-_Mars_Orbiter_Mission_%2830055660701%29.png', imageAltText: `Select Mars rover and sol to display photos...`, title: this.properties.title } } else { const rover = `${this.properties.nasa_rover.substring(0, 1).toUpperCase()}${this.properties.nasa_rover.substring(1)}`; const roverImage = this.state.roverPhotos[this.state.currentIndex]; if (roverImage) { return { primaryText: `Photos from the Mars rover ${rover} on sol ${this.properties.mars_sol}`, imageUrl: roverImage.img_src, imageAltText: `Image ${roverImage.id} taken on ${roverImage.earth_date} from ${rover}'s ${roverImage.camera.full_name} camera.`, title: this.properties.title }; } else { return { primaryText: `Please refresh the page to reload the rover photos`, imageUrl: '', imageAltText: '', title: this.properties.title } } }Next, replace the contents of the
onCardSelection()accessor method with the following code. This will open our QuickView, that you'll update in a moment, when the card is selected.return { type: 'QuickView', parameters: { view: QUICK_VIEW_REGISTRY_ID } };Next, implement the
onAction()method by adding the following code to theCardViewclass. This will run whenever a submit action occurs in the CardView's implementation. Recall in thecardButtons()method, you set theidproperty on the buttons to a positive or negative number to navigate through the array of images:public onAction(action: IActionArguments): void { if (action.type !== 'Submit') { return; } let currentIndex = this.state.currentIndex; this.setState({ currentIndex: currentIndex + Number(action.id) }); }Finally, comment out or remove the following reference to the
stringsobject:import * as strings from 'AceImageViewerAdaptiveCardExtensionStrings';
Update the QuickView
The last step before testing the ACE component is to update the QuickView. In this scenario, the QuickView will display more details about the current photo.
Locate and open the ./src/adaptiveCardExtensions/aceImageViewer/quickView/QuickView.ts file in VS Code.
Add the following
importstatement to the existing imports:import { IMarsRoverPhoto } from '../nasa.service';Remove the existing
IQuickViewDatainterface.Replace all remaining references to
IQuickViewDatain theQuickViewclass withIMarsRoverPhoto.Replace the contents of the
data()accessor method with the following:return this.state.roverPhotos[this.state.currentIndex];Finally, comment out or remove the following reference to the
stringsobject:import * as strings from 'AceImageViewerAdaptiveCardExtensionStrings';
Now, update the Adaptive Card template:
Locate and open the ./src/adaptiveCardExtensions/aceImageViewer/quickView/template/QuickViewTemplate.json file in VS Code.
Replace the contents of the template with the following code:
{
  "$schema": "http://adaptivecards.io/schemas/adaptive-card.json",
  "version": "1.5",
  "type": "AdaptiveCard",
  "body": [
    {
      "type": "Image",
      "url": "${img_src}"
    },
    {
      "type": "TextBlock",
      "text": "${rover.name} rover image #${id}",
      "horizontalAlignment": "Center"
    },
    {
      "type": "TextBlock",
      "text": "Photo Details",
      "spacing": "Medium",
      "separator": true,
      "size": "Large",
      "weight": "Bolder"
    },
    {
      "type": "FactSet",
      "facts": [
        {
          "title": "Rover:",
          "value": "${rover.name}"
        },
        {
          "title": "Camera:",
          "value": "${camera.full_name}"
        },
        {
          "title": "Date taken:",
          "value": "${earth_date} (sol ${sol})"
        }
      ]
    }
  ]
}
Test the dynamic ACE
Let's test the ACE to see our image browser!
In the console, execute the following statement:
gulp serve --nobrowser
In a browser, navigate to the SharePoint hosted workbench in site where you want to test the ACE. For example, if the URL of the site is https://contoso.sharepoint.com/sites/MSLearningTeam, the URL for the hosted workbench is https://contoso.sharepoint.com/sites/MSLearningTeam/_layouts/15/workbench.aspx.
Select the + icon and then select the AceImageViewer from the toolbox:
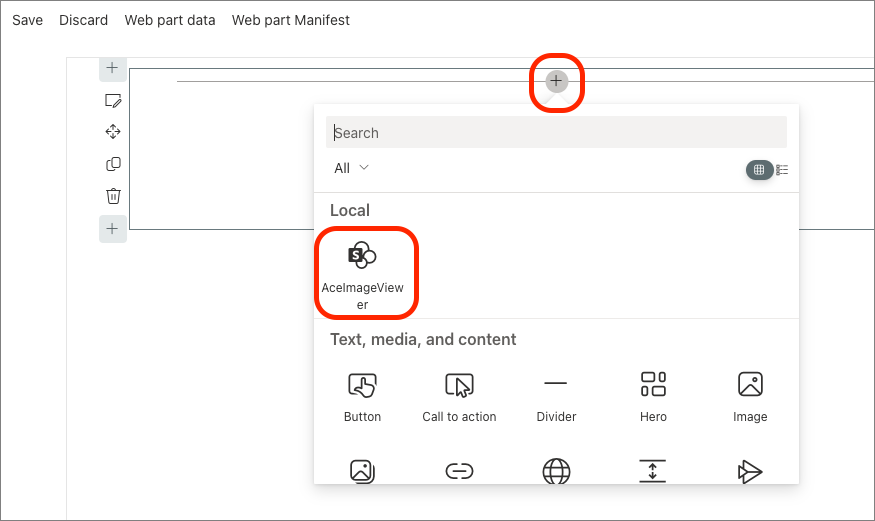
Notice the default experience for the component is using the image of Mars. That's because we don't have a Mars sol set:
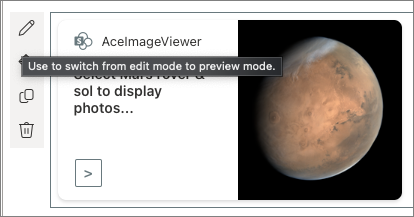
Just like a SPFx web part, you can hover the mouse over the ACE component and select the pencil icon to open the property pane:
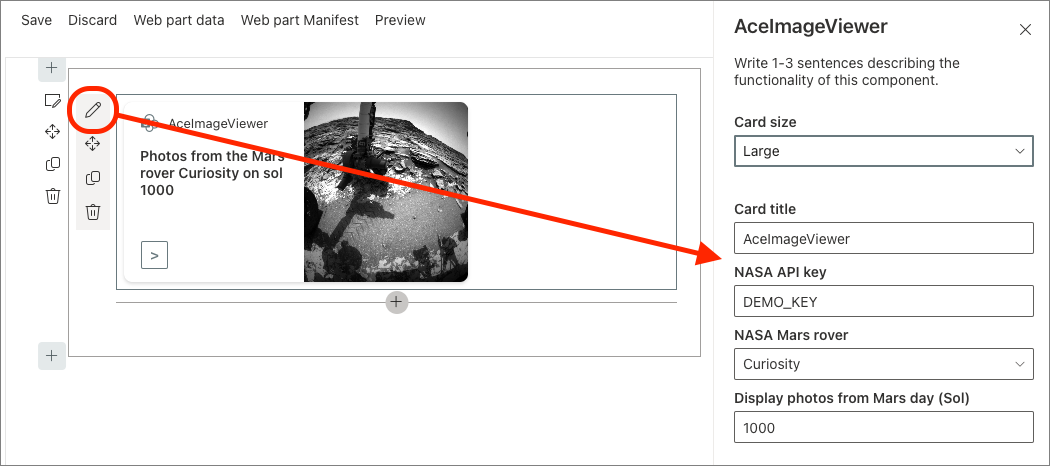
Set the Mars sol to 1000 and close the property pane by selecting the X in the top-right corner, and then select the Preview link in the top right corner of the top navigation of the page to put the page in display mode.
Use the provided buttons on the CardView to scroll through the images. A cropped version of the image is displayed in the Image Card's CardView

With your mouse, select anywhere on the card, without selecting either button. The QuickView will display the uncropped photo with more details about when it was taken:
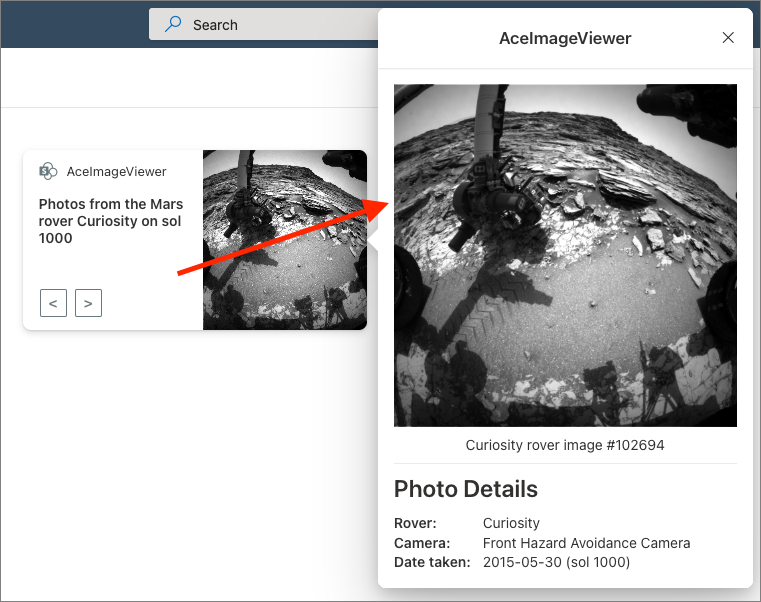
In this exercise, you created a SharePoint Framework (SPFx) Adaptive Card Extension (ACE) with the Image Card template that displayed images taken by one of the cameras on the selected Mars rover.