Plan the structure of your Bicep file
Bicep gives you the flexibility to decide how to structure your code. In this unit, you'll learn about the ways you can structure your Bicep code, and the importance of a consistent style and clear, understandable Bicep code.
What order should your Bicep code follow?
Your Bicep templates can contain many elements, including parameters, variables, resources, modules, outputs, and a targetScope for the entire template. Bicep doesn't enforce an order for your elements to follow. However, it's important to consider the order of your elements to ensure that your template is clear and understandable.
There are two main approaches to ordering your code:
- Group elements by element type
- Group elements by resource
You and your team should agree on one and use it consistently.
Group elements by element type
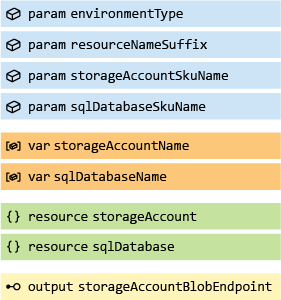
You can group all elements of the same type together. All your parameters would go in one place, usually at the top of the file. Variables come next, followed by resources and modules, and outputs are at the bottom. For example, you might have a Bicep file that deploys an Azure SQL database and a storage account.
When you group your elements by type, they might look like this:
Tip
If you follow this convention, consider putting the targetScope at the top of the file.
This ordering makes sense when you're used to other infrastructure as code languages (for example, the language in Azure Resource Manager templates). It can also make your template easy to understand, because it's clear where to look for specific types of elements. In longer templates, though, it can be challenging to navigate and jump between the elements.
You still have to decide how to order the elements within these categories. It's a good idea to group related parameters together. For example, all parameters that are about a storage account belong together and, within that, the storage account's SKU parameters belong together.
Similarly, you can group related resources together. Doing so helps anyone who uses your template to quickly navigate it and to understand the important parts of the template.
Sometimes, you create a template that deploys a primary resource with multiple secondary supporting resources. For example, you might create a template to deploy a website that's hosted on Azure App Service. The primary resource is the App Service app. Secondary resources in the same template might include the App Service plan, storage account, Application Insights instance, and others. When you have a template like this, it's a good idea to put the primary resource or resources at the top of the resource section of the template, so that anyone who opens the template can quickly identify the template's purpose and can find the important resources.
Group elements by resource
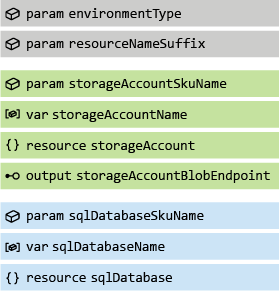
Alternatively, you can group your elements based on the type of resources you're deploying. Continuing the preceding example, you could group all the parameters, variables, resources, and outputs that relate to the Azure SQL database resources. You could then add the parameters, variables, resources, and outputs for the storage account, as shown here:
Grouping by resource can make it easier to read your template, because all the elements you need for a specific resource are in one place. However, it makes it harder to quickly check how specific element types are declared when, for example, you want to review all your parameters.
You also need to consider how to handle parameters and variables that are common to multiple resources, such as an environmentType parameter when you use a configuration map. Common parameters and variables should be placed together, usually at the top of the Bicep file.
Tip
Consider whether it might make more sense to create modules for groups of related resources, and then use a simpler template to combine the modules. We cover Bicep modules in more detail throughout the Bicep learning paths.
How can white space help create structure?
Blank lines, or white space, can help you add visual structure to your template. By using white space thoughtfully, you can group the sections of your Bicep code logically, which can in turn help clarify the relationships between resources. To do this, consider adding a blank line between major sections, regardless of the grouping style you prefer.
How do you define several similar resources?
With Bicep, you can use loops to deploy similar resources from a single definition. By using the for keyword to define resource loops, you can make your Bicep code cleaner and reduce unnecessary duplication of resource definitions. In the future, when you need to change the definition of your resources, you just update one place. By default, when Azure Resource Manager deploys your resources, it deploys all the resources in the loop at the same time, so your deployment is as efficient as possible.
Look for places where you define multiple resources that are identical, or that have few differences in their properties. Then, add a variable to list the resources to create, along with the properties that differ from the other resources. The following example uses a loop to define a set of Azure Cosmos DB containers, each of which has its own name and partition key:
var cosmosDBContainerDefinitions = [
  {
    name: 'customers'
    partitionKey: '/customerId'
  }
  {
    name: 'orders'
    partitionKey: '/orderId'
  }
  {
    name: 'products'
    partitionKey: '/productId'
  }
]

resource cosmosDBContainers 'Microsoft.DocumentDB/databaseAccounts/sqlDatabases/containers@2024-05-15' = [for cosmosDBContainerDefinition in cosmosDBContainerDefinitions: {
  parent: cosmosDBDatabase
  name: cosmosDBContainerDefinition.name
  properties: {
    resource: {
      id: cosmosDBContainerDefinition.name
      partitionKey: {
        kind: 'Hash'
        paths: [
          cosmosDBContainerDefinition.partitionKey
        ]
      }
    }
    options: {}
  }
}]
How do you deploy resources only to certain environments?
Sometimes, you define resources that should be deployed only to specific environments or under certain conditions. By using the if keyword, you can selectively deploy resources based on a parameter value, a configuration map variable, or another condition. The following example uses a configuration map to deploy logging resources for production environments, but not for test environments:
var environmentConfigurationMap = {
  Production: {
    enableLogging: true
  }
  Test: {
    enableLogging: false
  }
}

resource logAnalyticsWorkspace 'Microsoft.OperationalInsights/workspaces@2023-09-01' = if (environmentConfigurationMap[environmentType].enableLogging) {
  name: logAnalyticsWorkspaceName
  location: location
}

resource cosmosDBAccountDiagnostics 'Microsoft.Insights/diagnosticSettings@2021-05-01-preview' = if (environmentConfigurationMap[environmentType].enableLogging) {
  scope: cosmosDBAccount
  name: cosmosDBAccountDiagnosticSettingsName
  properties: {
    workspaceId: logAnalyticsWorkspace.id
    // ...
  }
}
How do you express dependencies between your resources?
In any complex Bicep template, you need to express dependencies between your resources. When Bicep understands the dependencies between your resources, it deploys them in the correct order.
Bicep allows you to explicitly specify a dependency by using the dependsOn property. However, in most cases, it's possible to let Bicep automatically detect dependencies. When you use the symbolic name of one resource within a property of another, Bicep detects the relationship. It's better to let Bicep manage these itself whenever you can. That way, when you change your template, Bicep will make sure the dependencies are always correct, and you won't add unnecessary code that makes your template more cumbersome and harder to read.
How do you express parent-child relationships?
Azure Resource Manager and Bicep have the concept of child resources, which makes sense only when they're deployed within the context of their parent. For example, an Azure SQL database is a child of a SQL server instance. There are several ways to define child resources, but in most cases, it's a good idea to use the parent property. This helps Bicep to understand the relationship so it can provide validation in Visual Studio Code, and it makes the relationship clear to anyone else who reads the template.
How do you set resource properties?
You need to specify the values for resource properties in your Bicep files. It's a good idea to be thoughtful when you're hard-coding values into your resource definitions. If you know the values won't change, hard-coding them might be better than using another parameter that makes your template harder to test and work with. If the values might change, though, consider defining them as parameters or variables to make your Bicep code more dynamic and reusable.
When you do hard-code values, it's good to make sure that they're understandable to others. For example, if a property has to be set to a specific value for the resource to behave correctly for your solution, consider creating a well-named variable that provides an explanation, then assigning the value by using the variable. For situations where a variable name doesn't tell the whole story, consider adding a comment. You'll learn more about comments later in this module.
For some resource properties, to construct values automatically, you need to create complex expressions that include functions and string interpolation. Your Bicep code is usually clearer when you declare variables and reference them in the resource code blocks.
Tip
When creating outputs, try to use resource properties wherever you can. Avoid incorporating your own assumptions about how resources work, because these assumptions might change over time.
For example, if you need to output the URL of an App Service app, avoid constructing a URL:
output hostname string = '${app.name}.azurewebsites.net'
The preceding approach will break if App Service changes the way they assign hostnames to apps, or if you deploy to Azure environments that use different URLs.
Instead, use the defaultHostname property of the app resource:
output hostname string = app.properties.defaultHostname
How do you use version control effectively?
Version-control systems such as Git can help simplify your work when you're refactoring code.
Because version-control systems are designed to keep track of the changes to your files, you can use them to easily return to an older version of your code if you make a mistake. It's a good idea to commit your work often so that you can go back to the exact point in time that you need.
Version control also helps you to remove old code from your Bicep files. What if your Bicep code includes a resource definition that you don't need anymore? You might need the definition again in the future, and it's tempting to simply comment it out and keep it in the file. But really, keeping it there only clutters up your Bicep file, making it hard for others to understand why the commented-out resources are still there.
Another consideration is that it's possible for someone to accidentally uncomment the definition, with unpredictable or potentially adverse results. When you use a version-control system, you can simply remove the old resource definition. If you need the definition again in the future, you can retrieve it from the file history.