Explore audio and video quality issues
Media flow is the term used for Microsoft Team’s real-time audio and video traffic between devices.
Understand media flow
For the best user experience Teams tries to establish a peer-to-peer connection over UDP. That isn’t always possible, however, as client devices are often on different networks, behind firewalls, and use NAT servers. To always provide the optimal experience, Teams uses Transport Relays (TR) to enable users to connect using UDP, TCP, or HTTP. The Transport Relay is a cloud server providing ICE, STUN, and TURN services.
ICE is the interactive connectivity establishment standard that allows peer-to-peer communication between devices on different networks. STUN and TURN are part of ICE and act as transport relay servers to allow packets with a changed source address to deliver the media information inside.
So how do ICE, STUN and TURN work?
- First a signaling connection is established. Teams uses REST API via https and WebSockets to establish the signaling connection to the cloud.
- Once Teams has a connection to the cloud, the STUN and TURN servers relay the packets.
- The STUN and TURN servers enable a device behind a firewall to set up a UDP connection and send and receive data through intermediary servers.
By using the signaling connection, which all devices can establish, the STUN and TURN servers ensure the media packets can flow through to their correct destination. See Learn More for a link to the Media in Teams – Media Flow video.
Troubleshoot media quality between Teams devices
- Use Local Internet Breakouts to ensure internet access is as close to the user as possible.
- Open UDP Ports 3478 – 3481 to allow communication with the Transport Relays.
- Have Teams’ traffic bypass HTTP Proxy Servers.
- Avoid Teams traffic across a VPN. Consider implementing VPN split tunneling - see the Learn more section for more information.
- In the meetings policy, set the maximum bandwidth for users. This is an average limit, not a peak limit, and stops high usage clients using too much bandwidth and reducing quality for others.
- Check that packet shaper or packet inspection devices are not installed.
Tip
Do not use any kind of packet sniffer, packet inspection, or packet shaper devices. These can degrade the Teams media traffic quality significantly.
Call Quality Dashboard
The Call Quality Dashboard (CQD) for Microsoft Teams and Skype for Business Online allows you to gain insights into the quality of calls made by users.
CQD starts storing data after the first sign-in. You must be assigned Global Administrator or Teams Administrator permissions to sign in. Alternatively, certain non-admin roles also have access to CQD, see Learn More. After the first sign-in, it may take a few hours for data to be collected.
The CQD can be accessed in the way that best suits your needs:
- Teams admin center > Users page. This displays commonly used data and cannot be changed.
- CQD portal. This provides more detailed reports, with drill-through filtering. You can customize these reports.
- Use Power BI to analyze CQD data by downloading the Power BI query templates for CQD. You also need to install the Power BI Connector for Microsoft CQD.
- Graph API. This option also allows you to access and analyze the data yourself. From the CQD you can see how many calls had quality issues, and on what dates.
Call Quality Dashboard interactive
The following interactive exercise guides you though using the Call Quality Dashboard. You will examine the Audio Streams Monthly Trend.
Once you have completed this exercise you will know how to access the Call Quality Dashboard and be ready to explore the available reports.
Troubleshooting voice issues interactive walkthrough
Troubleshoot call drops
If a call drops on a person-to-person call, check whether one person has installed Teams on multiple devices. Also check the call failures in the Call Quality Dashboard.
Use CQD data to assess problems and reduce their potential to negatively affect your users. Most user problems can be grouped into the following categories:
- Incomplete firewall or proxy configuration
- Poor Wi-Fi coverage
- Insufficient bandwidth
- Using VPNs
- Inconsistent or outdated client versions and drivers
- Unoptimized or built-in audio devices
- Problematic subnets or network devices
Logs
When troubleshooting Teams, there are three types of logs you can use:
- Debug logs
- Media logs
- Desktop logs
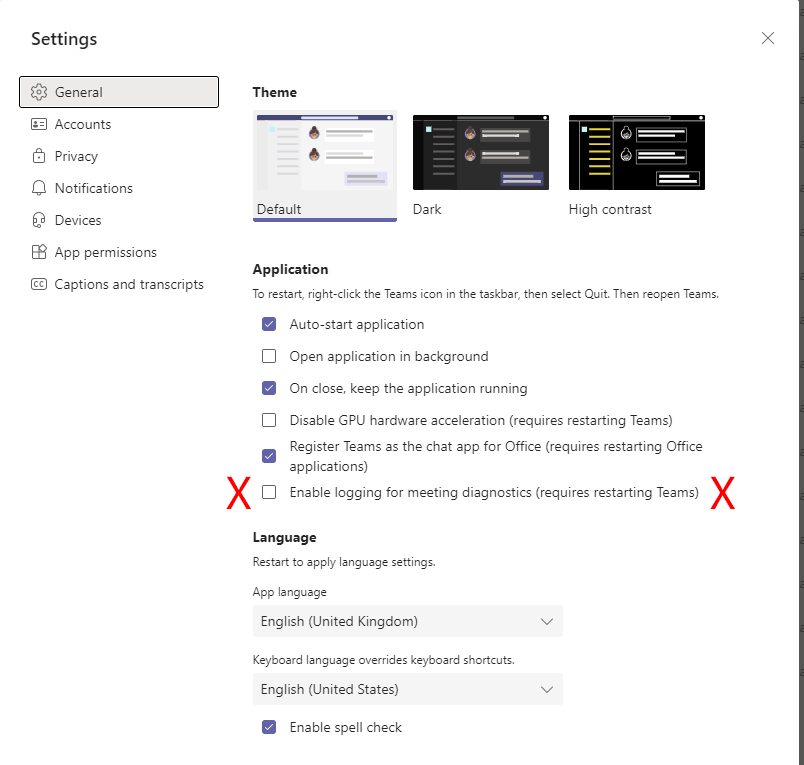
Media logging is turned off by default. To log diagnostic data for Teams meetings, users must turn on the option in the Teams client. From the Teams client top status bar, select Settings and more (…), select Settings > General, then select the Enable logging for meeting diagnostics (requires restarting Teams). The user must then restart Teams and reproduce the issue.
Tip
Sign out and log back into the Teams client after selecting Enable logging for meeting diagnostics (requires restarting Teams). Just closing Teams and opening it again in not sufficient. Although the setting appears to have been saved, the changes won't take effect without signing out and logging back in again.
Collect the logs as soon as the issue occurs. Right-click the Teams icon in the systems tray and select Collect support files. All log file types are stored in one folder called MSTeams Diagnostics Log.
Most logs are text-based and are read from the bottom-up. They can be read using any text-based editor, and new logs are created when logging into the client.
Tip
Media-stack, skylib logs are encrypted. These may be requested by Microsoft support engineers who can decrypt them.
Debug logs show login, connection requests, and call/conversion data flows. Media files contain information related to the media stack. Individual log files contain different information. See the link in Learn more for details of each log file.
Calling policies
Microsoft Teams calling policies are used to define features such as whether a user can make private calls, use call forwarding or simultaneous ringing to other users or external phone numbers, route calls to voicemail, send calls to call groups, use delegation for inbound and outbound calls.
You can use the Global (Org-wide default) policy that's created automatically or create and assign custom policies.
From the Teams admin center, in the left navigation, select Voice > Calling policies > Add. You can turn on or off the features that you want to use in your calling policy. To control whether users can route inbound calls to voicemail, select Enabled or User controlled. To prevent routing to voicemail, select Disabled. When you have made your selections, select Save.