Exercise - Using the variables and collections
This hands-on lab shows you how to create and use Global, Contextual, and Collection functions.
Sign into the Power Apps maker portal (make.powerapps.com).
From the Home screen left-side navigation panel, select + Create, then select Blank app and in the Create popup window under Blank canvas app select Create.
Name your app Collection exercise, leave the format as Tablet, and select Create.
After a few moments, your new app will appear. You can skip past the welcome dialog (if it appears). In the Tree view panel, find and select the App object, then select the OnStart property.

Set the OnStart property to this formula that we're using to create a collection of customer numbers and the associated invoice numbers (just copy and paste it into the fx formula bar):
ClearCollect(colCustomer,
{CustomerNumber: 7470, InvoiceNumber: "INV70817"},
{CustomerNumber: 4259, InvoiceNumber: "INV29595"},
{CustomerNumber: 8251, InvoiceNumber: "INV74302"},
{CustomerNumber: 2338, InvoiceNumber: "INV35115"},
{CustomerNumber: 1524, InvoiceNumber: "INV82337"},
{CustomerNumber: 1530, InvoiceNumber: "INV82338"}
);
Set(varUserDisplayName, User().FullName)
Select the ellipsis (…) next to the App object and select Run OnStart. This runs the OnStart formula you just entered and populates your collection colCustomer.
To view the collection, select the Insert tab (or + Insert from the command bar) and add a Vertical gallery, set its Items property to colCustomer.
Make the changes below to your new Gallery1 by using the Properties panel on the right of the screen:
Layout: Title and subtitle
Height: 650
Fields: change Title to reflect CustomerNumber in the Data panel (alternatively, you can select the Title label inside of the gallery and change Text property to ThisItem.CustomerNumber)
Delete the NextArrow icon (select it from within the gallery)
In the Gallery, select the circled edit pencil or the Title label, and use the Insert tab to add an Icon . Search for and select the Trash icon. Move the Trash icon to the right side of the gallery.
Your Gallery now includes the Trash can icon.

Select the Trash icon and the below formula to its OnSelect property:
Remove(colCustomer,ThisItem)Press and hold Alt Key, and select the first Trash can icon.
This deletes the selected row from the collection. While this process works, you probably want to give a warning message that the row will be deleted.
By employing a Contextual variable, let's create a popup warning to inform the user about the pending deletion and give them an option to cancel.
First change the OnSelect of the Trash can icon to the below:
UpdateContext({varPopup:true})To create the popup, select the screen (outside of the gallery control) and use Insert to add a Rectangle (you can enter "rectangle" in the search box in the Insert menu to find it fast).
Make the Rectangle properties as follows:
Name: rectangle_backgrd
Size: 744 (width); 720 (height)
Fill: RGBA(166, 166, 166, .50)
Position the rectangle to cover your gallery.
Add another Rectangle and update its properties to:
Name: rectangle_foregrd
Size: 744 (width); 348 (height)
Fill: RGBA(255, 255, 255, 1)
BorderThickness: 1
Position this rectangle to fit in the top portion of the other rectangle.
Select Insert >Text label.
Make the following changes to the Text label properties:
Name: lbl_popup
Font size: 15
Font weight: Bold
Text alignment: Center
Set the lbl_popup Text to the below formula:
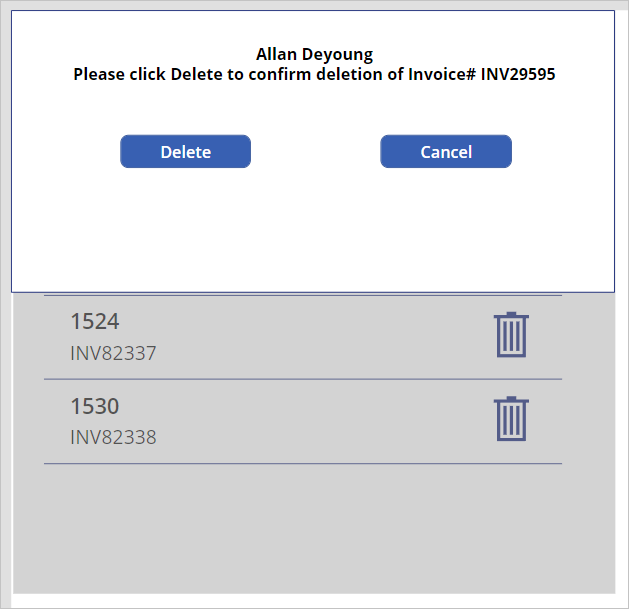
varUserDisplayName & "
Please click Delete to confirm deletion of Invoice#" & " " & Gallery1.Selected.InvoiceNumber
Select Insert > Button and name your new button: button_Delete; set its Text property to: Delete
Set the Delete Button OnSelect property to the below:
Remove(colCustomer,LookUp(colCustomer,CustomerNumber=Gallery1.Selected.CustomerNumber));
UpdateContext({varPopup:false})
Select Insert > Button and name the new button: button_Cancel; set its Text property to: Cancel
Set the Cancel Button OnSelect property to:
UpdateContext({varPopup:false})Arrange the new controls you created over top of Gallery1 like this:
Now let's select all of these controls together so we can group them. While holding down the Ctrl-key Select the following controls:
rectangle_backgrd
rectangle_foregrd
lbl_popup
button_Delete
button_Cancel
With all of them selected, right-click and select Group. Set the Visible property of Group1 to:
varPopupThat should make them all disappear from the screen, but if not, press and hold the Alt key and select your Cancel button.
You created a popup box that deletes the selected Customer from the gallery.
Let's test the Delete function.
Press and hold Alt Key and select the Trash can icon for invoice# INV29595.
Select the Delete button, INV29595 is removed from the gallery and your popup disappears.
Now press and hold Alt key again and select the Trash can icon for invoice# INV74302.
This time, select your Cancel button. The popup window closes, and INV74302 remains in the gallery.

We created a dynamic collection, a global variable, and a pop-up that uses a contextual variable.