Create - How to enter OKRs
The next of the 4Cs is Create. This is how to enter your OKRs into Viva Goals. During this process you can specify at what level OKRs are being set, who owns them, and how their progress will be tracked.
Objectives
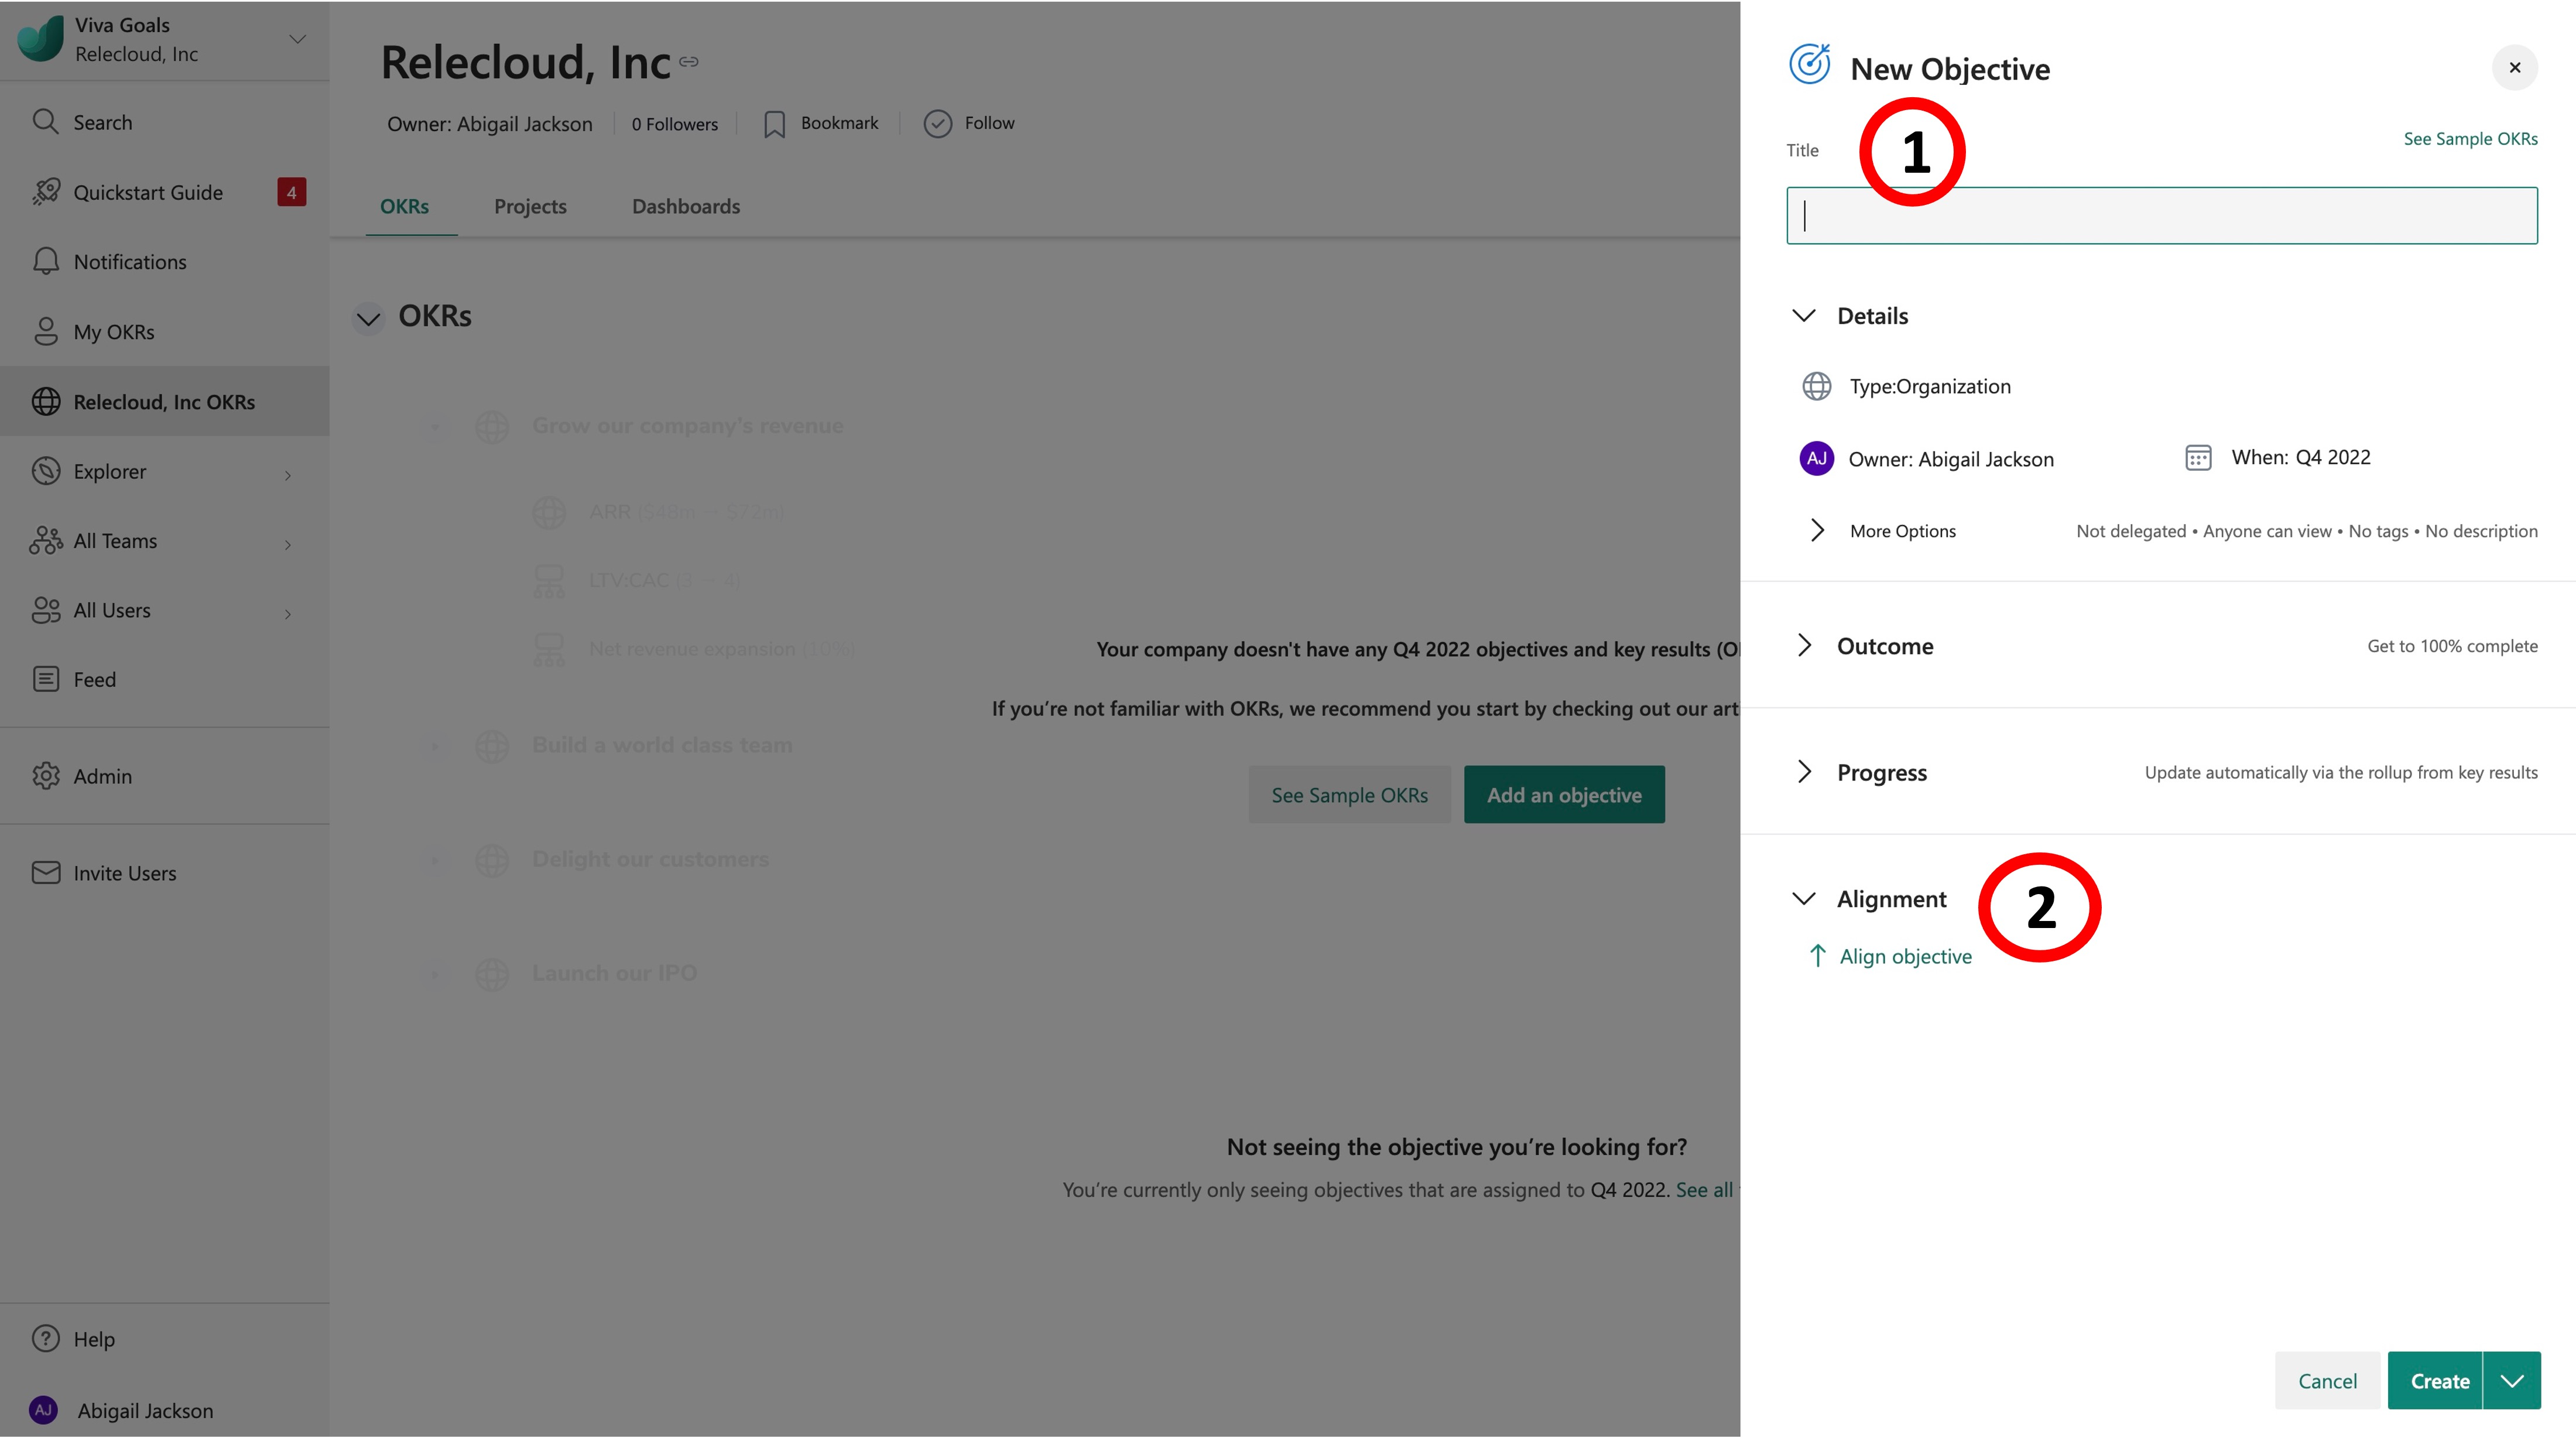
To create an Objective, select the New Objective plus sign and enter your objective in the Title (1) textbox.
Information in the Details section will be set by default depending on the entity you're currently viewing, and the time period selected.
- To change the entity and time period, or to add a co-owner of the Objective, select the Type, Owner, and When fields.
- Outcome will be measured as a percentage completion.
- The default selection in the Progress section will be Automatic via rollup from key results. This means that the progress of the Key Results aligned to this Objective will be responsible for moving the overall progress. If you wish to mark the progress of the Objective yourself, select Manually from the dropdown menu.
- To choose how to align your Objective, select Align Objective (2) from the Alignment section.
- You can find a particular Objective using the search box and/or by using the Time Period and Entities filters.
- Select the desired Objective.
- Select Save. Your Objective is now aligned.
- To finally create your Objective, select the Create button.
- The Objective you've created will now appear in the main screen section.
Key Results
To add a Key Result, navigate to the Objective to which it will be aligned.
- Select the More Actions menu.
- Select Add Key Result.
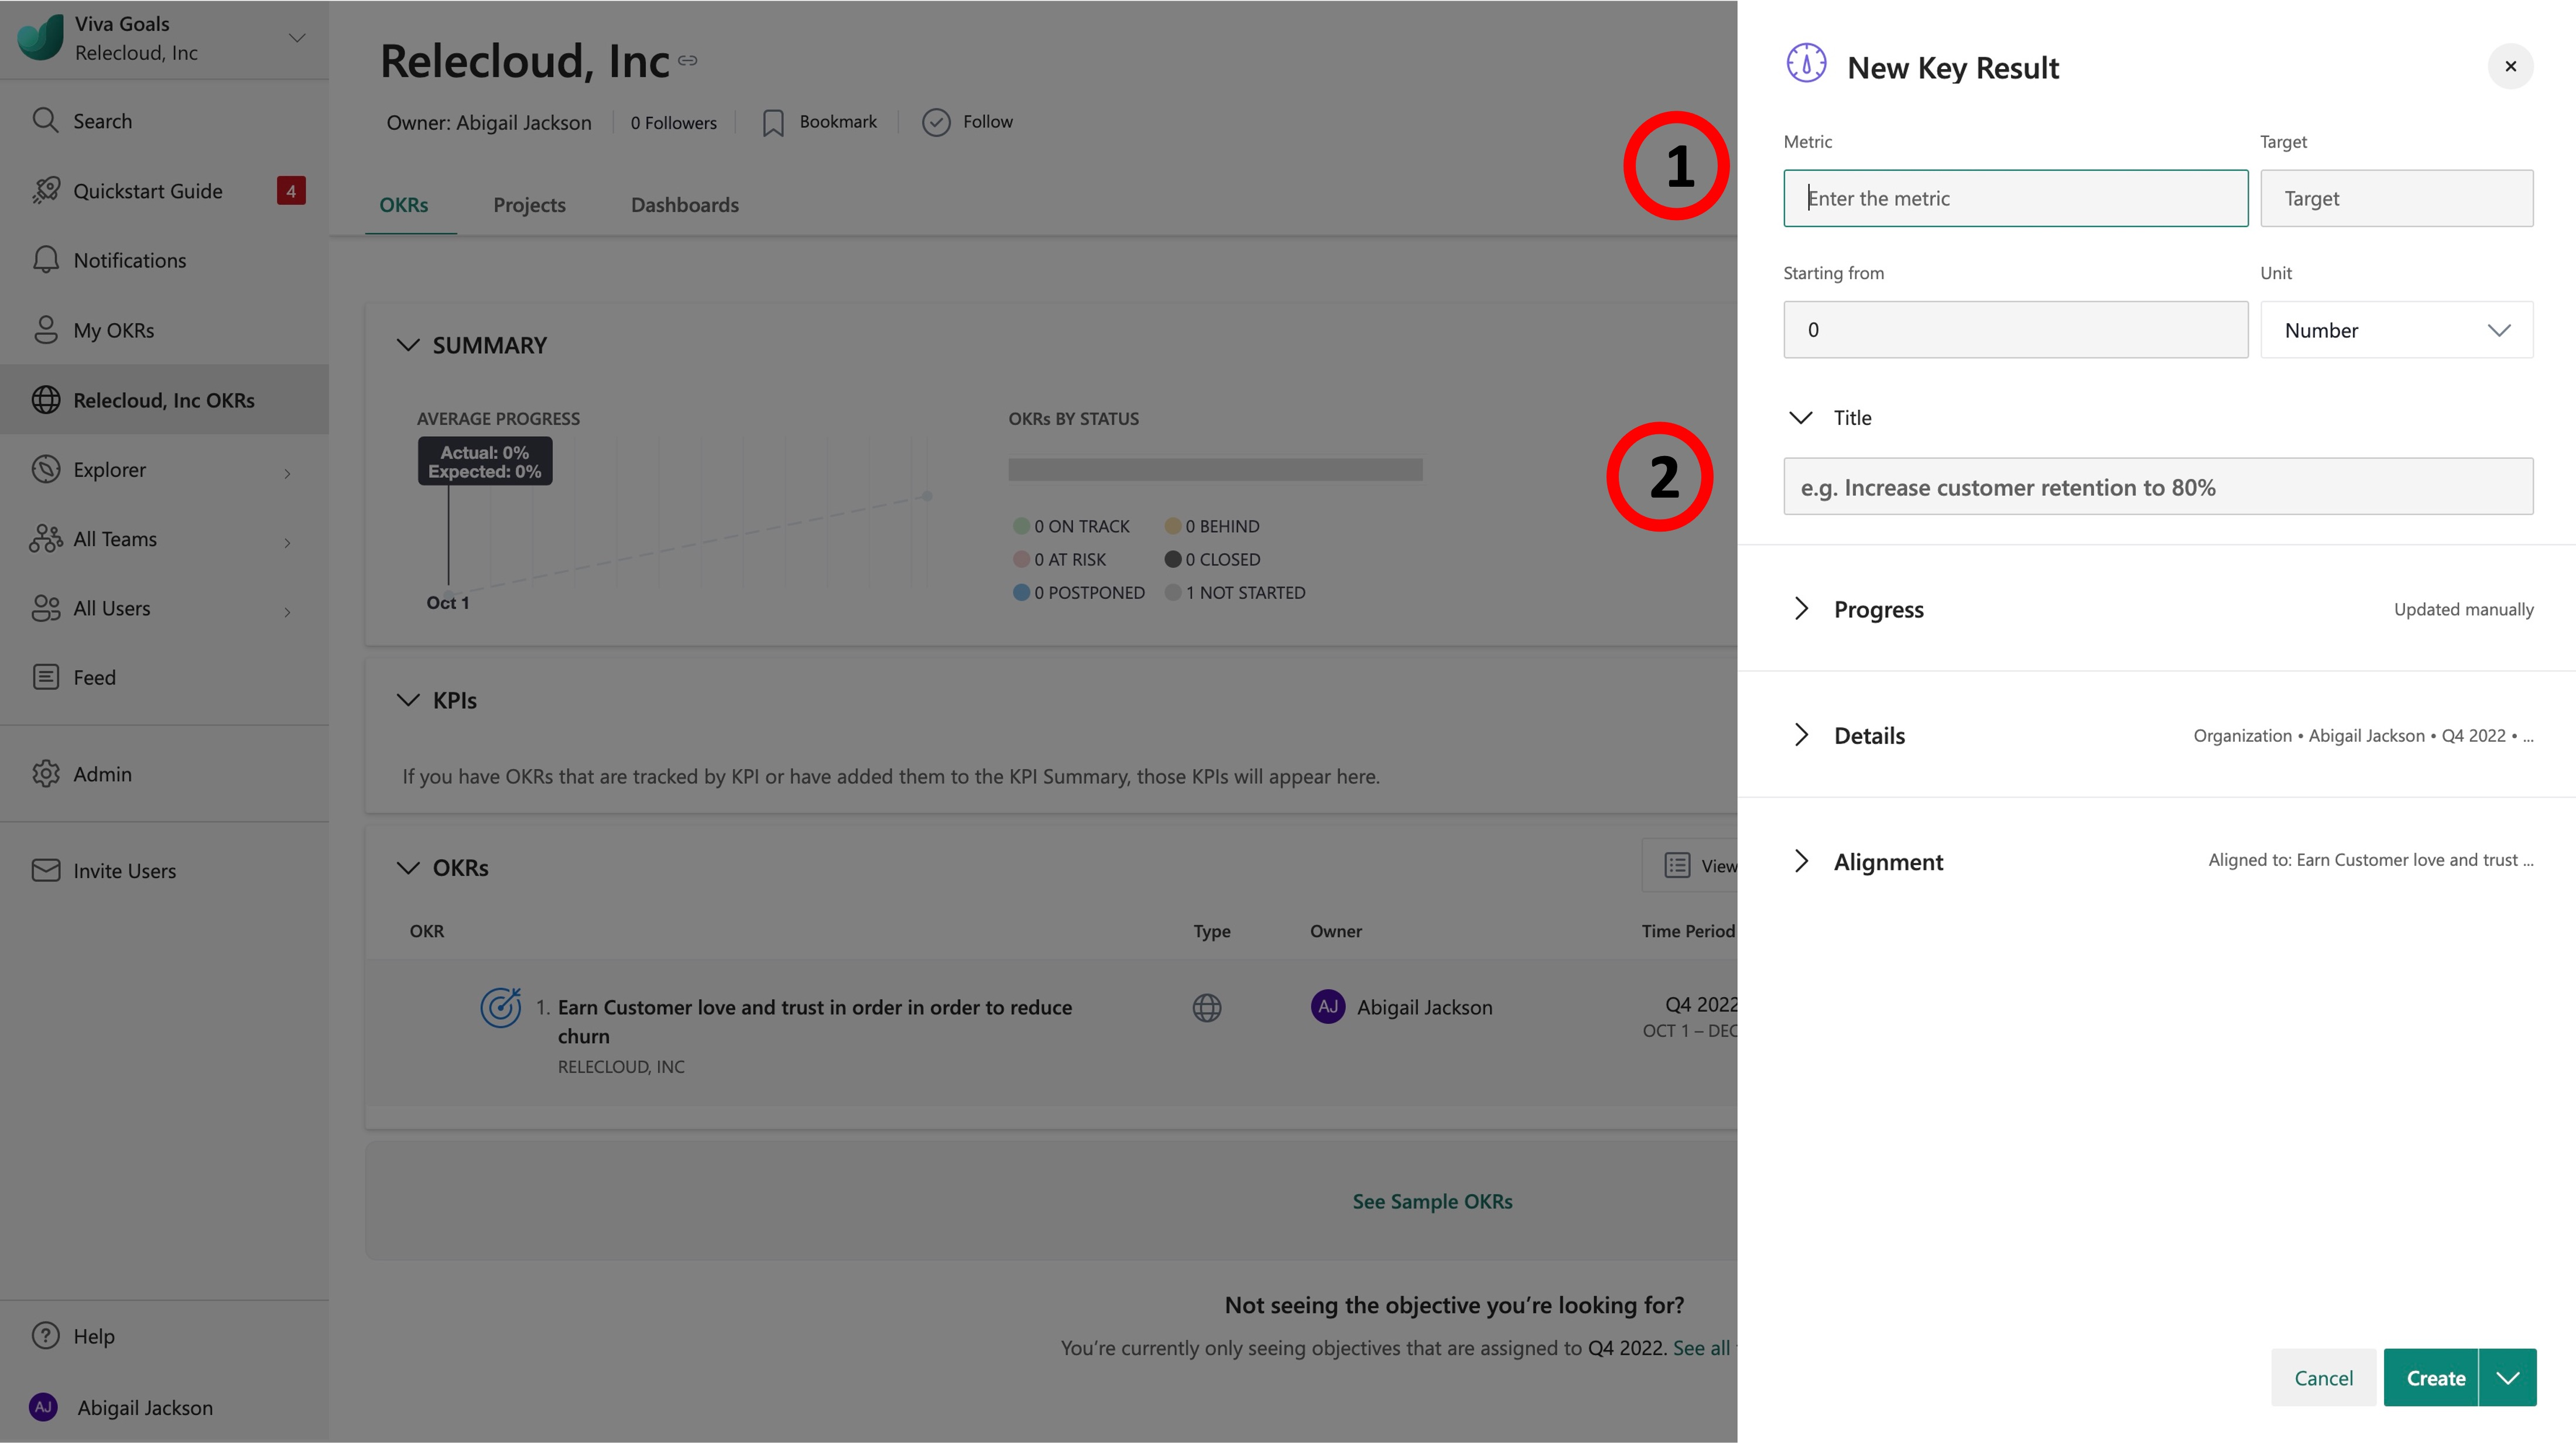
- Enter the metric you'll be tracking in the Metric (1) field.
- Add the Target and the Starting from point for this metric to the relevant fields and choose whether it's a number or a percentage using the Unit dropdown menu.
- The Title (2) field will have automatically populated. Adjust as necessary.
- Under the Progress section, you'll be able to choose whether the progress of this metric will be manually or automatically updated.
- Manually - The user will update the progress of the Key Result themselves.
- Automatically from a data source - The progress of the Key Result can be updated automatically via an integration with an outside data source. This integration must have first been enabled by your Admin to be available.
- To select an integration that has been enabled, select Automatically from a data source and choose the required outside data source.
- You'll then follow the process for connecting that particular data source.
- The Details section will have populated by default. To change the entity and time period, or to add a co-owner of the Key Result, select the Type, Owner, and When fields.
- The Alignment section will show the Objective from which the Key Result was created.
- When you're ready to continue, select Create.
- The Key Result will be created and appear underneath your Objective.
- Repeat this process until you've created 3-5 Key Results.
Projects/Key Initiatives
Projects/Key Initiatives are a list of tasks or focused outputs that underpin the Key Results. In Viva Goals, these tasks are captured using Projects.
There are 2 types of Projects:
Native Projects - These are Projects whose task list is created and managed directly in Viva Goals.
Integrated Projects - These are Projects whose progress is managed via an integration with an outside project management tool.
Projects can be created directly underneath the Key Result they're supporting or as a standalone effort. To add a Project as a standalone effort, select the Projects tab of the entity for which the Project is being created.
- Select + Add Project and follow the same steps as listed below.
- To add a Project that is aligned to the Key Result it's supporting, navigate to that Key Result.
- Select the More Actions menu.
- Select Add Project.
- Enter the name of your Project in the Title textbox.
- Information in the Details section will be set by default depending on the entity you're currently viewing, and the time period selected. To change the entity and time period, or to add a co-owner of the Project, select the Type, Owner, and When fields.
- The Outcome section is where you can start to make the choice regarding whether this is a Native or Integrated project. Select Show more options.
- Select Add tasks.
- Under the Tasks menu you can choose to Add tasks in Viva Goals or Automatically from a data source.
- For Native Projects, you'll select Add tasks in Viva Goals and then will be able to manually add tasks.
- Complete the Task name field and add a Due date and Owner if required.
- Select + Add another task to carry on adding tasks to the list.
- For Integrated Projects, you'll select Automatically from a data source and then you'll be able to integrate the Project to an outside project management tool. This integration must have been enabled by your Admin to be available.
- For Native Projects, you'll select Add tasks in Viva Goals and then will be able to manually add tasks.
- To select an integration that has been enabled, select Automatically from a data source and select the required outside data source.
- You'll then follow the process for connecting to the relevant project management tool.
- Due to the selections made in the Outcome section, the Progress section will automatically have Automatically based on completed tasks.
- The Alignment section will show the Key Result from which the Project was created.
- When you're ready to continue, select Save.
- The Project will be created and appear underneath your Key Result.