Exercise - Install Vision Edge Shell
Perform the following steps in the Azure Cloud Shell environment.
Install the Vision on Edge Solution Accelerator
Run the following command to download installer (acs.zip) from GitHub.
wget -O acs.zip https://github.com/Azure-Samples/azure-intelligent-edge-patterns/raw/master/factory-ai-vision/Installer/acs.zip
Unzip the installer.
unzip -o acs.zip
Execute the installer. It will check the az command and check if it requires any installing/updating the IoT extension.
bash factory-ai-vision-install.sh
You would be asked if you would like to use an existing Custom Vision Service. Choose no and go ahead to create a new one with the instruction.

Note
If you choose yes, you need to enter your Custom Vision API key and endpoint. You can find your training key here.
Once you create custom vision service information, make a note of API key and Endpoint.

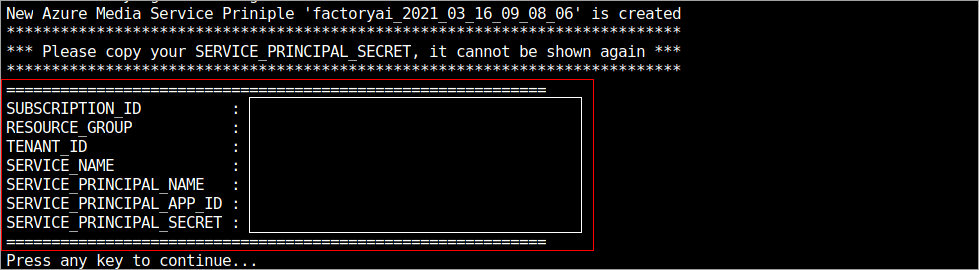
Next you will be asked if you want to use Azure Live Video Analytics. Choose yes and it will create Azure Media Service.

Copy the "SERVICE-PRINCIPLE-SECRET" information. You will need the secret information for later use.
There will be a list of IoT hubs, choose the IoT Hub that you created in this module.

It will show a list of devices in your account, and choose the device to install VisionEdge.

Choose the platform you are going to deploy.

You will be asked if your device has a GPU or not. Choose CPU as your Edge device doesn't have it.

The installation will be started after. You'll wait for couple minutes to complete the installation. You can check the deployment status on the Azure portal

You can check the deployment status on the Azure portal. Go to the IoT Hub resource and navigate to IoT Edge tab. Click on the edge device you created for this module to check the status of the modules.

Open your browser, connect to http://YOUR_IP:8181. You'll connect to the VisiononEdge solution.
To find your Public IP address, go to the overview page of your virtual machine and copy it.

When you connect to the Vision on Edge solution, click on the Home page.


