Configure manufacturing execution
Before setting up production-related parameters, you must set up the manufacturing execution parameters that are required for using production features.
Production parameter settings should always reflect your production environment. Production parameters determine when raw materials are deducted from stock in the production process. These parameters also determine what information is reported in other areas in Supply Chain Management regarding the implementation and completion of production orders in manufacturing execution.
Go to Production control > Setup > Manufacturing execution > Manufacturing execution parameters to set up manufacturing execution parameters.
Consider the following fields on the General tab:
Use password - Select the check box if workers are required to use a PIN code for access to the terminal after the identification number is entered. When you're using terminals for time and job registration, PIN codes should be enabled to prevent workers from registering by using an incorrect worker ID. PIN codes are activated by default. Remember to insert a PIN code for each worker on the Workers page.
Use badge ID - Use Worker badge ID as identification instead of the Personnel number.
Permanent teams - Select the check box to save pilot/assistant relations after clock-out registration for workers who registered either as assistants to other workers, or workers who are functioning as team pilots. This approach enables Supply Chain Management to automatically re-create the teams the following work day. The first worker in the team who clocks in the following work day becomes the pilot, and the other members of the team are automatically registered as assistants when they clock in. The pilot makes all the registrations for the team during the day.
Job table synchronization - Select how to synchronize the Time and attendance job table with base data. If you select Online, every new or edited job will immediately be transferred or synchronized to the Time and attendance job table. If you select Offline, the job table must be updated periodically.
Registration error mode - Specify whether registration should be prohibited or auto corrected if an error in raw registrations is detected.
Get registration time from - Select where the registration time is taken from when a registration is made. The choices are Legal entity and User.
Bar code setup - Select the type of bar code to be printed on items such as worker badges and job cards.
Report as finished - Select the status to be displayed on production jobs when a worker reports feedback in the Job registration form. The choices are In progress, Stopped, and Completed. It's important to select the correct combination of parameters to avoid registering erroneous BOM consumption. For example, by selecting the correct combination, you avoid deducting materials twice from stock or not deducting them at all.
Inventory adjustment - Select the default inventory adjustment journal.
Set up job card terminals
Go to Production control > Setup > Manufacturing execution > Configure job card terminals to set up a job card terminal.
The Setup of Action Pane button on a job card allows you to set up Action Pane configuration for workers who are using the selected job card type.

The Setup of grids button on a specific job card allows you to select fields that should appear and how they should appear for workers who are using the selected job card type.

Set up the job card device
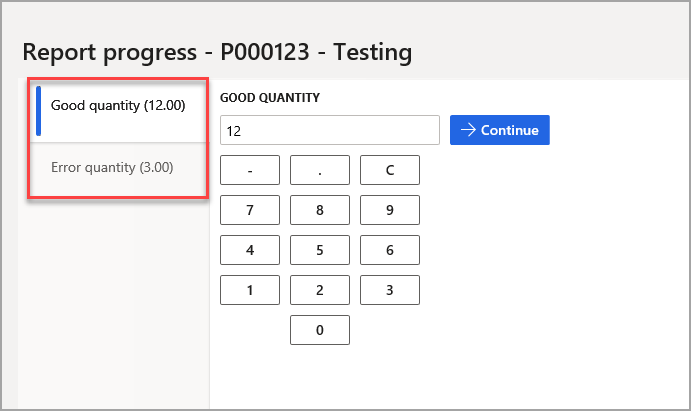
In addition to the use of the job card terminal, shop floor workers can also use a job card mobile device as a convenient alternative to the terminal. The screenshot below shows the configuration options on the device, at Production control > Setup > Manufacturing execution > Configure job card for devices:

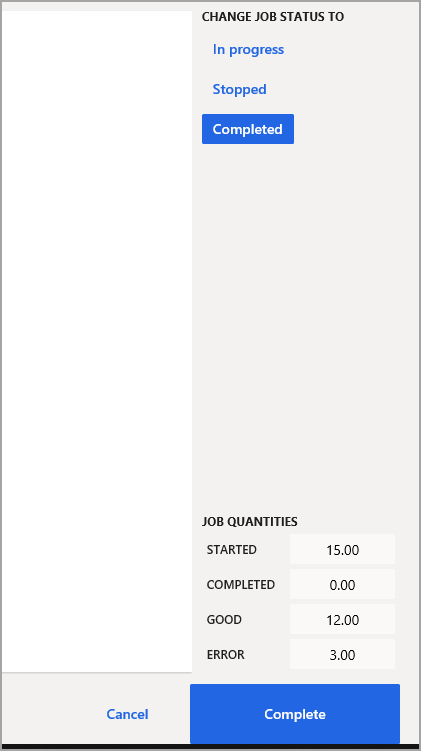
Once inside the device at Production control > Manufacturing execution > Job card device you can see the options to start a job, report progress on a job, go on to the next job, and take time actions. You can also see the options for the job currently assigned:

Here are some views of the Report progress screen, where you can show the good quantity and error quantity and also change the status of the job, and complete it if needed. Once completed, you can then print labels for license plates from the device.
Set up the production floor interface
The production floor interface helps workers manage production activities. The interface serves the same function as the job card device and job card terminal but provides a modern user interface that is optimized for touch interaction. Other features include:
Work on multiple jobs - Shop floor workers can select and start multiple jobs at the same time or start a new job while continuing to work on already started jobs.
Device-based configuration - Configuration of the shop floor execution interface works differently compared to the job card device and job card terminal. Instead of associating each application user with a configuration, the configuration is associated with the web browser running on a device.
There are two main tabs on the production floor interface and are shown in the screenshots below.
- The All jobs tab
- The Active jobs tab
All jobs tab
The All jobs tab lists all the production jobs including their current statuses. The status can be either Not started, Started, or Stopped. There are multiple columns across the All jobs tab that serve their own specific function.
- The Check mark column is used to indicate which jobs have been selected by the worker and a single worker can select multiple jobs. When a job is selected, more information can be seen at the bottom of the screen.
- The Order column is used to show which production order the job is in reference to.
- The Requested, Started, and Completed columns refer to the quantity that a job is planned to produce, the quantity already started, and the quantity completed.

Active jobs tab
When a job has been started, it will move over to the Active jobs tab.
The Active jobs tab shows all jobs in a list format, that the worker who is signed-in has started. Similar to the setup of the All jobs tab, the columns behave in the same way and actively track the number of Started, Requested, Completed jobs and many other data points in the columns. From this page, a user can report a progress update and move a production order to a status of Finished.

Production floor execution interface configurations
To set up the Production floor execution interface, go to Production control > Setup > Manufacturing execution > Configure production floor execution. The Configure production floor execution page shows a list of existing configurations. On this page, you can perform the following actions:
- Select any production floor configuration that is listed in the left column to view and edit it.
- Select New on the Action Pane to add a new device configuration to the list. Then, in the Configuration field, enter a name to identify the new configuration. The name that you enter must be unique among all device configurations, and you won't be able to edit it later.
- Set up the various settings for the selected device configuration. The following fields are available:
- Report quantity at clock-out – Set this option to Yes to prompt workers to report feedback about jobs that are in progress when they clock out.
- Lock employee – When this option is set to No, workers will be signed out immediately after they make a registration (such as a new job). The device will then return to the sign-in page. When this option is set to Yes, workers will stay signed in to the job card device.
- Use the actual time of registration – Set this option to Yes to set the time for each new registration to the exact time when the worker submitted the registration. When this option is set to No, the sign-in time is used instead. You'll usually want to set this option to Yes if you've set the Lock employee and/or Single worker option to Yes in cases where workers often remain signed in for longer periods.
- Single worker – Set this option to Yes if only one worker uses each job card device where this configuration is active. When this option is set to Yes, the Lock employee option is automatically set to Yes. This setting also removes the requirement for the worker to sign in by using a badge ID (or another similar ID). Instead, the worker signs into Supply Chain Management by using a system user account that is linked to a time registered worker
- Allow locking the touchscreen – Set this option to Yes to allow workers to lock the touchscreen of the job card device so that they can sanitize it.
- Screen lock duration – When the Allow locking touchscreen option is set to Yes, use this option to specify the number of seconds that the touchscreen should be locked for sanitizing. The duration must be between 5 and 120 seconds.
- Generate license plate – Set this option to Yes to generate a new license plate every time that a worker uses the job card device to report as finished. When this option is set to No, workers must specify an existing license plate when they report as finished.
- Print label– Set this option to Yes to print a license plate label when a worker uses the job card device to report as finished.
- Tab selection – Use the settings in this section to select which tabs should be displayed by the production floor execution interface when the current configuration is active. You can design as many tabs as you need and then add and arrange them here as required.
For details about how to design tabs and work with the settings here, see Design the production floor execution interface.
For more information about the Production floor execution interface, see How workers use the production floor execution interface.