Windows stop error 0xC0000102 Status File Corrupt
Applies to: ✔️ Windows VMs
This article provides steps to resolve issues where the Windows operating system (OS) encounters the stop error 0xC0000102, which keeps an Azure virtual machine (VM) from booting.
Symptoms
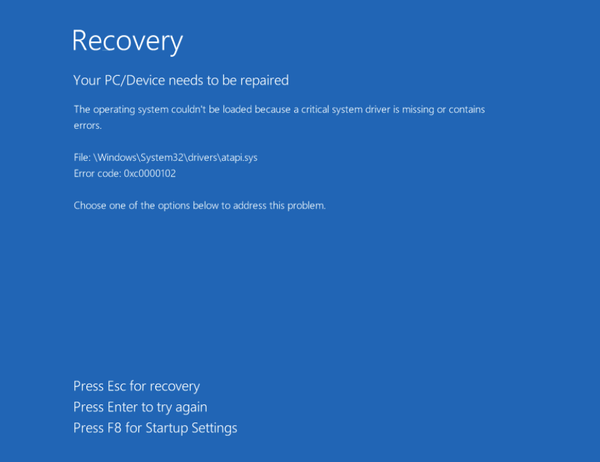
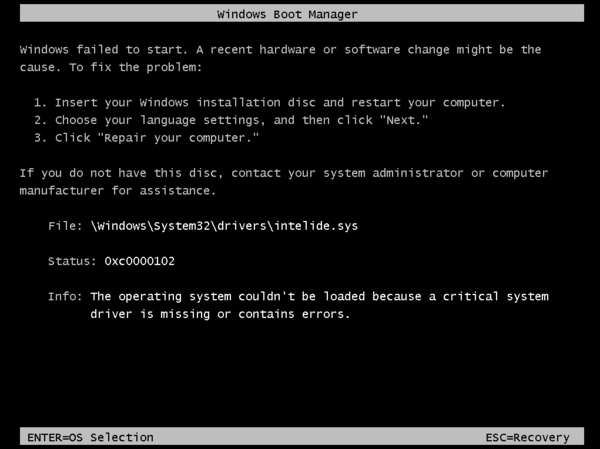
When you use boot diagnostics to view the screenshot of the VM, the screenshot displays the message that the OS encountered error code 0xC0000102 during startup.
Cause
Error 0xC0000102 is a STATUS_FILE_CORRUPT_ERROR, which means a corrupted file is preventing your VM from starting correctly. There are two possible causes for this error code:
- The file displayed in the error message is corrupt.
- The disk structure has become corrupt and unreadable.
Solution
Try restoring the VM from a backup
If you have a recent backup of the VM, you may try restoring the VM from the backup to fix the start problem. If restoring the VM from backup isn't possible, follow these steps:
- Create and Access a Repair VM
- Repair or replace the corrupt file
- Enable serial console and memory dump collection
- Rebuild the VM
Note
When encountering this error, the Guest OS isn't operational. You'll be troubleshooting in offline mode to resolve this issue.
Step 1: Create and access a repair VM
- Follow steps 1-3 of the VM repair process example to prepare a Repair VM.
- Use Remote Desktop Connection connect to the Repair VM.
Step 2: Repair or replace the corrupt file
Repair or replace the corrupted binary (.sys) file by following these steps:
Repair the corrupt binary file
Open an elevated CMD prompt and run chkdsk on the disk:
chkdsk <drive-letter>: /F
Replace the corrupt binary file
On the attached disk, browse to the location of the binary file that's displayed in the error message.
Rename the file from <binary-name>.sys to <binary-name>.sys.old.
On the attached disk, browse to the \Windows\WinSxS folder. Then, search for the binary file that's displayed in the error message. To do this, run the following command at a command prompt:
dir <binary-name> /sThe command lists all the different versions of the binary file together with the created date. Copy the latest version of the binary file to the \Windows\System32\Drivers folder by running the following command:
copy <drive>:\Windows\WinSxS\<directory-where-file-is>\<binary-name>.sys <drive>:\Windows\System32\Drivers\For example, see the following console output:
E:\Windows\WinSxS>dir ACPI.sys /s
 Volume in drive E has no label.
 Volume Serial Number is A0B1-C2D3

 Directory of E:\Windows\WinSxS\amd64_acpi.inf_0123456789abcdef_6.3.9600.16384_none_cdef0123456789ab

11/21/2014  07:48 PM            94,989 acpi.sys
               1 File(s)         94,989 bytes

 Directory of E:\Windows\WinSxS\amd64_acpi.inf_0123456789abcdef_6.3.9600.16384_none_89abcdef01234567

11/21/2014  07:48 PM           119,547 acpi.sys
               1 File(s)        119,547 bytes

 Directory of E:\Windows\WinSxS\amd64_acpi.inf_0123456789abcdef_6.3.9600.16384_none_456789abcdef0123

11/21/2014  04:06 PM           533,824 acpi.sys
               1 File(s)        533,824 bytes

     Total Files Listed:
               3 File(s)        748,360 bytes
               0 Dir(s)  123,967,512,576 bytes free

E:\Windows\WinSxS>copy E:\Windows\WinSxS\amd64_acpi.inf_0123456789abcdef_6.3.9600.16384_none_cdef0123456789ab\acpi.sys E:\Windows\System32\Drivers\
        1 file(s) copied.

E:\Windows\WinSxS>
Note
If the system binary file can't be renamed, take ownership of the file. This action gives you full access to this file.
The example console output shows volume E as an example. The actual letter should reflect the faulty drive (the OS disk attached as a data disk on the troubleshooting VM).
If the latest binary doesn't work, you can try the previous file version to obtain an earlier system update level on that component.
If the only binary that's returned in this step matches the file that you're trying to replace on the affected VM, and if both files have the same size and time stamp, you can replace the corrupted file by copying it from another working VM that has the same OS and, if possible, the same system update level.
Detach the repaired disk from the troubleshooting VM. Then, create a VM from the OS disk.
Step 3: Enable the Serial Console and memory dump collection
Before rebuilding the VM, it is recommended to enable memory dump collection and Serial Console. To do so, follow these steps:
Open an elevated command prompt session as an administrator.
Run the following BCDEdit commands using the /ems and /emssettings options:
Enable the serial console:
bcdedit /store <volume-letter-containing-the-bcd-folder>:\boot\bcd /ems {<boot-loader-identifier>} ON
bcdedit /store <volume-letter-containing-the-bcd-folder>:\boot\bcd /emssettings EMSPORT:1 EMSBAUDRATE:115200
Verify that the free space on the OS disk is larger than the memory size (RAM) on the VM.
If there isn't enough space on the OS disk, change the location where the memory dump file is created, and refer that location to any data disk attached to the VM that has enough free space. To change the location, replace
%SystemRoot%with the drive letter of the data disk, such asF:, in the following commands.To enable the OS dump file, run the following load, add, and unload commands to implement the suggested configuration using the reg tool:
Load the registry hive from the broken OS disk:
reg load HKLM\<broken-system> <volume-letter-of-broken-os-disk>:\windows\system32\config\SYSTEMEnable on ControlSet001:
reg add "HKLM\<broken-system>\ControlSet001\Control\CrashControl" /v CrashDumpEnabled /t REG_DWORD /d 1 /f
reg add "HKLM\<broken-system>\ControlSet001\Control\CrashControl" /v DumpFile /t REG_EXPAND_SZ /d "%SystemRoot%\MEMORY.DMP" /f
reg add "HKLM\<broken-system>\ControlSet001\Control\CrashControl" /v NMICrashDump /t REG_DWORD /d 1 /f
Enable on ControlSet002:
reg add "HKLM\<broken-system>\ControlSet002\Control\CrashControl" /v CrashDumpEnabled /t REG_DWORD /d 1 /f
reg add "HKLM\<broken-system>\ControlSet002\Control\CrashControl" /v DumpFile /t REG_EXPAND_SZ /d "%SystemRoot%\MEMORY.DMP" /f
reg add "HKLM\<broken-system>\ControlSet002\Control\CrashControl" /v NMICrashDump /t REG_DWORD /d 1 /f
Unload the broken OS disk:
reg unload HKLM\<broken-system>
Step 4: Rebuild the VM
Use step 5 of the VM Repair Commands to rebuild the VM.
Contact us for help
If you have questions or need help, create a support request, or ask Azure community support. You can also submit product feedback to Azure feedback community.