Note
Access to this page requires authorization. You can try signing in or changing directories.
Access to this page requires authorization. You can try changing directories.
Applies to: ✔️ Windows VMs
This article provides steps to resolve issues where Windows Boot Manager prevents the booting of an Azure Virtual Machine (VM).
Symptom
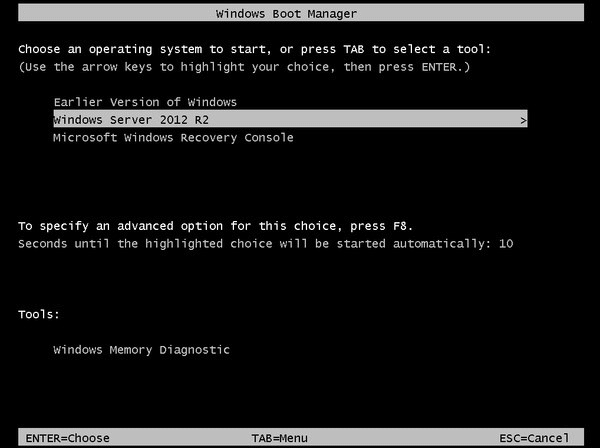
The VM is stuck waiting upon a user prompt and doesn't boot unless manually instructed to.
When you use Boot diagnostics to view the screenshot of the VM, you'll see that the screenshot displays the Windows Boot Manager with the message Choose an operating system to start, or press TAB to select a tool:.
Cause
The error is due to a BCD flag displaybootmenu in the Windows Boot Manager. When the flag is enabled, Windows Boot Manager prompts the user, during the booting process, to select which loader they wish to run, causing a boot delay. In Azure, this feature can add to the time it takes to boot a VM.
Solution
Tip
If you have a recent backup of the VM, you may try restoring the VM from the backup to fix the boot problem.
Process Overview:
- Configure for Faster Boot Time using Serial Console.
- Create and Access a Repair VM.
- Configure for Faster Boot Time on a Repair VM.
- Recommended: Before you rebuild the VM, enable serial console and memory dump collection.
- Rebuild the VM.
Configure for Faster Boot Time using Serial Console
If you have access to serial console, there are two ways you can achieve faster boot times. Either decrease the displaybootmenu wait time, or remove the flag altogether.
Follow directions to access Azure Serial Console for Windows to gain access to the text-based console.
Note
If you're unable to access serial console, skip ahead to Create and Access a Repair VM.
Option A: Reduce Waiting Time
a. Waiting time is set at 30 seconds by default but can be changed to a faster time (e.g. 5 seconds).
b. Use the following command in serial console to adjust the timeout value:
bcdedit /set {bootmgr} timeout 5Option B: Remove the BCD Flag
a. To prevent the Display Boot Menu prompt altogether, enter the following command:
bcdedit /deletevalue {bootmgr} displaybootmenuNote
If you were unable to use serial console to configure a faster boot time in the steps above, you can instead continue with the following steps. You'll now be troubleshooting in offline mode to resolve this issue.
Create and Access a Repair VM
- Use steps 1-3 of the VM Repair Commands to prepare a Repair VM.
- Use Remote Desktop Connection connect to the Repair VM.
Configure for Faster Boot Time on a Repair VM
Open an elevated command prompt.
Enter the following to enable DisplayBootMenu:
Use this command for Generation 1 VMs:
bcdedit /store <VOLUME LETTER WHERE THE BCD FOLDER IS>:\boot\bcd /set {bootmgr} displaybootmenu yesUse this command for Generation 2 VMs:
bcdedit /store <VOLUME LETTER OF EFI SYSTEM PARTITION>:EFI\Microsoft\boot\bcd /set {bootmgr} displaybootmenu yesReplace any greater than or less than symbols as well as the text within them, e.g. "< text here >".
Change the timeout value to 5 seconds:
Use this command for Generation 1 VMs:
bcdedit /store <VOLUME LETTER WHERE THE BCD FOLDER IS>:\boot\bcd /set {bootmgr} timeout 5Use this command for Generation 2 VMs:
bcdedit /store <VOLUME LETTER OF EFI SYSTEM PARTITION>:EFI\Microsoft\boot\bcd /set {bootmgr} timeout 5Replace any greater than or less than symbols as well as the text within them, e.g. "< text here >".
Recommended: Before you rebuild the VM, enable serial console and memory dump collection
To enable memory dump collection and Serial Console, follow these steps:
Open an elevated command prompt session as an administrator.
Run the following BCDEdit commands using the /ems and /emssettings options:
Enable the serial console:
bcdedit /store <volume-letter-containing-the-bcd-folder>:\boot\bcd /ems {<boot-loader-identifier>} ON
bcdedit /store <volume-letter-containing-the-bcd-folder>:\boot\bcd /emssettings EMSPORT:1 EMSBAUDRATE:115200
Verify that the free space on the OS disk is larger than the memory size (RAM) on the VM.
If there isn't enough space on the OS disk, change the location where the memory dump file is created, and refer that location to any data disk attached to the VM that has enough free space. To change the location, replace
%SystemRoot%with the drive letter of the data disk, such asF:, in the following commands.To enable the OS dump file, run the following load, add, and unload commands to implement the suggested configuration using the reg tool:
Load the registry hive from the broken OS disk:
reg load HKLM\<broken-system> <volume-letter-of-broken-os-disk>:\windows\system32\config\SYSTEMEnable on ControlSet001:
reg add "HKLM\<broken-system>\ControlSet001\Control\CrashControl" /v CrashDumpEnabled /t REG_DWORD /d 1 /f
reg add "HKLM\<broken-system>\ControlSet001\Control\CrashControl" /v DumpFile /t REG_EXPAND_SZ /d "%SystemRoot%\MEMORY.DMP" /f
reg add "HKLM\<broken-system>\ControlSet001\Control\CrashControl" /v NMICrashDump /t REG_DWORD /d 1 /f
Enable on ControlSet002:
reg add "HKLM\<broken-system>\ControlSet002\Control\CrashControl" /v CrashDumpEnabled /t REG_DWORD /d 1 /f
reg add "HKLM\<broken-system>\ControlSet002\Control\CrashControl" /v DumpFile /t REG_EXPAND_SZ /d "%SystemRoot%\MEMORY.DMP" /f
reg add "HKLM\<broken-system>\ControlSet002\Control\CrashControl" /v NMICrashDump /t REG_DWORD /d 1 /f
Unload the broken OS disk:
reg unload HKLM\<broken-system>
Rebuild the Original VM
Use step 5 of the VM Repair Commands to reassemble the VM.
Contact us for help
If you have questions or need help, create a support request, or ask Azure community support. You can also submit product feedback to Azure feedback community.