Note
Access to this page requires authorization. You can try signing in or changing directories.
Access to this page requires authorization. You can try changing directories.
Applies to: .NET Core 2.1, .NET Core 3.1, .NET 5
This article introduces how to configure the ASP.NET Core application in Linux to start automatically under a different user.
Prerequisites
To follow the exercises in this part, you must first follow the setup that is described in the previous parts of this series. Additionally, you must have the following:
- A Linux virtual machine, preferably running the Ubuntu 18.04 LTS distribution of Linux.
- Nginx running automatically and listening for requests on port 80.
- Nginx configured as a reverse proxy and routing incoming requests to an ASP.NET Core application that is listening on port 5000.
- The ASP.NET Core application configured to start automatically after the server is restarted or when the process is stopped or crashes.
Goal of this part
In the previous part, you created a service file for our ASP.NET Core application, and configured the service to run in the built-in www-user context.
However, in some environments, you may want to run your applications under different user contexts. This would give you full control over isolation from other applications that might be running on the same server. For example, if you host multiple web applications, you may want to configure each application to run under its own user account in order to have the flexibility to configure permissions separately for each application (instead of running all applications under the same www-data user context).
The goal is to configure the ASP.NET Core application to run under a specific user account.
You'll practice how to create a user, and learn how to list the other user accounts that are available on the computer.
Note
This part is optional. It also doesn't matter in which user context you run your ASP.NET Core application for the rest of the tutorial series.
Create a new user to run your application
You'll start by creating a new user and editing your service file to run your service within that new user context. To create the user account, run the sudo adduser <username> command. For this demonstration, the chosen username is firstappuser. However, feel free to use any name that you want.
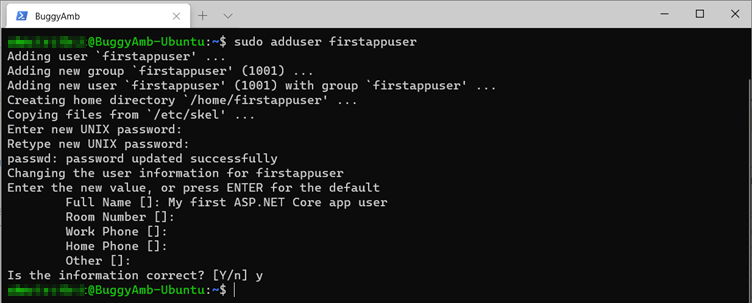
This screenshot shows the result of creating the firstappuser account.
Recall that the ASP.NET Core service runs in the www-data user context. This is a built-in account that's used for service applications, including Apache and Nginx. We recommend that you use this account for such workloads. If we check both users' group memberships by running the groups www-data and groups firstappuser commands, you won't notice any differences.
The local user accounts in Linux are stored in the /etc/passwd file. If you run sudo cat /etc/passwd, you'll see all the users, including the root user. The following screenshot describes each column.
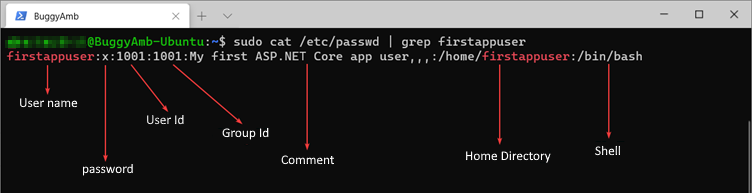
To see the differences between the www-data and firstappuser users, run the sudo cat /etc/passwd | grep 'www-data\|firstappuser' command. The output will resemble the following.

Note
The www-data user has /usr/sbin/nologin configured for the shell. This means that the www-data user can't log on to this computer interactively by using SSH. However, firstappuser is able to do this. Because the new account will be a service account, it makes sense, as a security measure, to prevent the user account from logging on.
To disable the shell access, run the sudo usermod -s /usr/sbin/nologin firstappuser command.

So far, you have created an account (firstappuser) that can be used as our service account. The next step is to configure the ASP.NET Core service to run within that user account. Open the service file by using a vi command. Replace "www-data" with "firstappuser" (or whatever username you chose), and then save the file.

This enables the ASP.NET Core application to start by using a different user account than the default www-data account.
After you change the service file, reload the configuration by running sudo systemctl daemon-reload. Then, restart your service by running sudo systemctl restart myfirstwebapp.service.
Verify that the application runs under new user account
There are several methods to identify the user who runs a specific process. For example, you can run ps -aux | grep <username>. Although that approach can prove useful, you'll still be missing some information, such as the actual command-line content. However, there is an easy way to collect more complete information by using htop.
Note: Htop is a task manager. It will be explained later in this series. Htop is pre-installed in several Linux distros, including the version of the Ubuntu server that you're probably using. If htop isn't installed in your Linux distro, you can install it by using package managers.
Examine the following screenshot. You can get the PID by running systemctl status. Then, pass the PID to the htop command by using the -p switch to get the details of the process for that PID.

And here's the output of the htop -p <PID> command.
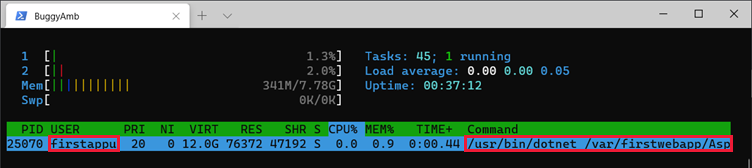
As the screenshot shows, the sample ASP.NET Core application now runs under the new user that was created by using the commands that are discussed in this part.
To quit htop, press F10 or Q.