Note
Access to this page requires authorization. You can try signing in or changing directories.
Access to this page requires authorization. You can try changing directories.
Applies to: .NET Core 2.1, .NET Core 3.1, .NET 5
This article discusses how to make two ASP.NET Core applications run side-by-side, listen on different ports, and process incoming requests.
Prerequisites
To complete this part of the tutorial, you should have following items set up:
- Both .NET Core 3.1 and .NET 5.0 SDKs installed.
- Nginx running automatically and listening for requests that are sent on port 80.
- Nginx configured as a reverse proxy and routing all the requests to the ASP.NET Core application (listening on port 5000.)
- One ASP.NET Core application that's running and configured to start automatically after the server is restarted or after the process is stopped.
- Linux local firewall that's enabled and configured to allow SSH and HTTP traffic.
- Sample buggy ASP.NET Core application that's downloaded and extracted to the /var/buggyamb_v1.1 directory.
The first ASP.NET Core demo application that was used in this series is an ASP.NET Core 5.0 application. The second application is an ASP.NET Core 3.1 application. If you don't have both .NET Core 3.1 and .NET 5.0 SDKs installed, install the missing one before you continue.
Note
You can check the installed version of runtimes and SDKs by running the dotnet --info command. .NET Core installation was discussed in previous parts of this series.
Goal of this part
At the end of this part, you'll have two ASP.NET Core applications that are running side-by-side, listening on different ports, and processing incoming requests.
Most of the actions that you'll take in this part will be similar: create a service file for the second ASP.NET Core application so that it can start whenever the server is restarted or the process is stopped.
Run second application
Run a second application as a service that's similar to the first application that's running. Before you create the service file, make sure that it runs correctly.
Recall that, in earlier chapters, you were instructed to copy the test debugging application to the /var/buggyamb_v1.1/ directory, and then run the application by using the dotnet /var/buggyamb_v1.1/BuggyAmb.dll command. You may receive the following error message:
System.IO.IOException: Failed to bind to address
http://127.0.0.1:5000: address already in use.
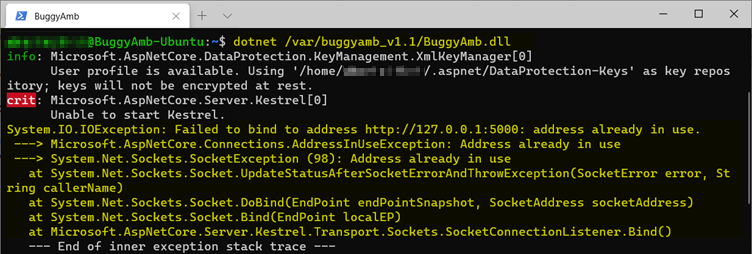
Per this message, another process is already using port 5000. This is obvious. But how can you learn which process is using the port? By running the sudo netstat -tulpn | grep 5000 command. In the following screenshot, the PID is 12536 and process name is dotnet. You'll most likely see that your process ID will be different:

The next step is to understand which ASP.NET Core application is hosted by the dotnet process that's listening on port 5000. You can run the cat /proc/12536/cmdline command to get a result that resembles the following screenshot.

This is the first ASP.NET Core application that was configured in this series. It's listening on port 5000. Therefore, our new ASP.NET Core buggy application can't listen on the same port.
Note
You've learned something new here. There's a directory named /proc. If you list the content of this directory, you'll see directories that are named for each PID that's running at that moment. Each subfolder will have several files that you can use to get properties of each process, such as the command-line, and memory or CPU information. For now, don't focus on this because we'll discuss it when we cover tools and processes.
The solution to the port conflict issue isn't to stop running the first application. Because the goal is to have both applications running at the same time, the solution is actually to run the second ASP.NET Core application on a different port.
Configure second ASP.NET Core application to listen on a different port
There are different ways to achieve this goal:
- Use
UseUrls()to set the port in Program.cs: This means that the port is hard-coded in the application. Although we can read the port from a configuration file, you don't want to change the application and compile again. Therefore, this training won't focus on this solution. - Command-line arguments: Use the
--urlsparameter when you run your application. - Environment variables: Set the URL for listening to use an environment variable. Use
DOTNET_URLSorASPNETCORE_URLSenvironment variable names to achieve this.
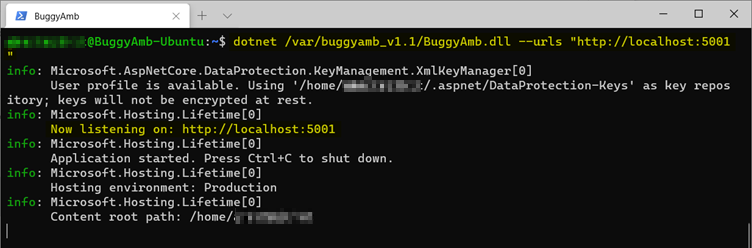
Both environment variables and the command-line argument approach are options to consider. Try to test the --urls option, as shown in the following screenshot.
Remember that the goal is to run the application as a service. This requires that you have a service file where you can set environment variables. You can set the executable command as shown previously, or you can set environment variables. The following examples use environment variables to configure the application to listen on an alternative port.
Create a service unit file for the second application
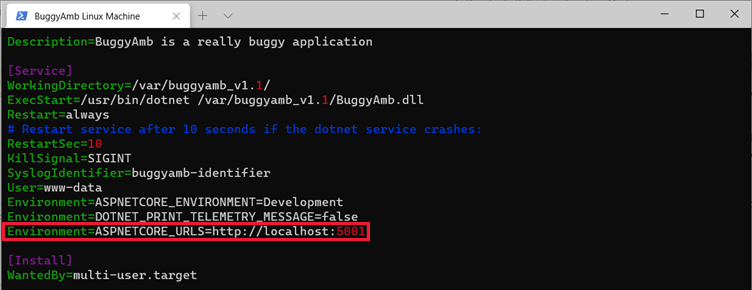
You'll use the following service definition in your service unit file. Remember that the second application will run in the /var/buggyamb_v1.1 directory.
Note
The Environment=ASPNETCORE_URLS=http://localhost:5001 line will declare an environment variable that's named ASPNETCORE_URLS and tell our application to listen on port 5001:
[Unit]
Description=BuggyAmb is a really buggy application

[Service]
WorkingDirectory=/var/buggyamb_v1.1/
ExecStart=/usr/bin/dotnet /var/buggyamb_v1.1/BuggyAmb.dll
Restart=always
# Restart service after 10 seconds if the dotnet service crashes:
RestartSec=10
KillSignal=SIGINT
SyslogIdentifier=buggyamb-identifier
User=www-data
Environment=ASPNETCORE_ENVIRONMENT=Development
Environment=DOTNET_PRINT_TELEMETRY_MESSAGE=false
Environment=ASPNETCORE_URLS=http://localhost:5001

[Install]
WantedBy=multi-user.target
The service file name will be buggyamb.service and will be created in the /etc/systemd/system/ directory. Just as you did before, use the vi editor, and run the sudo vi /etc/systemd/system/buggyamb.service command to create the service definition file. Copy and paste this configuration, and save it. Again, notice how you set the ASPNETCORE_URLS environment variable:
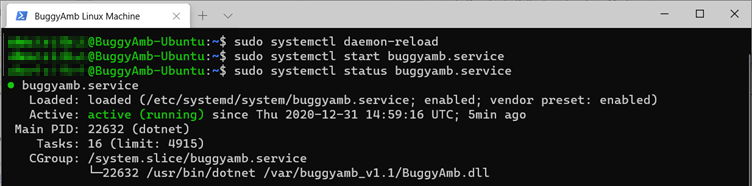
Now you've configured the buggy ASP.NET Core web application to run as a daemon. Is this enough to meet the goal that we stated at the beginning of the training? Enable and start the service by running the sudo systemctl enable buggyamb.service and sudo systemctl start buggyamb.service commands. Then check the service status by running systemctl status buggyamb.service, as shown in the following screenshot.
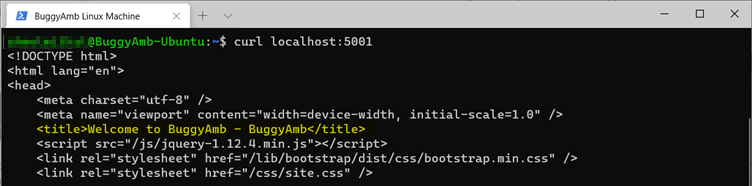
You're at the point where you can now check whether the BuggyAmb application works as expected. Run the curl localhost:5001 command to have the Welcome page of BuggyAmb HTML be displayed in the console, as shown in the following screenshot.
The application can't be tested yet from the client because it's listening on port 5001. This port isn't allowed in firewall settings. Because Nginx doesn't expose the port to the internet, you can configure Nginx to listen on port 80, and route the traffic to BuggyAmb when the incoming HTTP requests are made by using a certain hostname. For example, you could use the hostnames: http://buggyamb or http://buggyweb. You could also use any other hostname that you want.
For now, the goal is met to have the second ASP.NET Core application running side-by-side with the first demo application. In the next chapter, we'll continue to configure Nginx as we describe it in this part.
Next steps
Part 2.7 - Configure a second web site with hostname in Nginx