Note
Access to this page requires authorization. You can try signing in or changing directories.
Access to this page requires authorization. You can try changing directories.
Applies to: .NET Core 2.1, .NET Core 3.1, .NET 5
This article discusses how to copy core dump files from Linux machine to another. For example, you collect core dump files from Linux, and then you copy them to a Windows virtual machine (VM) to analyze.
Prerequisites
The minimum requirement to follow this section is to have at least one core dump captured in your Linux environment from the previous sections of this training. You can use any core dump file that's generated by either the createdump or dotnet-dump tool.
Goal of this lab
So far throughout the training modules, you have collected core dump files in Linux and opened them in debuggers on the same Linux VM. What happens if you can't analyze the dumps on the same VM? Usually, you would collect core dump files from your production environment with the intent to troubleshoot an issue. But this isn't recommended. Also, it's not always possible to run the debugging session on the same production computer.
To address this problem, this lab series will cover the following options to analyze the core dump file that's collected on a Linux VM:
- Use dotnet-dump to analyze the core dump file on a Linux VM that runs inside the Windows Subsystem For Linux (WSL) environment.
- Use dotnet-dump to analyze the core dump file on a Linux VM that runs inside a docker container.
The following exercises are based on a Windows 10-based VM that was used to host a docker container and WSL2 environments.
In this first part of the lab, you'll be guided through the procedure of copying core dump files from a Linux VM to a Windows VM by using the pscp command. This lab will also address methods to copy files that aren't recommended.
Copy a core dump file to your local VM
During the exercises in this training for debugging a failing ASP.NET core application, you generated three manual memory dump files. Now, you'll learn how to copy those core dump files to a Windows VM.

Remember that a core dump file contains the process memory. Therefore, the size of a core dump could be large if the process memory usage is high. Instead of copying each core dump file one by one, you can optimize the transfer. To do this, package and compress them using the tar command so that you'll have one compressed coredumps.tar.gz file that contains all three core dump files.
As the following screenshot shows, you can use the tar -czvf coredumps.tar.gz coredump.manual.* command to create the compressed archive file.

In the previous example, the archive file coredumps.tar.gz is in the dump files folder in the home directory on the Linux VM. The objective is to copy the /home/UserName/coredumps.tar.gz to d:\Learn\Linux\Dumps folder on the target Windows VM.
There are several ways to copy files from a Linux VM. You should already be familiar with one of the options: Using the pscp command on the Windows VM. If you have followed the entire series, you should remember this command from Part 2.5 - Copying files from your development environment to a Linux VM, and then extracting the files in Linux.
Note
For readers who haven't worked through Part 2.5 of this series: It introduces PuTTY and discusses the basic usage options.
Open the Windows Terminal on your Windows VM. (If you prefer, you can open a Command Prompt window instead. However, we strongly recommend that you use the Windows Terminal.) Then, run the following command to copy the file to the VM:
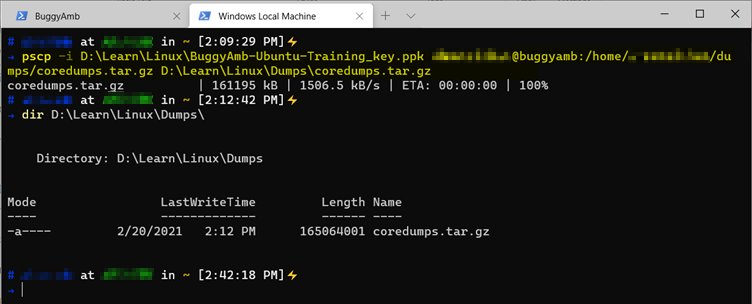
pscp -i D:\Learn\Linux\BuggyAmb-Ubuntu-Training_key.ppk <UserName>@buggyamb:/home/<UserName>/dumps/coredumps.tar.gz D:\Learn\Linux\Dumps\coredumps.tar.gz
Note
Similar to PuTTY, pscp uses PPK file format for the private key. If you have only the PEM file and don't have the PPK, you can convert the PEM format to PPK format by using the PuTTY Key Generator tool (PuTTYgen). This is explained in detail in Part 1.1 - Creating a Linux virtual machine in Azure and connecting to it.
As the following screenshot shows, the command successfully copied the coredumps.tar.gz file to the local VM in the D:\Learn\Linux\Dumps folder.
Other options to copy files from Linux
There are several methods to copy files from Linux to a Windows VM. One of the obvious options is to install an FTP server on Linux, and use FTP to transfer the files to the target Windows VM. If you were to choose this option, make sure to set up an FTP over an SSH solution for security, and avoid using a plain FTP protocol because that will send the username, password, and data in clear text.
Another option would be to copy the core dump files to the wwwroot folder of your ASP.NET Core application, and then download them by using a web browser. This is a really bad idea. Please do not try this! A core dump file contains all the memory of your process. This means that any sensitive information would be included in the core dump file. Copying such files to a web server means that you'll be exposing the sensitive information within the file to anyone who can access your web server, even if you don't share the URL. Consider this as a solution of last resort because of the information exposure that it involves.
Following a successful transfer, you should have at least one core dump file on your Windows VM. You can now move on to the next part to understand how to analyze the dump files.
Next steps
Lab 4.2 Analyze core dump files on another machine - Using WSL to open core dump files