Note
Access to this page requires authorization. You can try signing in or changing directories.
Access to this page requires authorization. You can try changing directories.
This article covers how to review the Windows Management Instrumentation (WMI) configuration, and how to diagnose and troubleshoot WMI connectivity or access issues.
Here are some examples of WMI configuration or connectivity issues you may experience. The issues are from different products and applications that use or depend on WMI.
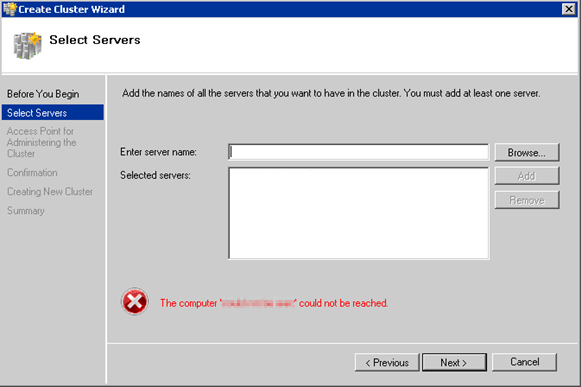
The Create Cluster Wizard attempts to connect to a remote machine (the cluster node) but fails to retrieve data.
When the Active Directory role installer tries to communicate with its host machine, the Active Directory Domain Services Configuration Wizard fails with the following error:
Adprep could not retrieve data from the server
testbox.contoso.comthrough Windows Management Instrumentation (WMI).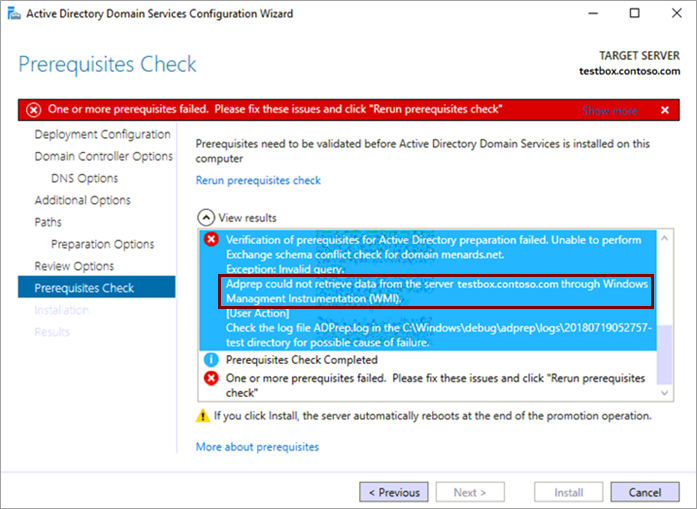
The local WMI query fails to use the
Get-WmiObjectPowerShell cmdlet and receives the "Access denied" error.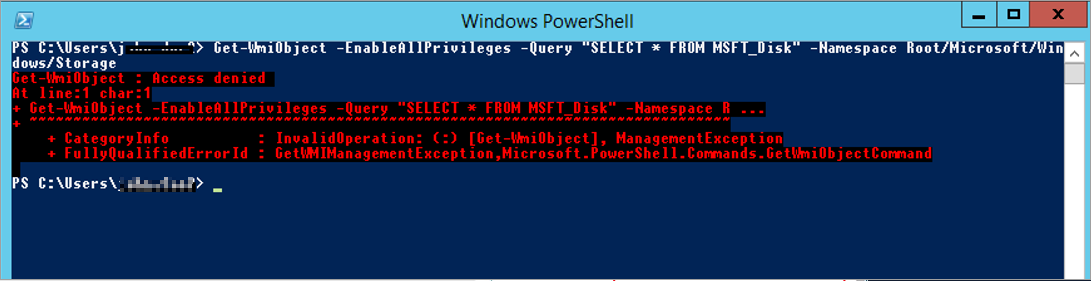
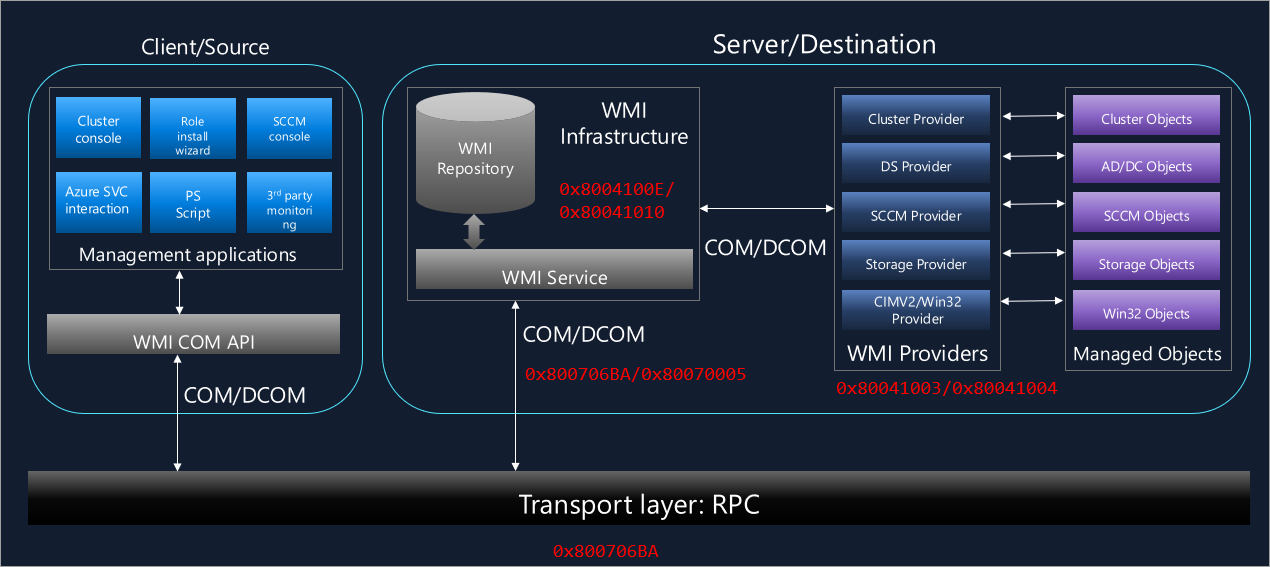
Connection flow
There are multiple components and layers involved in a WMI connection. The following components are involved at a high level:
The client or management application that initiates the WMI connection or query
The Component Object Model (COM) or Distributed Component Object Model (DCOM) component used for local and remote inter-process communications (IPC)
The transport or network layer (Remote Procedure Call (RPC))
The WMI repository and WMI service
The WMI provider
The managed objects
Identify the issue
Based on where the error or failure occurs or the component that returns the error, the issues can be categorized as follows:
- Connectivity issues
- Access issues
- Core WMI provider error codes
Connectivity issues
A WMI connection failure that occurs before establishing the connection to the WMI infrastructure either locally or remotely is considered a connectivity issue.
The problem or error is returned by the COM/DCOM architecture locally or remotely, the transport layer (RPC), or the firewall. Various errors can occur with connectivity issues, but the most common errors are:
-
0x800706BA
HRESULT_FROM_WIN32(RPC_S_SERVER_UNAVAILABLE) -
0x80041015
Networking error that prevents normal operation has occurred.
Access issues
An access issue occurs when a WMI connection or query fails due to access failure or lack of permissions for one or more WMI components.
In other words, there are multiple areas within WMI infrastructure, such as COM/DCOM, WMI namespaces, WMI repository, and providers, and users need appropriate permissions to access, use, or interact with them. Lack of permissions or restrictions results in WMI connection failures, and you may receive the following errors:
-
0x80070005
E_ACCESS_DENIED
Access denied by DCOM security -
0x80041003
WBEM_E_ACCESS_DENIED
Access denied by a provider
Core WMI provider error codes
Even after a successful connection to the WMI and having the correct permissions, a WMI query or connection can fail due to an underlying issue with the query, an error returned by the provider, an invalid class, or an invalid namespace.
The issue can be due to various reasons, and errors are mainly returned by the WMI service.
In such cases, the error code returned helps understand the issue. Here are some error codes:
-
0x80041002 - WBEM_E_NOT_FOUND
-
0x80041004 - WBEM_E_PROVIDER_FAILURE
-
0x80041062 - WBEM_E_PRIVILEGE_NOT_HELD
-
0x8004100E - WBEM_E_INVALID_NAMESPACE
-
0x80041010 - WBEM_E_INVALID_CLASS
-
0x80041011 - WBEM_E_PROVIDER_NOT_FOUND
-
0x80041012 - WBEM_E_INVALID_PROVIDER_REGISTRATION
-
0x80041013 - WBEM_E_PROVIDER_LOAD_FAILURE
The complete list of errors returned by the WMI infrastructure is listed in WMI Error Constants.
Check the configuration
If you can confirm the issue is a connectivity or access issue based on the failure or error returned, check the existing configuration of WMI or make sure the user has the appropriate permissions.
- By default, only members of the Administrators group can access the WMI namespace remotely.
- To connect to a remote computer using WMI, ensure that the correct DCOM settings and WMI namespace security settings are enabled for the connection.
- WMI has default impersonation, authentication, and authentication service (NTLM or Kerberos) settings that the target computer in a remote connection requires. Your local machine may use different defaults that the target system doesn't accept. You can change these settings in the connection call.
- Connections to WMI on the local computer have a default authentication level of
PktPrivacy. - WMI remote connections are affected by User Account Control (UAC) and Windows Firewall.
Set DCOM security to allow a non-administrator user to access a computer remotely
You can configure DCOM settings for WMI by using the DCOM Configuration utility (DCOMCnfg.exe) found in Administrative Tools in Control Panel.
This utility exposes the settings that enable certain users to connect to the computer remotely through DCOM. With this utility, you can set the security to start, access, and configure the WMI service.
The following procedure describes how to grant DCOM remote startup and activation permissions to certain users and groups.
If computer A is connecting remotely to computer B, you can set these permissions on computer B to allow a user or group that's not part of the Administrators group on computer B to execute DCOM startup and activation calls on computer B.
To grant DCOM remote launch and activation permissions to a user or group manually, follow these steps:
- Select Start > Run, type DCOMCNFG, and then select OK.
- In the Component Services window, expand Component Services > Computers. Right-click My Computer and select Properties.
- In the My Computer Properties dialog, select the COM Security tab.
- Under Launch and Activation Permissions, select Edit Limits.
- In the Launch and Activation Permission dialog, select Add if your name or group doesn't appear in the Group or user names list. In the Select Users, Computers, or Groups dialog, add your name and group in the Enter the object names to select box, and then select OK.
- In the Launch and Activation Permission dialog, select your user and group in the Group or user names list. Under Permissions for <user or group>, check Allow for the Remote Launch and Remote Activation permissions, and then select OK.
The following procedure describes how to grant DCOM remote access permissions to certain users and groups. If computer A is connecting remotely to computer B, you can set these permissions on computer B to allow a user or group that's not part of the Administrators group on computer B to connect to computer B.
To grant DCOM remote access permissions, follow these steps:
- Select Start > Run, type DCOMCNFG, and then select OK.
- In the Component Services window, expand Component Services > Computers. Right-click My Computer and select Properties.
- In the My Computer Properties dialog, select the COM Security tab.
- Under Access Permissions, select Edit Limits.
- In the Access Permission dialog, select ANONYMOUS LOGON in the Group or user names box. Under Permissions for ANONYMOUS LOGON, check Allow for the Remote Access permission, and then select OK.
Note
You can also add the user to the Distributed COM Users group locally on the target machine. By default, this group has all permissions to access COM/DCOM on any Windows machine.
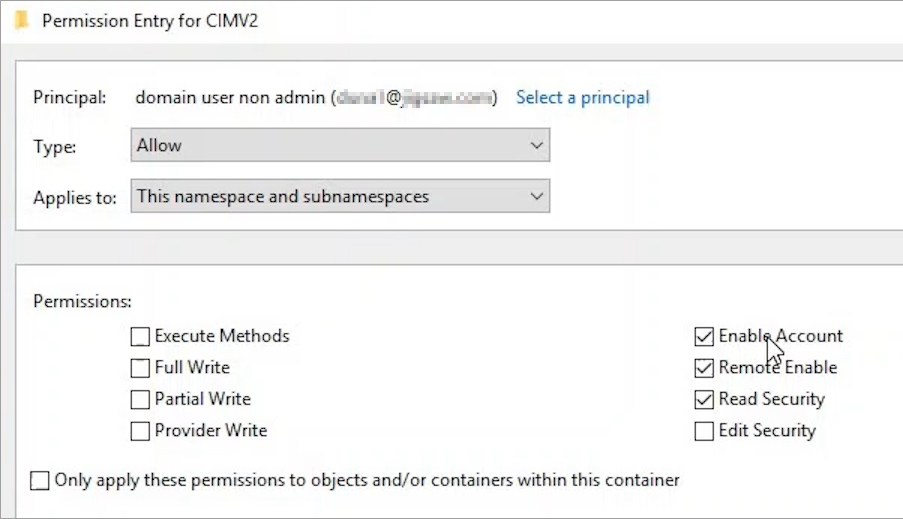
Allow users to access a specific WMI namespace
You can allow or disallow users to access a specific WMI namespace by setting the Remote Enable permission in the WMI Control for a namespace. If a user tries to connect to a namespace that the user isn't allowed to access, the user will receive error 0x80041003.
By default, this permission is enabled only for administrators. An administrator can enable remote access to specific WMI namespaces for a non-administrator user.
The following procedure sets Remote Enable permissions for a non-administrator user.
Connect to the remote computer by using WMIMGMT.msc.
Right-click WMI Control and select Properties.
In the Security tab, select the namespace and select Security.
Note
Root\cimv2 is the default namespace.
Locate or add the appropriate account and check Remote Enable and Read Security in the permissions list.
Note
To ensure the same permissions are inherited to the subfolder or subnamespaces, select Advanced. Then, select the intended user and make sure that This namespace and subnamespaces is selected under the Applies to section.
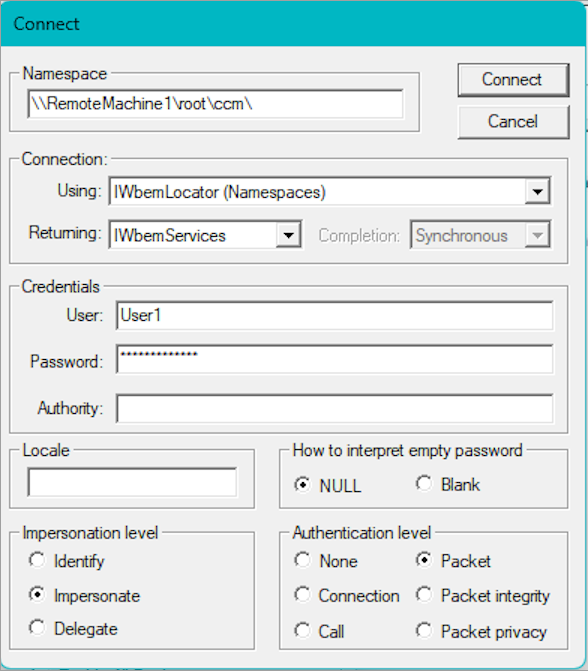
To check the connectivity to a specific class in a specific namespace, you can use the Windows Management Instrumentation Tester (WBEMTEST) tool by following the steps:
- Open WBEMTEST as an administrator and select Connect. By default, the console connects to the local WMI's Root\cimv2 namespace.
- Change the namespace to the one you're trying to test the connection to. If it's a remote machine, enter it in the format of \\<machinename>\Root\cimv2.
If the connection is successful, the WBEMTEST main window is connected to the non-default namespace provided.
By default, the WBEMTEST connection uses the logged-in user credentials. If you connect with a different account, the credentials pop up before attempting to connect.
The following example shows an attempt to connect to the namespace root\ccm on "RemoteMachine1" using the credentials of User1.
To set up a WMI connection between a domain-joined machine and a workgroup machine, consider a local user of the target machine.
Note
If you use the built-in local administrator of the target machine, this user already has the appropriate rights to access WMI remotely from other machines and doesn't need any additional configuration.
The target machine's firewall should allow the incoming WMI connection, for which the above firewall configuration can be performed as shown in the Windows Firewall settings section. Then, configure the DCOM security and WMI namespace as shown in the Set DCOM security to allow a non-administrator user to access a computer remotely and Allow users to access a specific WMI namespace sections.
Windows Firewall settings
WMI settings for Windows Firewall settings enable only WMI connections rather than other DCOM applications.
An exception must be set in the firewall for WMI on the remote target computer.
The exception for WMI allows WMI to receive remote connections. If a client application creates its own sink, that sink must be explicitly added to the firewall exceptions to allow callbacks to succeed.
You can enable or disable WMI traffic through the Windows Firewall UI. To do this, follow these steps:
- In Control Panel, select Security > Windows Firewall.
- Select Change Settings and then select the Exceptions tab.
- In the Exceptions window, select the Windows Management Instrumentation (WMI) check box to enable WMI traffic through the firewall. To disable WMI traffic, clear the check box.
You can enable or disable WMI traffic through the firewall at Command Prompt using the WMI rule group.
Use the following command at a command prompt to enable WMI traffic through the firewall.
netsh advfirewall firewall set rule group="windows management instrumentation (wmi)" new enable=yesUse the following command to disable WMI traffic through the firewall.
netsh advfirewall firewall set rule group="windows management instrumentation (wmi)" new enable=no
Instead of using a single WMI rule group command, you can also use individual commands for each DCOM, WMI service, and sink.
To enable WMI traffic using separate rules for DCOM, WMI, callback sink, and outgoing connections:
To establish a firewall exception for DCOM port 135, use the following command:
netsh advfirewall firewall add rule dir=in name="DCOM" program=%systemroot%\system32\svchost.exe service=rpcss action=allow protocol=TCP localport=135To establish a firewall exception for the WMI service, use the following command:
netsh advfirewall firewall add rule dir=in name ="WMI" program=%systemroot%\system32\svchost.exe service=winmgmt action = allow protocol=TCP localport=anyTo establish a firewall exception for the sink that receives callbacks from a remote computer, use the following command:
netsh advfirewall firewall add rule dir=in name ="UnsecApp" program=%systemroot%\system32\wbem\unsecapp.exe action=allowTo establish a firewall exception for outgoing connections to a remote computer that the local computer is communicating with asynchronously, use the following command:
netsh advfirewall firewall add rule dir=out name ="WMI_OUT" program=%systemroot%\system32\svchost.exe service=winmgmt action=allow protocol=TCP localport=any
To disable WMI traffic using separate rules for DCOM, WMI, callback sinks, and outgoing connections:
To disable the DCOM exception, use the following command:
netsh advfirewall firewall delete rule name="DCOM"To disable the WMI service exception, use the following command:
netsh advfirewall firewall delete rule name="WMI"To disable the sink exception, use the following command:
netsh advfirewall firewall delete rule name="UnsecApp"To disable the outgoing exception, use the following command:
netsh advfirewall firewall delete rule name="WMI_OUT"
Troubleshoot different scenarios
Most connectivity issues are due to incorrect permissions, no permissions, or external factors like firewalls or antivirus software. Hence, reviewing the configuration may resolve the issue.
Apart from the default configuration, some additional settings may impact the connectivity.
Review the application and system event logs for any errors logged by the client application or from the source (Microsoft-Windows-DistributedCOM), and look for any relevant errors or events that may be logged on the source or target computer depending on the scenario.
Review event logs of Windows Firewall under Event Viewer > Applications and Services Logs > Microsoft > Windows > Windows Firewall With Advanced Security > Firewall for any connections from WMI being blocked by the firewall.
Certain Group Policy settings are enabled to modify the default behavior and permissions of RPC and DCOM. For example:
This group policy can restrict unauthenticated RPC calls, which may cause the error:
The RPC server is unavailable. (Exception from HRESULT: 0x800706BA)
Computer Configuration\Administrative Templates\System\Remote Procedure Call\Restrict Unauthenticated RPC clients
This setting controls how the RPC server runtime handles unauthenticated RPC clients connecting to RPC servers. This policy setting impacts all RPC applications, including WMI.
This group policy can configure custom DCOM permissions:
Computer Configuration\Windows Settings\Security Settings\Local Policies\Security Options\DCOM: Machine Launch Restrictions in Security Descriptor Definition Language (SDDL) syntax
This setting allows you to specify an ACL in two ways. You can type the security descriptor in the SDDL, or grant or deny Local Access and Remote Access permissions to users and groups.
Review the RPC dynamic port range on the target machine:
netsh int ipv4 show dynamicport tcpnetsh int ipv4 show dynamicport udpnetsh int ipv6 show dynamicport tcpnetsh int ipv6 show dynamicport udp
Compare it with a working machine. If the port range is non-default or restricted to a small range, this may affect the WMI connection. The Service overview and network port requirements for Windows show the default port range needed for RPC.
If the issue is an access issue or a core WMI error, the incoming queries are logged as operational events in the log Microsoft-Windows-WMI-Activity/Operational under Event Viewer > Applications and Services Logs > Microsoft > Windows > WMI-Activity.
In some scenarios, local WMI connections may fail.
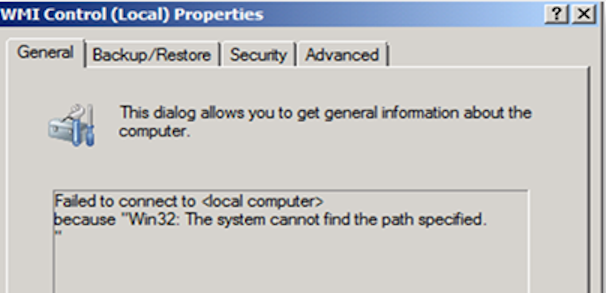
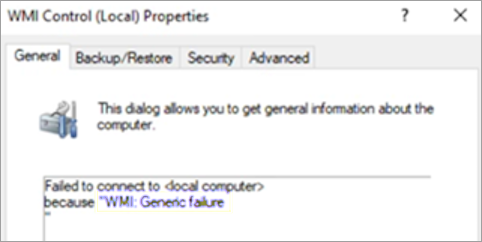
You can use WMIMGMT.msc to check the local WMI connectivity by right-clicking WMI Control and selecting Properties.
Here are some errors that occur when the local WMI fails:
-
Failed to connect to <local computer> because "WMI: Not Found"
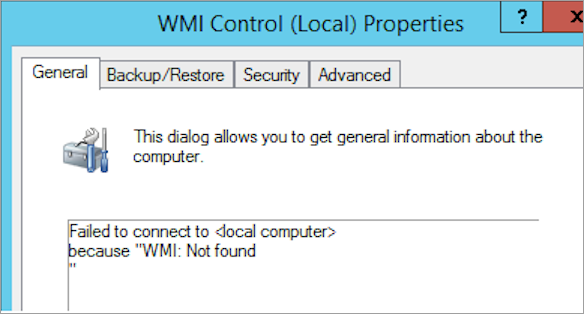
-
Failed to connect to <local computer> because "Win32: The system cannot find the path specified."
-
Failed to connect to <local computer> because "WMI: Generic failure"
These kinds of errors may sometimes be caused if there's any glitch in the WMI repository or if there's any corruption.
You can use the following command in an elevated command prompt window to perform a consistency check on the live or currently used WMI repository.
winmgmt /verifyrepository
You can also run this command with /verifyrepository <path>. When you specify the path argument, you can verify any saved copy of the repository.
In this case, the path argument should contain the full path to the saved repository copy. The saved repository should be a copy of the entire repository folder.
The following procedure describes how to recompile the WMI provider MOF files and re-register the WMI provider DLLs. This includes all the built-in providers and those placed in the default path. Run the following commands in an elevated command prompt window.
Note
The following steps involve restarting the WMI service.
Stop the WMI service and set it to
disabled:sc config winmgmt start= disabled net stop winmgmt /yNavigate to the WBEM folder:
%systemdrive%
cd %windir%\system32\wbem
Re-register the WMI providers:
for /f %s in ('dir /b *.dll') do regsvr32 /s %sSet the WMI service back to
Autoand start the service:sc config winmgmt start= Auto net start winmgmtRecompile the MOF files:
dir /b *.mof *.mfl | findstr /v /i uninstall > moflist.txt & for /F %s in (moflist.txt) do mofcomp %s
Note
There are multiple external blogs and sites to reset the WMI repository or rebuild the WMI repository. This sets the WMI repository back to its initial state when the operating system was installed. WMI will lose all the information that was gathered over time about the system itself, applications, services, and other entities around it. Hence, we don't recommend rebuilding the WMI repository unless it's performed by Microsoft support.
Connection flow at the network level
The following traces are the output of network traces captured using Network Monitor between two machines while performing a WMI query with WMIC.exe.
This can help determine if the issue is a network connectivity issue.
Connection to the endpoint mapper on port 135 of the target machine:
65 9:07:30 AM 3/21/2017 6.2302032 svchost.exe 10.0.0.6 10.0.0.22 TCP TCP:Flags=......S., SrcPort=49229, DstPort=DCE endpoint resolution(135), PayloadLen=0, Seq=3759018265, Ack=0, Win=8192 ( Negotiating scale factor 0x8 ) = 8192 {TCP:8, IPv4:7}Requesting RPC interface UUID for IRemoteSCMActivator:
68 9:07:30 AM 3/21/2017 6.2366981 svchost.exe 10.0.0.6 10.0.0.22 MSRPC MSRPC:c/o Bind: IRemoteSCMActivator(DCOM) UUID{000001A0-0000-0000-C000-000000000046} Call=0x5 Assoc Grp=0x0 Xmit=0x16D0 Recv=0x16D0 {MSRPC:9, TCP:8, IPv4:7}Connection to one of the dynamic ports provided by the endpoint mapper of the target machine:
77 9:07:30 AM 3/21/2017 6.3539124 WMIC.exe 10.0.0.6 10.0.0.22 TCP TCP:Flags=......S., SrcPort=49230, DstPort=49154, PayloadLen=0, Seq=2143969401, Ack=0, Win=8192 ( Negotiating scale factor 0x8 ) = 8192 {TCP:10, IPv4:7}Connection to the namespace Root\CIMV2 of the machine "TargetMachine":
96 9:07:30 AM 3/21/2017 6.4702188 WMIC.exe 10.0.0.6 10.0.0.22 WMI WMI:IWbemLevel1Login:NTLMLogin Request, NetworkResource=\\TargetMachine\ROOT\CIMV2 PreferredLocale=ms_409,en-US,en Flags=0 {MSRPC:11, TCP:10, IPv4:7}Query execution:
116 9:07:31 AM 3/21/2017 6.7577443 WMIC.exe 10.0.0.6 10.0.0.22 WMI WMI:IWbemServices:ExecQuery Request, *Encrypted* {MSRPC:11, TCP:10, IPv4:7}
Data collection
Before opening a support case for further investigation, you can collect data by following the steps below:
Download TSS.zip and extract the contents.
Start the tracing by running the following cmdlet from an elevated PowerShell command prompt.
.\TSS.ps1 -UEX_WMIAdvanced -WMIProvList RPC,DCOM -NetshScenario netconnection -noBasicLogReproduce the connectivity error or wait until the error is reproduced. Keep the tracing running for more than two minutes.
Stop the tracing by following instructions in the PowerShell window that is running the TSS tool.
The script creates a zip file containing all the trace results and diagnostic information. After a support case is created, you can upload this file to the secure workspace for analysis.