Note
Access to this page requires authorization. You can try signing in or changing directories.
Access to this page requires authorization. You can try changing directories.
Applies To: Windows Server 2016
Background
This information is intended to help you decide whether enabling hybrid AD configuration is the right choice for your organization.
What is a hybrid AD configuration?
A hybrid AD configuration is a setup where the organization uses both AD as well as Microsoft Entra ID. In such an environment, a user account exists in both of these directory services.
What does “Enable hybrid AD configuration” mean?
The Universal Print connector runs as Windows service on the PC where it is installed. One of the connector functions is to retrieve print jobs from Universal Print and send them to the target printer. The connector uses the “System” account to submit print jobs to the spooler. Therefore, although the Universal Print portal will show the Microsoft Entra ID username who submitted a print job, every print job printed using Universal Print will show up in the Windows printer queue on the connector as submitted by the user “System”.
Some legacy print management applications, that rely on Active Directory domains, read the username from the spooler queue and use that information to perform some function (e.g. deduct the print job from a user’s monthly printing quota). Until these applications are updated to work more seamlessly with Universal Print, they will not be able to obtain the identity of the user who originated a print job.
When the “Enable hybrid AD configuration” option is turned on in the Universal Print connector, the connector attempts to map the Microsoft Entra ID user identity to a corresponding local AD domain user identity. If a matching identity is found, the connector service then impersonates that user’s domain identity before submitting the print job to the spooler on their behalf. In that case, the domain username of the user who originated the print job will show up in the spooler queue on the connector PC allowing legacy applications to read it.
Pre-requisites
There are a number of subscriptions, services and computers you'll need to acquire before starting this installation. They are as follows:
Microsoft Entra ID premium subscription.
See Get started with an Azure subscription for a trial subscription to Azure.
MDM service, such as Intune.
See Microsoft Intune for a trial subscription to Intune.
Windows Server 2016 or later machine running Active Directory.
See Step-By-Step: Setting up Active Directory in Windows Server 2016 for help setting up Active Directory.
A dedicated, domain-joined Windows Server machine running as a Print Server and a Universal Print connector.
See Install Universal Print connector on Windows for required Windows Server version and more information.
Public facing domain name.
You can use the domain name created for you by Azure (domainname.onmicrosoft.com), or purchase your own domain name. See Add your custom domain name using the Microsoft Entra ID portal.
Deployment steps
The steps below would enable you to setup a typical Universal Print deployment required for enabling Hybrid AD/Microsoft Entra ID Environment.
Step 1 - Install Microsoft Entra ID Connect
- Microsoft Entra ID connect synchronizes Microsoft Entra ID to on-premises AD. On the Windows Server machine with Active Directory, download and install the Microsoft Entra ID Connect software with express settings. See Getting started with Microsoft Entra ID Connect using express settings.
Step 2 - Setup the Print Server
Make sure the Print Server has all the available Windows Update installed (Update the server before proceeding ahead).
Note: Server 2019 must be patched to build 17763.165 or later.
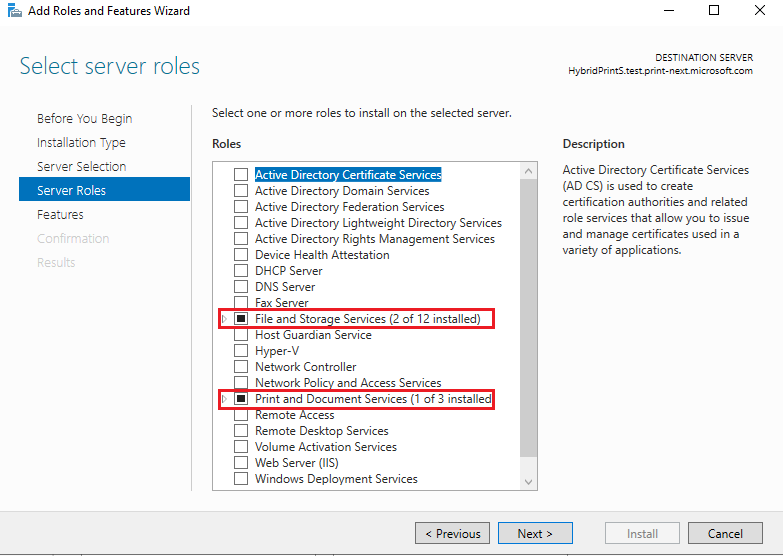
On the Windows Server machine which acts as a print server, we would need to install the Print Server Role.
- See Install roles, role services, and features by using the add Roles and Features Wizard for details on how to install server roles.
To ensure that the local AD maps with the Microsoft Entra ID accounts, the Windows Server that acts as Print Server must be Hybrid Joined/Azure Joined. See Universal Print Setup to ensure that all the steps are completed. In short,
- Install the Universal Print Connector on the Print Server machine if not already done.
- Register the connector with Universal Print by providing a unique name for the connector.
- Share the registered printers on the administrative portal.
Step 3 - Setup Directory Sync of Local AD with Microsoft Entra ID
The users or groups must exist in on-premises Active Directory and synchronized with Microsoft Entra ID. If the solution is deployed to a non-routable domain (e.g. mydomain.local), the Microsoft Entra ID domain (e.g. domainname.onmicrosoft.com, or one purchased from third-party vendor) needs to be added as a UPN suffix to on-premises Active Directory. This is so the exact same user who will be publishing printers (e.g. admin@domainname.onmicrosoft.com). See Prepare a non-routable domain for directory synchronization to ensure the local domain is added and synced.
Note: This is an important step as it is the basic requirement for a complete setup. The local AD user must have same username on the synced Microsoft Entra ID account.
Example: domain/user1 should translate to user1@example.com
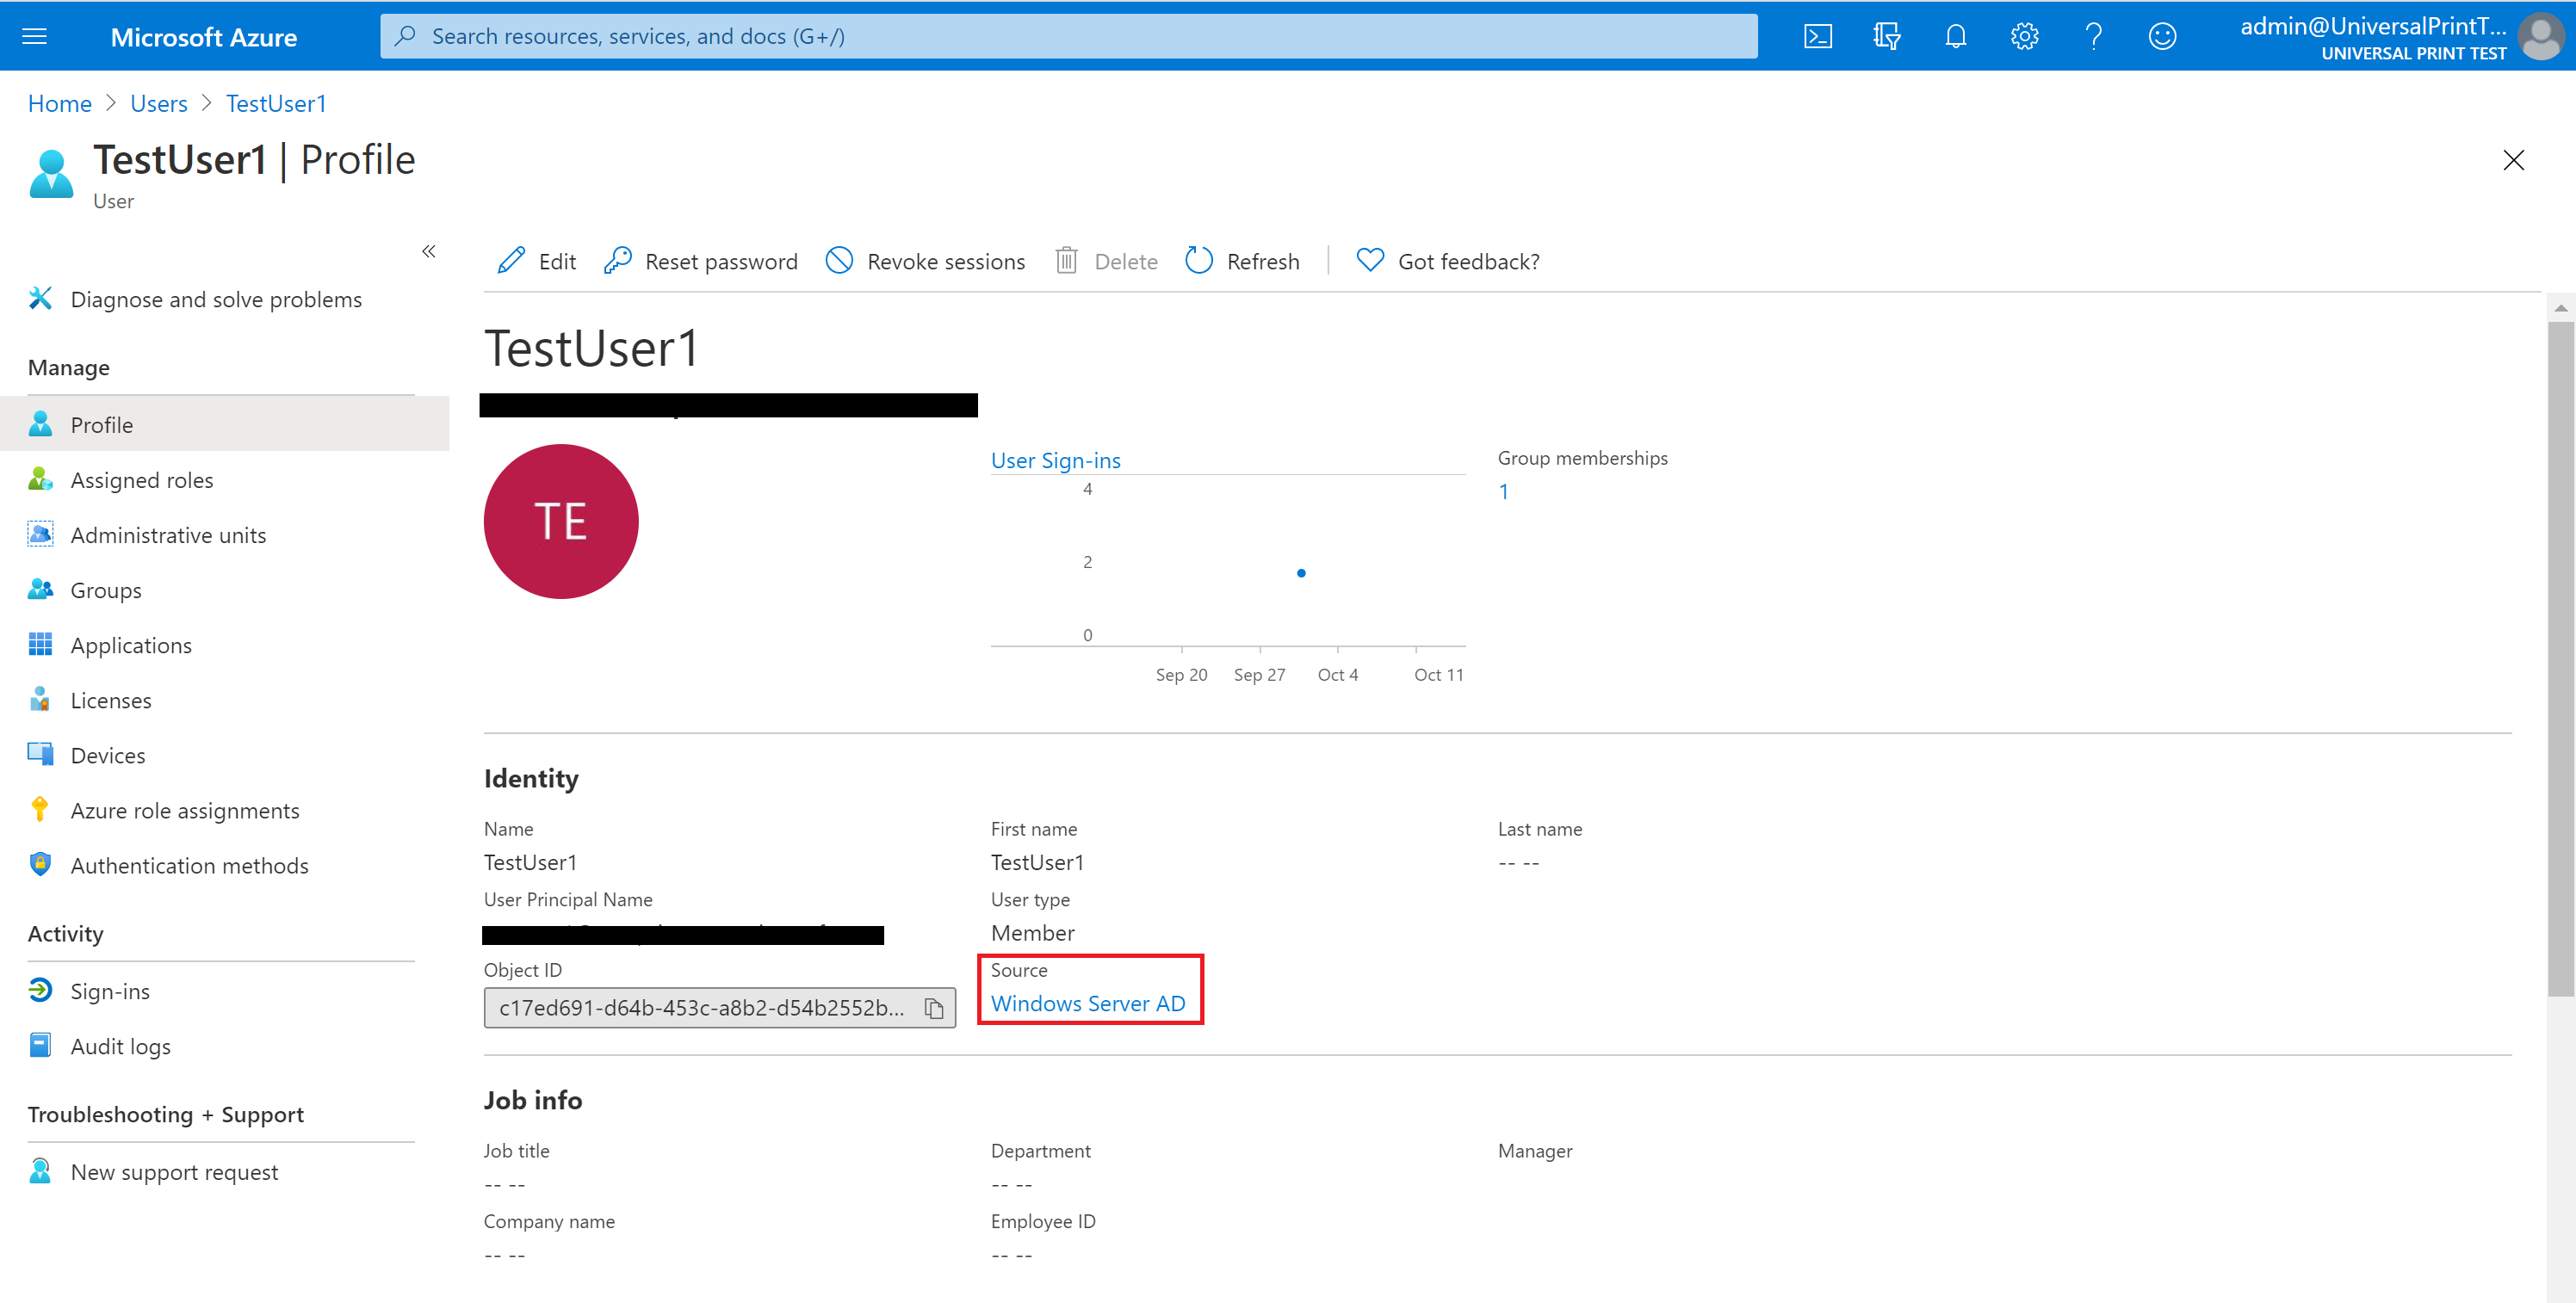
Once the sync takes place (default synchronization frequency is 30 minutes), you can verify the AD users are synced on the administrative portal. Under Microsoft Entra ID, select the users tab and a list of all users would appear. It would be easy to verify if a user is directory synced in that list. Details of a user should show that the source is Windows Server AD.
Step 4 - Enabling the hybrid AD/Microsoft Entra ID support on Universal Print Connector
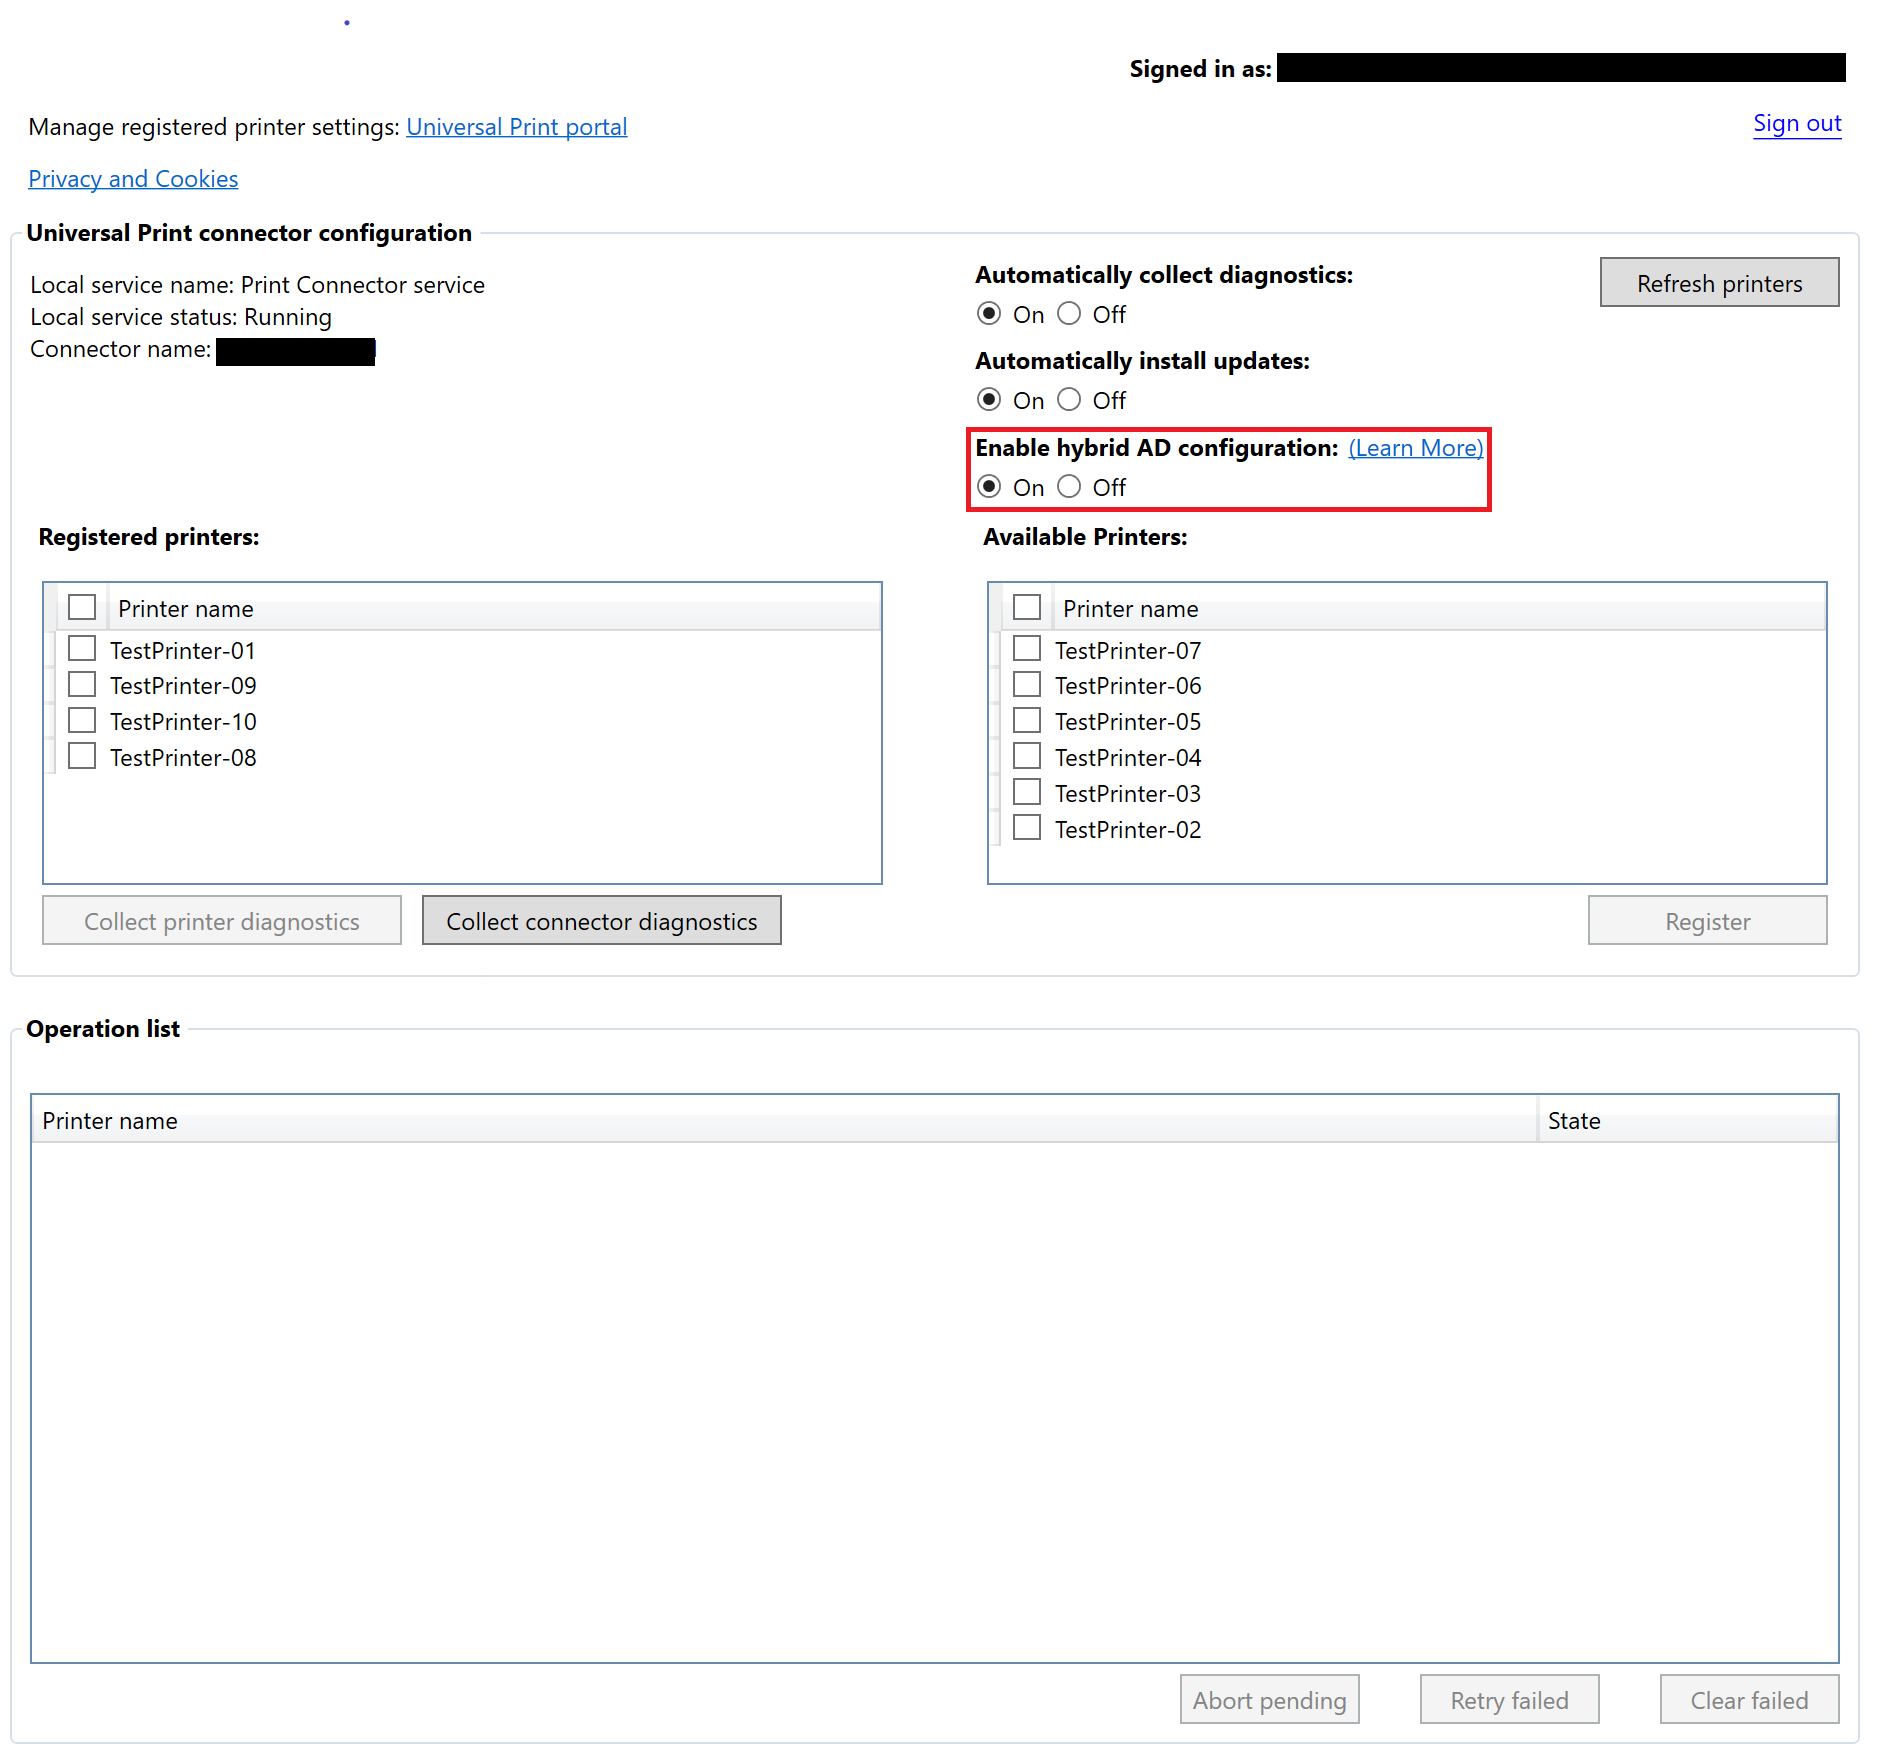
On the Print Server where the connector is installed, there must be a toggle button on the top right corner of the application.
- Select the on radio button for Enable hybrid AD configuration option on the connector.
Verify the deployment
Verifying that the deployment would be by sending a test print job to the Print server using your Microsoft Entra ID credentials on a AD joined client machine.
The machine must be Microsoft Entra ID joined with the same account that it is linked with during the sync step. Go to Settings > Accounts > Email & Accounts. Click on Add a work or school account and login using the credentials to add the Microsoft Entra ID account to the client machine.
Steps to submit a test print to verify the deployment are below:
- Add a printer and print a test page
- Once you notice a print job queued in the print queue, the print server under the folder C:/prints should have a test print file appear in the name printerName.pdf.
- If this file appears, you can check if the mapping has successfully occurred by checking the event logs in the path mentioned in the Troubleshooting section for Print Server logs.
Troubleshooting
Below are common issues encountered during deployment:
| Error | Recommended Steps |
|---|---|
| The request to add or remove features on the specified server failed | Ensure Windows Server has the latest update by checking for updates on the server. |
| Check if server is Domain and Azure joined | Run dsregcmd on command prompt and check if AzureADJoined and DomainJoined are set to "YES" state. |
| Print jobs stay in Sent to printer state | |
| Print jobs show as "Aborted" in the portal. Print Connector event log shows Event 27 "Failed to impersonate <user> for job <id>, followed by Event 9 "PrintJob failed System.Security.SecurityException: The user name or password is incorrect...". | Check that the computer account is a member of the "Windows Authorization Access Group" as described here - Apps and APIs require access. |
For more trouble shooting help related to Universal Print, see Universal Print troubleshooting guide.
Below are locations of logs that can help troubleshooting:
| Component | Log location |
|---|---|
| Windows 10 Client | |
| Print Server | Use Event Viewer to see log of Print Connector. Click on Start and type Event Viewer. Navigate to Applications and Services Logs > Microsoft > Windows > PrintConnector > Operational. |