Note
Access to this page requires authorization. You can try signing in or changing directories.
Access to this page requires authorization. You can try changing directories.
This article provides steps to troubleshoot and resolve Universal Print issues.
Issues covered in this article
- Universal Print troubleshooting guide
Admin is unable to access Universal Print on the Azure Portal
Configuring and registering printers
- A printer on the connector does not show up in the connector app
- Admin is unable to register a printer
- Troubleshooting 3rd party solutions
- Registered printer shows as Available in Print Connector App
- Printer brought back online still shows as "Stopped" in Azure Portal and "Attention Required" on clients
Discover and Install printer on Client
- User is unable to discover any Universal Print printer
- User is unable to discover a specific Universal Print printer
- Printer options are not available or selected printer options are not reflected in printed output
- Verifying that a PC is connected to Microsoft Entra ID
- Printer shows as Offline on the user PC
- Printer status error on user PC or Azure Portal
- Printer not installed via Endpoint Manager (MEM)
- User is prompted with credential dialog when discovering printers
Users are unable to access Universal Print
If users are having issues accessing Universal Print even though you have one of the eligible licenses, make sure at least one of them contains the Universal Print Service plan. To check whether a product license provides Universal Print access:
- Navigate to Microsoft Entra ID > Licenses > All products in Azure Portal
- Select a product in the list
- Navigate to "Service plan details" in the left navigation menu
- Check whether Universal Print is in the Service plan list
- If the Universal Print Service Plan is included with one or more of your product licenses, ensure that the appropriate licenses are assigned to users who need Universal Print access
Admin is unable to access Universal Print on the Azure Portal
If you receive a '403' error accessing the Universal Print portal, check the following:
- Verify that the Admin's user account is assigned the Global Administrator or the Printer Administrator role in Microsoft Entra ID.
- Verify that the Admin's user account is assigned a license that contains a Universal Print license. See Universal Print license assignment for details. For M365 customers, Universal Print is part of the Windows 10 Enterprise license.
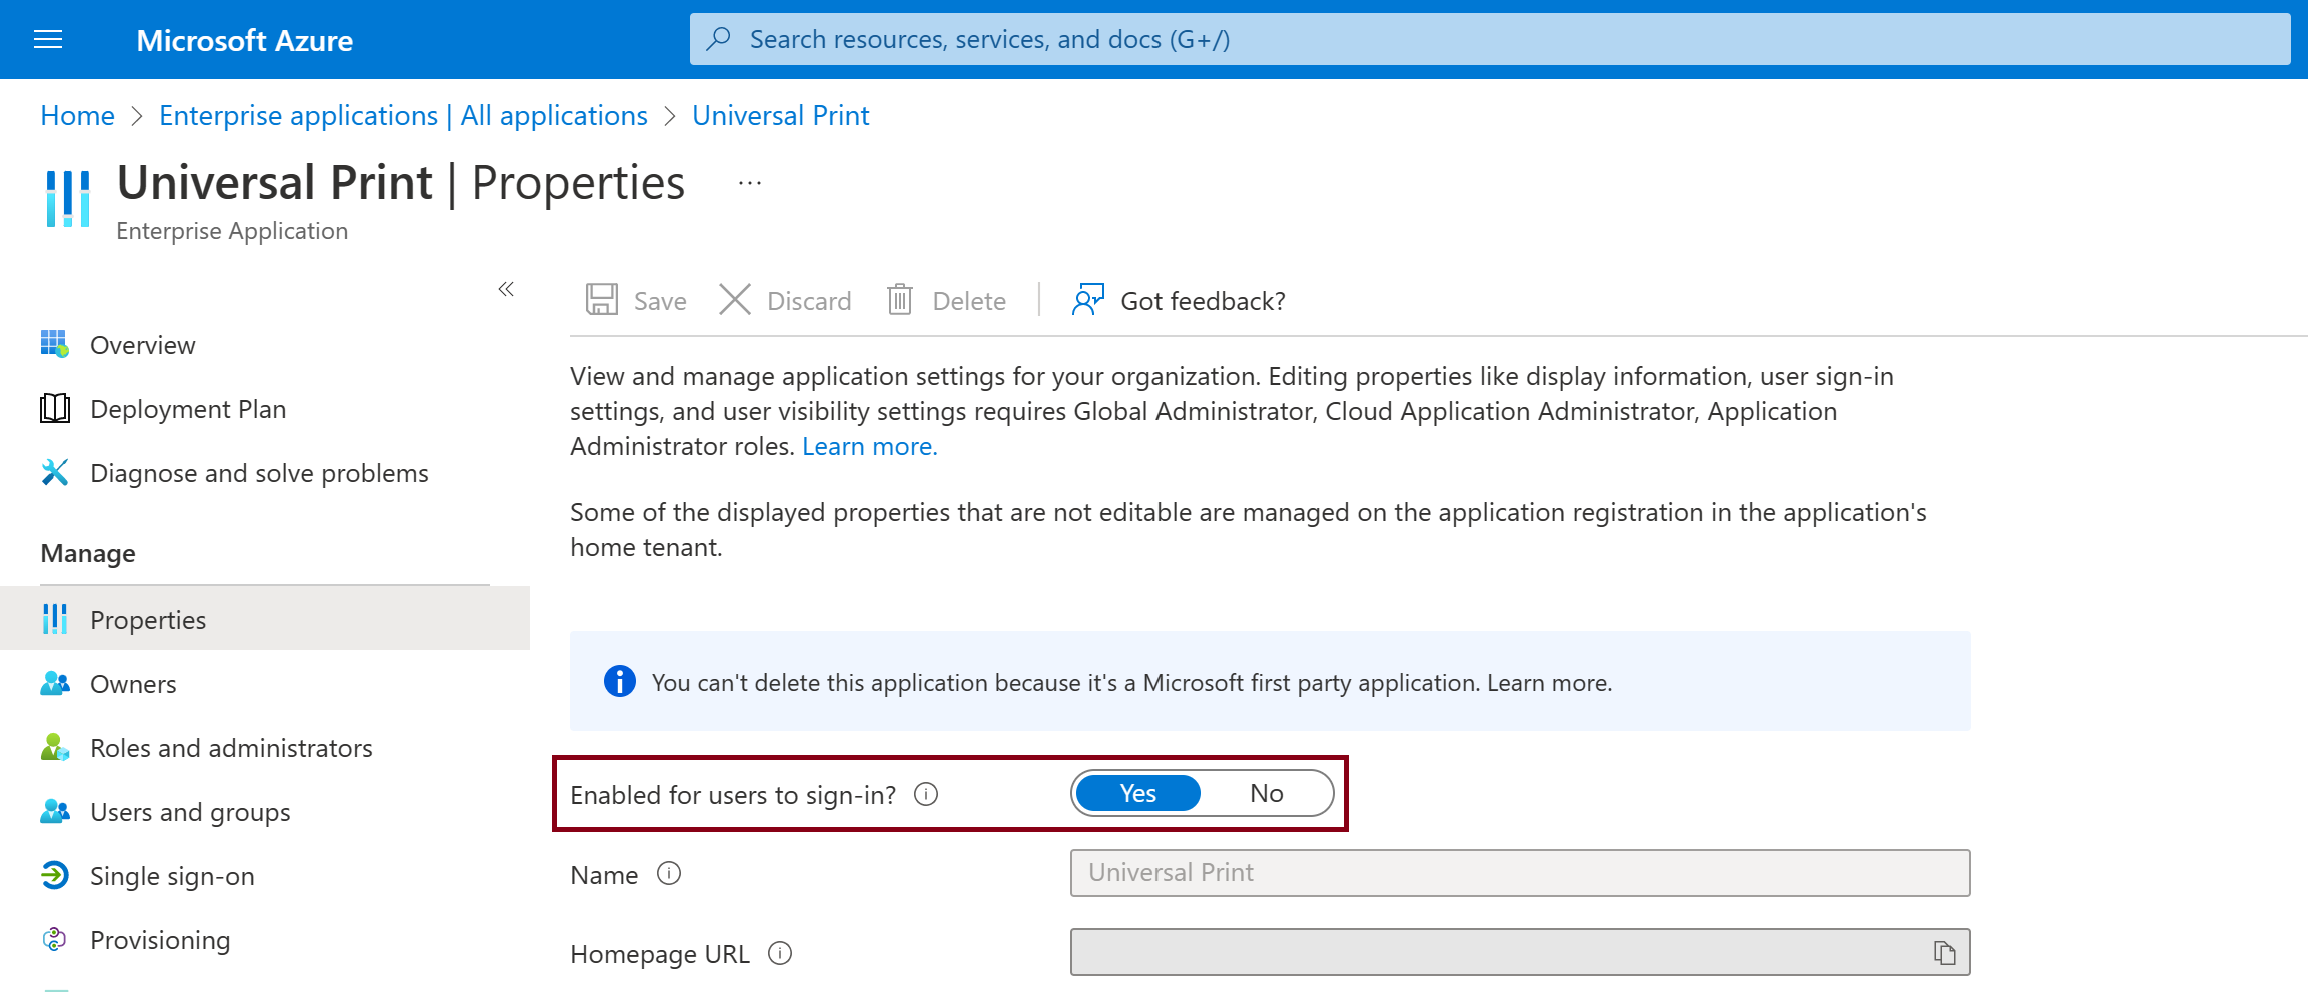
- Verify that the Universal Print app is enabled in your environment:
- Navigate to Enterprise Applications > All applications in Azure Portal
- Remove all search filters and type "Universal Print"
- Click the "Universal Print" row in the search results
- Click the "Properties" menu item and ensure "Enabled for users to sign-in?" is set to "Yes":
If you receive a '500', '503' or '504' error, check to see that you are not experiencing any network issues accessing the Azure portal. Check here for any notifications of an outage. If you are still seeing the issue, open a Support case via the Azure Support portal.
Configuring and registering printers
A printer on the connector does not show up in the connector app
Only printers that are local to the PC running the Connector will be visible to be registered. Printers that are installed as network Point and Print printers or use a PORTPROMPT: port will be bypassed during enumeration.
Verify that the physical print device is installed locally on the connector PC and is not a printer shared from another PC including a print server.
Check the print connector event log for events indicating why a specific printer was skipped and not made available to register. The event will have the text "Skipping printer" along with the printer name and reason it was skipped.
Admin is unable to register a printer
For Universal Print Native printers:
- Verify that you are using an account that has Global Administrator rights if this is the first printer being registered. Most IHVs have an app that is installed into Azure that assists the printers with registering as Microsoft Entra ID-joined devices. Installing the app will require the Global Administrator role. Subsequent printers will be able to be registered using the Print Administrator or Print Technician roles.
- Verify that the printer can access the Internet and is not blocked by firewall or proxy settings.
- Check to see if the printer has been previously registered, and is still seen as Registered in the Universal Print portal or under Microsoft Entra ID Devices.
- If you are still unable to register a printer that supports Universal Print natively, contact the printer IHV for assistance.
For Printers using Microsoft's Universal Print Connector
- Verify that you are not trying to register a printer queue for a physical print device that has already been registered.
- Check the print connector event log for Printer Registration Failure events (event ID 8) for the reason why the printer registration failed.
- Go through the connector troubleshooting checklist.
- Verify that user account is assigned a Universal Print license and one of the administrator roles - Global Administrator, Print Administrator, or Print Technician. See Universal Print license assignment.
- Verify that the Connector PC can access the Internet and is not blocked by firewall or proxy settings.
- Verify that the connector PC can access Microsoft Entra ID. See steps below.
For Printers using a Third Party Connector
- Verify that the printer is not listed as Registered in Universal Print or Microsoft Entra ID Devices.
- Check with the ISV for the Connector for additional support.
Troubleshooting 3rd party solutions
Please do the following before contacting Microsoft support:
- Please contact the solution provider regarding their solution's support for Universal Print. Some solution providers have updated versions of their offerings that support Universal Print.
- Please let the Universal Print team know about this so we could investigate why the 3rd party functionality doesn't work with Universal Print. You can do so by posting in the "Discussions" section at https://aka.ms/UPCommunity.
Registered printer shows as Available in Print Connector App
If the printer is deleted from Microsoft Entra ID Devices, it will be unregistered on the Connector. However, it will still show as "Registered" in the Universal Print portal. If you look in the Print Connector Event log, you will see errors for the printer:
- Printer <printerid> has been deregistered from cloud. Deleting local data.
- Got DeregisteredDeviceException for printer <printerid>.
- Token request failed for printer <printerid>: System.Net.WebException: The remote server returned an error: (400) Bad Request.
Attempts to re-register the printer fail with "device already exists" error in the Print Connector Event log.
To address this issue, you will need to unshare and unregister the printer in the Universal Print portal, and then re-register the printer from the Print Connector App.
If you wish to retain the Universal Print share endpoint, use the steps here to retain the printer share endpoint.
Printer brought back online still shows as "Stopped" in Azure Portal and "Attention Required" on clients
Printers sometimes need to be taken offline for maintenance, and when they are brought back online they may still show as Stopped in the Azure Portal, and as Attention Required on users' devices. To resolve this:
- Open the printer's queue on the Connector host machine by selecting the printer in the "Printers & scanners" page of the Windows "Settings" app, then click "Open queue".
- Go to the "Printer" menu, toggle the "Pause Printing" option on, and then toggle it off again (you many also need to click the "Open As Administrator" option first). This will cause the Connector to recognize that the printer is online again and it will update the Portal and users' devices.
Discover and Install printer on Client
User is unable to discover any Universal Print printer
When the user clicks "Add a printer or scanner" in the "Devices" section in the Windows "Settings" app, no Universal Print printers are discovered.
Verify that the user's PC is connected to Microsoft Entra ID. See steps below.
Verify that the user has been assigned a Universal Print license: See Universal Print license assignment.
Verify that the user is not still part of a Hybrid Cloud Print (HCP) deployment:
Check for and delete the following registry key:
Computer\HKEY_LOCAL_MACHINE\SOFTWARE\Microsoft\PolicyManager\current\<SID>\EnterpriseCloudPrint
Important
If this key was set using a policy (e.g. using Microsoft Endpoint Manager), it will be recreated automatically the next time the policy is applied.
Verify that the user does not have multiple Work Accounts configured:
- In the Windows "Settings" app, click on "Accounts" > "Access work or school".
- If the PC is joined to Microsoft Entra ID, remove all additional Work and School accounts.
- If the PC is not joined to Microsoft Entra ID and there's more than 1 account, remove all except the account for the organization that has the printer the user is trying to discover.
Verify that the user has access to the printer share:
- Launch the Universal Print admin portal and login as Print administrator.
- Navigate to "Printer shares" under Manage.
- Click on any printer to which the user should have access.
- In the left-hand pane, click on Manage and then "Access Control".
- Verify the configuration to ensure that the user has access to printer share. If not, ensure that the user is added by clicking the "Add" button.
Verify that the user can access the Microsoft Graph:
- Check if access to the Internet in general, and *.print.microsoft.com specifically, are blocked by network firewall settings, or if a winhttp proxy is required. Use the netsh winhttp set proxy ipaddress:port command to configure the proxy settings on the client.
- Using Fiddler on the user's PC (see running a Fiddler trace ), verify that there are no errors accessing https://graph.print.microsoft.com. The most common error is 403.
- WPAD will show access to the Internet and *.print.microsoft.com in the browser, but Universal Print is not able to use setting deployed with WPAD. That is because WPAD is only used by the Browser
User is unable to discover a specific Universal Print printer
When the user clicks "Add a printer or scanner" in the "Devices" section in the Windows "Settings" app, some Universal Print printers are discovered, but a certain printer is not in that list.
Verify that the user has access to the printer share for that printer:
- Launch the Universal Print admin portal and login as Print administrator.
- Navigate to "Printer shares" under Manage.
- Click on the printer share that the user is trying to discover.
- Verify that the "Printer Share Name" has a value (i.e. the printer is shared).
- In the left-hand pane, click on Manage and then "Access Control".
- Verify the configuration to ensure that the user has access to printer share. If not, ensure that the user is added by clicking the "Add" button.
Verify location settings:
If the printer is still not on the list of discovered printers, that could be because the user has access to more than 10 printers. Windows shows only the first 10 printers reported by Universal Print. The first 10 printers are picked based on the proximity of the printer to the user. If the printer’s location properties are not set, or if the Windows location service on the user's PC is disabled, then the printer might not be automatically discovered for the user.
Please see Manage printer location settings to learn more about Universal Print printer location configuration.
Please see How to control location settings to learn more about configuring Windows 10 location service.
Search for the printer manually:
After the given printer is not discovered in the automatic search, go to Search by location or keywords to narrow results or Search Universal Print for printers (depending on your version of Windows, one of these 2 links will be there) and search for the desired printer manually. You could also click the Select a search location link on that page and browse the organization's building hierarchy for the desired printer’s location.
Printer options are not available or selected printer options are not reflected in printed output
Verify that the printer options were set for the printer on the connector PC.
Delete and re-install the printer on the user's PC in case the printer installation did not download the settings when the printer was installed.
See "Diagnosing missing printer options" to determine if some options were dropped because they are not supported by Universal Print.
Check for the latest driver available from your printer's manufacturer. If there are multiple drivers available for your printer model, we recommend using the following in order of preference:
- Manufacturer's Universal or Global printer driver
- Model-specific V4 printer driver
- Model-specific V3 printer driver
- Model-specific printer driver (no V4 or V3 specified) Change to this driver on the connector PC by following the steps at "How to change the printer's driver on Universal Print connector?".
Verifying that a PC is connected to Microsoft Entra ID
Run
dsregcmd /status /verbose /debugand verify that one of the following configurations are true:Device State - AzureAdJoined : YES
and
SSO State - AzureAdPrt : YESor
User State - WorkplaceJoined : YES
Printer shows as Offline on the user PC
Verify that the printer is online on connector PC:
- Print a test page to the printer from the connector PC.
Go through the connector troubleshooting checklist.
Printer not installed via Microsoft Endpoint Manager (MEM)
Check the troubleshooting section of the Endpoint Management / Intune provisioning tool page.
User is prompted with credential dialog when discovering printers
Windows pops up a user credential dialog prompt after clicking on the "Add a printer or scanner" button to search for printers. After entering user credentials, it errors out with error message
Request Id: <GUID> Correlation Id: <GUID> Timestamp: <Date and Time> Message: AADSTS50020: User account '<account>' from identity provider 'live.com' does not exist in tenant 'Microsoft Services' and cannot access the application '<GUID>'(Universal Print Native Client) in that tenant. The account needs to be added as an external user in the tenant first. Sign out and sign in again with a different Microsoft Entra ID user account.
Verify the user credentials entered is an account in the Microsoft Entra ID tenant which is using Universal Print.
Print Jobs
A print job does not complete successfully
Verify that the user PC sent the print job to Universal Print:
Open the printer queue on the user PC and check if the job is still in the queue with one of the status Sending to Printer or Error-Sending to printer.
If the user PC is unable to send the job Universal Print, this could be cause by a firewall or network security blocking access to *.print.microsoft.com. Verify that there are no errors accessing "print.print.microsoft.com" by running a Fiddler trace on the user's PC.
Verify that the job appears in the printer jobs on the Azure Portal:
- Navigate to Printers in the Azure Portal.
- Click on the target printer.
- On the left-hand pane, click "Job", and look for the user's job. Successful jobs show their status as "Completed".
A job status of Stopped, Aborted, or Pending means that the job was not successfully sent to the target printer. Continue with the next steps to troubleshoot issues on the connector and target printer.
Verify that the target printer installed on the connector is a physical print device and not a logical printer that belongs to a 3rd party solution:
If the target printer is a logical printer that is part of a 3rd party solution, please see Troubleshooting 3rd party solutions.
Verify that the target printer is working by printing a test page to that printer from the connector PC.
Verify that there are no print job failures on the connector:
Verify that you have installed the latest printer driver for the target printer on the connector and try the print job again.
Important
To update the printer driver on the connector, follow the steps at "How to change the printer's driver on Universal Print connector?".
Check the print connector event log for job failure errors. Job failure errors have the error code XPS_JOB_FAILED in the event details. You can match the "UP Job Id" from the event details to the "Id" in the printer's "Jobs" section in the Azure Portal.
Verify that the printer name on the connector was not changed:
If the printer driver was updated, the printer name may have changed.
- Rename the printer back to the original name.
- Unregister the old printer and register the new printer.
If "Enable hybrid AD configuration" is set to On in the Print Connector app, check the Print Connector event log for an Event 27 "Failed to impersonate <user> for job <id>" followed by Event 9 "PrintJob failed System.Security.SecurityException: The user name or password is incorrect...". To resolve this error, set "Enable hybrid AD configuration" to Off. Please see Enable Hybrid AD/Microsoft Entra ID Environment on Universal Print for more information.
If a printer is unshared and is later shared again with the same name, users' connections to the printer will be broken. If a printer has been unshared/re-shared, users will need to uninstall and re-install the printer on their Windows device to continue printing.
The print job username is 'System'
This is expected behavior when using the Universal Print connector. The connector runs as the local system account on the PC where it is installed. Therefore, a print job submitted to the Windows print spooler by the connector is submitted by the system account.
Some features of 3rd party print management solutions, that don't yet have support for Universal Print, rely on the username of the user who submitted the print job to be reported to the Windows print spooler. These features are intended for Windows Print Server. They don't work as-is with Universal Print.
If you have such a 3rd party solution, please see Troubleshooting 3rd party solutions.
Additionally, if your environment meets the pre-requisites, you can enable support for Hybrid AD/Microsoft Entra ID configuration in the Universal Print connector. This will cause the connector to impersonate AD domain identity of the user who submitted the print job and, therefore, the print job username will be that user's username.
Printer status error on user PC or Azure Portal
Verify that the printer is healthy by printing a test page to that printer from the connector PC where it is locally installed.
Verify that the connector is healthy by going through the connector troubleshooting checklist.
Verify that the connector is able to send printer status to Universal Print by ensuring that there is no firewall rule or network security policy blocking the connector from communicating with Azure. Check the print connector event log for errors containing the text "Unable to connect to the remote server".
If the printer status in the Azure Portal is not "Ready" click on the printer and see the "Printer Status Reasons" in the printer's "Overview" section.
"Unsupported document format: application/pdf" error
This error means that the target printer does not support receiving print jobs in the PDF format. This usually occurs when an application is using the Graph API to send a PDF print job to the printer.
If the target printer is connected to Universal Print through a Microsoft print connector, you can follow these steps to enable Universal Print to convert the PDF document into the XPS format that is supported by connector-attached printers:
Make sure that Document Conversion is enabled, then verify that conversion is enabled for the target printer:
- Go to the Universal Print portal.
- In the navigation pane, click on Printers.
- In the list of printers, click on the target printer.
- In the navigation pane, click on Printer properties.
- Click on the Printer defaults tab.
- In the Content type dropdown list, verify that both application/pdf and application/xps are listed.
Universal Print Connector service
Admin cannot remove a connector from Universal Print on the Azure Portal
See How to remove a Universal Print connector.
Connector troubleshooting checklist
Verify that the connector prerequisites are met.
Verify that the following Windows services are running:
- Print Connector service (PrintConnectorSvc.exe)
- Spooler (Spoolsv.exe)
Verify that the latest version of the connector is installed:
- Download the latest connector installer.
- Compare the version in the file name to the version on title bar (top-left corner) of the connector app when you run it. The first 3 parts of the version (i.e. 1.3.7) must match.
Confirm that the Connector PC has access to the Internet as outlined here.
Check the print connector event log for errors.
Check the print connector event log
Right-click the Start button and click Run.
Run the following to open the event viewer directly to the connector channel.
eventvwr /c:Microsoft-Windows-PrintConnector/Operational
Events to look for:
Event 22 - Notification that a job is waiting.
Event 25 - Print of job ID started.
Event 10 - Print job sent to Spooler.
Event 26 - AD - Hybrid configuration - Impersonation succeeded.
Event 27 - AD - Hybrid configuration - Impersonation failed. See Troubleshooting AD Hybrid.
Event 9 - Merge Ticket failure. This occurs when there is a mismatch between the options supported by the print driver on the Connector and the IPP Specification as outlined here - Supported Print Options. To view the specifics, follow the troubleshooting steps here. For the known issue regarding merge tickets errors for Brother printers, you can find it here.
Connector service crashing or "wcf endpoint is not listening"
When starting the Print Connector app, you see an error that the wcf endpoint is not listening. You may also see that the Print Connector is crashing on startup. This indicates that there may be a conflict accessing port 8091.
To confirm there is a conflict:
Check to see if the Print Connector service is running. If it is, stop the service.
Open a command prompt and run
netstat -a.Check for Active connection using port 8091. Ex. 0.0.0.0:8091.
If another process is using the port, use the following steps to change the port being used by the Connector.
Identify a port that is not being used. (For this example, we will use port 8095).
In an elevated Powershell window, run the following commands to change the port:
net stop "print connector service"
net stop printconnectorupdatersvc
reg add HKEY_LOCAL_MACHINE\SOFTWARE\Microsoft\UniversalPrint\Connector /v ServicePort /d 8095 /F
net start "print connector service"
net start printconnectorupdatersvc
- To verify port is listening on the new port, open a browser and go to the following URL: http://localhost:8095/WindowsServiceHostedService/PrinterConnectorService.
You should see a web page with a title: ProxyWCF Service
License Management
Universal Print license assignment
From the Microsoft 365 admin center
- Sign in to the "Licenses" section in the Microsoft 365 Admin Center.
- Click on the license that includes Universal Print as outlined here.
- Verify that the user's name is in the list of users assigned a license. If not, assign the user a license by clicking on the "Assign licenses" button.
From the Azure Portal
- Verify that the usage location is set for the user:
- Navigate to "Users | All users".
- Click on the user to whom you want to assign a license.
- In the the user Profile, find the Settings section and ensure that the Usage location property is assigned a value. If it is empty, click Edit, choose a usage location, and then click Save.
- Navigate to the "Licenses | All products" in the Azure Portal.
- Click on the license that includes Universal Print as outlined here.
- Verify that the user's name is in the list of users assigned a Universal Print license. If not, assign the user a license by clicking on the "Assign" button.
Useful troubleshooting tasks
Verifying PC is connected to Microsoft Entra ID
Run
dsregcmd /status /verbose /debugand verify that one of the following configurations are true:Device State - AzureAdJoined : YES
and
SSO State - AzureAdPrt : YESor
User State - WorkplaceJoined : YES
Running a Fiddler trace
Download and open Fiddler.
Verify that Fiddler isn't capturing traffic. Select File and make sure Capture Traffic isn't checked.
Select WinConfig button, then select Exempt All, and then select Save Changes.
Select Tools, and then select Options.
Select the HTTPS tab.
Select Decrypt HTTPS traffic and select yes for the certification prompts.
Open elevated command prompt and run the following command:
netsh winhttp set proxy 127.0.0.1:8888Enable capturing traffic. Select File, then select Capture Traffic.
Close the application used to print and then reopen it. (This is necessary to clear caches.)
Reproduce the problem.
Save and review the trace file.
Once you have finished with Fiddler, open elevated command prompt and do the following command:
netsh winhttp reset proxy
Running a Browser Trace
Investigating any Portal issue, it is probably a good idea to capture:
- Name and version of the web browser.
- Web logs (from the browser) for the page that reported the issue.
To collect web logs, we recommend using the web browsers' developer tools. Dev tools can be found under "More Tools" in the browser menu or using a short-cut Ctrl+Shift+I or F12.
Here are the steps to collect the log:
- Launch the browser and open dev tools (using Ctrl+Shift+I or F12).
- In developer tools, click on "Network" tab.
- If issue is across multiple pages, click on the "Preserve log" checkbox.
- Open or refresh the web page which was having issue. You can also reproduce the portal operation at this point (e.g. sharing a printer).
- Once the page has loaded and you can notice the problem, click on "Export HAR file".
- Save the file locally on your device.
Re-register a printer while retaining the printer share endpoint
- On the Connector system, create a new Dummy printer.
- Create "test" folder in the C:\ drive.
- Control Panel – Devices and Printers.
- Add Printer.
- Click "The printer I want isn't listed".
- Select "Add a local printer or network printer with manual settings." Click Next.
- Select "Create a new port:".
- Type of port: "Local Port".
- Click Next.
- Enter a port name: "C:\test\dummyprint.prn".
- Click OK.
- Select a driver (this printer won't be used, so any driver will work). Click Next.
- Printer Name: "Dummy Printer". Click Next.
- Select "Do not share this printer". Click Next.
- Click Finish.
- Open the Print queue for the "Dummy Printer" and set it to "Paused". (This will prevent jobs that are sent to the printer from being printed until we have completed the operation. Note that the first job pending in the portal for the printer may be lost and need to be re-sent.)
- Open Print Connector App and register the new "Dummy Printer" with Universal Print.
- Go to the Universal Print Portal.
- Go to the Printer Shares blade.
- Go to the Printer Share for the printer that needs to be re-registered.
- Click "Swap printer".
- The new "Dummy Printer" should be listed as an option. Select the "Dummy Printer" and click "Swap".
- Go back to the Printer's properties in the Portal and select "Unregister".
- On the Connector, open the Print Connector App and select the printer from the "Available" list and register the printer.
- Once it is registered, go back to the Printer Share in the Universal Print portal and select "Swap printer". Select the newly re-registered printer and click "Swap".
The print share should now be pointed to the newly re-registered printer.
Use PrintCollect, Fiddler, and UPPrinterInstaller
You can use Fiddler tracing, the Print-Collect script, and UPPrinterInstaller.exe to resync the installation of the universal printer. You can review these logs for possible issues. You can also work with the Microsoft support team to review and analyze these logs.
To use these tools, you need:
Windows PowerShell app
The Printer Shared ID
The OMA DM Account ID
This ID is the account ID of the user that's installing the printer. This ID authenticates the user and allows them to access the printer. To get the ID, you have the following options:
- Option 1: Open the Task Scheduler app, expand Task Sheduler Library > Microsoft > Windows > EnterpriseMgmt. Typically, the ID is the first GUID listed, something like
8A917C42-BE97-49EA-AD77-6EF9FE143E0. - Option 2: Download the SyncMLViewer tool (opens a GitHub repo).
- Option 1: Open the Task Scheduler app, expand Task Sheduler Library > Microsoft > Windows > EnterpriseMgmt. Typically, the ID is the first GUID listed, something like
The Correlation ID
This ID is a unique identifier that tracks the installation of a printer driver. It helps troubleshoot any errors that can occur during the installation. To get the ID:
- Open the Event Viewer app, expand Windows Logs, and select Application.
- In the list, look for the
UPPrinterInstaller.exeentry. TheCorrelationIDis shown in the Details tab.
You can also use the Find action, and search for
UPPrinterInstaller.
Tracing steps
On the client device, install Fiddler. For the specific steps, go to Running a Fiddler trace (in this article).
Download Print-Collect and extract the files. Open the Windows PowerShell app as administrator, and run
Print-Collect.ps1with your parameters. For example, you can enter:.\Print-Collect.ps1 -Trace [-RPC] [-Network] [-ProcMon] [-PSR] -Logs [-NoDumps]For a description of these parameters and other parameters you can enter, open the
Print-Collect.ps1file in a text editor.Start the Fiddler trace.
Open another command prompt as administrator, go to the
System32directory, which is typicallyC:\windows\system32. Enter syntax similar to the following. The GUIDs are specific to your universal printer and environment. Be sure to replace the sample GUIDs with your values.UPPrinterInstaller.exe -install -printersharedid E7CBB880-A194-450A-ACC7-86AEE809B971 -omadmaccountid 8A917C42-BE97-49EA-AD77-6EF9FE143E04 -correlationid 8A7E7CDE-D0EE-4C45-86FB-3570C3D5F81F")