Note
Access to this page requires authorization. You can try signing in or changing directories.
Access to this page requires authorization. You can try changing directories.
Overview
This guide describes how ISV/OEM partners with cloud-based pull print solutions can integrate with Universal Print Anywhere — Microsoft's pull print platform built on Universal Print.
Leveraging Existing Specifications
This guide does not introduce any new specification. It describes how partners can combine the following existing specifications to integrate their cloud pull print solutions with Universal Print Anywhere:
- Mopria Cloud Specification v1.1, Section 5.1.2 — Cloud Topography (for cloud to cloud communication)
- Mopria Cloud Specification v1.2, Section 5.1.6 — Secure Release
- Microsoft's IPP-Infra extension for Universal Print Anywhere OEM Badge Release Integration
Why Integrate with Universal Print Anywhere?
The Scale Challenge with Standard Print Queues
Many partner pull print solutions today integrate with Universal Print by registering a single virtual print queue as a standard printer. All users in the customer's tenant submit their print jobs to this one shared queue, and the partner cloud solution then downloads those jobs and manages the pull print release workflow independently.
This single virtual queue model runs into the per-printer limits that apply to every standard print queue in Universal Print. Standard queues are designed for a moderate number of jobs distributed across many individual printers — not for the high-concentration workload of a pull print deployment where every user in a tenant submits to one endpoint. As a result, a single virtual queue quickly becomes a bottleneck: job submissions get throttled, concurrent job slots are exhausted, and end users see slow or failed prints once the deployment grows beyond a small workforce.
For the specific per-printer thresholds (jobs per 10 minutes, concurrent jobs, bandwidth, etc.) that constrain a single virtual queue, see Universal Print service limits.
How Universal Print Anywhere Solves This
Universal Print Anywhere is purpose-built for pull print scenarios and is designed precisely to remove the single virtual queue bottleneck described above. Even though, from the end user's perspective, jobs still flow through what looks like one pull print printer, the underlying Anywhere infrastructure is architected to absorb the high, concentrated job volume that results from an entire tenant submitting to a single endpoint — without hitting the per-printer limits that apply to standard print queues.
By integrating with Universal Print Anywhere, partner solutions benefit from:
- Enterprise-scale job handling — the pull print infrastructure is designed to support high job volumes from all users in a tenant submitting to a single pull print printer, without the per-printer throttling that constrains a standard virtual queue
- Built-in secure release — jobs are automatically held until the user releases them at a printer
- Consistent end-user experience — users discover and install the pull print printer like any other Universal Print printer
- Access control — configuring access control is done at the printer share level of the registered pull print printer, which administrators are already familiar with as it is the same for standard printers
Integration Architecture
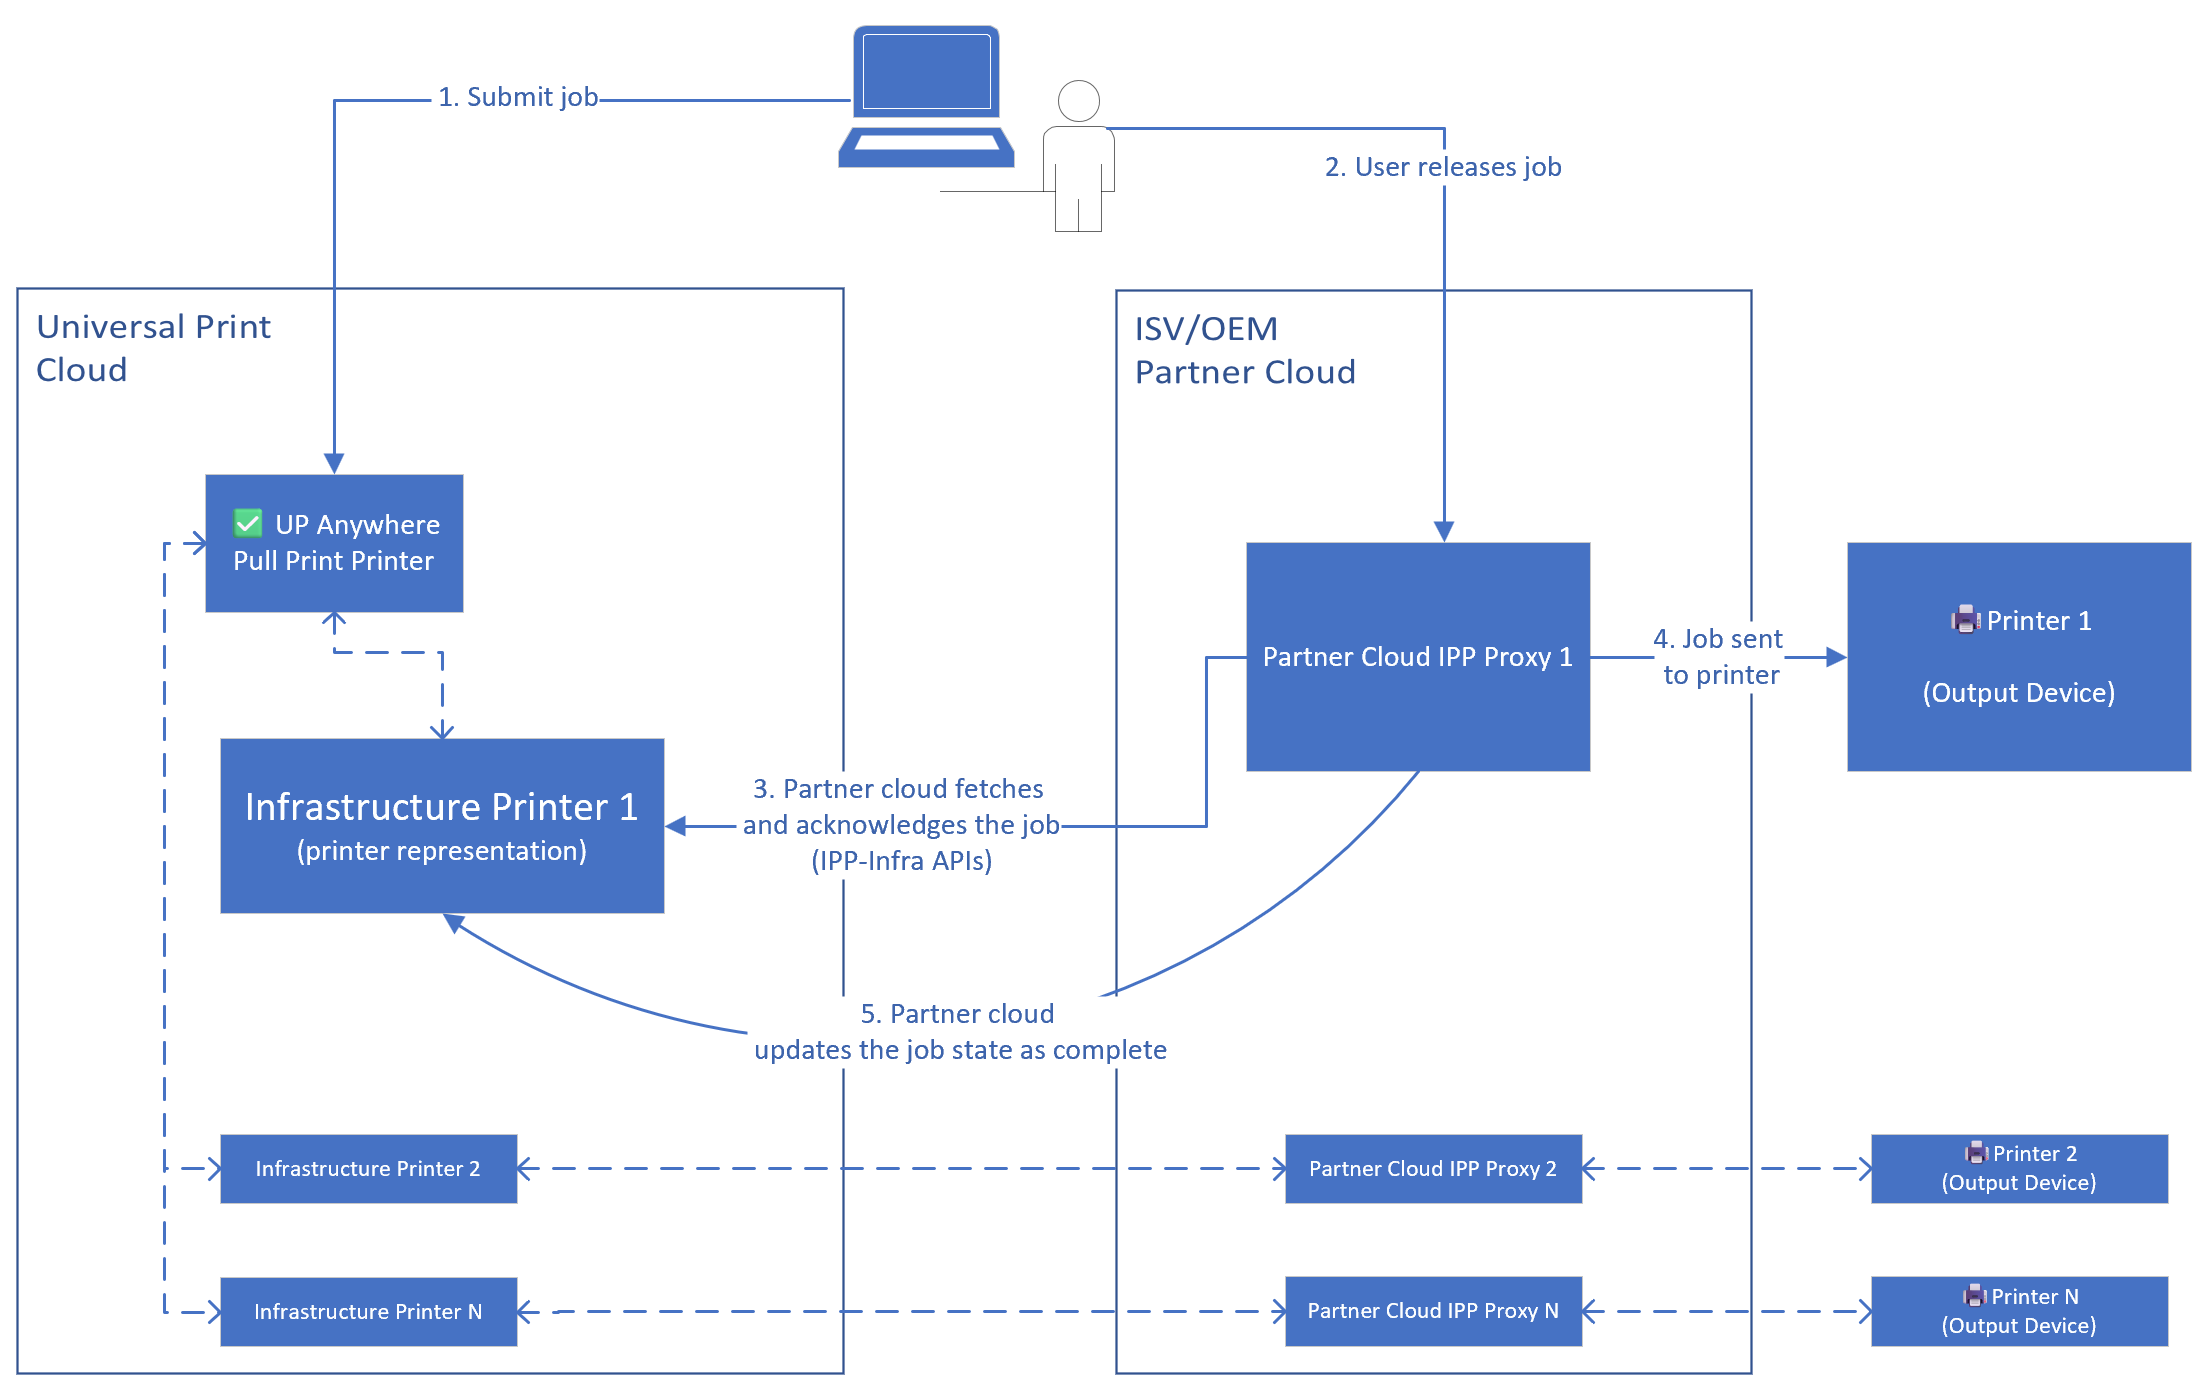
In this model, the partner leverages Universal Print Anywhere for job storage, scale, and release infrastructure:
| Step | Description |
|---|---|
| ① | User submits print job to the Universal Print Anywhere pull print printer. Jobs are held for secure release in Universal Print (no partner cloud notification or download needed). |
| ② | When user badges at a printer, partner cloud maps credential to user UPN. |
| ③ | Partner cloud calls IPP-Infra operations (Get-Jobs, Fetch-Job, Fetch-Document, Acknowledge-Job), with requesting-user-uri, on the printer's infrastructure printer representation registered in Universal Print. The job is released to the infrastructure printer for printing (as part of Acknowledge-Job operation called with requesting-user-uri). |
| ④ | Partner cloud forwards the job to the printer. |
| ⑤ | Partner cloud updates the job state as complete using IPP-Infra API. |
Note: The partner cloud does not need to subscribe for notifications. Instead, when a user authenticates at a printer, the partner cloud calls Universal Print's IPP-Infra APIs to retrieve and release the user's jobs on demand. For Universal Print, partner cloud acts as IPP Proxy on behalf of all the printers.
What You Need to Do
Step 1: Register Printers in Universal Print
Acting as the IPP Proxy, partner cloud registers all printers that participate in your pull print solution in Universal Print. This can be done either using the Universal Print printer registration API or the Microsoft Graph printer registration API.
- Universal Print Printer Registration API: OEM Printer Registration Documentation
- Microsoft Graph Printer Registration API: Graph API - Create Printer
Each registered printer receives a Cloud Device ID and a device certificate used for authentication in subsequent API calls.
Step 2: Create a Pull Print Printer
A Printer Administrator in the customer's tenant creates the pull print printer using the Universal Print admin portal:
- Navigate to the Universal Print admin portal (Azure Portal → Universal Print)
- Select Pull-print printers from the left menu
- Click + Add to create a new pull print printer
- Enter a display name (e.g., "Contoso Pull Print") and configure the location properties
- Configure the Print options — select which document formats, paper sizes, color modes, and other print settings the pull print printer should support
For full details, see Universal Print Anywhere Overview.
Step 3: Add Printers as Members
The Printer Administrator adds the registered printers as members of the pull print printer. This tells Universal Print which printers can participate in the job release workflow.
In the Universal Print admin portal:
- Navigate to Pull-print printers and select the pull print printer created in Step 2
- Select Member Printers from the left menu
- Click + Add and use the search filter to find registered printers
- Select the printers to add as members
Tip: You can toggle the "Add all configured printers to this pull-print printer" option to automatically include all printers in the organization.
For full details, see Managing Universal Print Anywhere Member Printers.
Step 4: Configure the Pull Print Printer Share
The Printer Administrator shares the pull print printer so end users can discover and install it, and configure access control:
In the Universal Print admin portal:
- Navigate to Printer Shares and find the share associated with the pull print printer
- Configure access permissions to control which users or groups can submit jobs
End users discover and install the shared pull print printer using standard Universal Print printer discovery (Windows Settings → Printers & Scanners → Add Printer).
Automating Setup: If you want to minimize manual admin overhead and automate the setup for your customers, PowerShell scripts can be provided to perform Steps 1–4 programmatically using admin consent (admin token). Contact the Universal Print team for details on the available scripts and Graph API endpoints for automation.
Step 5: Implement the Job Release Flow (Badge Release via IPP-Infra)
This is the core integration point. When a user authenticates at a printer (output device) using badge tap, or any other mechanism your solution supports, your cloud solution acts as the IPP proxy of that output device and performs the following IPP-Infra operations using the printer's device token:
5a. Get the User's Jobs
IPP proxy in partner cloud calls Get-Jobs using the printer's cloudDeviceId to retrieve the user's releasable jobs. This returns jobs from associated pull print printers as well as any direct jobs on the printer.
IPP Operation: Get-Jobs
Target Printer: {printerCloudDeviceId}
Authentication: Printer's device token

Key Attributes:
  requesting-user-uri: mailto:{userUPN}     ← UPN of the authenticated user
  my-jobs: true                              ← Only this user's jobs
  which-jobs: fetchable                      ← Only jobs ready for release/printing
The response includes the list of jobs with their attributes (job name, creation time, document format, copies, etc.). Present this list to the user on the printer panel for job selection.
5b. Fetch the Selected Job
For each job the user selects to print, IPP proxy in partner cloud calls Fetch-Job to get the job attributes:
IPP Operation: Fetch-Job
Target Printer: {printerCloudDeviceId}
Authentication: Printer's device token

Key Attributes:
  requesting-user-uri: mailto:{userUPN}
  job-id: {selectedJobId}
This operation returns the job attributes for the selected job.
5c. Download the Document
IPP proxy in partner cloud calls Fetch-Document to download the print-ready document payload:
IPP Operation: Fetch-Document
Target Printer: {printerCloudDeviceId}
Authentication: Printer's device token

Key Attributes:
  requesting-user-uri: mailto:{userUPN}
  job-id: {jobId}
The response contains the document payload (e.g., PDF, PWG-Raster) and document attributes (format, size, etc.). This can be called before the Acknowledge-Job operation if required — for example, to show a print preview on the printer panel before the user agrees to release the job at that printer.
5d. Acknowledge and Release the Job
When the user agrees to release the job at that printer, IPP proxy in partner cloud calls Acknowledge-Job to acknowledge and release the job at that printer:
IPP Operation: Acknowledge-Job
Target Printer: {printerCloudDeviceId}
Authentication: Printer's device token

Key Attributes:
  requesting-user-uri: mailto:{userUPN}
  job-id: {jobId}
5e. Report Job Completion
After the printer finishes printing (or if printing fails), IPP proxy in partner cloud calls Update-Job-Status to report the final job status:
IPP Operation: Update-Job-Status
Target Printer: {printerCloudDeviceId}
Authentication: Printer's device token

Key Attributes:
  job-id: {jobId}
  job-state: completed          ← or "aborted" / "canceled" if printing failed
This updates the job status in Universal Print so users and administrators can see the final outcome.
Detailed Job Release Sequence
The following sequence diagram shows the detailed interaction between the user, partner cloud solution, Universal Print, and the printer during job release:
![]()
Authentication and Authorization
Printer Device Tokens
All IPP-Infra operations in the job release flow are performed using the printer's device token. When a printer is registered in Universal Print, it receives a device certificate that is used to obtain OAuth 2.0 device tokens. You may already be doing this for the virtual print queue currently registered in Universal Print.
Partner cloud solution must:
- Securely store the device certificates for registered printers
- Use the device certificate to obtain a device token when making IPP-Infra calls
- Include the
output-device-uuidattribute in all IPP-Infra operations to identify the printer
User Identity
The requesting-user-uri attribute (format: mailto:<userUPN>) identifies the user whose jobs should be retrieved or released. Partner cloud solution is responsible for mapping the user's authentication credential (badge ID, PIN, etc.) to their Azure AD User Principal Name (UPN).
Admin Permissions
Setup operations (Steps 1–4: printer registration, pull print printer creation, member management, share configuration) require Printer Administrator role permissions in the customer's tenant. These are typically performed during initial deployment by the customer's IT administrator using the Universal Print admin portal.
If you prefer to automate the setup process for your customers, PowerShell scripts and Graph API-based tooling can be provided to perform these steps programmatically. This requires the customer to grant admin consent to your application. Contact the Universal Print team for details on available automation scripts and tooling.
Frequently Asked Questions
Do I need to change my badge/card reader integration?
No. Your existing mechanism for authenticating users at the printer (badge tap, PIN entry, card swipe, etc.) and mapping credentials to user identities remains unchanged. The only change is what happens after you identify the user — instead of retrieving jobs from your own storage, you call Universal Print's IPP-Infra APIs.
Do I still need to subscribe to job notifications?
No. In this model, you don't need to monitor for new jobs or download them proactively. Jobs are stored in Universal Print and retrieved on demand when the user authenticates at a printer. This simplifies your integration and eliminates the need for webhook subscriptions or polling.
What happens if the printer is also used for direct printing?
This works seamlessly. When you call Get-Jobs with requesting-user-uri, the response includes both:
- Jobs from associated pull print printers (held for release)
- Direct jobs sent to the printer
Your solution can present all available jobs to the user.
Can a printer be a member of multiple pull print printers?
Yes. A printer can participate in multiple pull print printers. Get-Jobs returns releasable jobs from all associated pull print printers.
What document formats are supported?
Universal Print Anywhere pull print printers support: PDF, PWG-Raster, PCLm, URF, XPS, and RAW. Administrators can configure which formats are available for each pull print printer.
What if the user has no jobs?
Get-Jobs returns an empty list. Your printer panel UI should handle this gracefully (e.g., "No print jobs available").