Note
Access to this page requires authorization. You can try signing in or changing directories.
Access to this page requires authorization. You can try changing directories.
Note
If you're running Visual Studio 2022, ensure you use version 17.3 or later for this tutorial.
This tutorial shows how to create a basic forms over data application in Visual Studio. The app uses SQL Server LocalDB, the Northwind database, Entity Framework 6 (not Entity Framework Core), and Windows Presentation Foundation (WPF) for .NET Framework (not .NET Core or .NET 5 or later). It shows how to do basic data binding with a master-detail view, and includes a custom BindingNavigator control with buttons that do the following: move to first, move previous, move next, move to last, delete, add, set new order, update, and cancel.
This tutorial focuses on using data tools in Visual Studio, and doesn't attempt to explain the underlying technologies in any depth. It assumes that you have a basic familiarity with Extensible Application Markup Language (XAML), Entity Framework, and SQL. Although the code in this tutorial doesn't demonstrate Model-View-ViewModel (MVVM) architecture, which is standard for WPF applications, you can copy the code with a few modifications into your own MVVM application.
To view the final code for this tutorial, see Visual Studio tutorial samples - EF6.
In this tutorial, you:
- Install and connect to Northwind
- Configure the WPF app project
- Create the ADO.NET entity data model
- Data bind the model to the XAML page
- Adjust the page design and add grids
- Add buttons to navigate, add, update, and delete
- Run the WPF application
Prerequisites
Visual Studio with .NET Desktop Development workload installed, and the Windows Communication Foundation component installed. To install it:
- Open the Visual Studio Installer app, or select Tools > Get Tools and Features from the Visual Studio menu.
- In Visual Studio Installer, choose Modify next to the version of Visual Studio you want to modify.
- Select the Individual components tab, and then choose Windows Communication Foundation under Development activities.
- Select Modify.
SQL Server Express LocalDB. If you don't have SQL Server Express LocalDB, you can install it from the SQL Server download page. Or, you can install it with the Visual Studio Installer app as an individual component.
SQL Server Object Explorer. To install it, install the Data storage and processing workload in the Visual Studio Installer app.
Entity Framework 6 tools. This is usually installed when you install the .NET Dektop Development workload.
Install and connect to Northwind
The following example uses SQL Server Express LocalDB and the Northwind sample database. If the ADO.NET data provider for that product supports Entity Framework, it should work with other SQL database products as well.
Install the Northwind sample database by following these steps:
In Visual Studio, open the SQL Server Object Explorer window from the View menu. Expand the SQL Server node. Right-click your LocalDB instance and select New Query.
A query editor window opens.
Copy the Northwind Transact-SQL (T-SQL) script to your clipboard.
Paste the T-SQL script into the query editor, and then choose Execute.
The T-SQL script query creates the Northwind database and populates it with data.
Add new connections for the Northwind database.
Configure the WPF app project
To configure the WPF app project, follow these steps:
In Visual Studio, create a new C# WPF App (.NET Framework) project.
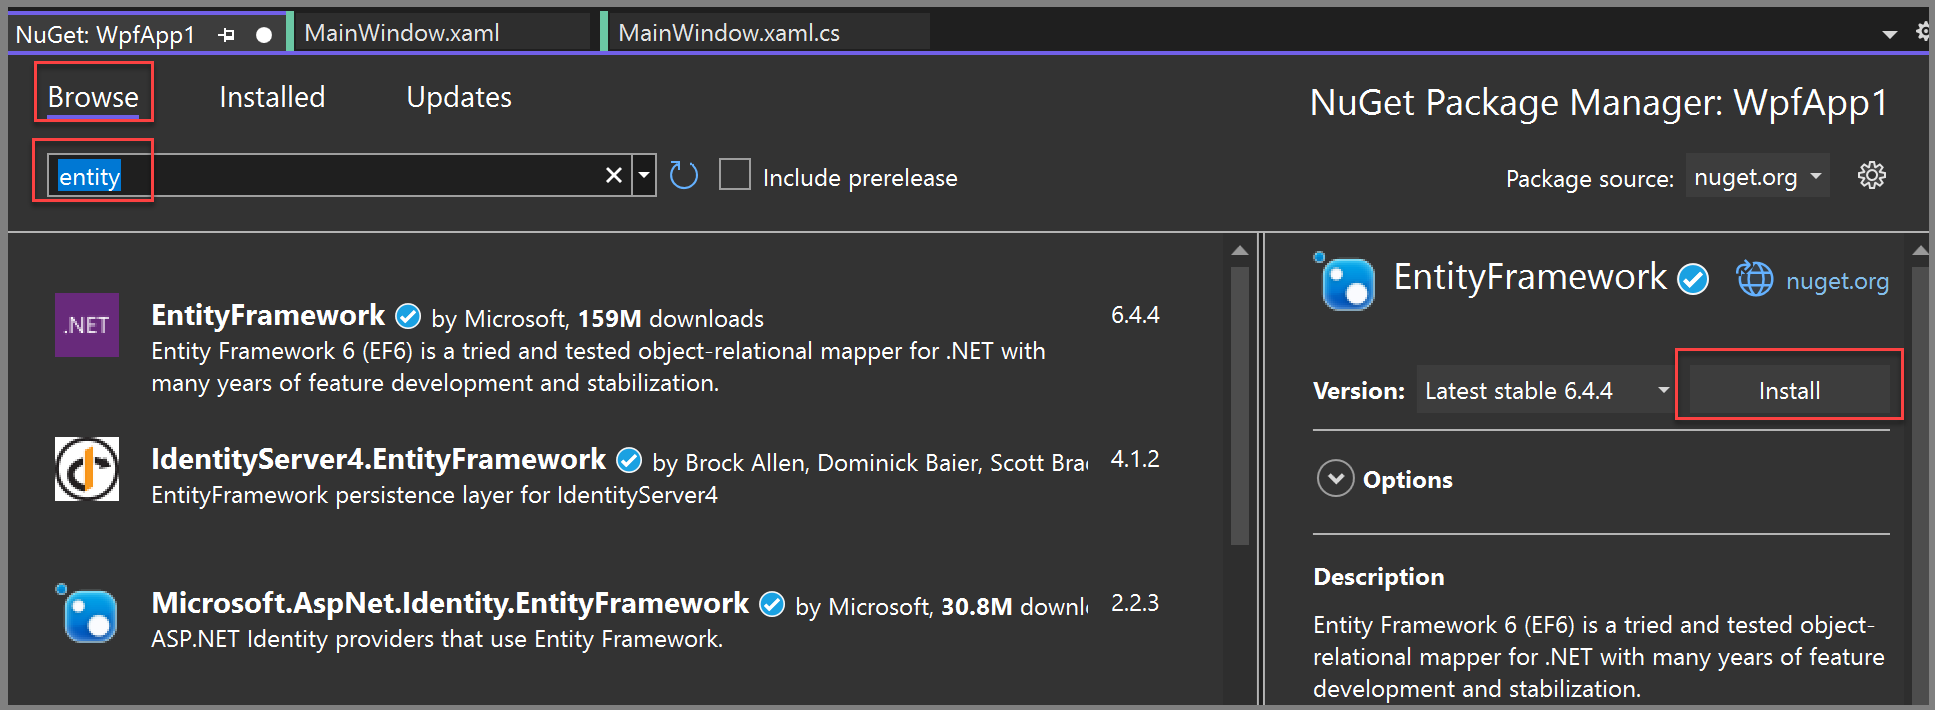
Add the NuGet package for Entity Framework 6. In Solution Explorer, select the project node. In the main menu, choose Project > Manage NuGet Packages.
In the NuGet Package Manager, select the Browse link. Search for and select the EntityFramework package. Select Install in the right pane and follow the prompts.
The Output window displays the progress and notifies you when the install is complete.
You can now use Visual Studio to create a model based on the Northwind database.
Create the ADO.NET entity data model
To create the ADO.NET entity data model, follow these steps:
Right-click the WPF App project node in Solution Explorer and choose Add > New Item. In the left pane, under the C# node, choose Data and in the middle pane, choose ADO.NET Entity Data Model.
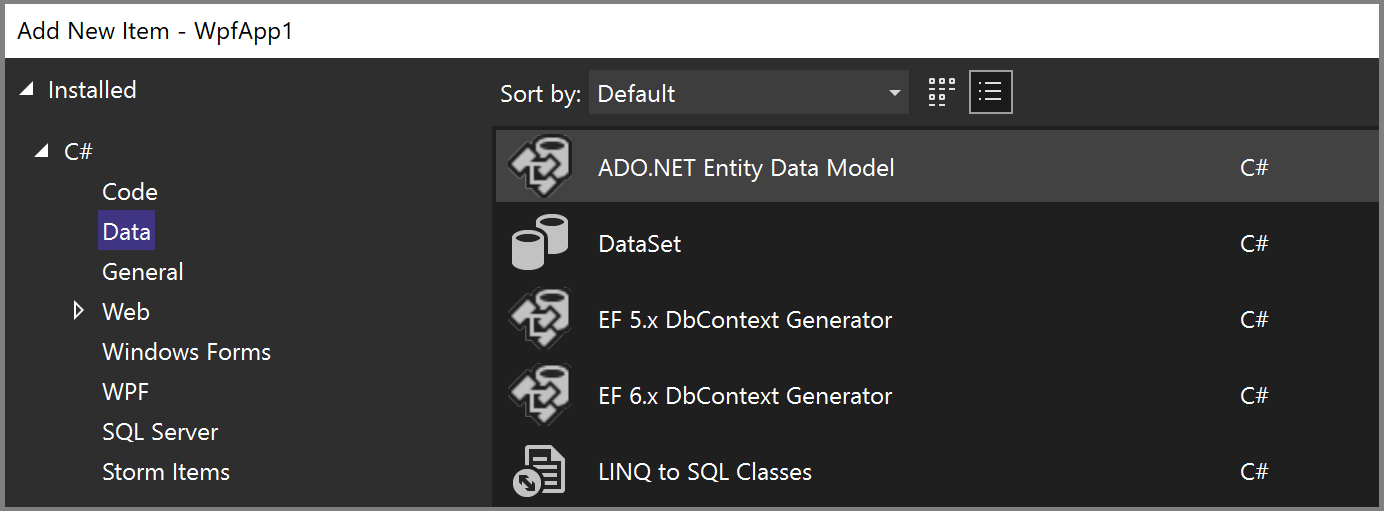
Enter Northwind_model for the Name, and then choose Add.
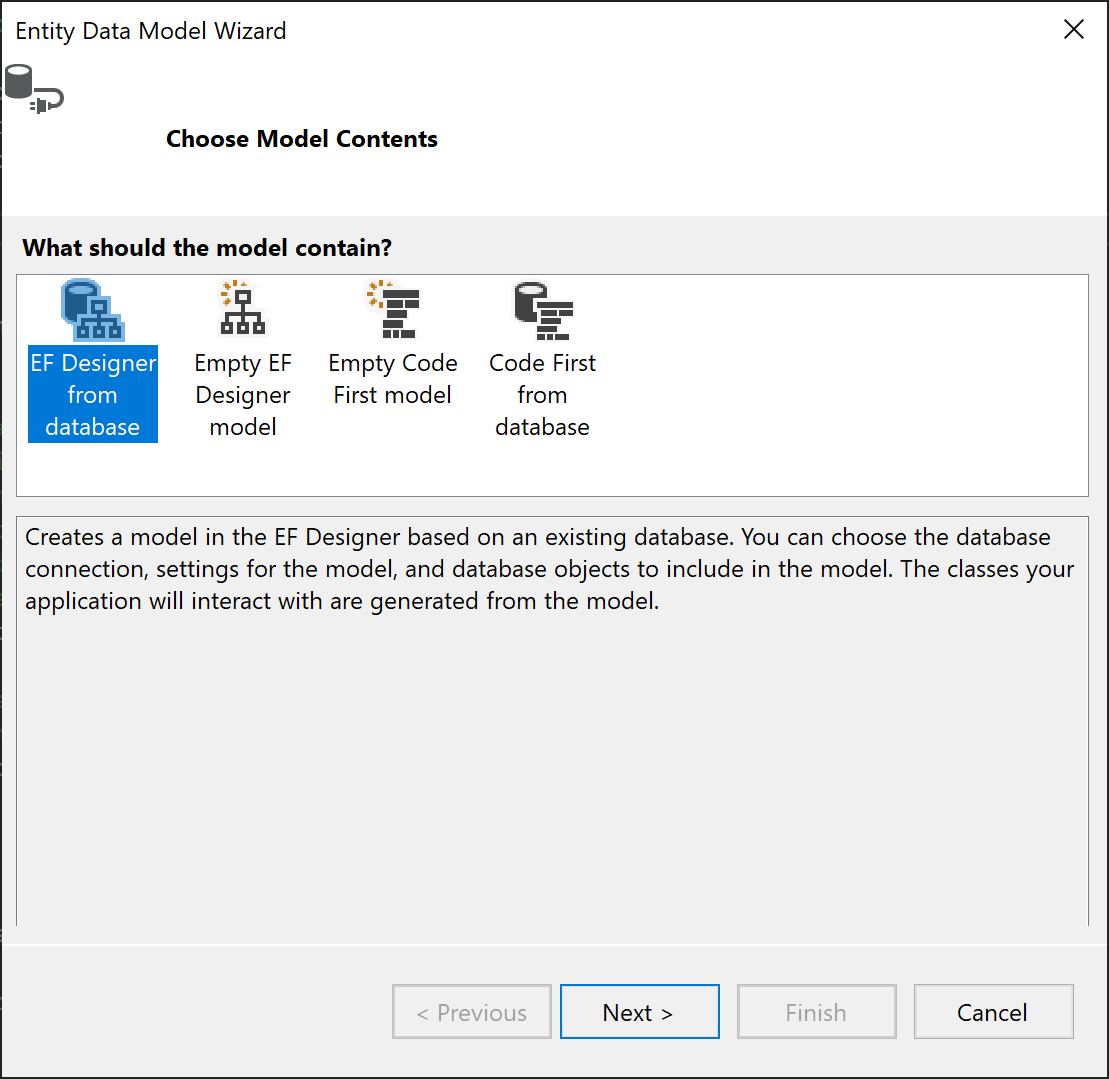
In the Entity Data Model Wizard, choose EF Designer from database, and then select Next.
In Choose Your Data Connection, select your LocalDB Northwind connection (for example, (localdb)\MSSQLLocalDB), and then select Next.
If you don't see a connection:
Choose New Connection. If Microsoft SQL Server isn't selected as the Data source in the Connection Properties dialog, select Change. In the Choose Data Source dialog, choose Microsoft SQL Server, and then select OK.
In the Connection Properties dialog, enter (localdb)\MSSQLLocalDB as the Server name.
For Select or enter a database name, select Northwind, and then select OK.
In Choose Your Data Connection, select your LocalDB Northwind connection, and select Next.
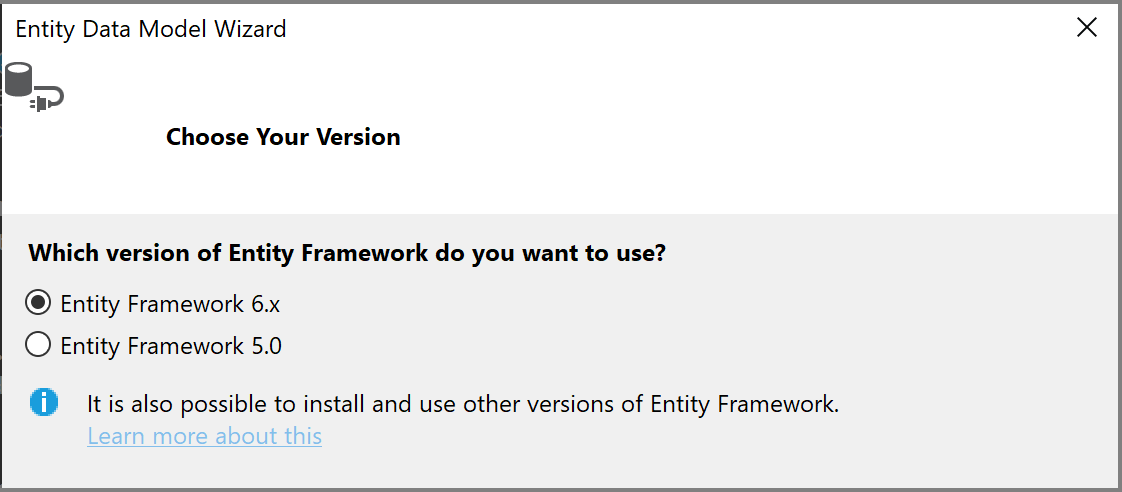
If prompted, choose the version of Entity Framework you're using, and then select Next.
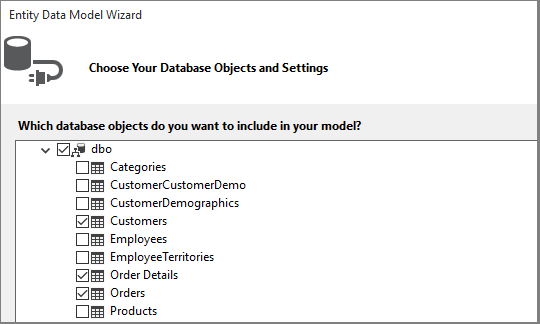
In the next page of the wizard, choose which tables, stored procedures, and other database objects to include in the Entity Framework model. Expand the dbo node under the Tables node in the tree view. Select Customers, Order Details, and Orders. Leave the defaults checked and select Finish.
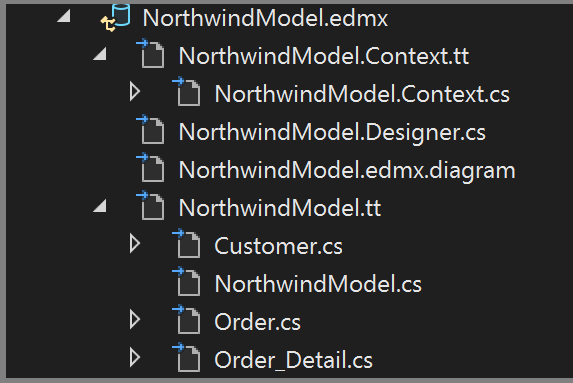
The wizard generates the C# classes that represent the Entity Framework model, and are what Visual Studio data binds to the WPF user interface. It creates the following files in your project:
The
.edmxfile describes the relationships and other metadata that associates the classes with objects in the database.The
.ttfiles are T4 templates that generate the code that operates on the model and saves changes to the database.
These files are visible in Solution Explorer under the Northwind_model node:
The Forms Designer for the
.edmxfile isn't used in this tutorial, but you can use it to modify certain properties and relationships in the model.
The .tt files are general purpose and you must edit one of them to work with WPF data binding, which requires ObservableCollection objects. Follow these steps:
In Solution Explorer, expand the Northwind_model node until you find Northwind_model.tt. Double-click this file and make the following edits:
Replace the two occurrences of ICollection with ObservableCollection<T>.
Replace the first occurrence of HashSet<T> with ObservableCollection<T> near line 51. Don't replace the second occurrence of HashSet.
Replace the only occurrence of System.Collections.Generic (near line 431) with System.Collections.ObjectModel.
Press F5 to build and run the project. When the application first runs, the model classes are visible to the data sources wizard.
Now you're ready to hook up this model to the XAML page so that you can view, navigate, and modify the data.
Data bind the model to the XAML page
Although it's possible to write your own data-binding code, it's easier to let Visual Studio do it for you. To do so, follow these steps:
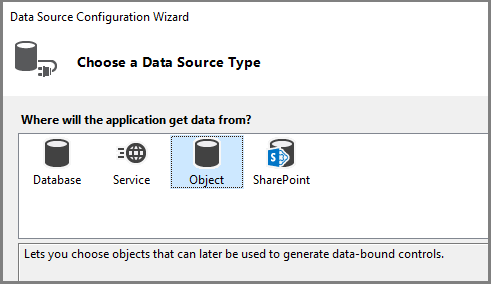
From the main menu, choose Project > Add new data source to display the Data Source Configuration Wizard. Because you're binding to the model classes, not to the database, choose Object. Select Next.
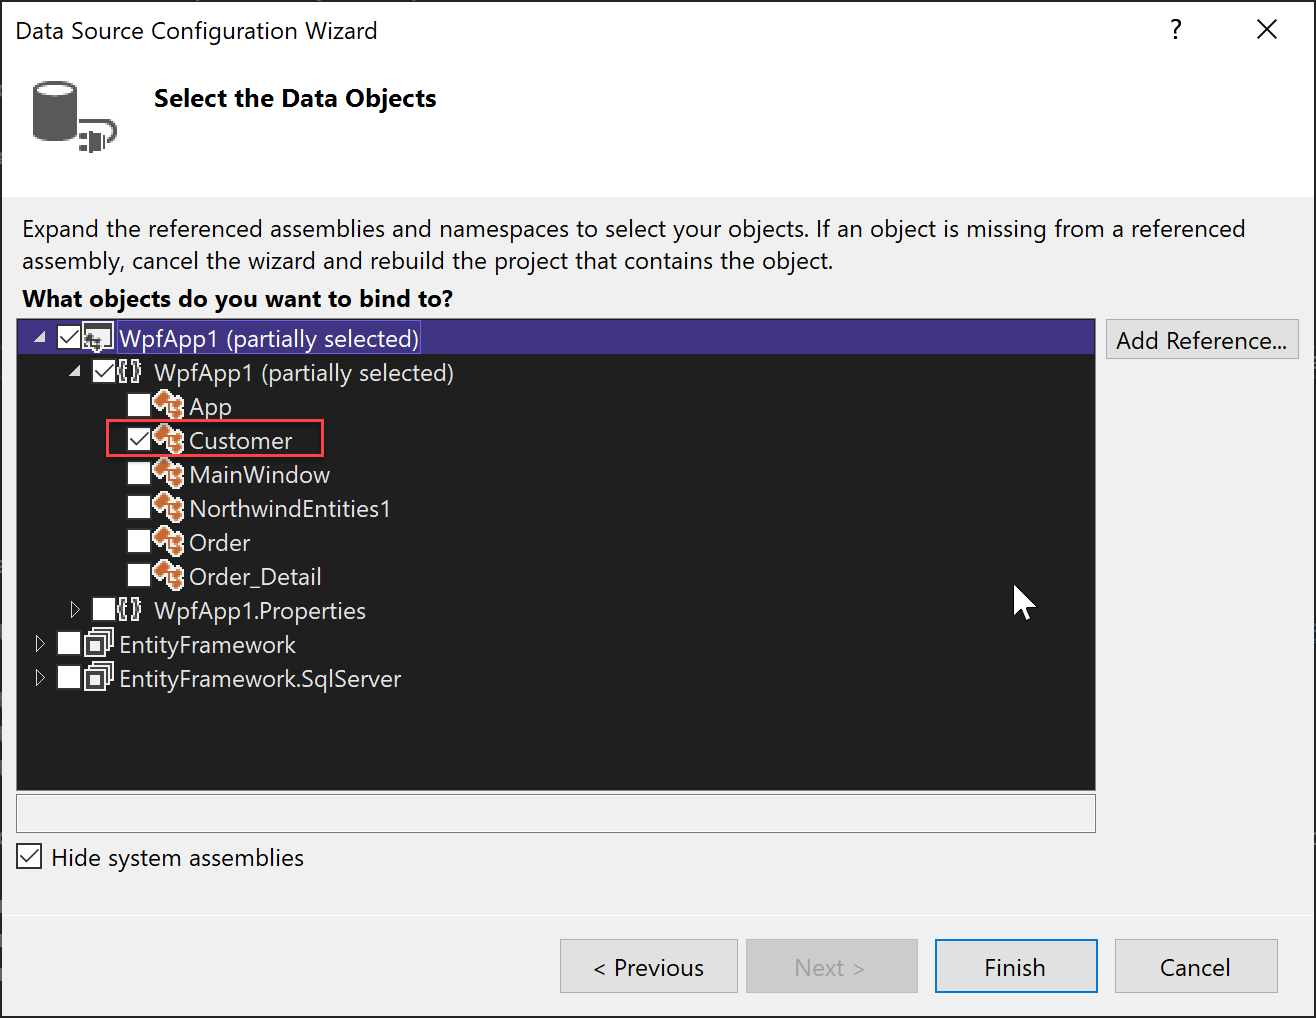
Expand the node for your project, select the Customer object, and then select Finish. The sources for Order objects are automatically generated from the Orders navigation property in Customer.
In Solution Explorer, double-click MainWindow.xaml in your project to edit the XAML. Change the
Titlefrom MainWindow to something more descriptive, and increase itsHeightandWidthto 600 and 800 (you can change these values later, if necessary).Add these three row definitions to the main grid, one row for the navigation buttons, one for the customer's details, and one for the grid that shows their orders:
    <Grid.RowDefinitions>
        <RowDefinition Height="auto"/>
        <RowDefinition Height="auto"/>
        <RowDefinition Height="*"/>
    </Grid.RowDefinitions>
Next, you display each property in the Customers class in its own individual text box. Follow these steps:
In Solution Explorer, double-click MainWindow.xaml to open it in the designer.
The Data Sources tab appears in the left pane of Visual Studio near the Toolbox.
To open the Data Sources window, select the Data Sources tab or choose View > Other Windows > Data Sources from the menu.
In Data Sources, select Customers, and then select Details from the drop-down list.
Drag the node to the middle row of the design area. If you misplace it, you can later specify the row manually in the XAML by selecting
Grid.Row="1".By default, the controls are placed vertically in a grid element, but you can arrange them however you like on the form. For example, you could place the Name text box above the address. The sample application for this tutorial reorders the fields and rearranges them into two columns.
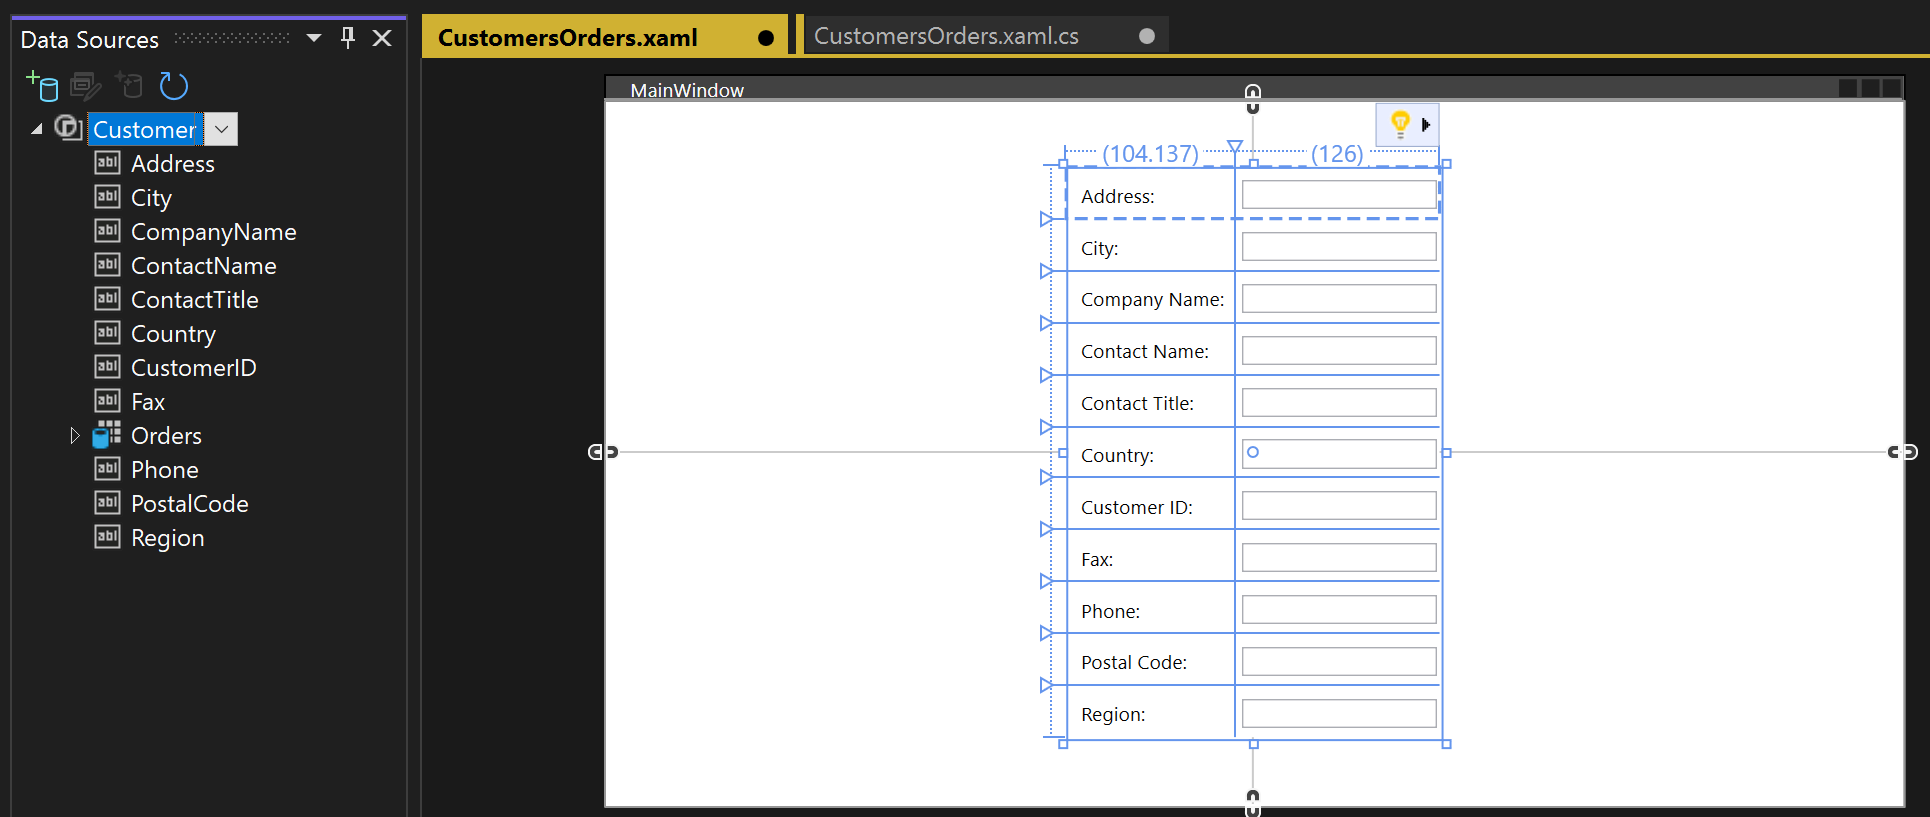
In the XAML view, you can now see a new
Gridelement in row 1 (the middle row) of the parent grid. The parent grid has aDataContextattribute that refers to a CollectionViewSource that belongs to theWindows.Resourceselement. Given that data context, when the first text box binds to Address, that name is mapped to theAddressproperty in the currentCustomerobject inCollectionViewSource.<Grid DataContext="{StaticResource customerViewSource}">Drag the
Orderobject's property of theCustomersclass to the lower half of the form, so that the designer puts it in row 2.When a customer is visible in the top half of the form, you want to see their orders in the bottom half. You show the orders in a single grid view control. For master-detail data binding to work as expected, it's important that you bind to the
Ordersproperty in theCustomersclass, not to the separateOrdersnode.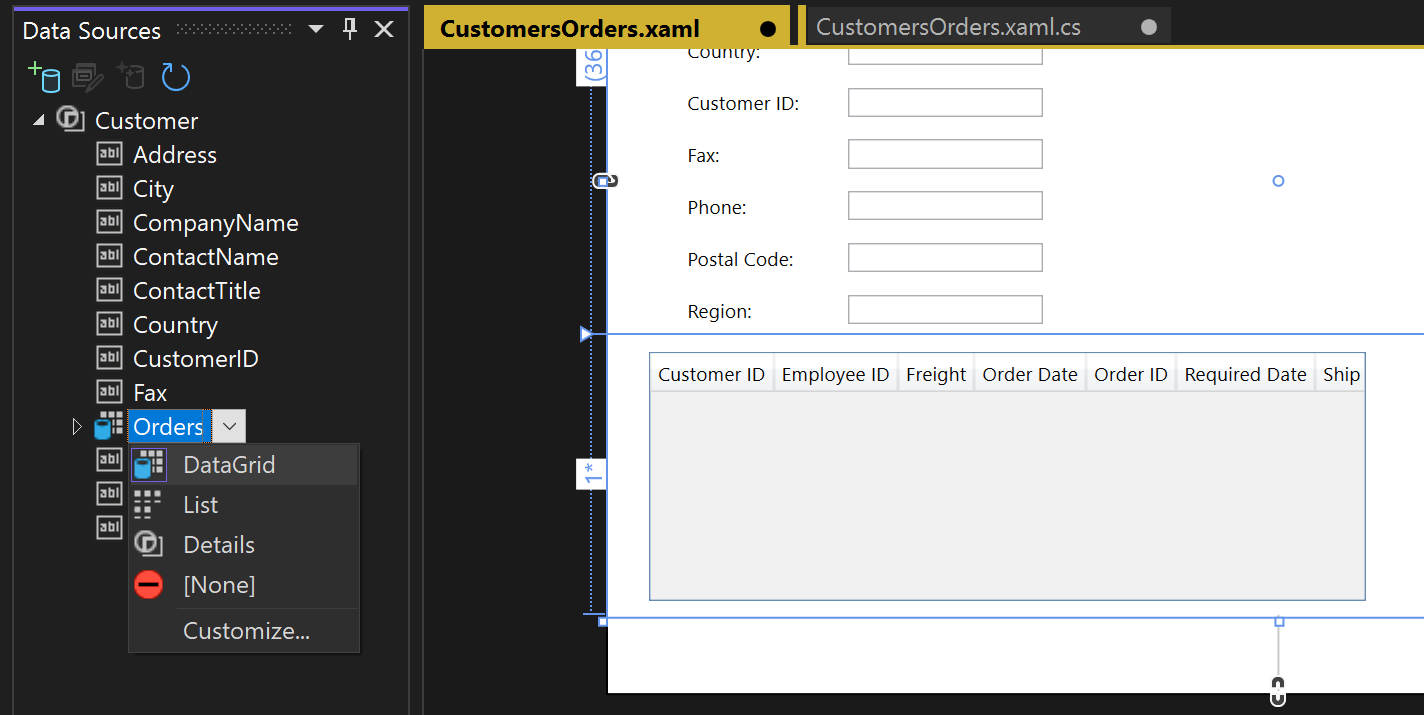
Visual Studio now generates all the binding code that connects the UI controls to events in the model.
To see some data, write code to populate the model. Navigate to
MainWindow.xaml.csand add a data member to theMainWindowclass for the data context.This object, which was generated for you, acts like a control that tracks changes and events in the model.
Add
CollectionViewSourcedata members for customers and orders, and the associated constructor initialization logic to the existing constructorMainWindow(). The first part of the class should look like this:public partial class MainWindow : Window { NorthwindEntities context = new NorthwindEntities(); CollectionViewSource custViewSource; CollectionViewSource ordViewSource; public MainWindow() { InitializeComponent(); custViewSource = ((CollectionViewSource)(FindResource("customerViewSource"))); ordViewSource = ((CollectionViewSource)(FindResource("customerOrdersViewSource"))); DataContext = this; }If it doesn't exist, add a
usingdirective forSystem.Data.Entityto bring theLoadextension method into scope:using System.Data.Entity;Scroll down and find the
Window_Loadedevent handler. Notice that Visual Studio added aCollectionViewSourceobject. This object represents theNorthwindEntitiesobject that you selected when you created the model. Because you already added it, you don't need it here. Replace the code inWindow_Loadedso that the method looks like this:private void Window_Loaded(object sender, RoutedEventArgs e) { // Load is an extension method on IQueryable, // defined in the System.Data.Entity namespace. // This method enumerates the results of the query, // similar to ToList but without creating a list. // When used with Linq to Entities, this method // creates entity objects and adds them to the context. context.Customers.Load(); // After the data is loaded, call the DbSet<T>.Local property // to use the DbSet<T> as a binding source. custViewSource.Source = context.Customers.Local; }Press F5.
You should see the details for the first customer that was retrieved into the
CollectionViewSourceand their orders in the data grid. You'll fix the formatting in the next section. You can also create a way to view the other records and do basic create, read, update, and delete (CRUD) operations.
Adjust the page design and add grids for new customers and orders
The default arrangement produced by Visual Studio isn't ideal for your application, so we provide the final XAML here to copy into your code. You also need some grids to enable the user to add a new customer or order.
To add a new customer and order, create a separate set of text boxes that aren't data-bound to the CollectionViewSource. You control which grid the user sees at any given time by setting the Visible property in the handler methods. Finally, you add a Delete button to each row in the Orders grid to enable the user to delete an individual order.
Open
MainWindow.xamland add the following styles to theWindows.Resourceselement:<Style x:Key="Label" TargetType="{x:Type Label}" BasedOn="{x:Null}"> <Setter Property="HorizontalAlignment" Value="Left"/> <Setter Property="VerticalAlignment" Value="Center"/> <Setter Property="Margin" Value="3"/> <Setter Property="Height" Value="23"/> </Style> <Style x:Key="CustTextBox" TargetType="{x:Type TextBox}" BasedOn="{x:Null}"> <Setter Property="HorizontalAlignment" Value="Right"/> <Setter Property="VerticalAlignment" Value="Center"/> <Setter Property="Margin" Value="3"/> <Setter Property="Height" Value="26"/> <Setter Property="Width" Value="120"/> </Style>Replace the entire outer grid with this markup:
<Grid>
  <Grid.RowDefinitions>
      <RowDefinition Height="auto"/>
      <RowDefinition Height="auto"/>
      <RowDefinition Height="*"/>
  </Grid.RowDefinitions>
  <Grid x:Name="existingCustomerGrid" Grid.Row="1" HorizontalAlignment="Left" Margin="5" Visibility="Visible" VerticalAlignment="Top" Background="AntiqueWhite" DataContext="{StaticResource customerViewSource}">
      <Grid.ColumnDefinitions>
          <ColumnDefinition Width="Auto" MinWidth="233"/>
          <ColumnDefinition Width="Auto" MinWidth="397"/>
      </Grid.ColumnDefinitions>
      <Grid.RowDefinitions>
          <RowDefinition Height="Auto"/>
          <RowDefinition Height="Auto"/>
          <RowDefinition Height="Auto"/>
          <RowDefinition Height="Auto"/>
          <RowDefinition Height="Auto"/>
          <RowDefinition Height="Auto"/>
      </Grid.RowDefinitions>
      <Label Content="Customer ID:" Grid.Row="0" Style="{StaticResource Label}"/>
      <TextBox x:Name="customerIDTextBox" Grid.Row="0" Style="{StaticResource CustTextBox}"
               Text="{Binding CustomerID, Mode=TwoWay, NotifyOnValidationError=true, ValidatesOnExceptions=true}"/>
      <Label Content="Company Name:" Grid.Row="1" Style="{StaticResource Label}"/>
      <TextBox x:Name="companyNameTextBox" Grid.Row="1" Style="{StaticResource CustTextBox}"
               Text="{Binding CompanyName, Mode=TwoWay, NotifyOnValidationError=true, ValidatesOnExceptions=true}"/>
      <Label Content="Contact Name:" Grid.Row="2" Style="{StaticResource Label}"/>
      <TextBox x:Name="contactNameTextBox" Grid.Row="2" Style="{StaticResource CustTextBox}"
               Text="{Binding ContactName, Mode=TwoWay, NotifyOnValidationError=true, ValidatesOnExceptions=true}"/>
      <Label Content="Contact title:" Grid.Row="3" Style="{StaticResource Label}"/>
      <TextBox x:Name="contactTitleTextBox" Grid.Row="3" Style="{StaticResource CustTextBox}"
               Text="{Binding ContactTitle, Mode=TwoWay, NotifyOnValidationError=true, ValidatesOnExceptions=true}"/>
      <Label Content="Address:" Grid.Row="4" Style="{StaticResource Label}"/>
      <TextBox x:Name="addressTextBox" Grid.Row="4" Style="{StaticResource CustTextBox}"
               Text="{Binding Address, Mode=TwoWay, NotifyOnValidationError=true, ValidatesOnExceptions=true}"/>
      <Label Content="City:" Grid.Column="1" Grid.Row="0" Style="{StaticResource Label}"/>
      <TextBox x:Name="cityTextBox" Grid.Column="1" Grid.Row="0" Style="{StaticResource CustTextBox}"
               Text="{Binding City, Mode=TwoWay, NotifyOnValidationError=true, ValidatesOnExceptions=true}"/>
      <Label Content="Country:" Grid.Column="1" Grid.Row="1" Style="{StaticResource Label}"/>
      <TextBox x:Name="countryTextBox" Grid.Column="1" Grid.Row="1" Style="{StaticResource CustTextBox}"
               Text="{Binding Country, Mode=TwoWay, NotifyOnValidationError=true, ValidatesOnExceptions=true}"/>
      <Label Content="Fax:" Grid.Column="1" Grid.Row="2" Style="{StaticResource Label}"/>
      <TextBox x:Name="faxTextBox" Grid.Column="1" Grid.Row="2" Style="{StaticResource CustTextBox}"
               Text="{Binding Fax, Mode=TwoWay, NotifyOnValidationError=true, ValidatesOnExceptions=true}"/>
      <Label Content="Phone:" Grid.Column="1" Grid.Row="3" Style="{StaticResource Label}"/>
      <TextBox x:Name="phoneTextBox" Grid.Column="1" Grid.Row="3" Style="{StaticResource CustTextBox}"
               Text="{Binding Phone, Mode=TwoWay, NotifyOnValidationError=true, ValidatesOnExceptions=true}"/>
      <Label Content="Postal Code:" Grid.Column="1" Grid.Row="4" VerticalAlignment="Center" Style="{StaticResource Label}"/>
      <TextBox x:Name="postalCodeTextBox" Grid.Column="1" Grid.Row="4" Style="{StaticResource CustTextBox}"
               Text="{Binding PostalCode, Mode=TwoWay, NotifyOnValidationError=true, ValidatesOnExceptions=true}"/>
      <Label Content="Region:" Grid.Column="1" Grid.Row="5" Style="{StaticResource Label}"/>
      <TextBox x:Name="regionTextBox" Grid.Column="1" Grid.Row="5" Style="{StaticResource CustTextBox}"
               Text="{Binding Region, Mode=TwoWay, NotifyOnValidationError=true, ValidatesOnExceptions=true}"/>
  </Grid>
  <Grid x:Name="newCustomerGrid" Grid.Row="1" HorizontalAlignment="Left" VerticalAlignment="Top" Margin="5" DataContext="{Binding RelativeSource={RelativeSource FindAncestor, AncestorType={x:Type Window}}, Path=newCustomer, UpdateSourceTrigger=Explicit}" Visibility="Collapsed" Background="CornflowerBlue">
      <Grid.ColumnDefinitions>
          <ColumnDefinition Width="Auto" MinWidth="233"/>
          <ColumnDefinition Width="Auto" MinWidth="397"/>
      </Grid.ColumnDefinitions>
      <Grid.RowDefinitions>
          <RowDefinition Height="Auto"/>
          <RowDefinition Height="Auto"/>
          <RowDefinition Height="Auto"/>
          <RowDefinition Height="Auto"/>
          <RowDefinition Height="Auto"/>
          <RowDefinition Height="Auto"/>
      </Grid.RowDefinitions>
      <Label Content="Customer ID:" Grid.Row="0" Style="{StaticResource Label}"/>
      <TextBox x:Name="add_customerIDTextBox" Grid.Row="0" Style="{StaticResource CustTextBox}"
               Text="{Binding CustomerID, Mode=TwoWay, NotifyOnValidationError=true, ValidatesOnExceptions=true}"/>
      <Label Content="Company Name:" Grid.Row="1" Style="{StaticResource Label}"/>
      <TextBox x:Name="add_companyNameTextBox" Grid.Row="1" Style="{StaticResource CustTextBox}"
               Text="{Binding CompanyName, Mode=TwoWay, NotifyOnValidationError=true, ValidatesOnExceptions=true }"/>
      <Label Content="Contact Name:" Grid.Row="2" Style="{StaticResource Label}"/>
      <TextBox x:Name="add_contactNameTextBox" Grid.Row="2" Style="{StaticResource CustTextBox}"
               Text="{Binding ContactName, Mode=TwoWay, NotifyOnValidationError=true, ValidatesOnExceptions=true}"/>
      <Label Content="Contact title:" Grid.Row="3" Style="{StaticResource Label}"/>
      <TextBox x:Name="add_contactTitleTextBox" Grid.Row="3" Style="{StaticResource CustTextBox}"
               Text="{Binding ContactTitle, Mode=TwoWay, NotifyOnValidationError=true, ValidatesOnExceptions=true}"/>
      <Label Content="Address:" Grid.Row="4" Style="{StaticResource Label}"/>
      <TextBox x:Name="add_addressTextBox" Grid.Row="4" Style="{StaticResource CustTextBox}"
               Text="{Binding Address, Mode=TwoWay, NotifyOnValidationError=true, ValidatesOnExceptions=true}"/>
      <Label Content="City:" Grid.Column="1" Grid.Row="0" Style="{StaticResource Label}"/>
      <TextBox x:Name="add_cityTextBox" Grid.Column="1" Grid.Row="0" Style="{StaticResource CustTextBox}"
               Text="{Binding City, Mode=TwoWay, NotifyOnValidationError=true, ValidatesOnExceptions=true}"/>
      <Label Content="Country:" Grid.Column="1" Grid.Row="1" Style="{StaticResource Label}"/>
      <TextBox x:Name="add_countryTextBox" Grid.Column="1" Grid.Row="1" Style="{StaticResource CustTextBox}"
               Text="{Binding Country, Mode=TwoWay, NotifyOnValidationError=true, ValidatesOnExceptions=true}"/>
      <Label Content="Fax:" Grid.Column="1" Grid.Row="2" Style="{StaticResource Label}"/>
      <TextBox x:Name="add_faxTextBox" Grid.Column="1" Grid.Row="2" Style="{StaticResource CustTextBox}"
               Text="{Binding Fax, Mode=TwoWay, NotifyOnValidationError=true, ValidatesOnExceptions=true}"/>
      <Label Content="Phone:" Grid.Column="1" Grid.Row="3" Style="{StaticResource Label}"/>
      <TextBox x:Name="add_phoneTextBox" Grid.Column="1" Grid.Row="3" Style="{StaticResource CustTextBox}"
               Text="{Binding Phone, Mode=TwoWay, NotifyOnValidationError=true, ValidatesOnExceptions=true}"/>
      <Label Content="Postal Code:" Grid.Column="1" Grid.Row="4" VerticalAlignment="Center" Style="{StaticResource Label}"/>
      <TextBox x:Name="add_postalCodeTextBox" Grid.Column="1" Grid.Row="4" Style="{StaticResource CustTextBox}"
               Text="{Binding PostalCode, Mode=TwoWay, NotifyOnValidationError=true, ValidatesOnExceptions=true}"/>
      <Label Content="Region:" Grid.Column="1" Grid.Row="5" Style="{StaticResource Label}"/>
      <TextBox x:Name="add_regionTextBox" Grid.Column="1" Grid.Row="5" Style="{StaticResource CustTextBox}"
               Text="{Binding Region, Mode=TwoWay, NotifyOnValidationError=true, ValidatesOnExceptions=true}"/>
  </Grid>
  <Grid x:Name="newOrderGrid" Grid.Row="1" HorizontalAlignment="Left" VerticalAlignment="Top" Margin="5" DataContext="{Binding Path=newOrder, Mode=TwoWay}" Visibility="Collapsed" Background="LightGreen">
      <Grid.ColumnDefinitions>
          <ColumnDefinition Width="Auto" MinWidth="233"/>
          <ColumnDefinition Width="Auto" MinWidth="397"/>
      </Grid.ColumnDefinitions>
      <Grid.RowDefinitions>
          <RowDefinition Height="Auto"/>
          <RowDefinition Height="Auto"/>
          <RowDefinition Height="Auto"/>
          <RowDefinition Height="Auto"/>
          <RowDefinition Height="Auto"/>
          <RowDefinition Height="Auto"/>
          <RowDefinition Height="Auto"/>
      </Grid.RowDefinitions>
      <Label Content="New Order Form" FontWeight="Bold"/>
      <Label Content="Employee ID:"  Grid.Row="1" Style="{StaticResource Label}"/>
      <TextBox x:Name="add_employeeIDTextBox" Grid.Row="1" Style="{StaticResource CustTextBox}"
               Text="{Binding EmployeeID, Mode=TwoWay, NotifyOnValidationError=true, ValidatesOnExceptions=true}"/>
      <Label Content="Order Date:"  Grid.Row="2" Style="{StaticResource Label}"/>
      <DatePicker x:Name="add_orderDatePicker" Grid.Row="2"  HorizontalAlignment="Right" Width="120"
              SelectedDate="{Binding OrderDate, Mode=TwoWay, NotifyOnValidationError=true, ValidatesOnExceptions=true, UpdateSourceTrigger=PropertyChanged}"/>
      <Label Content="Required Date:" Grid.Row="3" Style="{StaticResource Label}"/>
      <DatePicker x:Name="add_requiredDatePicker" Grid.Row="3" HorizontalAlignment="Right" Width="120"
               SelectedDate="{Binding RequiredDate, Mode=TwoWay, NotifyOnValidationError=true, ValidatesOnExceptions=true, UpdateSourceTrigger=PropertyChanged}"/>
      <Label Content="Shipped Date:"  Grid.Row="4"  Style="{StaticResource Label}"/>
      <DatePicker x:Name="add_shippedDatePicker"  Grid.Row="4"  HorizontalAlignment="Right" Width="120"
              SelectedDate="{Binding ShippedDate, Mode=TwoWay, NotifyOnValidationError=true, ValidatesOnExceptions=true, UpdateSourceTrigger=PropertyChanged}"/>
      <Label Content="Ship Via:"  Grid.Row="5" Style="{StaticResource Label}"/>
      <TextBox x:Name="add_ShipViaTextBox"  Grid.Row="5" Style="{StaticResource CustTextBox}"
               Text="{Binding ShipVia, Mode=TwoWay, NotifyOnValidationError=true, ValidatesOnExceptions=true}"/>
      <Label Content="Freight"  Grid.Row="6" Style="{StaticResource Label}"/>
      <TextBox x:Name="add_freightTextBox" Grid.Row="6" Style="{StaticResource CustTextBox}"
               Text="{Binding Freight, Mode=TwoWay, NotifyOnValidationError=true, ValidatesOnExceptions=true}"/>
  </Grid>
  <DataGrid x:Name="ordersDataGrid" SelectionUnit="Cell" SelectionMode="Single" AutoGenerateColumns="False" CanUserAddRows="false" IsEnabled="True" EnableRowVirtualization="True" Width="auto" ItemsSource="{Binding Source={StaticResource customerOrdersViewSource}}" Margin="10,10,10,10" Grid.Row="2" RowDetailsVisibilityMode="VisibleWhenSelected">
      <DataGrid.Columns>
          <DataGridTemplateColumn>
              <DataGridTemplateColumn.CellTemplate>
                  <DataTemplate>
                      <Button Content="Delete" Command="{StaticResource DeleteOrderCommand}" CommandParameter="{Binding}"/>
                  </DataTemplate>
              </DataGridTemplateColumn.CellTemplate>
          </DataGridTemplateColumn>
          <DataGridTextColumn x:Name="customerIDColumn" Binding="{Binding CustomerID}" Header="Customer ID" Width="SizeToHeader"/>
          <DataGridTextColumn x:Name="employeeIDColumn" Binding="{Binding EmployeeID}" Header="Employee ID" Width="SizeToHeader"/>
          <DataGridTextColumn x:Name="freightColumn" Binding="{Binding Freight}" Header="Freight" Width="SizeToHeader"/>
          <DataGridTemplateColumn x:Name="orderDateColumn" Header="Order Date" Width="SizeToHeader">
              <DataGridTemplateColumn.CellTemplate>
                  <DataTemplate>
                      <DatePicker SelectedDate="{Binding OrderDate, Mode=TwoWay, NotifyOnValidationError=true, ValidatesOnExceptions=true, UpdateSourceTrigger=PropertyChanged}"/>
                  </DataTemplate>
              </DataGridTemplateColumn.CellTemplate>
          </DataGridTemplateColumn>
          <DataGridTextColumn x:Name="orderIDColumn" Binding="{Binding OrderID}" Header="Order ID" Width="SizeToHeader"/>
          <DataGridTemplateColumn x:Name="requiredDateColumn" Header="Required Date" Width="SizeToHeader">
              <DataGridTemplateColumn.CellTemplate>
                  <DataTemplate>
                      <DatePicker SelectedDate="{Binding RequiredDate, Mode=TwoWay, NotifyOnValidationError=true, ValidatesOnExceptions=true, UpdateSourceTrigger=PropertyChanged}"/>
                  </DataTemplate>
              </DataGridTemplateColumn.CellTemplate>
          </DataGridTemplateColumn>
          <DataGridTextColumn x:Name="shipAddressColumn" Binding="{Binding ShipAddress}" Header="Ship Address" Width="SizeToHeader"/>
          <DataGridTextColumn x:Name="shipCityColumn" Binding="{Binding ShipCity}" Header="Ship City" Width="SizeToHeader"/>
          <DataGridTextColumn x:Name="shipCountryColumn" Binding="{Binding ShipCountry}" Header="Ship Country" Width="SizeToHeader"/>
          <DataGridTextColumn x:Name="shipNameColumn" Binding="{Binding ShipName}" Header="Ship Name" Width="SizeToHeader"/>
          <DataGridTemplateColumn x:Name="shippedDateColumn" Header="Shipped Date" Width="SizeToHeader">
              <DataGridTemplateColumn.CellTemplate>
                  <DataTemplate>
                      <DatePicker SelectedDate="{Binding ShippedDate, Mode=TwoWay, NotifyOnValidationError=true, ValidatesOnExceptions=true, UpdateSourceTrigger=PropertyChanged}"/>
                  </DataTemplate>
              </DataGridTemplateColumn.CellTemplate>
          </DataGridTemplateColumn>
          <DataGridTextColumn x:Name="shipPostalCodeColumn" Binding="{Binding ShipPostalCode}" Header="Ship Postal Code" Width="SizeToHeader"/>
          <DataGridTextColumn x:Name="shipRegionColumn" Binding="{Binding ShipRegion}" Header="Ship Region" Width="SizeToHeader"/>
          <DataGridTextColumn x:Name="shipViaColumn" Binding="{Binding ShipVia}" Header="Ship Via" Width="SizeToHeader"/>
      </DataGrid.Columns>
   </DataGrid>
</Grid>
Add buttons to navigate, add, update, and delete
In a Windows Forms application, you're provided with a BindingNavigator object with buttons for navigating through rows in a database and doing basic CRUD operations. Although WPF doesn't provide a BindingNavigator, it's easy to create one by creating buttons inside a horizontal StackPanel, and associating the buttons with commands that are bound to methods in the code-behind file.
There are four parts to the command logic:
- Commands
- Bindings
- Buttons
- Command handlers in the code-behind
Add commands, bindings, and buttons in XAML
In the
MainWindow.xamlfile, add the commands inside theWindows.Resourceselement as follows:<RoutedUICommand x:Key="FirstCommand" Text="First"/> <RoutedUICommand x:Key="LastCommand" Text="Last"/> <RoutedUICommand x:Key="NextCommand" Text="Next"/> <RoutedUICommand x:Key="PreviousCommand" Text="Previous"/> <RoutedUICommand x:Key="DeleteCustomerCommand" Text="Delete Customer"/> <RoutedUICommand x:Key="DeleteOrderCommand" Text="Delete Order"/> <RoutedUICommand x:Key="UpdateCommand" Text="Update"/> <RoutedUICommand x:Key="AddCommand" Text="Add"/> <RoutedUICommand x:Key="CancelCommand" Text="Cancel"/>A
CommandBindingmaps aRoutedUICommandevent to a method in the code behind. Add thisCommandBindingselement after theWindows.Resourcesclosing tag as follows:<Window.CommandBindings> <CommandBinding Command="{StaticResource FirstCommand}" Executed="FirstCommandHandler"/> <CommandBinding Command="{StaticResource LastCommand}" Executed="LastCommandHandler"/> <CommandBinding Command="{StaticResource NextCommand}" Executed="NextCommandHandler"/> <CommandBinding Command="{StaticResource PreviousCommand}" Executed="PreviousCommandHandler"/> <CommandBinding Command="{StaticResource DeleteCustomerCommand}" Executed="DeleteCustomerCommandHandler"/> <CommandBinding Command="{StaticResource DeleteOrderCommand}" Executed="DeleteOrderCommandHandler"/> <CommandBinding Command="{StaticResource UpdateCommand}" Executed="UpdateCommandHandler"/> <CommandBinding Command="{StaticResource AddCommand}" Executed="AddCommandHandler"/> <CommandBinding Command="{StaticResource CancelCommand}" Executed="CancelCommandHandler"/> </Window.CommandBindings>Add the
StackPanelwith the navigation, add, delete, and update buttons. Add this style toWindows.Resources:<Style x:Key="NavButton" TargetType="{x:Type Button}" BasedOn="{x:Null}"> <Setter Property="FontSize" Value="24"/> <Setter Property="FontFamily" Value="Segoe UI Symbol"/> <Setter Property="Margin" Value="2,2,2,0"/> <Setter Property="Width" Value="40"/> <Setter Property="Height" Value="auto"/> </Style>Paste this code just after the
RowDefinitionsfor the outerGridelement, toward the top of the XAML page:<StackPanel Orientation="Horizontal" Margin="2,2,2,0" Height="36" VerticalAlignment="Top" Background="Gainsboro" DataContext="{StaticResource customerViewSource}" d:LayoutOverrides="LeftMargin, RightMargin, TopMargin, BottomMargin"> <Button Name="btnFirst" Content="|◄" Command="{StaticResource FirstCommand}" Style="{StaticResource NavButton}"/> <Button Name="btnPrev" Content="◄" Command="{StaticResource PreviousCommand}" Style="{StaticResource NavButton}"/> <Button Name="btnNext" Content="►" Command="{StaticResource NextCommand}" Style="{StaticResource NavButton}"/> <Button Name="btnLast" Content="►|" Command="{StaticResource LastCommand}" Style="{StaticResource NavButton}"/> <Button Name="btnDelete" Content="Delete Customer" Command="{StaticResource DeleteCustomerCommand}" FontSize="11" Width="120" Style="{StaticResource NavButton}"/> <Button Name="btnAdd" Content="New Customer" Command="{StaticResource AddCommand}" FontSize="11" Width="80" Style="{StaticResource NavButton}"/> <Button Content="New Order" Name="btnNewOrder" FontSize="11" Width="80" Style="{StaticResource NavButton}" Click="NewOrder_click"/> <Button Name="btnUpdate" Content="Commit" Command="{StaticResource UpdateCommand}" FontSize="11" Width="80" Style="{StaticResource NavButton}"/> <Button Content="Cancel" Name="btnCancel" Command="{StaticResource CancelCommand}" FontSize="11" Width="80" Style="{StaticResource NavButton}"/> </StackPanel>
Add command handlers to the MainWindow class
The code-behind in MainWindow.xaml.cs is minimal except for the add and delete methods:
To navigate, call methods on the
Viewproperty of theCollectionViewSource.To perform a cascade delete on an order, use the
DeleteOrderCommandHandleras shown in the code sample. However, you must first delete the order's associatedOrder_Details.Use the
UpdateCommandHandlerto add a customer or order to the collection, or update an existing customer or order with the changes that the user makes in the text boxes.Add these handler methods to the
MainWindowclass inMainWindow.xaml.cs. If yourCollectionViewSourcefor the Customers table has a different name, you must adjust the name in each of the methods:private void LastCommandHandler(object sender, ExecutedRoutedEventArgs e) { custViewSource.View.MoveCurrentToLast(); } private void PreviousCommandHandler(object sender, ExecutedRoutedEventArgs e) { custViewSource.View.MoveCurrentToPrevious(); } private void NextCommandHandler(object sender, ExecutedRoutedEventArgs e) { custViewSource.View.MoveCurrentToNext(); } private void FirstCommandHandler(object sender, ExecutedRoutedEventArgs e) { custViewSource.View.MoveCurrentToFirst(); } private void DeleteCustomerCommandHandler(object sender, ExecutedRoutedEventArgs e) { // If existing window is visible, delete the customer and all their orders. // In a real application, you should add warnings and allow the user to cancel the operation. var cur = custViewSource.View.CurrentItem as Customer; var cust = (from c in context.Customers where c.CustomerID == cur.CustomerID select c).FirstOrDefault(); if (cust != null) { foreach (var ord in cust.Orders.ToList()) { Delete_Order(ord); } context.Customers.Remove(cust); } context.SaveChanges(); custViewSource.View.Refresh(); } // Commit changes from the new customer form, the new order form, // or edits made to the existing customer form. private void UpdateCommandHandler(object sender, ExecutedRoutedEventArgs e) { if (newCustomerGrid.IsVisible) { // Create a new object because the old one // is being tracked by EF now. Customer newCustomer = new Customer { Address = add_addressTextBox.Text, City = add_cityTextBox.Text, CompanyName = add_companyNameTextBox.Text, ContactName = add_contactNameTextBox.Text, ContactTitle = add_contactTitleTextBox.Text, Country = add_countryTextBox.Text, CustomerID = add_customerIDTextBox.Text, Fax = add_faxTextBox.Text, Phone = add_phoneTextBox.Text, PostalCode = add_postalCodeTextBox.Text, Region = add_regionTextBox.Text }; // Perform very basic validation if (newCustomer.CustomerID.Length == 5) { // Insert the new customer at correct position: int len = context.Customers.Local.Count(); int pos = len; for (int i = 0; i < len; ++i) { if (String.CompareOrdinal(newCustomer.CustomerID, context.Customers.Local[i].CustomerID) < 0) { pos = i; break; } } context.Customers.Local.Insert(pos, newCustomer); custViewSource.View.Refresh(); custViewSource.View.MoveCurrentTo(newCustomer); } else { MessageBox.Show("CustomerID must have 5 characters."); } newCustomerGrid.Visibility = Visibility.Collapsed; existingCustomerGrid.Visibility = Visibility.Visible; } else if (newOrderGrid.IsVisible) { // Order ID is auto-generated so we don't set it here. // For CustomerID, address, etc we use the values from current customer. // User can modify these in the datagrid after the order is entered. Customer currentCustomer = (Customer)custViewSource.View.CurrentItem; Order newOrder = new Order() { OrderDate = add_orderDatePicker.SelectedDate, RequiredDate = add_requiredDatePicker.SelectedDate, ShippedDate = add_shippedDatePicker.SelectedDate, CustomerID = currentCustomer.CustomerID, ShipAddress = currentCustomer.Address, ShipCity = currentCustomer.City, ShipCountry = currentCustomer.Country, ShipName = currentCustomer.CompanyName, ShipPostalCode = currentCustomer.PostalCode, ShipRegion = currentCustomer.Region }; try { newOrder.EmployeeID = Int32.Parse(add_employeeIDTextBox.Text); } catch { MessageBox.Show("EmployeeID must be a valid integer value."); return; } try { // Exercise for the reader if you are using Northwind: // Add the Northwind Shippers table to the model. // Acceptable ShipperID values are 1, 2, or 3. if (add_ShipViaTextBox.Text == "1" || add_ShipViaTextBox.Text == "2" || add_ShipViaTextBox.Text == "3") { newOrder.ShipVia = Convert.ToInt32(add_ShipViaTextBox.Text); } else { MessageBox.Show("Shipper ID must be 1, 2, or 3 in Northwind."); return; } } catch { MessageBox.Show("Ship Via must be convertible to int"); return; } try { newOrder.Freight = Convert.ToDecimal(add_freightTextBox.Text); } catch { MessageBox.Show("Freight must be convertible to decimal."); return; } // Add the order into the EF model context.Orders.Add(newOrder); ordViewSource.View.Refresh(); } // Save the changes, either for a new customer, a new order // or an edit to an existing customer or order. context.SaveChanges(); } // Sets up the form so that user can enter data. Data is later // saved when user clicks Commit. private void AddCommandHandler(object sender, ExecutedRoutedEventArgs e) { existingCustomerGrid.Visibility = Visibility.Collapsed; newOrderGrid.Visibility = Visibility.Collapsed; newCustomerGrid.Visibility = Visibility.Visible; // Clear all the text boxes before adding a new customer. foreach (var child in newCustomerGrid.Children) { var tb = child as TextBox; if (tb != null) { tb.Text = ""; } } } private void NewOrder_click(object sender, RoutedEventArgs e) { var cust = custViewSource.View.CurrentItem as Customer; if (cust == null) { MessageBox.Show("No customer selected."); return; } existingCustomerGrid.Visibility = Visibility.Collapsed; newCustomerGrid.Visibility = Visibility.Collapsed; newOrderGrid.UpdateLayout(); newOrderGrid.Visibility = Visibility.Visible; } // Cancels any input into the new customer form private void CancelCommandHandler(object sender, ExecutedRoutedEventArgs e) { add_addressTextBox.Text = ""; add_cityTextBox.Text = ""; add_companyNameTextBox.Text = ""; add_contactNameTextBox.Text = ""; add_contactTitleTextBox.Text = ""; add_countryTextBox.Text = ""; add_customerIDTextBox.Text = ""; add_faxTextBox.Text = ""; add_phoneTextBox.Text = ""; add_postalCodeTextBox.Text = ""; add_regionTextBox.Text = ""; existingCustomerGrid.Visibility = Visibility.Visible; newCustomerGrid.Visibility = Visibility.Collapsed; newOrderGrid.Visibility = Visibility.Collapsed; } private void Delete_Order(Order order) { // Find the order in the EF model. var ord = (from o in context.Orders.Local where o.OrderID == order.OrderID select o).FirstOrDefault(); // Delete all the order_details that have // this Order as a foreign key foreach (var detail in ord.Order_Details.ToList()) { context.Order_Details.Remove(detail); } // Now it's safe to delete the order. context.Orders.Remove(ord); context.SaveChanges(); // Update the data grid. ordViewSource.View.Refresh(); } private void DeleteOrderCommandHandler(object sender, ExecutedRoutedEventArgs e) { // Get the Order in the row in which the Delete button was clicked. Order obj = e.Parameter as Order; Delete_Order(obj); }
Run the WPF application
To start debugging, press F5. Verify that customer and order data are populated in the grid, and the navigation buttons work as expected.
Select Commit to add a new customer or order to the model after you enter the data.
Select Cancel to back out of a new customer or new order form without saving the data.
To make edits to existing customers and orders directly, use the text boxes, which write those changes to the model automatically.