Note
Access to this page requires authorization. You can try signing in or changing directories.
Access to this page requires authorization. You can try changing directories.
Note
The DataSet class and related classes are legacy .NET Framework technologies from the early 2000s that enable applications to work with data in memory while the apps are disconnected from the database. The technologies are especially useful for apps that enable users to modify data and persist the changes back to the database. Although datasets are a proven successful technology, the recommended approach for new .NET applications is to use Entity Framework Core. Entity Framework provides a more natural way to work with tabular data as object models, and has a more simple programming interface.
When displaying data on forms in Windows applications, you can choose existing controls from the Toolbox. Or, you can author custom controls if your application requires functionality that is not available in the standard controls. This walkthrough shows how to create a control that implements the ComplexBindingPropertiesAttribute. Controls that implement the ComplexBindingPropertiesAttribute contain a DataSource and DataMember property that can be bound to data. Such controls are similar to a DataGridView or ListBox.
For more information on control authoring, see Developing Windows Forms controls at design time.
When authoring controls for use in data-binding scenarios you need to implement one of the following data-binding attributes:
| Data-binding attribute usage |
|---|
| Implement the DefaultBindingPropertyAttribute on simple controls, like a TextBox, that display a single column (or property) of data. For more information, see Create a Windows Forms user control that supports simple data binding. |
| Implement the ComplexBindingPropertiesAttribute on controls, like a DataGridView, that display lists (or tables) of data. (This process is described in this walkthrough page.) |
| Implement the LookupBindingPropertiesAttribute on controls, like a ComboBox, that display lists (or tables) of data but also need to present a single column or property. For more information, see Create a Windows Forms user control that supports lookup data binding. |
This walkthrough creates a complex control that displays rows of data from a table. This example uses the Customers table from the Northwind sample database. The complex user control will display the customers table in a DataGridView in the custom control.
During this walkthrough, you'll learn how to:
Add a new User Control to your project.
Visually design the user control.
Implement the
ComplexBindingPropertyattribute.Create a dataset with the Data Source Configuration Wizard.
Set the Customers table in the Data Sources window to use the new complex control.
Add the new control by dragging it from the Data Sources window onto Form1.
Prerequisites
To complete this tutorial, you need the .NET desktop development and Data storage and processing workloads installed in Visual Studio. To install them, open Visual Studio Installer and choose Modify (or More > Modify) next to the version of Visual Studio you want to modify. See Modify Visual Studio.
This walkthrough uses SQL Server Express LocalDB and the Northwind sample database.
If you don't have SQL Server Express LocalDB, install it either from the SQL Server Express download page, or through the Visual Studio Installer. In the Visual Studio Installer, you can install SQL Server Express LocalDB as part of the Data storage and processing workload, or as an individual component.
Install the Northwind sample database by following these steps:
In Visual Studio, open the SQL Server Object Explorer window. (SQL Server Object Explorer is installed as part of the Data storage and processing workload in the Visual Studio Installer.) Expand the SQL Server node. Right-click on your LocalDB instance and select New Query.
A query editor window opens.
Copy the Northwind Transact-SQL script to your clipboard. This T-SQL script creates the Northwind database from scratch and populates it with data.
Paste the T-SQL script into the query editor, and then choose the Execute button.
After a short time, the query finishes running and the Northwind database is created.
Create a Windows Forms app project
The first step is to create a Windows Forms App project for either C# or Visual Basic. Name the project ComplexControlWalkthrough.
Add a user control to the project
Because this walkthrough creates a complex data-bindable control from a User Control, add a User Control item to the project:
From the Project menu, choose Add User Control.
Type ComplexDataGridView in the Name area, and then select Add.
The ComplexDataGridView control is added to Solution Explorer, and opens in the designer.
Design the ComplexDataGridView control
To add a DataGridView to the user control, drag a DataGridView from the Toolbox onto the user control's design surface.
Add the required data-binding attribute
For complex controls that support data binding, you can implement the ComplexBindingPropertiesAttribute:
Switch the ComplexDataGridView control to code view. (On the View menu, select Code.)
Replace the code in the
ComplexDataGridViewwith the following:using System.Windows.Forms; namespace CS { [System.ComponentModel.ComplexBindingProperties("DataSource", "DataMember")] public partial class ComplexDataGridView : UserControl { public object DataSource { get{ return dataGridView1.DataSource; } set{ dataGridView1.DataSource = value; } } public string DataMember { get{ return dataGridView1.DataMember; } set{ dataGridView1.DataMember = value; } } public ComplexDataGridView() { InitializeComponent(); } } }From the Build menu, choose Build Solution.
Create a data source from your database
Use the Data Source Configuration wizard to create a data source based on the Customers table in the Northwind sample database:
To open the Data Sources window, on the Data menu, click Show Data Sources.
In the Data Sources window, select Add New Data Source to start the Data Source Configuration wizard.
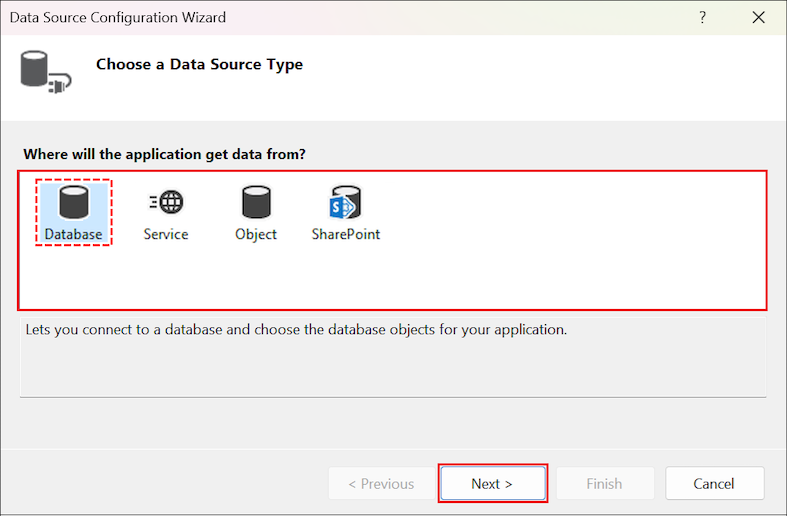
Select Database on the Choose a Data Source Type page, and then select Next.
On the Choose your Data Connection page do one of the following:
If a data connection to the Northwind sample database is available in the dropdown list, select it.
Select New Connection to launch the Add/Modify Connection dialog box.
If your database requires a password, select the option to include sensitive data, and then select Next.
On the Save connection string to the Application Configuration file page, click Next.
On the Choose your Database Objects page, expand the Tables node.
Select the
Customerstable, and then select Finish.The NorthwindDataSet is added to your project, and the
Customerstable appears in the Data Sources window.
Set the Customers table to use the ComplexDataGridView control
Within the Data Sources window, you can set the control to be created prior to dragging items onto your form:
Open Form1 in the designer.
Expand the Customers node in the Data Sources window.
Click the dropdown list arrow on the Customers node, and choose Customize.
Select the ComplexDataGridView from the list of Associated Controls in the Data UI Customization Options dialog box.
Click the dropdown list arrow on the
Customerstable, and choose ComplexDataGridView from the control list.
Add controls to the form
You can create the data-bound controls by dragging items from the Data Sources window onto your form. Drag the main Customers node from the Data Sources window onto the form. Verify that the ComplexDataGridView control is used to display the table's data.
Run the application
Press F5 to run the application.
Next steps
Depending on your application requirements, there are several steps you might want to perform after creating a control that supports databinding. Some typical next steps include:
Placing your custom controls in a control library so you can reuse them in other applications.
Creating controls that support lookup scenarios. For more information, see Create a Windows Forms user control that supports lookup data binding.