Note
Access to this page requires authorization. You can try signing in or changing directories.
Access to this page requires authorization. You can try changing directories.
This guide explains how to set up and configure a Visual Studio ASP.NET Core app, deploy it to IIS using an Azure VM, and attach the remote debugger from Visual Studio.
For IIS scenarios, Linux isn't supported.
To debug IIS on an Azure VM, follow the steps in this article. Using this method, you can use a customized configuration of IIS, but the setup and deployment steps are more complicated. If you don't need to customize IIS for your scenario, you might choose simpler methods to host and debug the app in Azure App Service instead.
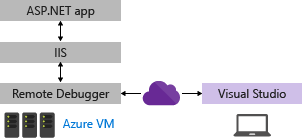
For an Azure VM, you must deploy your app from Visual Studio to Azure and you also need to manually install the IIS role and the remote debugger, as shown in the following illustration.
Warning
Be sure to delete the Azure resources that you create when you have completed the steps in this tutorial. That way you can avoid incurring unnecessary charges.
These procedures have been tested on these server configurations:
- Windows Server 2022 and IIS 10
- Windows Server 2019 and IIS 10
- Windows Server 2016 and IIS 10
Prerequisites
Visual Studio 2019 or later versions is required to follow the steps shown in this article.
Network requirements
Debugging between two computers connected through a proxy isn't supported. Debugging over a high latency or low bandwidth connection, such as dialup Internet, or over the Internet across countries/regions isn't recommended and might fail or be unacceptably slow. For a complete list of requirements, see Requirements.
App already running in IIS on the Azure VM?
This article includes steps on setting up a basic configuration of IIS on Windows server and deploying the app from Visual Studio. These steps are included to make sure that the server has the required components installed, that the app can run correctly, and that you're ready to remote debug.
If your app is running in IIS and you just want to download the remote debugger and start debugging, go to Download and Install the remote tools on Windows Server.
If you want help ensuring your app is set up, deployed, and running correctly in IIS so that you can debug, follow all the steps in this article.
Before you begin, follow all the steps described in Create a Windows Virtual Machine, which includes steps to install the IIS web server.
Make sure you open port 80 in the Azure Network security group. When you verify that port 80 is open, also open the correct port for the remote debugger (4026, 4024, or 4022). That way, you don't have to open it later. If you're using Web Deploy, also open port 8172.
Create the ASP.NET Core application on the Visual Studio computer
Create a new ASP.NET Core web application.
In Visual Studio, choose File > Start window to open the Start window, and then choose Create a new project. In the search box, type web app, then choose C# as the language, then choose ASP.NET Core Web Application (Model-View-Controller), and then choose Next. On the next screen, name the project MyASPApp, and then choose Next.
Choose either the recommended target framework or .NET 10, and then choose Create. The version must match the version installed on the server.
Open the HomeController.cs file in the Controllers folder and set a breakpoint in the
return View;statement in thePrivacymethod.In older templates, open the Privacy.cshtml.cs file and set a breakpoint in the
OnGetmethod.
Update browser security settings on Windows Server
If you're using an older version of Windows Server, you might need to add some domains as trusted sites to enable you to download some of the web server components. Add the trusted sites by going to Internet Options > Security > Trusted Sites > Sites. Add the following domains.
- microsoft.com
- go.microsoft.com
- download.microsoft.com
- iis.net
When you download the software, you might get requests to grant permission to load various web site scripts and resources. Some of these resources aren't required, but to simplify the process, select Add when prompted.
Install ASP.NET Core on Windows Server
Install the .NET Core Hosting Bundle on the hosting system. The bundle installs the .NET Core Runtime, .NET Core Library, and the ASP.NET Core Module. For more in-depth instructions, see Publishing to IIS.
For the current .NET Core hosting bundle, install the ASP.NET Core Hosting Bundle.
Note
If you previously installed IIS, the ASP.NET Core IIS Module gets installed with ASP.NET Core. Otherwise, install the ASP.NET Core IIS Module manually.
For .NET Core 2, install the .NET Core Windows Server Hosting.
Note
If the system doesn't have an Internet connection, obtain and install the Microsoft Visual C++ 2015 Redistributable before installing the .NET Core Windows Server Hosting bundle.
Restart the system (or execute net stop was /y followed by net start w3svc from a command prompt to pick up a change to the system PATH).
Choose a deployment option
If you need help deploying the app to IIS, consider these options:
Deploy by creating a publish settings file in IIS and importing the settings in Visual Studio. In some scenarios, this approach is a fast way to deploy your app. When you create the publish settings file, permissions are automatically set up in IIS.
Deploy by publishing to a local folder and copying the output by a preferred method to a prepared app folder on IIS.
(Optional) Deploy using a publish settings file
You can use this option create a publish settings file and import it into Visual Studio.
Note
This deployment method uses Web Deploy, which must be installed on the server. If you want to configure Web Deploy manually instead of importing the settings, you can install Web Deploy 3.6 instead of Web Deploy 3.6 for Hosting Servers. However, if you configure Web Deploy manually, you will need to make sure that an app folder on the server is configured with the correct values and permissions (see Configure ASP.NET Web site).
Configure the ASP.NET Core web site
In IIS Manager, in the left pane under Connections, select Application Pools. Open DefaultAppPool and set the .NET CLR version to No Managed Code. This is required for ASP.NET Core. The Default Web Site uses the DefaultAppPool.
Stop and restart the DefaultAppPool.
Install and configure Web Deploy on Windows Server
Web Deploy provides additional configuration features that enable the creation of the publish settings file from the UI.
Note
The Web Platform Installer reached End-of-Life on 7/1/22. For more information, see Web Platform Installer - End of support and sunsetting the product/application feed. You can directly install Web Deploy 4.0 to create the publish settings file.
If you did not already install IIS Management Scripts and Tools, install it now.
Go to Select server roles > Web Server (IIS) > Management Tools, and then select the IIS Management Scripts and Tools role, click Next, and then install the role.
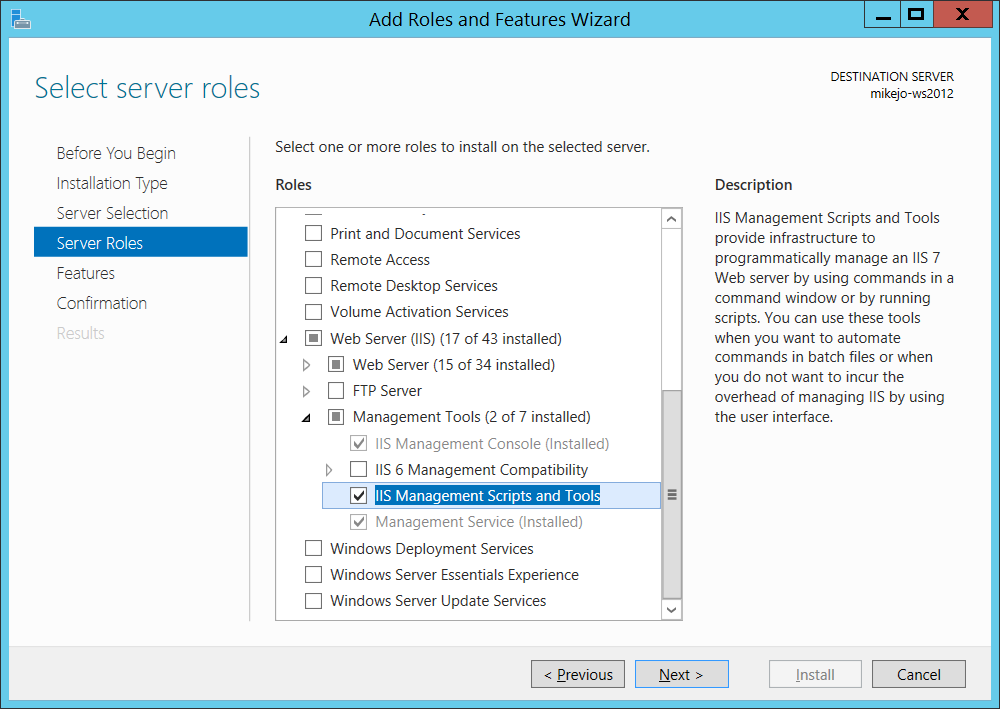
The scripts and tools are required to enable the generation of the publish settings file.
Make sure you also install the Management Service and IIS Management Console (they may be already installed).
On Windows Server, download Web Deploy 4.0.
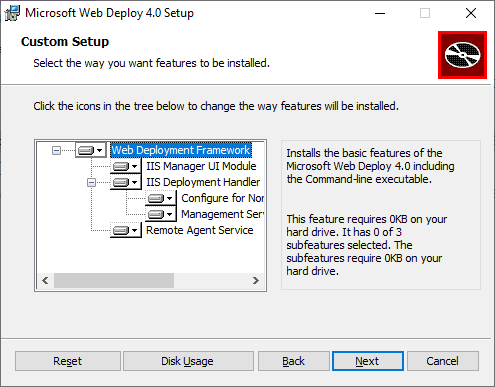
Run the Web Deploy installation program, and make sure you select Complete installation instead of a typical installation.
With a complete installation, you get the components you need to generate a publish settings file. (If you choose Custom instead, you can see the list of components, as shown in the following illustration.)
(Optional) Verify that Web Deploy is running correctly by opening Control Panel > System and Security > Windows Tools > Services, and then make sure that:
Web Deployment Agent Service is running (the service name is different in older versions).
Web Management Service is running.
If one of the agent services is not running, restart the Web Deployment Agent Service.
If the Web Deployment Agent Service is not present at all, go to Control Panel > Programs > Uninstall a program, find Microsoft Web Deploy <version>. Choose to Change the installation and make sure that you choose Will be installed to the local hard drive for the Web Deploy components. Complete the change installation steps.
Create the publish settings file in IIS on Windows Server
Close and reopen the IIS Management Console to show updated configuration options in the UI.
In IIS, right-click the Default Web Site, choose Deploy > Configure Web Deploy Publishing.
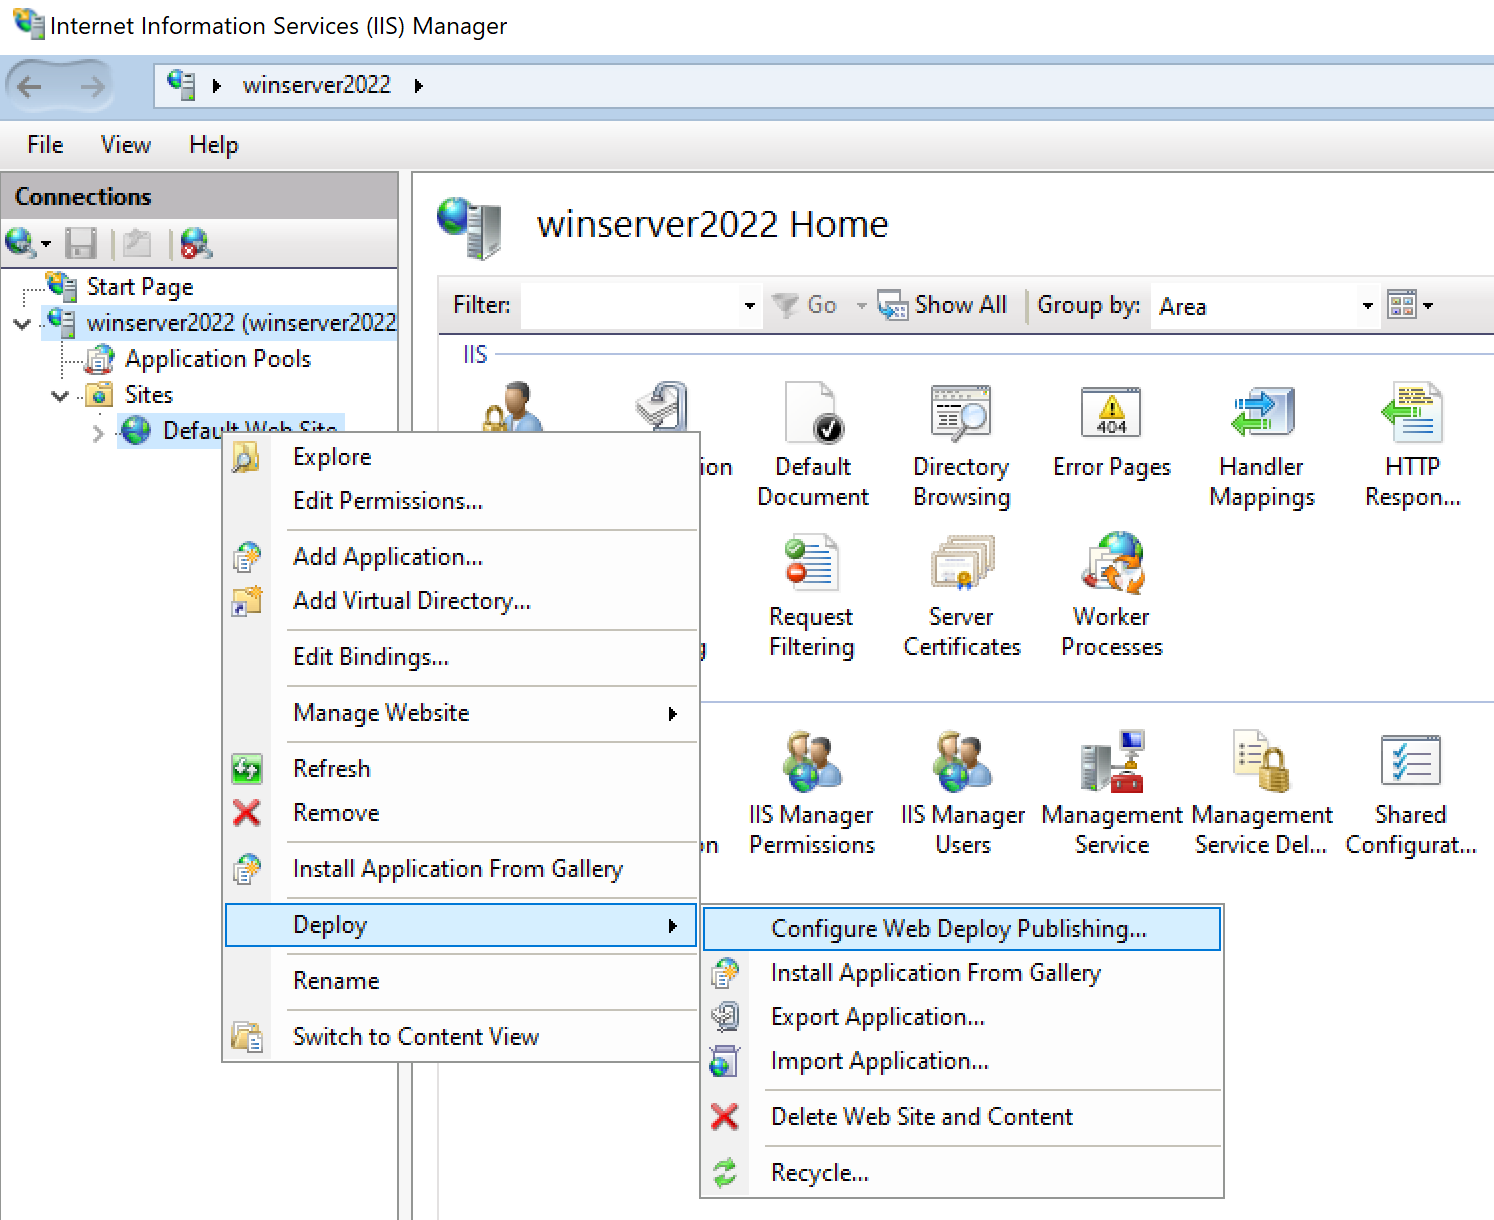
If you don't see the Deploy menu, see the preceding section to verify that Web Deploy is running.
In the Configure Web Deploy Publishing dialog box, examine the settings.
Click Setup.
In the Results panel, the output shows that access rights are granted to the specified user, and that a file with a
.publishsettingsfile extension has been generated in the location shown in the dialog box.<?xml version="1.0" encoding="utf-8"?> <publishData> <publishProfile publishUrl="https://myhostname:8172/msdeploy.axd" msdeploySite="Default Web Site" destinationAppUrl="http://myhostname:80/" profileName="Default Settings" publishMethod="MSDeploy" userName="myhostname\myusername" /> </publishData>Depending on your Windows Server and IIS configuration, you see different values in the XML file. Here are a few details about the values that you see:
The msdeploy.axd file referenced in the
publishUrlattribute is a dynamically generated HTTP handler file for Web Deploy. (For testing purposes,http://myhostname:8172generally works as well.)The
publishUrlport is set to port 8172, which is the default for Web Deploy.The
destinationAppUrlport is set to port 80, which is the default for IIS.If, in later steps, you're unable to connect to the remote host from Visual Studio using the host name, test the server's IP address in place of the host name.
Note
If you're publishing to IIS running on an Azure VM, you must open an inbound port for Web Deploy and IIS in the Network Security group. For detailed information, see Open ports to a virtual machine.
Copy this file to the computer where you're running Visual Studio.
Import the publish settings in Visual Studio and deploy
On the computer where you have the ASP.NET project open in Visual Studio, right-click the project in Solution Explorer, and choose Publish.
If you previously configured any publishing profiles, the Publish pane appears. Click New or Create new profile.
Select the option to import a profile.
In the Publish dialog box, click Import Profile.
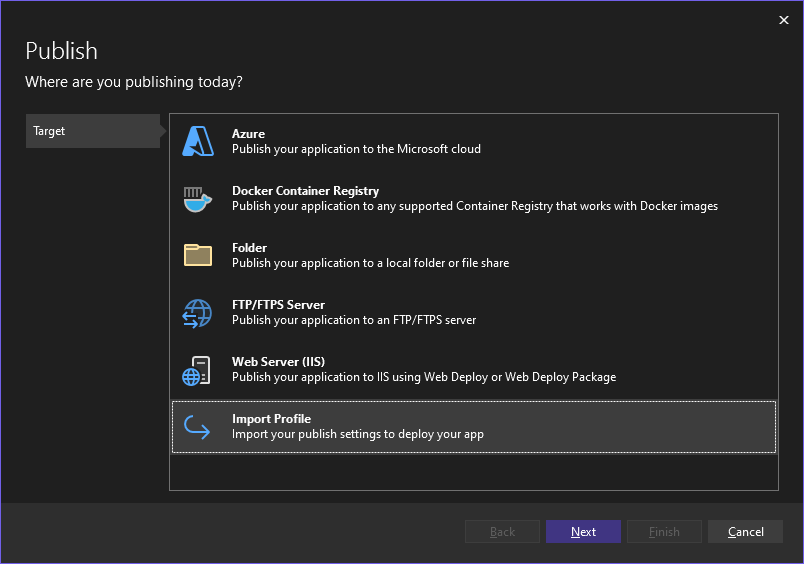
Navigate to the location of the publish settings file that you created in the previous section.
In the Import Publish Settings File dialog, navigate to and select the profile that you created in the previous section, and click Open.
Click Finish to save the publishing profile, and then click Publish.
Visual Studio begins the deployment process, and the Output window shows progress and results.
If you get any deployment errors, click More Actions > Edit to edit settings. Modify settings and click Validate to test new settings. If the host name isn't found, try the IP address instead of the host name in both the Server and Destination URL fields.

Note
If you restart an Azure VM, the IP address might change.
After the app deploys successfully, it should start automatically.
- If the app doesn't start after deployment, start the app in IIS to verify that it runs correctly.
- For ASP.NET Core, make sure the Application pool field for the DefaultAppPool is set to No Managed Code.
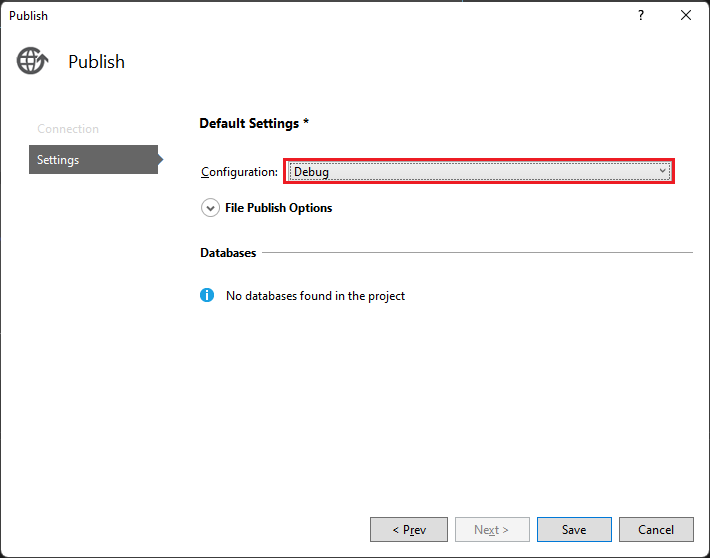
When you're ready, switch to a debug configuration.
Important
If you choose to debug a Release configuration, you disable debugging in the web.config file when you publish.
- Select More Options > Edit to edit the profile, and then select Settings.
- Select Save and then republish the app.
- Select a Debug configuration, and then select Remove additional files at destination under the File Publish options.
Warning
Using username and password credentials (basic authentication) is not the most secure method of authentication. Whenever possible, use alternative methods. For example, consider publishing to a package from Visual Studio, and then use WebDeploy.exe from a command line to deploy the package. With that method, you can use IIS Manager to configure authorized Windows users who can publish to the web server, and run WebDeploy.exe under that Windows user account. See Installing and Configuring Web Deploy on IIS 8.0 or Later. If you do use password credentials, be sure to use a strong password, and secure the password from being leaked or shared.
(Optional) Deploy by publishing to a local folder
You can use this option to deploy your app if you want to copy the app to IIS using PowerShell, RoboCopy, or you want to manually copy the files.
Configure the ASP.NET Core Web site on the Windows Server computer
If you're importing publish settings, you can skip this section.
Open the Internet Information Services (IIS) Manager and go to Sites.
Right-click the Default Web Site node and select Add Application.
Set the Alias field to MyASPApp and the Application pool field to No Managed Code. Set the Physical path to C:\Publish (where you later deploy the ASP.NET Core project).
With the site selected in the IIS Manager, choose Edit Permissions, and make sure that IUSR, IIS_IUSRS, or the user configured for the Application Pool is an authorized user with Read & Execute rights.
If you don't see one of these users with access, go through steps to add IUSR as a user with Read & Execute rights.
Important
For security information related to the built-in accounts, see Understanding Built-In User and Group Accounts in IIS 7.
(Optional) Publish and Deploy the app by publishing to a local folder from Visual Studio
If you're not using Web Deploy, you must publish and deploy the app using the file system or other tools. You can start by creating a package using the file system, and then either deploy the package manually or use other tools like PowerShell, Robocopy, or XCopy. In this section, we assume you're manually copying the package if you aren't using Web Deploy.
In the Solution Explorer, right-click the project node and select Publish (for Web Forms, Publish Web App).
If you have previously configured any publishing profiles, the Publish pane appears. Click New profile.
In the Publish dialog box, select Folder, click Browse, and create a new folder, C:\Publish.
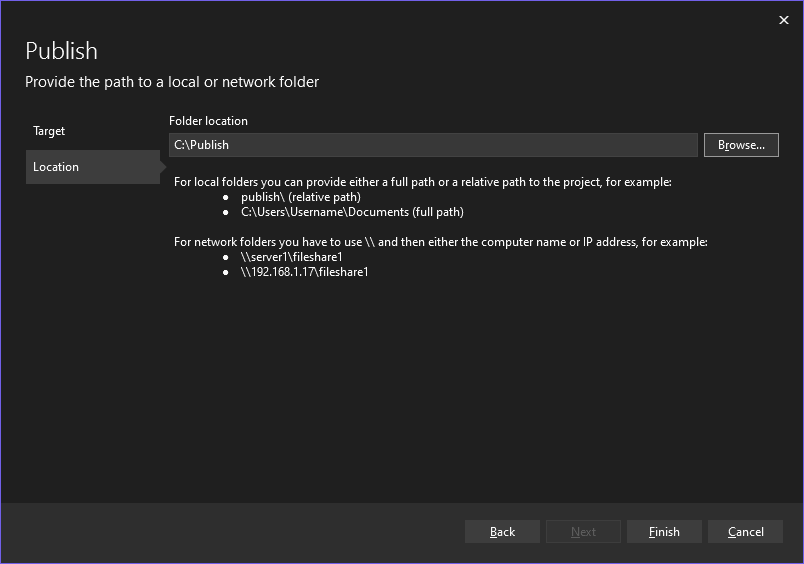
Click Finish to save the publish profile.
Switch to a debug configuration.
Choose Edit to edit the profile, and then choose Settings. Choose a Debug configuration, and then choose Remove additional files at destination under the File Publish options.
Note
If you use a Release build, you disable debugging in the web.config file when you publish.
Click Publish.
The application publishes a Debug configuration of the project to the local folder. Progress shows in the Output window.
Copy the ASP.NET project directory from the Visual Studio computer to the local directory configured for the ASP.NET app (in this example, C:\Publish) on the Windows Server computer. In this tutorial, we assume you are copying manually, but you can use other tools like PowerShell, Xcopy, or Robocopy.
Caution
If you need to make changes to the code or rebuild, you must republish and repeat this step. The executable you copied to the remote machine must exactly match your local source and symbols. If you do not do this you will receive a
cannot find or open the PDB filewarning in Visual Studio when you attempt to debug the process.On the Windows Server, verify that you can run the app correctly by opening the app in your browser.
If the app doesn't run correctly, there may be a mismatch between the version of ASP.NET installed on your server and your Visual Studio machine, or you may have an issue with your IIS or Web site configuration. Recheck earlier steps.
Download and Install the remote tools on Windows Server
Download the version of the remote tools that matches your version of Visual Studio.
On the remote device or server that you want to debug on, rather than the Visual Studio machine, download and install the correct version of the remote tools from the links in the following table.
- Download the most recent update of the remote tools for your version of Visual Studio. Remote tools for Visual Studio 2022 and 2026 can be used with either version of Visual Studio. However, remote tools versions that are earlier than Visual Studio 2022 aren't compatible with later Visual Studio versions. (For example, if you're using Visual Studio 2019, download the latest update of the remote tools for Visual Studio 2019. In this scenario, don't download the remote tools for Visual Studio 2022.)
- Download the most recent update of the remote tools for your version of Visual Studio. Earlier remote tools versions aren't compatible with later Visual Studio versions. (For example, if you're using Visual Studio 2019, download the latest update of the remote tools for Visual Studio 2019. In this scenario, don't download the remote tools for Visual Studio 2022.)
- Download the remote tools with the same architecture as the machine you're installing them on. For example, if you want to debug x86 applications on a remote computer running an x64 operating system, install the x64 remote tools. To debug x86, ARM, or x64 applications on an ARM64 operating system, install the ARM64 remote tools.
| Version | Link | Notes |
|---|---|---|
| Visual Studio 2026 | Remote tools | Compatible with Visual Studio 2022 and later versions. Download the version matching your device operating system (x86, x64 (AMD64), or ARM64). On older versions of Windows Server, see Unblock the file download for help with downloading the remote tools. |
| Visual Studio 2022 | Remote tools | Remote tools for Visual Studio 2022 are available from My.VisualStudio.com. If prompted, join the free Visual Studio Dev Essentials program, or sign in with your Visual Studio subscription ID. Download the version matching your device operating system (x86, x64 (AMD64), or ARM64). On older versions of Windows Server, see Unblock the file download for help with downloading the remote tools. |
| Visual Studio 2019 | Remote tools | Remote tools for Visual Studio 2019 are available from My.VisualStudio.com. If prompted, join the free Visual Studio Dev Essentials program, or sign in with your Visual Studio subscription ID. Download the version matching your device operating system (x86, x64 (AMD64), or ARM64). On older versions of Windows Server, see Unblock the file download for help with downloading the remote tools. |
| Visual Studio 2017 | Remote tools | Remote tools for Visual Studio 2017 are available from My.VisualStudio.com. If prompted, join the free Visual Studio Dev Essentials program, or sign in with your Visual Studio subscription ID. Download the version matching your device operating system (x86, x64 (AMD64), or ARM64). On Windows Server, see Unblock the file download for help with downloading the remote tools. |
| Visual Studio 2015 | Remote tools | Remote tools for Visual Studio 2015 are available from My.VisualStudio.com. If prompted, join the free Visual Studio Dev Essentials program, or sign in with your Visual Studio subscription ID. On Windows Server, see Unblock the file download for help with downloading the remote tools. |
| Visual Studio 2013 | Remote tools | Download page in Visual Studio 2013 documentation |
| Visual Studio 2012 | Remote tools | Download page in Visual Studio 2012 documentation |
| Version | Link | Notes |
|---|---|---|
| Visual Studio 2022 | Remote tools | Compatible with all Visual Studio 2022 versions. Download the version matching your device operating system (x86, x64 (AMD64), or ARM64). On older versions of Windows Server, see Unblock the file download for help with downloading the remote tools. |
| Visual Studio 2019 | Remote tools | Remote tools for Visual Studio 2019 are available from My.VisualStudio.com. If prompted, join the free Visual Studio Dev Essentials program, or sign in with your Visual Studio subscription ID. Download the version matching your device operating system (x86, x64 (AMD64), or ARM64). On older versions of Windows Server, see Unblock the file download for help with downloading the remote tools. |
| Visual Studio 2017 | Remote tools | Remote tools for Visual Studio 2017 are available from My.VisualStudio.com. If prompted, join the free Visual Studio Dev Essentials program, or sign in with your Visual Studio subscription ID. Download the version matching your device operating system (x86, x64 (AMD64), or ARM64). On Windows Server, see Unblock the file download for help with downloading the remote tools. |
| Visual Studio 2015 | Remote tools | Remote tools for Visual Studio 2015 are available from My.VisualStudio.com. If prompted, join the free Visual Studio Dev Essentials program, or sign in with your Visual Studio subscription ID. On Windows Server, see Unblock the file download for help with downloading the remote tools. |
| Visual Studio 2013 | Remote tools | Download page in Visual Studio 2013 documentation |
| Visual Studio 2012 | Remote tools | Download page in Visual Studio 2012 documentation |
You can run the remote debugger by copying msvsmon.exe to the remote computer, rather than installing the remote tools. However, the Remote Debugger Configuration Wizard (rdbgwiz.exe) is available only when you install the remote tools. You may need to use the wizard for configuration if you want to run the remote debugger as a service. For more information, see (Optional) Configure the remote debugger as a service.
Note
- To debug Windows 10 or later apps on ARM devices, use ARM64, which is available with the latest version of the remote tools.
- To debug Windows 10 apps on Windows RT devices, use ARM, which is available only in the Visual Studio 2015 remote tools download.
- To debug x64 apps on an ARM64 operating system, run the x64 msvsmon.exe that is installed with the ARM64 remote tools.
Set up the remote debugger on Windows Server
On the remote computer, find and start the Remote Debugger from the Start menu.
If you don't have administrative permissions on the remote computer, right-click the Remote Debugger app and select Run as administrator. Otherwise, just start it normally.
If you are planning to attach to a process which is running as an administrator, or is running under a different user account (such as IIS), right-click the Remote Debugger app and select Run as administrator. For more information, see Run the remote debugger as an administrator.
The first time you start the remote debugger (or before you have configured it), the Remote Debugging Configuration wizard appears.
In most scenarios, select Configure remote debugging.

In most scenarios, choose Next until you get to the Configure the Windows Firewall page of the wizard.

Select at least one network type you want to use the remote tools on. If the computers are connected through a domain, you must choose the first item. If the computers are connected through a workgroup or homegroup, choose the second or third item as appropriate.
Next, select Finish to start the remote debugger.
When configuration is complete, the Remote Debugger window appears.


The remote debugger is now waiting for a connection. Use the server name and port number shown to set the remote connection configuration in Visual Studio.
To stop the remote debugger, select File > Exit. You can restart it from the Start menu, or from the command line:
<Remote debugger installation directory>\msvsmon.exe
Note
If you need to add permissions for additional users, change the authentication mode, or port number for the remote debugger, see Configure the remote debugger.
Attach to the ASP.NET Core application from the Visual Studio computer
Starting in Visual Studio 2022 version 17.10 Preview 2, the Attach to Process dialog box has changed. If you need instructions that match the older dialog box, switch to the Visual Studio 2019 view (upper left version selector in the article).
On the Visual Studio computer, open the solution that you're trying to debug (MyASPApp if you're following all the steps in this article).
In Visual Studio, select Debug > Attach to Process (Ctrl + Alt + P).
Tip
In Visual Studio 2017 and later versions, you can reattach to the same process you previously attached to by using Debug > Reattach to Process... (Shift + Alt + P).
Set the Connection Type to Remote (Windows).
The Connection Target option appears.
Set the Connection Target to <remote computer name> and press Enter.
Verify that Visual Studio adds the required port to the computer name, which appears in the format: <remote computer name>:port
On Visual Studio 2022, you should see <remote computer name>:4026
The port is required. If you don't see the port number, add it manually.
Select Refresh.
You should see some processes appear in the Available Processes window.
If you don't see any processes, try using the IP address instead of the remote computer name (the port is required). You can use
ipconfigin a command line to get the IPv4 address.If you want to use the Find button, you might need to open outbound UDP port 3702 on the server.
Check Show processes from all users.
Type the first letter of your process name to quickly find your app.
If you're using the in-process hosting model on IIS, select the correct w3wp.exe process. Starting in .NET Core 3, this process is the default.
Otherwise, select the dotnet.exe process. (This is the out-of-process hosting model.)
If you have multiple processes showing w3wp.exe or dotnet.exe, check the User Name column. In some scenarios, the User Name column shows your app pool name, such as IIS APPPOOL\DefaultAppPool. If you see the App Pool, but it's not unique, create a new named App Pool for the app instance you want to debug, and then you can find it easily in the User Name column.

Select Attach.
Open the remote computer's website. In a browser, go to http://<remote computer name>.
You should see the ASP.NET web page.
In the running ASP.NET application, select the link to the Privacy page.
The breakpoint should be hit in Visual Studio.
If you're unable to attach or hit the breakpoint, see Troubleshoot remote debugging.
Troubleshooting IIS deployment
- If you can't connect to the host using the host name, try the IP address instead.
- Make sure the required ports are open on the remote server.
- For ASP.NET Core, you need to make sure that the Application pool field for the DefaultAppPool is set to No Managed Code.
- Verify that the version of ASP.NET used in your app is the same as the version you installed on the server. For your app, you can view and set the version in the Properties page. To set the app to a different version, that version must be installed.
- If the app tried to open, but you see a certificate warning, choose to trust the site. If you already closed the warning, you can edit the publishing profile, a *.pubxml file, in your project and add the following element (for test only):
<AllowUntrustedCertificate>true</AllowUntrustedCertificate> - After it's deployed, start the app in IIS to test that it deployed correctly.
- Check the Output window in Visual Studio for status information, and check your error messages.
Open required ports on Windows Server
In most setups, required ports are opened by the installation of ASP.NET and the remote debugger. However, if you're troubleshooting deployment issues and the app is hosted behind a firewall, you might need to verify that the correct ports are open.
On an Azure VM, you must open ports through:
Required ports:
- 80 - Required for IIS
- 4026 - Required for remote debugging from Visual Studio 2022 (see Remote Debugger Port Assignments for more information).
- UDP 3702 - (Optional) The Discovery port enables you to the Find button when attaching to the remote debugger in Visual Studio. This must be an outbound port (outbound rule).
In addition, these ports should already be opened by the ASP.NET Core installation:
- 8172 - (Optional) Required for Web Deploy to deploy the app from Visual Studio