Configure projects to target platforms
Visual Studio enables you to set up your application builds to target different platforms (processor architectures), including Arm64 and other platforms. You don't need to be running Visual Studio on a platform in order to build for that target platform. For more information about Arm64 support in Visual Studio, see Visual Studio on ARM-powered devices. For 64-bit platform support for .NET development, see 64-bit applications.
Note
Visual Studio 2022 runs as a 64-bit application. This is totally separate from the platforms you can target for your projects in Visual Studio. You can use any version of Visual Studio to target both 32-bit and 64-bit platforms.
Visual Studio enables you to set up your application builds to target different platforms (processor architectures), such as x86 and x64. For 64-bit platform support for .NET development, see 64-bit applications.
Note
Visual Studio runs as a 32-bit application. This is totally separate from the platforms you can target for your projects in Visual Studio. You can use any version of Visual Studio to target both 32-bit and 64-bit platforms.
Target platforms with the Configuration Manager
The Configuration Manager provides a way for you to quickly add a new platform to target with your project. If you select one of the platforms included with Visual Studio, a configuration is set up to build your project for the selected platform.
To target some platforms in a native C++ project, you need to install the build tools for the platform. C++ build tools for x86, and x64 platforms are installed with the default C++ workload. If you're targeting another processor architecture, like Arm64, you need to use the Visual Studio Installer to install the build tools for the platform before continuing. See Modify Visual Studio. You don't need to run Visual Studio on an Arm64 device to target Arm64. For Arm64, you can install Arm64 build tools or ARM64EC build tools; see Arm64 Visual Studio.
For .NET development, .NET 6 or later is required to target the Arm64 platform. See .NET Support for macOS 11 and Windows 11 for Arm64 and x64.
To configure a project to target Arm64 and other platforms
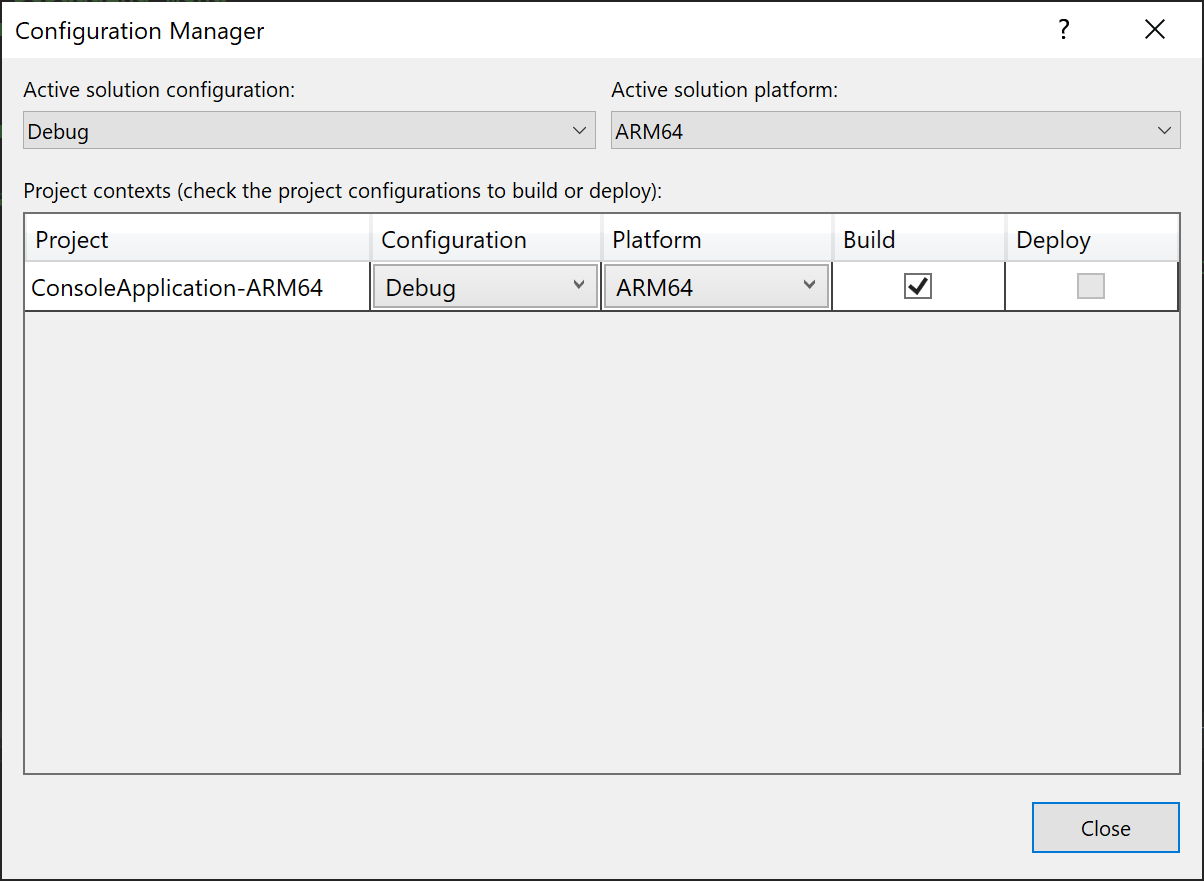
On the menu bar, choose Build > Configuration Manager.
In the Active solution platform list, choose a platform for the solution to target, and then choose the Close button.
If the platform that you want doesn't appear in the Active solution platform list, choose New. After you install the tools for a particular platform, you'll be able to add the new solution and project configurations that target that platform.
The New Solution Platform dialog box appears.
In the Type or select the new platform list, choose the desired platform (processor architecture); for example,
ARM64.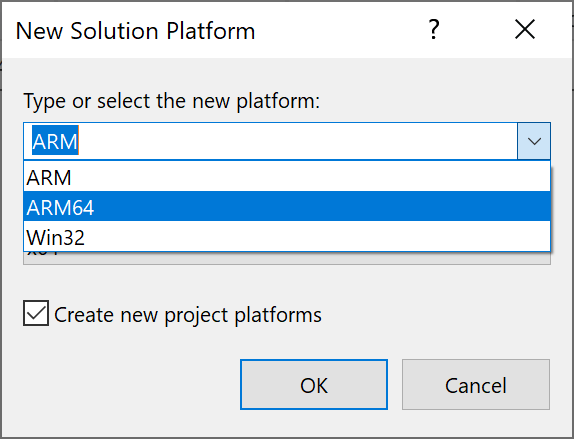
Note
If you give your configuration a new name, you may have to modify the settings in the Project Designer to target the correct platform.
If you want to copy the settings from a current platform configuration, choose it, and then choose the OK button.
To configure a project to target a different platform
On the menu bar, choose Build > Configuration Manager.
In the Active solution platform list, choose a platform for the solution to target, and then choose the Close button.
If the platform that you want doesn't appear in the Active solution platform list, choose New. After you install the tools for a particular platform, you'll be able to add the new solution and project configurations targeting that platform.
The New Solution Platform dialog box appears.
In the Type or select the new platform list, choose the desired platform (processor architecture); for example,
x64.Note
If you give your configuration a new name, you may have to modify the settings in the Project Designer to target the correct platform.
If you want to copy the settings from a current platform configuration, choose it, and then choose the OK button.
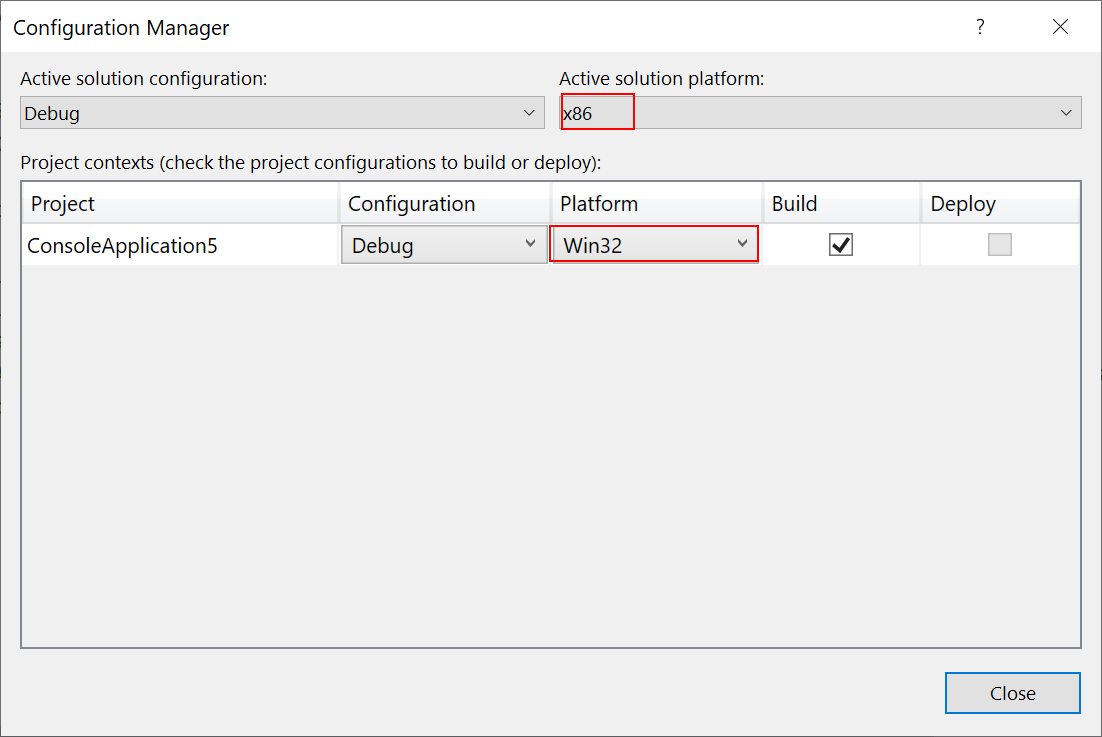
Note
The Win32 platform name is used for C++ projects, and it means x86. Visual Studio considers both project-level platforms and solution-level platforms, and the project platforms come from the language-specific project systems. C++ projects use Win32 and x64, but the solution platforms use x86 and x64. When you choose x86 as the solution configuration, Visual Studio selects the Win32 platform for C++ projects. To see both project-level platform and solution-level platform settings, open Configuration Manager and note the two platform settings. The solution-level platform is shown in the Active solution platform dropdown, and the table shows the project-level platform for each project.
Target platforms in the Project Designer or Project Properties UI
The Project Designer or Project Properties UI also provides a way to target different platforms with your project. If selecting one of the platforms included in the list in the New Solution Platform dialog box doesn't work for your solution, you can create a custom configuration name and modify the settings in Project Properties to target the correct platform.
Performing this task varies based on the programming language you're using. See the following links for more information:
For Visual Basic projects, see /platform (Visual Basic).
For C# projects, see Build page, Project Designer (C#).
Prefer 32-bit setting
The Prefer 32-bit setting in the Build page of the project designer for .NET Framework 4.5 or later projects handles the case where you're building the AnyCPU configuration, but you want your application to run in 32-bit mode when it's executed on platforms that support both 32-bit and 64-bit modes. If you enable the checkbox, the PlatformTarget build property is set to anycpu32bitpreferred. See comments on the PlatformTarget for C# and /platform for Visual Basic.
Manually editing the project file
Sometimes, you need to manually edit the project file for some custom configuration. An example is when you have conditions that can't be specified in the IDE, such as a reference that is different for two different platforms, or an assembly that must be registered for a particular platform in order to expose it to COM. The tool that processes the project file is MSBuild.
Caution
Manually editing a C++ project file that you're using in Visual Studio isn't recommended.
COM registration
If you're building a .NET assembly and exposing it to COM, Visual Studio registers the assembly with a particular platform architecture, since there are different registry locations for each platform architecture (for example, x86 and x64). If your assembly already targets a specific platform, then that is used, but if you're registering a .NET assembly that’s built for Any CPU, MSBuild defaults to registering it for MSBuild's current runtime. If you're building in Visual Studio, that's x64 in Visual Studio 2022 and later, and x86 in Visual Studio 2019 and earlier. If you set the platform architecture using the methods described previously in this article, or specify a different PlatformTarget in the project file, MSBuild will respect that when registering. There is a property you can set to override this behavior, RegisterAssemblyMSBuildArchitecture. You can set RegisterAssemblyMSBuildArchitecture to the desired platform architecture (such as x86 or x64) by adding it to a top-level PropertyGroup element in the project file.
Referencing x86 and x64 assemblies and DLLs
You might have a .NET assembly or DLL that has both x86 and x64 versions. To set up your project to use these references, first add the reference, and then open the project file and edit it to add an ItemGroup with a condition that references both the configuration, and the target platform. For example, suppose the binary you're referencing is ClassLibrary1 and there are different paths for Debug and Release configurations, as well as x86 and x64 versions. Then, use four ItemGroup elements with all combinations of settings, as follows:
<Project Sdk="Microsoft.NET.Sdk">

  <PropertyGroup>
    <OutputType>Exe</OutputType>
    <TargetFramework>netcoreapp2.0</TargetFramework>
    <Platforms>AnyCPU;x64;x86</Platforms>
  </PropertyGroup>

  <ItemGroup Condition=" '$(Configuration)|$(Platform)' == 'Debug|x64'">
    <Reference Include="ClassLibrary1">
      <HintPath>..\..\ClassLibrary1\ClassLibrary1\bin\x64\Debug\netstandard2.0\ClassLibrary1.dll</HintPath>
    </Reference>
  </ItemGroup>

  <ItemGroup Condition=" '$(Configuration)|$(Platform)' == 'Release|x64'">
    <Reference Include="ClassLibrary1">
      <HintPath>..\..\ClassLibrary1\ClassLibrary1\bin\x64\Release\netstandard2.0\ClassLibrary1.dll</HintPath>
    </Reference>
  </ItemGroup>

  <ItemGroup Condition=" '$(Configuration)|$(Platform)' == 'Debug|x86'">
    <Reference Include="ClassLibrary1">
      <HintPath>..\..\ClassLibrary1\ClassLibrary1\bin\x86\Debug\netstandard2.0\ClassLibrary1.dll</HintPath>
    </Reference>
  </ItemGroup>

  <ItemGroup Condition=" '$(Configuration)|$(Platform)' == 'Release|x86'">
    <Reference Include="ClassLibrary1">
      <HintPath>..\..\ClassLibrary1\ClassLibrary1\bin\x86\Release\netstandard2.0\ClassLibrary1.dll</HintPath>
    </Reference>
  </ItemGroup>
</Project>
For more information about the project file, see MSBuild project file schema reference.
Related content
Feedback
Coming soon: Throughout 2024 we will be phasing out GitHub Issues as the feedback mechanism for content and replacing it with a new feedback system. For more information see: https://aka.ms/ContentUserFeedback.
Submit and view feedback for