Note
Access to this page requires authorization. You can try signing in or changing directories.
Access to this page requires authorization. You can try changing directories.
In this tutorial for Visual Studio development using ASP.NET Core and TypeScript, you create a simple web application, add some TypeScript code, and then run the app.
In Visual Studio 2022 and later, if you want to use Angular or Vue with ASP.NET Core, it's recommended that you use the ASP.NET Core Single Page Application (SPA) templates to create an ASP.NET Core app with TypeScript. For more information, see the Visual Studio tutorials for Angular or Vue.
In this tutorial, you learn how to:
- Create an ASP.NET Core project
- Add the NuGet package for TypeScript support
- Add some TypeScript code
- Run the app
- Add a third-party library using npm
Prerequisites
You must have Visual Studio installed and the ASP.NET web development workload.
If you haven't already installed Visual Studio, go to the Visual Studio downloads page to install it for free.
If you need to install the workload but already have Visual Studio, go to Tools > Get Tools and Features... to open the Visual Studio Installer. Choose the ASP.NET and web development workload, then select Modify.
Create a new ASP.NET Core MVC project
Visual Studio manages files for a single application in a project. The project includes source code, resources, and configuration files.
Note
To start with an empty ASP.NET Core project and add a TypeScript frontend, see ASP.NET Core with TypeScript instead.
In this tutorial, you begin with a simple project containing code for an ASP.NET Core MVC app.
Open Visual Studio. If the start window isn't open, choose File > Start Window.
On the start window, choose Create a new project.
On the Create a new project window, enter web app in the search box. Next, choose C# as the language.
After you apply the language filter, choose ASP.NET Core Web App (Model-View-Controller), and then select Next.
Note
If you don't see the ASP.NET Core Web Application project template, you must add the ASP.NET and web development workload. For detailed instructions, see the Prerequisites.
In the Configure your new project window, enter a name for your project in the Project name box. Then, select Next.
- In the Additional information window, ensure .NET 8.0 or later is selected in the Framework dropdown menu, and then select Create.
Visual Studio opens your new project.
Add some code
In Solution Explorer (right pane), right-click the project node and select Manage NuGet Packages for Solutions.
In the Browse tab, search for Microsoft.TypeScript.MSBuild.
Select Install to install the package.
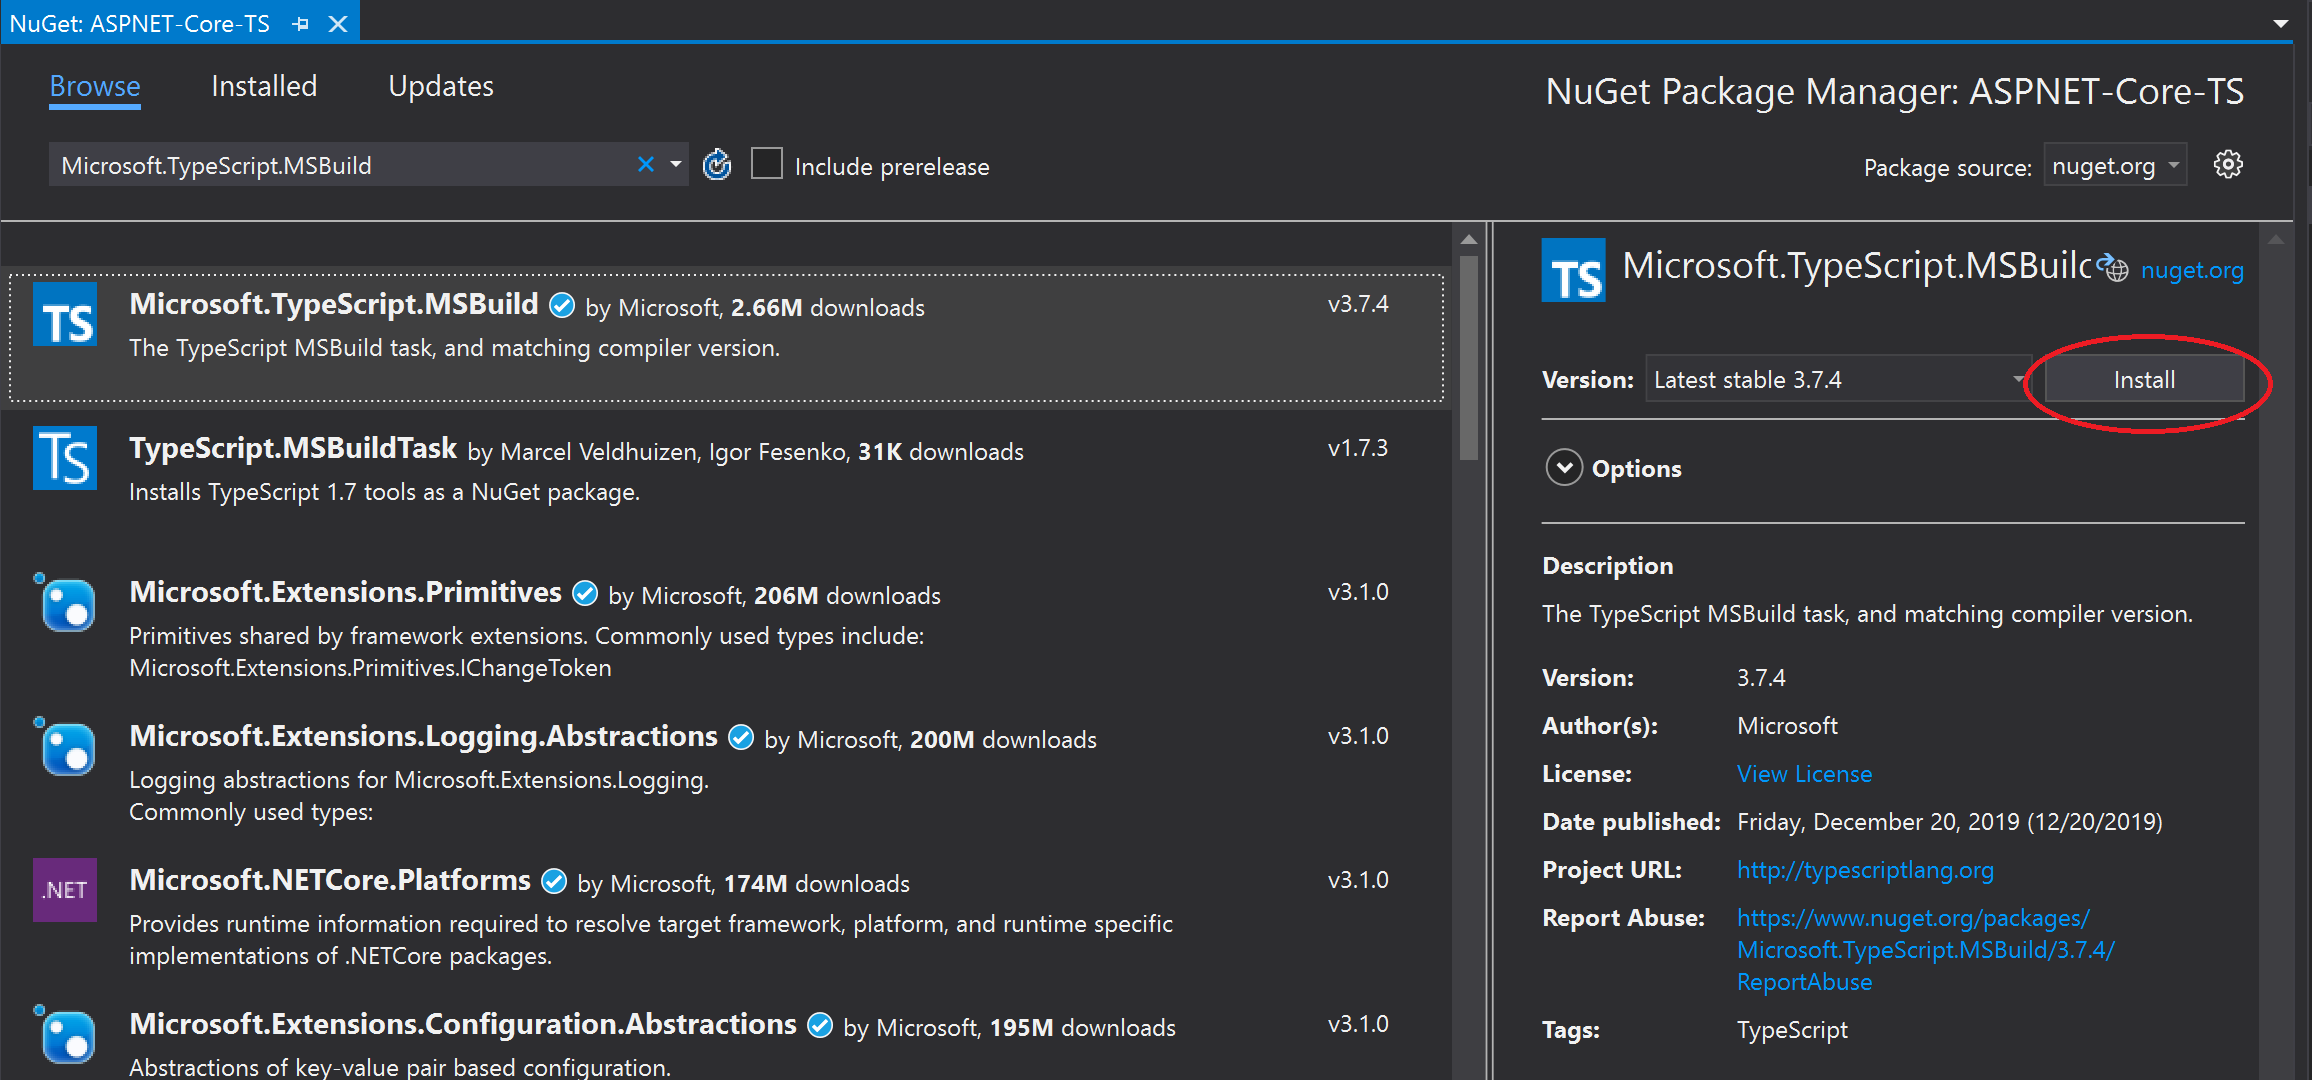

Visual Studio adds the NuGet package under the Dependencies node in Solution Explorer.
Right-click the project node and select Add > New Item. Choose the TypeScript JSON Configuration File, and then select Add.
If you don't see all the item templates, select Show All Templates, and then choose the item template.
Visual Studio adds the
tsconfig.jsonfile to the project root. You can use this file to configure options for the TypeScript compiler.Open
tsconfig.jsonand replace the default code with the following code:{ "compileOnSave": true, "compilerOptions": { "noImplicitAny": false, "noEmitOnError": true, "removeComments": false, "sourceMap": true, "target": "ES6", "rootDir": "./scripts", "outDir": "wwwroot/js" }, "include": [ "scripts/**/*" ], "exclude": [ "node_modules", "wwwroot" ] }The outDir option specifies the output folder for the plain JavaScript files that the TypeScript compiler transpiles.
This configuration provides a basic introduction to using TypeScript. In other scenarios, such as when using gulp or webpack, you might want a different intermediate location for the transpiled JavaScript files instead of wwwroot/js. The location depends on your tools and configuration preferences.
In Solution Explorer, right-click the project node and select Add > New Folder. Use the name scripts for the new folder.
Right-click the scripts folder and select Add > New Item. Choose the TypeScript File, type the name
app.tsfor the filename, and then select Add.If you don't see all the item templates, select Show All Templates, and then choose the item template.
Visual Studio adds
app.tsto the scripts folder.Open
app.tsand add the following TypeScript code.function TSButton() { let name: string = "Fred"; const element = document.getElementById("ts-example"); if (element) { element.innerHTML = greeter(user); } } class Student { fullName: string; constructor(public firstName: string, public middleInitial: string, public lastName: string) { this.fullName = firstName + " " + middleInitial + " " + lastName; } } interface Person { firstName: string; lastName: string; } function greeter(person: Person) { return "Hello, " + person.firstName + " " + person.lastName; } let user = new Student("Fred", "M.", "Smith");Visual Studio provides IntelliSense support for your TypeScript code.
To try this feature, remove
.lastNamefrom thegreeterfunction, reenter the period (.), and notice the IntelliSense updates.
Select
lastNameto add the last name back to the code.Open the Views/Home folder, and then open Index.cshtml.
Add the following HTML code to the end of the file.
<div id="ts-example">
    <br />
    <button type="button" class="btn btn-primary btn-md" onclick="TSButton()">
        Click Me
    </button>
</div>
Open the Views/Shared folder, and then open _Layout.cshtml.
Add the following script reference before the call to
@await RenderSectionAsync("Scripts", required: false):<script src="~/js/app.js"></script>Select File > Save All (Ctrl + Shift + S) to save your changes.
Build the application
Select Build > Build Solution.
Although the app builds automatically when you run it, we want to take a look at something that happens during the build process.
Open the wwwroot/js folder to see two new files:
app.jsand the source map file, app.js.map. The TypeScript compiler generates these files.Source map files are required for debugging.
Run the application
Press F5 (Debug > Start Debugging) to run the application.
The app opens in a browser.
In the browser window, you see the Welcome heading and the Click Me button.
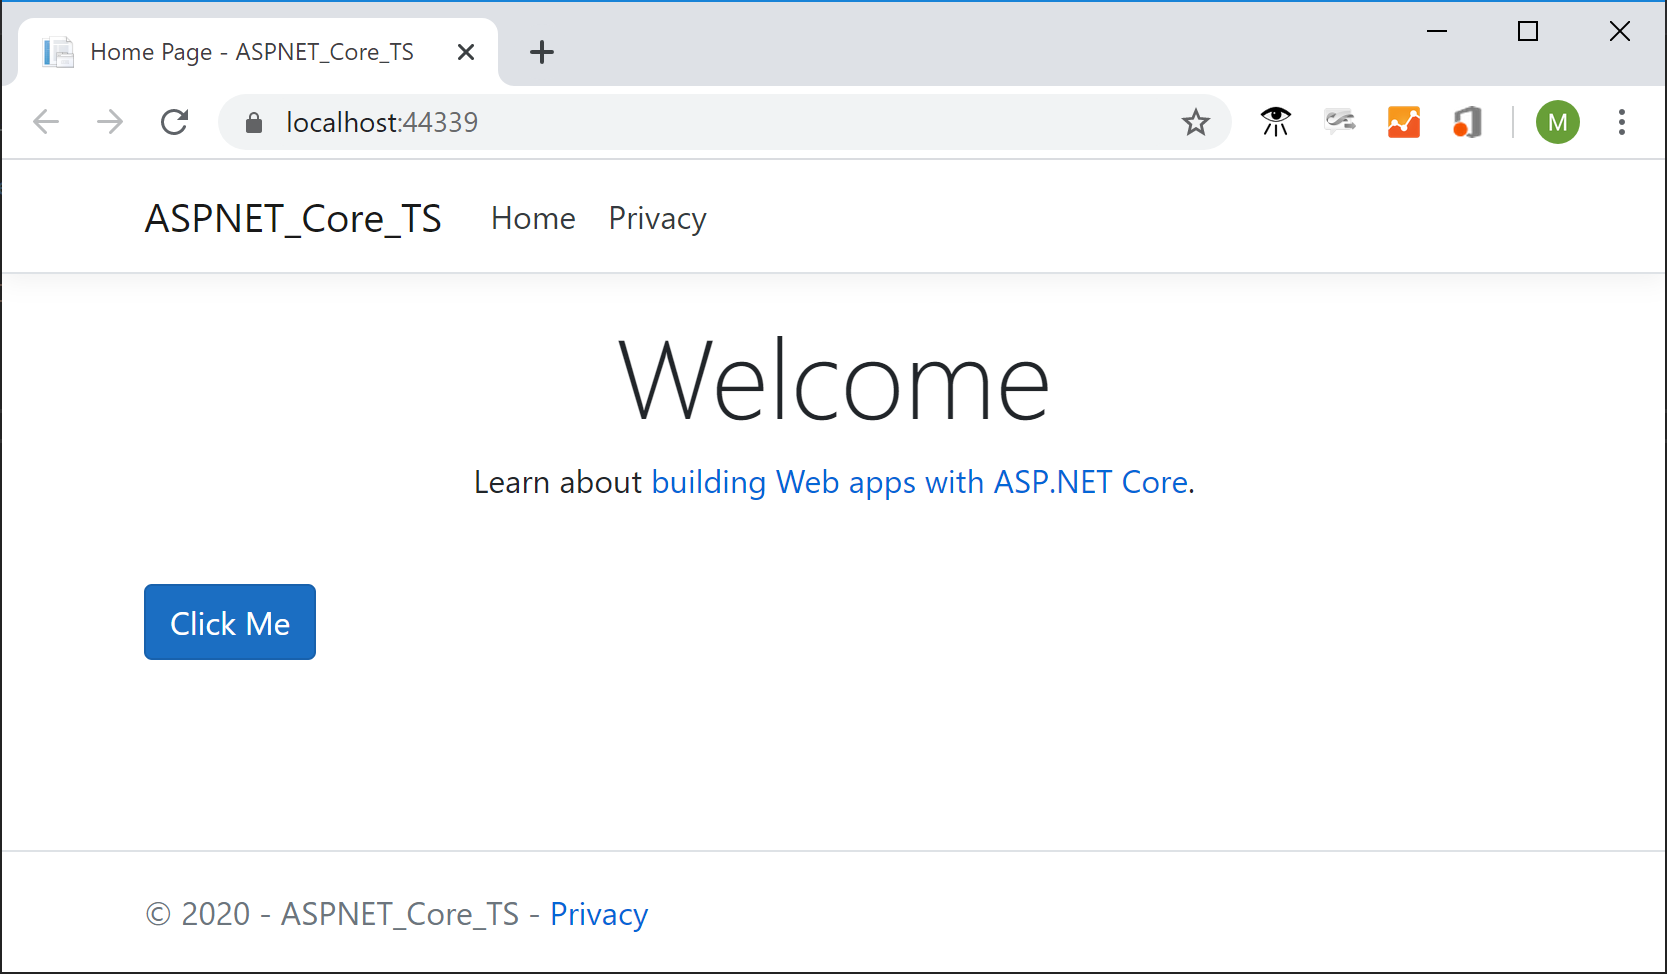
Select the button to display the message we specified in the TypeScript file.
Debug the application
Set a breakpoint in the
greeterfunction inapp.tsby clicking in the left margin in the code editor.
Press F5 to run the application.
You might need to respond to a message to enable script debugging.
Note
Chrome or Edge is required for client-side script debugging.
When the page loads, press Click Me.
The application pauses at the breakpoint. Now, you can inspect variables and use debugger features.
Add TypeScript support for a third-party library
Follow the instructions in npm package management to add a
package.jsonfile to your project. This task adds npm support to your project.Note
For ASP.NET Core projects, you can also use Library Manager or yarn instead of npm to install client-side JavaScript and CSS files.
In this example, add a TypeScript definition file for jQuery to your project. Include the following code in your
package.jsonfile."devDependencies": { "@types/jquery": "3.5.1" }This code adds TypeScript support for jQuery. The jQuery library itself is already included in the MVC project template (look under wwwroot/lib in Solution Explorer). If you're using a different template, you might need to include the jquery npm package as well.
If the package in Solution Explorer isn't installed, right-click the npm node and choose Restore Packages.
Note
In some scenarios, Solution Explorer might indicate that an npm package is out of sync with
package.jsondue to a known issue described here. For example, the package might appear as not installed when it is installed. In most cases, you can update Solution Explorer by deleting package.json, restarting Visual Studio, and re-adding thepackage.jsonfile as described earlier in this article.In Solution Explorer, right-click the scripts folder and choose Add > New Item.
If you don't see all the item templates, choose Show All Templates, and then choose the item template.
Choose TypeScript File, type library.ts, and choose Add.
In library.ts, add the following code.
var jqtest = {
  showMsg: function (): void {
     let v: any = jQuery.fn.jquery.toString();
     let content: any = $("#ts-example-2")[0].innerHTML;
     alert(content.toString() + " " + v + "!!");
     $("#ts-example-2")[0].innerHTML = content + " " + v + "!!";
  }
};

jqtest.showMsg();
For simplicity, this code displays a message using jQuery and an alert.
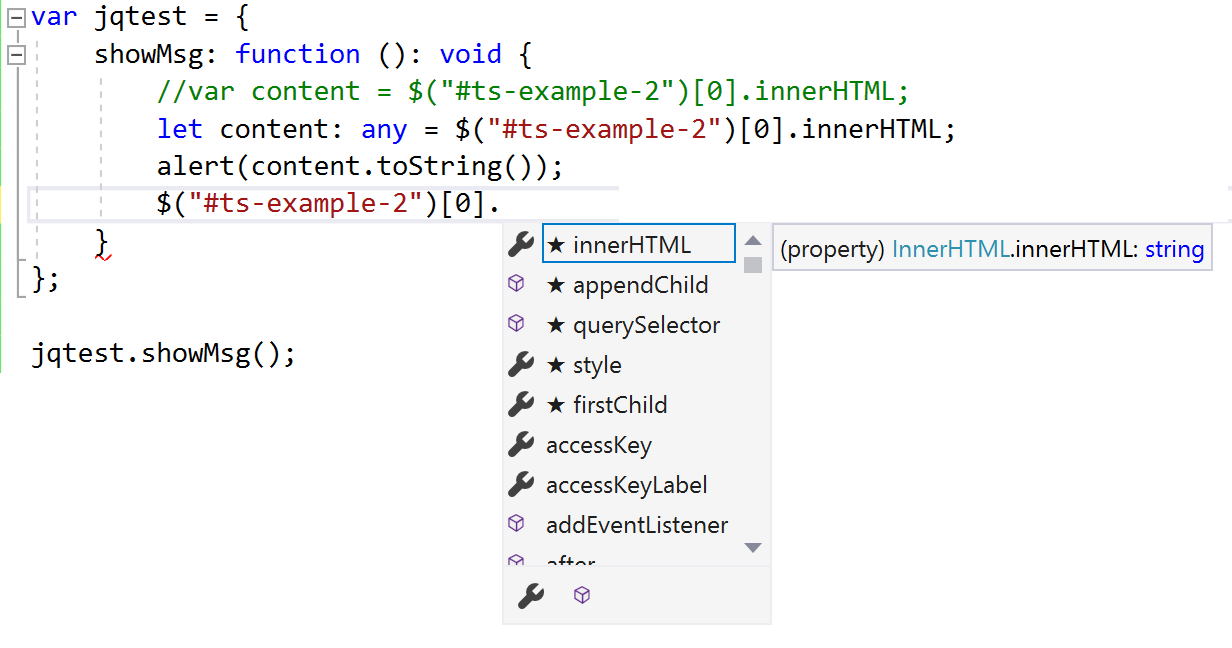
With TypeScript type definitions for jQuery added, you get IntelliSense support on jQuery objects when you enter a period (.) following a jQuery object, as shown here.
In _Layout.cshtml, update the script references to include
library.js.<script src="~/js/app.js"></script> <script src="~/js/library.js"></script>In Index.cshtml, add the following HTML to the end of the file.
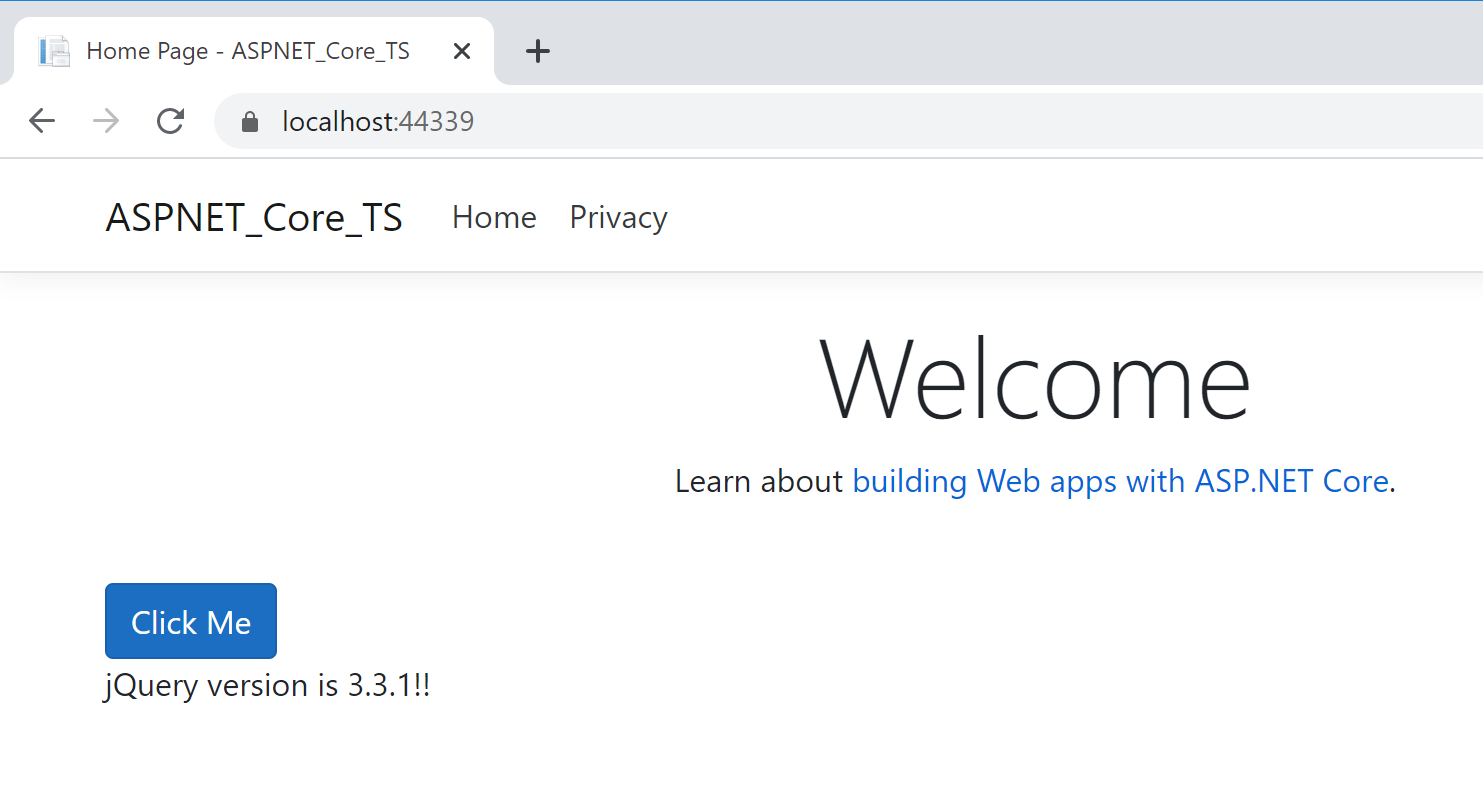
<div>
  <p id="ts-example-2">jQuery version is:</p>
</div>
Press F5 (Debug > Start Debugging) to run the application.
The app opens in the browser.
Select OK in the alert to see the page updated to jQuery version is: 3.3.1!!.
Next steps
You might want to learn more details about using TypeScript with ASP.NET Core. If you're interested in Angular programming in Visual Studio, you can use the Angular language service extension for Visual Studio.