Note
Access to this page requires authorization. You can try signing in or changing directories.
Access to this page requires authorization. You can try changing directories.
Reusing existing code and refreshing code are common tasks for developers. You might want to refactor existing code for another purpose and save time by not writing all new code. You might want to clean your code to remove unused items or refresh imports and methods so they're current with recent versions.
Visual Studio provides several commands to help you automatically transform and clean your Python source code:
- Rename changes the name of a selected class, method, or variable.
- Add import provides a smart tag to add a missing import.
- Remove unused imports deletes unused imports.
Prerequisites
- Visual Studio. To install the product, follow the steps in Install Visual Studio.
- Access to a Python code project with existing code.
Rename a class, method, or variable
You can use the Rename command to change the name for a specific identifier, including a class, method, or variable. Visual Studio supports updating all instances of the identifier or only the specific instances that you indicate.
The following steps show how to use the Rename command in your code.
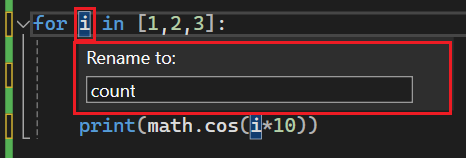
In your code, right-click the identifier that you want to rename and select Rename. You can also place the caret on an identifier and select Edit > Refactor > Rename from the menu, or use the keyboard shortcut Ctrl+R.
In the Rename dialog, type the new name for the identifier followed by Enter:
Add an import statement
If you have identifiers in your code that are missing definitions or supporting type information, Visual Studio can help you correct the issue. When you place the caret on an identifier that lacks information, Visual Studio shows a smart tag (light bulb) to the left of the code. The tag lists commands to add the necessary import or from ... import statements for the corresponding identifier.
The following steps show how to work with the smart tag to add imports in your code.
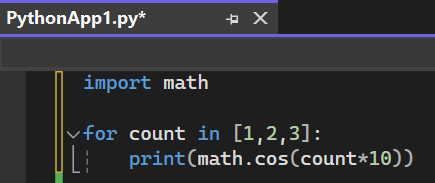
In your code, place the caret on an identifier for which Visual Studio displays the smart tag (light bulb). In this example, the smart tag displays for the call to the math module:
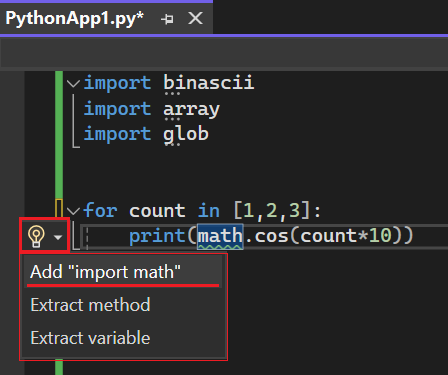
On the smart tag menu, select the command to add the necessary module or type information to your code file. In this example, the command to add the
import mathstatement is selected.Visual Studio offers
importcompletions for top-level packages and modules in the current project and the standard library. Visual Studio also offersfrom ... importcompletions for submodules and subpackages and module members. Completions include functions, classes, or exported data.After you select an option, confirm the expected change is made to your file.
Visual Studio adds the
importstatement at the top of your code file after other imports, or into an existingfrom ... importstatement if the same module is already imported. In this example, theimport mathstatement is added at the top of the file after the other imports: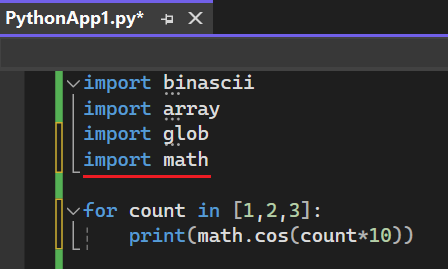
Visual Studio attempts to filter out members that aren't defined in a module. An example is as a module imported into another module that's not a child of the importing module. Many modules use the import sys statement rather than from xyz import sys. You don't see a completion for importing the sys module from other modules even if the modules are missing an __all__ member that excludes the sys module.
Similarly, Visual Studio filters functions that are imported from other modules or the built-in namespace. If a module imports the settrace function from the sys module, in theory, you can import the function from that module. However, the best approach is to use the import settrace from sys statement directly, so Visual Studio specifically offers that statement.
Finally, suppose a module is normally excluded, but it has other values that are included like a name assigned with a value in the module. Visual Studio still excludes the import. This behavior assumes the value shouldn't be exported because another module defines it. Another assignment is likely to be a dummy value that also isn't exported.
Remove unused imports
When you write code, it's easy to end up with import statements for modules that aren't being used at all. Because Visual Studio analyzes your code, it can automatically determine if an import statement is needed by looking at whether the imported name is used within the scope after the statement occurs.
The following steps show how to remove unused imports in your code.
In your code, place the caret on an
importstatement for which Visual Studio displays the smart tag (light bulb). In this example, the smart tag displays for the unused modules binascii, array, and glob: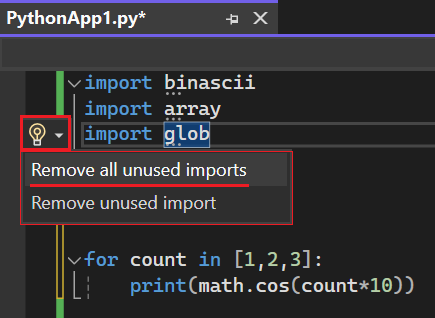
Select the Remove all unused imports or Remove unused import option to remove only the selected module.
After you select an option, confirm the changes are made to your file. In this example, Visual Studio removes the three unused modules: binascii, array, and glob.
Considerations when using refactoring commands
Before you use the refactoring commands, review the following considerations.
After you run a refactoring command, you can revert the changes by using the Edit > Undo command. The Rename command offers a Preview feature, so you can see changes before they're applied.
Visual Studio doesn't account for control flow in your code. If you use an identifier before the supporting definition is present in the code, such as an
importstatement, Visual Studio still processes the identifier as used. Visual Studio expects to find supporting definitions for identifiers before you make calls and assignments.Visual Studio ignores all
from __future__import statements. These statements are imports that are performed inside of a class definition or by usingfrom ... import *statements.