Note
Access to this page requires authorization. You can try signing in or changing directories.
Access to this page requires authorization. You can try changing directories.
Visual Studio provides tools to help you create custom workflows that manage the life cycle of documents and list items in a SharePoint Web site. Items provided include a designer, a set of activity controls, and the necessary assembly references. Visual Studio also includes the SharePoint Customization Wizard, to help create and configure the workflows.
For more information about SharePoint, see Microsoft SharePoint Products and Technologies.
Workflows in SharePoint
When you add a workflow to a SharePoint library or list, you enforce a business process on all items in the library or list. A workflow describes the actions that the system or users must perform on each item, such as sending the item to be edited and then reviewed. These actions, known as activities, are the building blocks of the workflow.
You can create SharePoint workflows in Visual Studio and deploy them to a SharePoint Web site. After a workflow is deployed to SharePoint, you associate it with a library or list. It can then be started automatically, by a process, or manually, by a user. For more information about workflow operation, see Develop SharePoint workflows using Visual Studio.
Create custom SharePoint workflows
Two SharePoint workflow projects are available to you in Visual Studio: Sequential Workflow and State Machine Workflow.
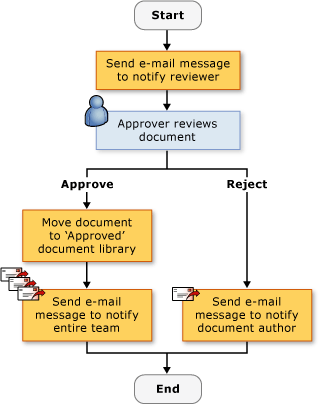
A sequential workflow represents a series of steps. The steps are performed one after another until the last activity is completed. Sequential workflows are always strictly sequential in their execution. Because they can receive external events, and include parallel logic flows, the exact order of execution may vary. The following illustration shows an example of a sequential workflow.

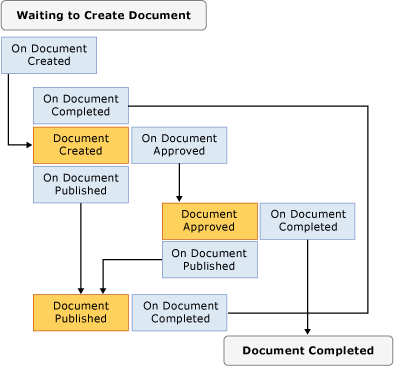
A state machine workflow represents a set of states, transitions, and actions. The steps in a state machine workflow execute asynchronously. This means that they are not necessarily performed one after another, but instead are triggered by actions and states. One state is assigned as the start state, and then, based on an event, a transition is made to another state. The state machine can have a final state that determines the end of the workflow. The following diagram shows an example of a state machine workflow.

For more information about workflow types, see Workflow Types.
Use the wizard
When you create a SharePoint workflow project in Visual Studio, you first specify its settings in the SharePoint Customization Wizard. The wizard uses these settings to create a project in Solution Explorer. This project contains a code file, several files that are used to deploy the workflow, and references to assemblies that are required to create a custom SharePoint workflow.
After you create the workflow, you can modify its properties in the Properties window. Although most workflow properties can be changed directly in the Properties window, some require you to click an ellipsis button ( ) to change their values. This button restarts the SharePoint Customization Wizard. After you make the property value changes, choose the Finish button to finalize them.
Note
The Workflow Type property is read-only and cannot be changed. If you want to change the workflow type, you must create another workflow.
Design a SharePoint workflow
After you define all the steps in the business process, use the Visual Studio workflow designer to design the SharePoint workflow. To open the designer, double-click Workflow1.cs or Workflow1.vb in Solution Explorer, or open the shortcut menu for either of those files and then choose Open.
Activities
To design a workflow, add activities from the Toolbox to a workflow schedule on the designer. A workflow schedule contains the sequence of activities in the order that they should be performed.
There are two types of activities:
Simple activities perform a single unit of work, such as "delay for 1 day" or "start Web service."
Composite activities contain other activities; for example, a conditional activity might contain two branches.
Both types of activities are available in the Toolbox.
Activities can have properties, methods, and events. Use the Properties window to set the properties of an activity.
You can also create a custom activity. For more information, see Walkthrough: Create a custom site workflow activity.
Activities are organized in the following tabs in the Toolbox:
SharePoint Workflow
Windows Workflow v3.0
Windows Workflow v3.5
Not all core workflow activities are supported by SharePoint. For more information, see Workflow Activities for Windows SharePoint Services Overview.
SharePoint workflow activities
The SharePoint Workflow tabs contain specialized activities for use in Microsoft SharePoint Foundation. These activities simplify and streamline the development of document life cycle workflows. For more information about the activities listed in the SharePoint Workflow tab, see Workflow Activities for Windows SharePoint Services Overview.
Windows workflow activities
The Windows Workflow tabs contain activities that are provided by the Windows Workflow Foundation. You can use these activities to create workflow schedules for any kind of Windows workflow application.
For more information about the activities listed in the Windows Workflows tab, see Windows Workflow Foundation Activities. For more information about the Windows Workflow Foundation, see Windows Workflow Foundation Overview.
Work with activities in the designer
Your workflow schedule can contain a combination of Windows Workflow activities and SharePoint Workflow activities.
The designer displays visual cues to help you position and configure activities correctly. When you drag or copy an activity onto the workflow schedule, the designer displays green plus-sign (+) icons that show you valid locations for that activity in the workflow. You cannot position an activity in a location where it would not be valid. For example, you cannot position a Send activity as the first activity in a Listen activity branch. For more information, see SharePoint Designer Developer Center.
Collect information during the workflow
You might want to gather information from users at predefined times in the workflow. You can collect information by using forms or item properties.
Forms
Forms are like dialog boxes that contain questions and provide ways for users to give answers.
There are four types of forms that can be used in a workflow:
Association
Initiation
Modification
Task
Of these, Visual Studio includes item templates for association and initiation forms. An example of an association form is one that lets the administrator installing the workflow enter parameters that relate to the workflow, such as a spending limit for an expense workflow. An example of an initiation form is one that lets the user of an expense workflow enter the amount that they spent into the workflow. For more information about these types of forms, see SharePoint project and project item templates.
Item properties
You can also collect information from users by using the properties of an item in the SharePoint library or list. The main code file (Workflow1.cs or Workflow1.vb) declares an instance of the Microsoft.SharePoint.Workflow.SPWorkflowActivationProperties.WorkflowProperties class named workflowProperties. Use the workflowProperties object to access the properties of the library or list in code. For an example, see Walkthrough: Create and debug a SharePoint workflow solution.
Debug a SharePoint workflow template
You can debug a SharePoint workflow project the same as you debug other Visual Studio Web-based projects. When you start the Visual Studio debugger, Visual Studio uses the settings that you specify in the SharePoint Customization Wizard to open the appropriate SharePoint Web site and automatically associate the workflow template with the appropriate library or list. Visual Studio also attaches the Visual Studio debugger to the Microsoft SharePoint Foundation process named w3wp.exe.
To test the workflow, you must start it manually. For more information, see the section "Debugging Workflows" in Debugging SharePoint Solutions. For more information about Visual Studio Web application debugging, see Debug web applications and script.
Deploy a SharePoint workflow template
Visual Studio SharePoint workflow projects deploy just like other Visual Studio SharePoint projects. For more information, see Package and Deploy SharePoint solutions.
Import globally reusable workflows
In addition to creating site-specific reusable workflows, SharePoint Designer enables you to create globally reusable workflows, which are workflows that can be used by any SharePoint site. The Import Reusable Workflow project in Visual Studio currently does not import globally reusable workflows. However, you can either use SharePoint Designer to convert a globally reusable workflow into a reusable workflow, or import the workflow as an unconverted declarative workflow. For more information, see Import Items from an existing SharePoint site.
Related topics
| Title | Description |
|---|---|
| Walkthrough: Create and debug a SharePoint workflow solution | Leads you step-by-step through creating and debugging a simple Visual Studio workflow. |
| Walkthrough: Create a workflow with association and initiation forms | Leads you step-by-step to creating a more full-featured Visual Studio workflow complete with Association and Initiation forms. |
| Walkthrough: Add an application page to a workflow | Builds on the topic Walkthrough: Create a workflow with association and initiation forms by adding an additional .aspx application page that reports on data entered into the workflow. |
| Walkthrough: Create a custom site workflow activity | Demonstrates how to perform two key tasks: create a site-level workflow, and create a custom workflow activity. |
| Walkthrough: Import a SharePoint Designer reusable workflow into Visual Studio | Demonstrates how to import reusable declarative workflows created in SharePoint Designer 2010 into a Visual Studio SharePoint project. |