Note
Access to this page requires authorization. You can try signing in or changing directories.
Access to this page requires authorization. You can try changing directories.
This article steps you through creating, running, and customizing a series of unit tests using the Microsoft unit test framework for managed code and Visual Studio Test Explorer. You start with a C# project that is under development, create tests that exercise its code, run the tests, and examine the results. Then you change the project code and rerun the tests. If you would like a conceptual overview of these tasks before going through these steps, see Unit test basics.
This article describes how to manually create unit tests. If you would like to generate tests automatically from existing code, see the following articles:
Prerequisites
Visual Studio must be installed along with the .NET desktop development workload.
Create a project to test
Open Visual Studio.
On the start window, choose Create a new project.
Search for and select the C# Console App project template for .NET, and then click Next.
If you do not see the Console App template, use the Visual Studio Installer to install the .NET desktop development workload.
Name the project Bank, and then click Next.
Choose either the recommended target framework or .NET 8, and then choose Create.
The Bank project is created and displayed in Solution Explorer with the Program.cs file open in the code editor.
Note
If Program.cs is not open in the editor, double-click the file Program.cs in Solution Explorer to open it.
Replace the contents of Program.cs with the following C# code that defines a class, BankAccount:
using System;

namespace BankAccountNS
{
    /// <summary>
    /// Bank account demo class.
    /// </summary>
    public class BankAccount
    {
        private readonly string m_customerName;
        private double m_balance;

        private BankAccount() { }

        public BankAccount(string customerName, double balance)
        {
            m_customerName = customerName;
            m_balance = balance;
        }

        public string CustomerName
        {
            get { return m_customerName; }
        }

        public double Balance
        {
            get { return m_balance; }
        }

        public void Debit(double amount)
        {
            if (amount > m_balance)
            {
                throw new ArgumentOutOfRangeException("amount");
            }

            if (amount < 0)
            {
                throw new ArgumentOutOfRangeException("amount");
            }

            m_balance += amount; // intentionally incorrect code
        }

        public void Credit(double amount)
        {
            if (amount < 0)
            {
                throw new ArgumentOutOfRangeException("amount");
            }

            m_balance += amount;
        }

        public static void Main()
        {
            BankAccount ba = new BankAccount("Mr. Bryan Walton", 11.99);

            ba.Credit(5.77);
            ba.Debit(11.22);
            Console.WriteLine("Current balance is ${0}", ba.Balance);
        }
    }
}
Rename the file to BankAccount.cs by right-clicking and choosing Rename in Solution Explorer.
On the Build menu, click Build Solution (or press Ctrl + SHIFT + B).
You now have a project with methods you can test. In this article, the tests focus on the Debit method. The Debit method is called when money is withdrawn from an account.
Create a unit test project
On the File menu, select Add > New Project.
Tip
You can also right-click on the solution in Solution Explorer and choose Add > New Project.
Type test in the search box, select C# as the language, and then select the C# MSTest Test Project for .NET template, and then click Next.
Name the project BankTests and click Next.
Choose either the recommended target framework or .NET 8, and then choose Create.
Starting in Visual Studio 2022 version 17.10, you can also select a test runner. For the test runner, you can choose either VSTest or MSTest. For more information on the difference between test runners, see Microsoft.Testing.Platform and VSTest comparison.
The BankTests project is added to the Bank solution.
In the BankTests project, add a reference to the Bank project.
In Solution Explorer, select Dependencies under the BankTests project and then choose Add Reference (or Add Project Reference) from the right-click menu.
In the Reference Manager dialog box, expand Projects, select Solution, and then check the Bank item.
Choose OK.
Create the test class
Create a test class to verify the BankAccount class. You can use the UnitTest1.cs file that was generated by the project template, but give the file and class more descriptive names.
Rename a file and class
To rename the file, in Solution Explorer, select the UnitTest1.cs file in the BankTests project. From the right-click menu, choose Rename (or press F2), and then rename the file to BankAccountTests.cs.
To rename the class, position the cursor on
UnitTest1in the code editor, right-click, and then choose Rename (or press F2). Type in BankAccountTests and then press Enter.
The BankAccountTests.cs file now contains the following code:
// The 'using' statement for Test Tools is in GlobalUsings.cs
// using Microsoft.VisualStudio.TestTools.UnitTesting;

namespace BankTests
{
    [TestClass]
    public class BankAccountTests
    {
        [TestMethod]
        public void TestMethod1()
        {
        }
    }
}
Add a using statement
Add a using statement to the test class to be able to call into the project under test without using fully qualified names. At the top of the class file, add:
using BankAccountNS;
Test class requirements
The minimum requirements for a test class are:
The
[TestClass]attribute is required on any class that contains unit test methods that you want to run in Test Explorer.Each test method that you want Test Explorer to recognize must have the
[TestMethod]attribute.
You can have other classes in a unit test project that do not have the [TestClass] attribute, and you can have other methods in test classes that do not have the [TestMethod] attribute. You can call these other classes and methods from your test methods.
Create the first test method
In this procedure, you write unit test methods to verify the behavior of the Debit method of the BankAccount class.
There are at least three behaviors that need to be checked:
The method throws an ArgumentOutOfRangeException if the debit amount is greater than the balance.
The method throws an ArgumentOutOfRangeException if the debit amount is less than zero.
If the debit amount is valid, the method subtracts the debit amount from the account balance.
Tip
You can delete the default TestMethod1 method, because you won't use it in this article.
To create a test method
The first test verifies that a valid amount (that is, one that is less than the account balance and greater than zero) withdraws the correct amount from the account. Add the following method to that BankAccountTests class:
[TestMethod]
public void Debit_WithValidAmount_UpdatesBalance()
{
    // Arrange
    double beginningBalance = 11.99;
    double debitAmount = 4.55;
    double expected = 7.44;
    BankAccount account = new BankAccount("Mr. Bryan Walton", beginningBalance);

    // Act
    account.Debit(debitAmount);

    // Assert
    double actual = account.Balance;
    Assert.AreEqual(expected, actual, 0.001, "Account not debited correctly");
}
The method is straightforward: it sets up a new BankAccount object with a beginning balance and then withdraws a valid amount. It uses the Assert.AreEqual method to verify that the ending balance is as expected. Methods such as Assert.AreEqual, Assert.IsTrue, and others are frequently used in unit testing. For more conceptual information on writing a unit test, see Write your tests.
Test method requirements
A test method must meet the following requirements:
It's decorated with the
[TestMethod]attribute.It returns
void.It cannot have parameters.
Build and run the test
On the Build menu, choose Build Solution (or press Ctrl + SHIFT + B).
If Test Explorer is not open, open it by choosing Test > Test Explorer (or Test > Windows > Test Explorer) from the top menu bar (or press Ctrl + E, T).
Choose Run All to run the test (or press Ctrl + R, V).
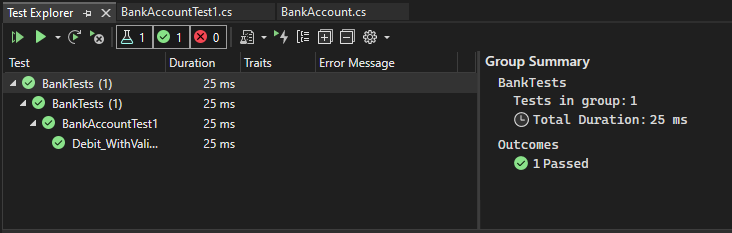
While the test is running, the status bar at the top of the Test Explorer window is animated. At the end of the test run, the bar turns green if all the test methods pass, or red if any of the tests fail.
In this case, the test fails.
Select the method in Test Explorer to view the details at the bottom of the window.
Fix your code and rerun your tests
The test result contains a message that describes the failure. You might need to drill down to see this message. For the AreEqual method, the message displays what was expected and what was actually received. You expected the balance to decrease, but instead it increased by the amount of the withdrawal.
The unit test has uncovered a bug: the amount of the withdrawal is added to the account balance when it should be subtracted.
Correct the bug
To correct the error, in the BankAccount.cs file, replace the line:
m_balance += amount;
with:
m_balance -= amount;
Rerun the test
In Test Explorer, choose Run All to rerun the test (or press Ctrl + R, V). The red/green bar turns green to indicate that the test passed.
Use unit tests to improve your code
This section describes how an iterative process of analysis, unit test development, and refactoring can help you make your production code more robust and effective.
Analyze the issues
You've created a test method to confirm that a valid amount is correctly deducted in the Debit method. Now, verify that the method throws an ArgumentOutOfRangeException if the debit amount is either:
- greater than the balance, or
- less than zero.
Create and run new test methods
Create a test method to verify correct behavior when the debit amount is less than zero:
[TestMethod]
public void Debit_WhenAmountIsLessThanZero_ShouldThrowArgumentOutOfRange()
{
    // Arrange
    double beginningBalance = 11.99;
    double debitAmount = -100.00;
    BankAccount account = new BankAccount("Mr. Bryan Walton", beginningBalance);

    // Act and assert
    Assert.ThrowsException<System.ArgumentOutOfRangeException>(() => account.Debit(debitAmount));
}
Use the ThrowsException method to assert that the correct exception has been thrown. This method causes the test to fail unless an ArgumentOutOfRangeException is thrown. If you temporarily modify the method under test to throw a more generic ApplicationException when the debit amount is less than zero, the test behaves correctly—that is, it fails.
To test the case when the amount withdrawn is greater than the balance, do the following steps:
Create a new test method named
Debit_WhenAmountIsMoreThanBalance_ShouldThrowArgumentOutOfRange.Copy the method body from
Debit_WhenAmountIsLessThanZero_ShouldThrowArgumentOutOfRangeto the new method.Set the
debitAmountto a number greater than the balance.
Run the two tests and verify that they pass.
Continue the analysis
The method being tested can be improved further. With the current implementation, we have no way to know which condition (amount > m_balance or amount < 0) led to the exception being thrown during the test. We just know that an ArgumentOutOfRangeException was thrown somewhere in the method. It would be better if we could tell which condition in BankAccount.Debit caused the exception to be thrown (amount > m_balance or amount < 0) so we can be confident that our method is sanity-checking its arguments correctly.
Look at the method being tested (BankAccount.Debit) again, and notice that both conditional statements use an ArgumentOutOfRangeException constructor that just takes name of the argument as a parameter:
throw new ArgumentOutOfRangeException("amount");
There's a constructor you can use that reports far richer information: ArgumentOutOfRangeException(String, Object, String) includes the name of the argument, the argument value, and a user-defined message. You can refactor the method under test to use this constructor. Even better, you can use publicly available type members to specify the errors.
Refactor the code under test
First, define two constants for the error messages at class scope. Place the definitions in the class under test, BankAccount:
public const string DebitAmountExceedsBalanceMessage = "Debit amount exceeds balance";
public const string DebitAmountLessThanZeroMessage = "Debit amount is less than zero";
Then, modify the two conditional statements in the Debit method:
if (amount > m_balance)
{
    throw new System.ArgumentOutOfRangeException("amount", amount, DebitAmountExceedsBalanceMessage);
}

if (amount < 0)
{
    throw new System.ArgumentOutOfRangeException("amount", amount, DebitAmountLessThanZeroMessage);
}
Refactor the test methods
Refactor the test methods by removing the call to Assert.ThrowsException. Wrap the call to Debit() in a try/catch block, catch the specific exception that's expected, and verify its associated message. The Microsoft.VisualStudio.TestTools.UnitTesting.StringAssert.Contains method provides the ability to compare two strings.
Now, the Debit_WhenAmountIsMoreThanBalance_ShouldThrowArgumentOutOfRange might look like this:
[TestMethod]
public void Debit_WhenAmountIsMoreThanBalance_ShouldThrowArgumentOutOfRange()
{
    // Arrange
    double beginningBalance = 11.99;
    double debitAmount = 20.0;
    BankAccount account = new BankAccount("Mr. Bryan Walton", beginningBalance);

    // Act
    try
    {
        account.Debit(debitAmount);
    }
    catch (System.ArgumentOutOfRangeException e)
    {
        // Assert
        StringAssert.Contains(e.Message, BankAccount.DebitAmountExceedsBalanceMessage);
    }
}
Retest, rewrite, and reanalyze
Currently, the test method doesn't handle all the cases that it should. If the method under test, the Debit method, failed to throw an ArgumentOutOfRangeException when the debitAmount was larger than the balance (or less than zero), the test method would pass. This scenario isn't good because you want the test method to fail if no exception is thrown.
This outcome is a bug in the test method. To resolve the issue, add an Assert.Fail assert at the end of the test method to handle the case where no exception is thrown.
Rerunning the test shows that the test now fails if the correct exception is caught. The catch block catches the exception, but the method continues to execute and it fails at the new Assert.Fail assert. To resolve this problem, add a return statement after the StringAssert in the catch block. Rerunning the test confirms that you've fixed this problem. The final version of the Debit_WhenAmountIsMoreThanBalance_ShouldThrowArgumentOutOfRange looks like this:
[TestMethod]
public void Debit_WhenAmountIsMoreThanBalance_ShouldThrowArgumentOutOfRange()
{
    // Arrange
    double beginningBalance = 11.99;
    double debitAmount = 20.0;
    BankAccount account = new BankAccount("Mr. Bryan Walton", beginningBalance);

    // Act
    try
    {
        account.Debit(debitAmount);
    }
    catch (System.ArgumentOutOfRangeException e)
    {
        // Assert
        StringAssert.Contains(e.Message, BankAccount.DebitAmountExceedsBalanceMessage);
        return;
    }

    Assert.Fail("The expected exception was not thrown.");
}
Conclusion
The improvements to the test code led to more robust and informative test methods. But more importantly, they also improved the code under test.
Tip
This article uses the Microsoft unit test framework for managed code. Test Explorer can also run tests from third-party unit test frameworks that have adapters for Test Explorer. For more information, see Install third-party unit test frameworks.
Related content
For information about how to run tests from a command line, see VSTest.Console.exe command-line options.