Note
Access to this page requires authorization. You can try signing in or changing directories.
Access to this page requires authorization. You can try changing directories.
Important
This feature is for public preview customers only. Features in preview might not be complete and could undergo changes before becoming available in the broader release.
To start getting data from your source file into Organizational Data in Microsoft 365, the global admin needs to create and register an app in the Microsoft Entra admin center. Then, as the data source admin, you need to help the global admin register their app by giving them a security certificate or secret.
Here's how.
1. Register a new app in the Microsoft Entra admin center
Applies to: Microsoft 365 Global Administrator
Note
For more information about registering an app in the Microsoft Entra admin center, see Quickstart: Register an application with the Microsoft identity platform.
From the Microsoft admin center's left rail, select All admin centers. This option appears as the last one on the list.

Select Microsoft Entra ID.
Create a new app registration:
In the top toolbar, select Add > App registration.

On the resulting screen:
Give your app a name.
Under Supported account types, leave the first option, Accounts in this organizational directory only ([Your organization] only - Single tenant), selected.
If you're setting up a direct connection with an external source like Workday Report as a Service (RaaS), under Redirect URI, select Select a platform, then select Web. Then enter this URL:
http://localhost:5173/callback.At the bottom of the screen, select Register.

When you arrive back at the Overview page, copy the Application (client) ID and Directory (tenant) ID. Keep these IDs handy. You'll need to provide them later.

Remove API permissions:
On the left, select API permissions.
For each listed API / Permissions name, select the ellipsis (...) to the right of the API, such as Microsoft Graph.
Select Remove permission.

Confirm removal. When you remove permissions for these items, you're making sure the app only has permissions for what it needs.
If you're setting up a direct connection with an external source like Workday RaaS, add an API permission:
Select Add a permission.

Select APIs my organization uses.

Search for "Workplace Analytics," and select it.
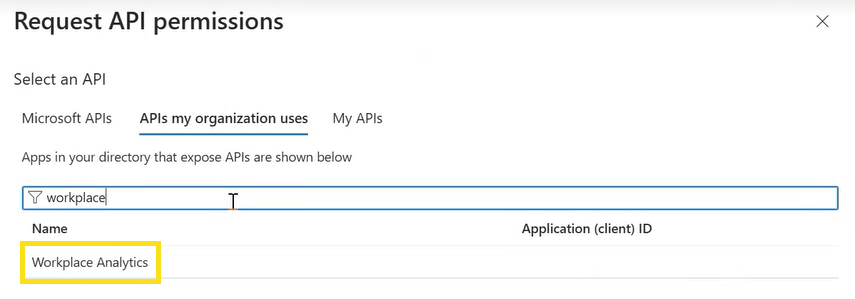
Select Delegated permissions.
Under AdministratorSettings, select AdministratorSettings.ReadWrite.
Select Add permissions.
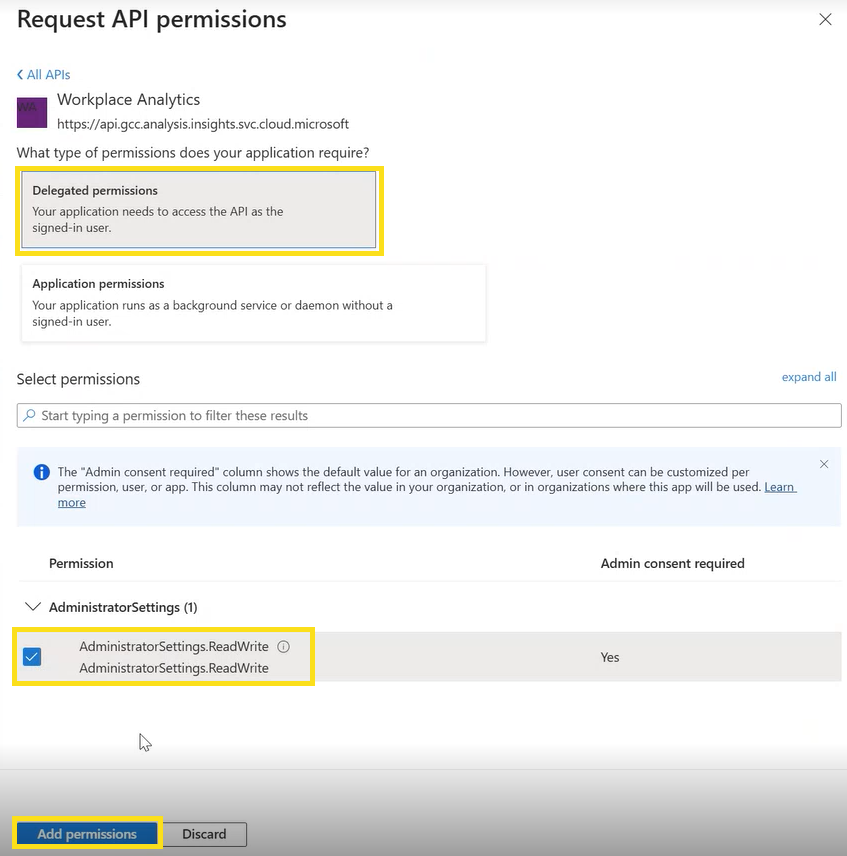
Under Configured permissions, select Grant admin consent.
Give the Data source admin the app ID and the tenant ID.


2. Generate the security certificate (if using certificate)
Applies to: Organizational Data Source Administrator or HRIS Source system admin
Create a certificate by following these instructions. Then, send the generated certificate to the global admin.
3. Set up the security certificate, secret, or federated credential in the app registration in the Microsoft Entra admin center
Applies to: Microsoft 365 Global Administrator
Use only one of the three options below. If, however, you're setting up a direct connection with an external source like Workday RaaS, you must use a client secret, not a certificate or federated credential.
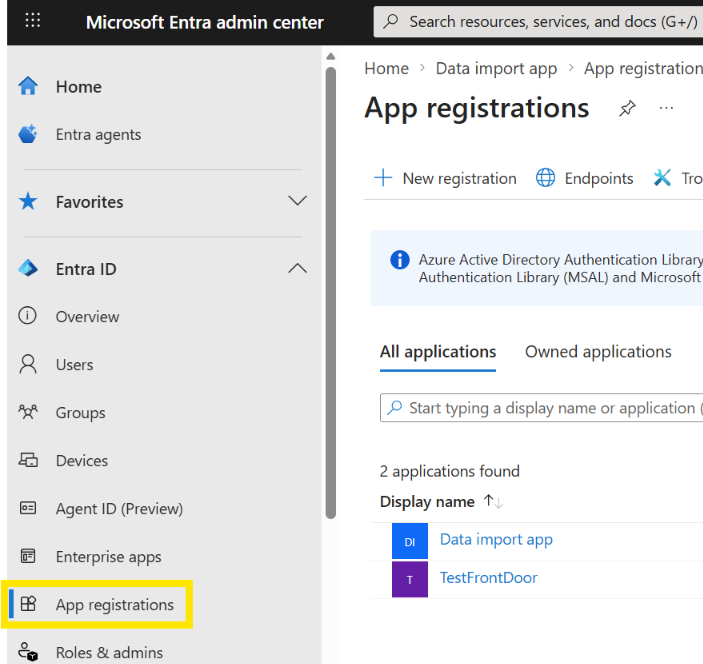
First, navigate back to your app registration in the Microsoft Entra admin center. Find your app registrations under Entra ID on the left.
Using a certificate
In the app registration in the Microsoft Entra admin center, under Manage on the left, select Certificates & secrets.
Select Certificates, then select Upload certificate.

Upload the certificate that the data source admin gave you and add a Description. Select Add.

Using a client secret
In the app registration in the Microsoft Entra admin center, under Manage on the left, select Certificates & secrets.
Select Client secrets, then select New client secret.

Enter a description for the secret and set an expiration date. Then select Add.

On the Certificates & secrets page, select the copy icon to copy the secret to your clipboard. Save it securely for later use when setting up the import.

Using a federated credential
You can use workload identity federation to configure a user-assigned managed identity or app registration in Microsoft Entra ID to trust tokens from an external identity provider. This eliminates the maintenance burden of manually managing certificates or secrets.
In the app registration in the Microsoft Entra admin center, under Manage on the left, select Certificates & secrets.
Select Federated credentials, then select Add credential.

Set up the credential using the resources here.
4. Set up the import in the Microsoft 365 admin center
Applies to: Microsoft 365 Global Administrator or Organizational Data Source Administrator
Start the import from the Data Connections page on the Organizational Data in Microsoft 365 page (Home > Setup > Migration and imports > Organizational Data in Microsoft 365 > Data Connections).
Select Get started (if this is the first time you're importing data), or New import (if you've already imported data).
On the Select connection type page, select Start API-based setup.
Select the apps and services with which you'd like to share data. By default, all public reserved attributes are shared across Microsoft 365 and Viva apps and services. Use this page to select apps with which to share application-specific and custom data. You can change your selections at any time within Settings. Learn more.
The Preparation and setup overview page lays out the rest of the steps to complete the connection. Some of these steps, such as the creation of the app ID, have already been completed using the process described above. You'll need to prepare a header .csv file to map your imported attributes to the apps with which you're sharing data. If you don't already have a template for this file, select Download template to get started. Learn more about how to structure this data file.
On the Set up API-based connection page, give your connection a name, and enter the app ID that your global admin gave you. If you're setting up a direct connection with an external source like Workday RaaS, instead of the app ID, enter the email address that you'll use to retrieve OAuth tokens from the Node script.
- Share the Scale unit, such as "novaprdwus2-01," with your data source admin so that they can send data to the Microsoft 365 API.
- If you'd like to review the details about the quality of your ingested data before making it available to downstream apps, select Manually approve data before sharing. Learn how.
- If you want, select Prioritize Organizational Data in Microsoft 365. Learn more about this setting.
On the Import headers for attribute mapping page, upload the .csv file you created in the previous step for attribute mapping.
- Make sure the headers in the .csv header file match your .csv data file. If you have more fields in your .csv header file than in your .csv data file, or vice versa, processing for your import will fail.
Map your reserved attributes to your imported data. This means you'll match attributes from your .csv file (which might be an automated output from an external source like a Workday report) to their corresponding attributes for the apps with which you're sharing data. Any imported attributes that you don't match to reserved attributes are used as custom attributes and can't be renamed. Learn more. To automatically map columns and skip manual mapping, use reserved attribute names with the "Microsoft_" prefix, such as Microsoft_PersonEmail, in your .csv column headers. See the complete list of reserved attribute names.
View the global attributes that are used for all Microsoft 365 apps and services. These are attributes pulled from your imported data that are automatically used by all eligible apps. At the bottom of the page, select Next.
On the last page, review all the details, apps, and attribute mapping for your connection. If everything looks correct, select Connect.
Note
If you set up periodic exports from your source system, your data will be validated for Viva and Microsoft 365 services requirements. If you haven't configured periodic exports, the connector will be set up, but data won't be pulled into the system to be validated. Instead, you'll see an "Awaiting connection" status on the Data connections tab in the Microsoft 365 admin center. Selecting that connection shows that the data source admin hasn't configured the periodic exports. You'll be prompted to reach out to them to get that process started.
Your organizational data is validated against the requirements for use with Viva and Microsoft 365 services. Validation takes a few hours; however, it can take up to three days for your complete data upload to be available in the profile store. You can check the validation status on the Organizational data page in the admin center. When the validation is complete, you see a message that your data is in use and managed by Viva and Microsoft 365. Once validation is complete, the organizational data is made available to the apps and services you selected.