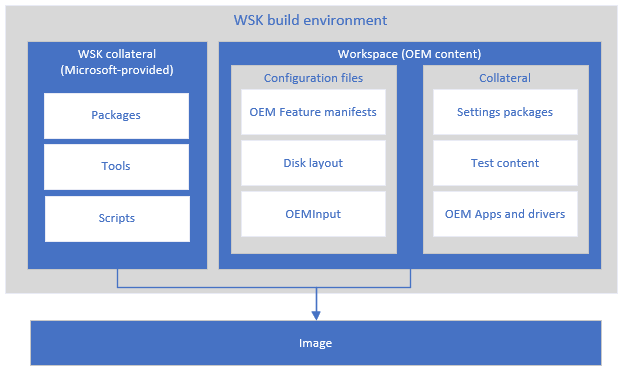
Get started with a workspace
A workspace is a working directory that helps organize the OEM-owned apps, drivers, and other assets needed to create a Factory OS image. To get started working with Factory OS images, use the tooling in the Windows System kit (WSK) to create a workspace. When you build your image, the customizations and collateral in your workspace get combined with packages in the WSK to build an image.
You can create one workspace for each device design, or you can use the same workspace to create many device designs. Workspaces can be version-controlled using tools like Git. Each device design is defined by its own image configuration file.
Prerequisites
- A technician PC (work PC) with Windows 10, version 1607 or later, and at least 15GB of free space.
The Windows System Kit
The Windows System Kit includes:
- Factory OS
- Tools, samples, and test certificates to help you create Windows images.
Run the Windows System Kit environment
Mount the ISO as a drive (for example, C:). You can use the Windows System Kit from there, or use a tool like Robocopy to install it to a fixed location.
Create a new workspace and sample files
Start the Windows System Kit Build Environment as an administrator i.e open an admin cmd window and run SetImagGenEnv.cmd from the location where you mounted the ISO:
E:\SetImagGenEnv.cmd {CEIPON | CEIPOFF}Note
When you run
SetImagGenEnv.cmdwith no additional parameters, you'll see a dialogue prompting you to opt-in to the Customer Experience Improvement Program which provides Microsoft data that helps improve the Windows kits. You can suppress the dialogue and choose to opt-in or opt-out by specifying either of the below parameters. Use these parameters if you're using the WSK in an automated setting:- CEIPON: Opt-into data collection for the Customer Experience Improvement Program. See Telemetry collected by the Windows system kit to learn about what's collected.
- CEIPOFF: Do not opt-into out of data collection for the Customer Experience Improvement Program
Create a workspace folder, for example,
C:\Workspace. If the directory does not already exist, this command creates it. This script prepares a set of sample files which you can modify to create your own designs.For your first image, we recommend preparing to create a Factory OS Generation-2 virtual machine (VHDX):
PrepWSKWorkspace "C:\Workspace" -Product FactoryOS -VMTo prepare to create physical devices (FFU), omit the -VM:
PrepWSKWorkspace "C:\Workspace" -Product FactoryOSYou can run this command multiple times with different options to create new sets of sample files. You can reuse the same workspace folder over and over. By default, PrepWSKWorkspace will prompt to make sure files you might have modified are not overridden.
For more options, see PrepWSKWorkspace Syntax.
If you've already created a workspace
If you've already created a workspace, you can use it again without running PrepWSKWorkspace.
To start working from an existing workspace:
Start the Windows System Kit Build Environment as an administrator (open an admin cmd window and run
SetImagGenEnv.cmdfrom the mounted WSK ISO.In the command prompt, navigate to the workspace folder
cd c:\workspaceFrom your workspace folder, run
SetWSKWorkspaceRootto establish the existing workspace as the primary location that the WSK scripts will pull required files from.SetWSKWorkspaceRoot
Next steps
- Want to try it out right away? For VMs, you can jump ahead and build an image with no other customizations.
- Customize your image by adding apps, drivers, languages, and more.
- Learn more about Feature manifest files and Image configuration files.