Note
Access to this page requires authorization. You can try signing in or changing directories.
Access to this page requires authorization. You can try changing directories.
An in-place upgrade moves your server from an older version of Windows Server to a newer version while keeping your settings, server roles, and data intact. For example, you can upgrade from Windows Server 2012 R2 to Windows Server 2025. When you upgrade in place, your environment stays running on a supported version with the latest security and performance features, all without rebuilding.
This article shows you how to upgrade by using Windows Server Setup from installation media or the feature update in Windows Update.
Prerequisites
To determine the Windows Server versions and supported upgrade paths, see Supported in-place upgrade paths by version.
Administrative rights on the target server.
A full backup of your server, including the operating system, apps, data, and any VMs. Perform a restore test to confirm the backup is valid and recoverable. You can use Windows Server Backup or a partner backup solution.
A scheduled maintenance window, as downtime is required during the upgrade.
Knowledge of:
- The roles and features that support an in-place upgrade. See Upgrade and migrate roles and features in Windows Server.
- The Microsoft server applications that are supported on Windows Server. See Microsoft server applications compatibility for Windows Server.
- Any non-Microsoft application vendor support requirements.
A server that:
- Meets or exceeds the hardware requirements for Windows Server.
- Isn't clustered. If you're running a cluster, use the Cluster-Aware Updating feature or a cluster operating system rolling upgrade instead.
A valid product key and activation method. Keys and methods can vary depending on the distribution channel that you received the Windows Server media from, such as a Commercial Licensing program, a retail channel, or an OEM.
A location to store files away from your server, such as a USB flash drive or network location.
If Configuration Manager is installed on a Windows Server 2012 or Windows Server 2012 R2 server, follow the preupgrade and post-upgrade instructions at Upgrade on-premises infrastructure that supports Configuration Manager.
Important
Don't use in-place upgrade for servers that run Active Directory Domain Services (AD DS). Although an in-place upgrade is technically possible, it doesn't deliver the AD performance and feature improvements included in Windows Server 2025 and later. Instead, use a clean OS install to promote new domain controllers and demote the older ones. For more information, see Upgrade domain controllers to a newer version of Windows Server.
Depending on whether you upgrade by using installation media or Windows Update, you need to meet additional prerequisites. Select the tab for your upgrade method:
The installation media upgrade method applies to non-Azure servers only. To upgrade Windows Server in an Azure virtual machine (VM), see In-place upgrade for VMs running Windows Server in Azure or use the Windows Update method.
Installation media (ISO image, USB drive, or DVD) for the version of Windows Server that you want to upgrade to.
You can get installation media for your target version of Windows Server from an original equipment manufacturer (OEM), a retail distribution channel, a Visual Studio subscription, or the Microsoft 365 admin center.
Collect pre-upgrade diagnostic information
Collect diagnostic information from your server before upgrading in case the upgrade fails. Store the diagnostic files where you can access them if your server goes down.
To collect your information:
Open an elevated PowerShell prompt, make a note of your current directory, and run the following commands:
Get-ComputerInfo -Property WindowsBuildLabEx,WindowsEditionID | Out-File -FilePath .\computerinfo.txt
systeminfo.exe | Out-File -FilePath systeminfo.txt
ipconfig /all | Out-File -FilePath ipconfig.txt
The
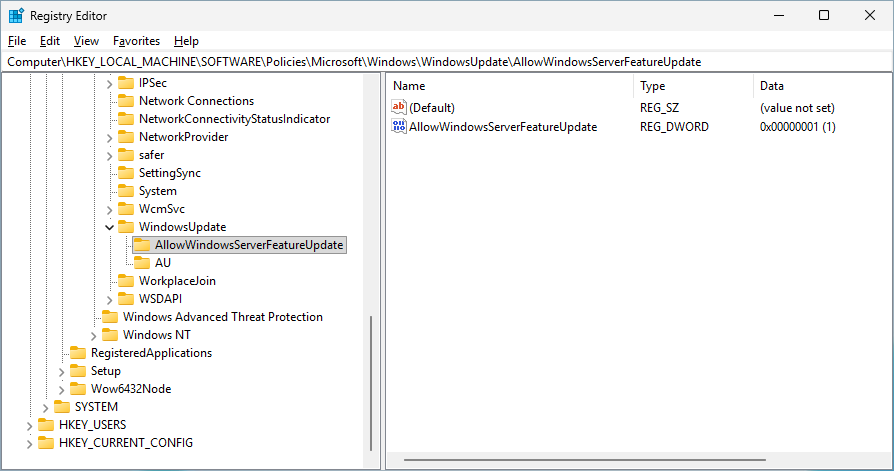
Get-ComputerInfocommand requires PowerShell 5.1 or later. If your Windows Server version doesn't include PowerShell 5.1, open Registry Editor and find theBuildLabExandEditionIDvalues underHKEY_LOCAL_MACHINE\SOFTWARE\Microsoft\Windows NT\CurrentVersion.Open File Explorer, go to the directory you noted, and copy the files to a USB flash drive or network location off your computer.
Back up your server operating system, apps, and VMs after collecting your system information. Shut down or migrate any VMs currently running on the server. Make sure no VMs are running during the upgrade.
Perform the in-place upgrade
You can perform the in-place upgrade by using installation media or Windows Update. Select the tab for your upgrade method:
Tip
Looking for a way to upgrade without installation media? Use the Windows Update tab to upgrade without needing installation media.
Run Windows Server Setup from your installation media to do the in-place upgrade. This procedure applies to non-Azure, nonclustered servers running Windows Server 2012 R2 or later. During the upgrade, your server restarts several times.
To do the in-place upgrade by using installation media:
Mount or insert the installation media. Open File Explorer, go to the root of the installation media, and then open
setup.exe. For example, if you mounted an ISO image or inserted a DVD as drive D, the file path isD:\setup.exe. If User Account Control prompts you to allow Setup to make changes, select Yes.By default, Setup automatically downloads updates for the installation. If you're okay with the default settings, select Next to continue.
If you don't want Setup to automatically download updates, select Change how Setup downloads updates, select the appropriate option for your environment, and then select Next.
If prompted, enter your product key, and then select Next.
Select the edition of Windows Server you want to install, and then select Next.
Review the applicable notices and license terms. If you agree to the terms, select Accept.
Select Keep files, settings, and apps to do an in-place upgrade, and then select Next.
After Setup finishes analyzing your device, it displays the Ready to install screen. To start the in-place upgrade, select Install.
The in-place upgrade starts, and the screen displays the progress. After the in-place upgrade finishes, your server restarts.
Verify the in-place upgrade
After the server restarts, verify the upgrade succeeded by checking the Windows Server version and testing your applications.
Open an elevated PowerShell prompt. Run the following command to verify that the version and edition match what you expected.
Get-ComputerInfo -Property WindowsProductNameEnsure all applications are running and client connections are successful.
If your server isn't working as expected after the in-place upgrade, analyze the Setup log files in the C:\Windows\Panther directory. Also download the SetupDiag tool to analyze the Setup log files.
If you need technical assistance, contact Microsoft Support.