Note
Access to this page requires authorization. You can try signing in or changing directories.
Access to this page requires authorization. You can try changing directories.
Data binding in WinUI 3 apps lets you efficiently connect controls to data sources. Learn how to bind a control to a single item or a collection of items, control item rendering, implement details views, and format data for display. For more details, see Data binding in depth.
Prerequisites
This topic assumes that you know how to create a basic WinUI app with Windows App SDK. For instructions on creating your first WinUI app, see Create a WinUI app.
Create the project
Create a new WinUI Blank App (Packaged) C# project. Name it "Quickstart".
Bind to a single item
Every binding consists of a binding target and a binding source. Typically, the target is a property of a control or other UI element, and the source is a property of a class instance (a data model, or a view model). This example shows how to bind a control to a single item. The target is the Text property of a TextBlock. The source is an instance of a simple class named Recording that represents an audio recording. Let's look at the class first.
Add a new class to your project, and name the class Recording.
namespace Quickstart
{
    public class Recording
    {
        public string ArtistName { get; set; }
        public string CompositionName { get; set; }
        public DateTime ReleaseDateTime { get; set; }
        public Recording()
        {
            ArtistName = "Wolfgang Amadeus Mozart";
            CompositionName = "Andante in C for Piano";
            ReleaseDateTime = new DateTime(1761, 1, 1);
        }
        public string OneLineSummary
        {
            get
            {
                return $"{CompositionName} by {ArtistName}, released: "
                    + ReleaseDateTime.ToString("d");
            }
        }
    }
    public class RecordingViewModel
    {
        private Recording defaultRecording = new();
        public Recording DefaultRecording { get { return defaultRecording; } }
    }
}
Next, expose the binding source class from the class that represents your window of markup. Add a property of type RecordingViewModel to MainWindow.xaml.cs.
namespace Quickstart
{
    public sealed partial class MainWindow : Window
    {
        public MainWindow()
        {
            this.InitializeComponent();
        }
        public RecordingViewModel ViewModel{ get; } = new RecordingViewModel();
    }
}
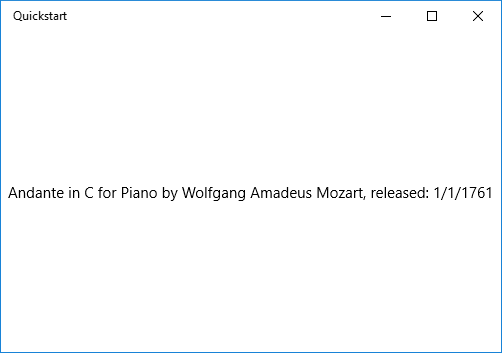
The last piece is to bind a TextBlock to the ViewModel.DefaultRecording.OneLineSummary property.
<Window x:Class="Quickstart.MainWindow" ... >
    <Grid>
        <TextBlock Text="{x:Bind ViewModel.DefaultRecording.OneLineSummary}"
                   HorizontalAlignment="Center"
                   VerticalAlignment="Center"/>
    </Grid>
</Window>
Here's the result.
Bind to a collection of items
A common scenario is to bind to a collection of business objects. In C#, use the generic ObservableCollection<T> class for data binding. It implements the INotifyCollectionChanged interface, which provides change notification to bindings when items are added or removed. However, due to a known WinUI Release mode bug with .NET 8 and later, you might need to use a List<T> in some scenarios, especially if your collection is static and doesn't change after initialization. If your UI needs to update when the collection changes at runtime, use ObservableCollection<T>. If you only need to display a fixed set of items, List<T> is sufficient. Additionally, if you want your bound controls to update with changes to properties of objects in the collection, those objects should implement INotifyPropertyChanged. For more info, see Data binding in depth.
Note
By using List<T>, you might not receive change notifications for collection changes. If you need to respond to changes, consider using ObservableCollection<T>. In this example, you don't need to respond to collection changes, so List<T> is sufficient.
The following example binds a ListView to a collection of Recording objects. First, add the collection to your view model. Add these new members to the RecordingViewModel class.
public class RecordingViewModel
{
    ...
    private List<Recording> recordings = new();
    public List<Recording> Recordings{ get{ return recordings; } }
    public RecordingViewModel()
    {
        recordings.Add(new Recording(){ ArtistName = "Johann Sebastian Bach",
            CompositionName = "Mass in B minor", ReleaseDateTime = new DateTime(1748, 7, 8) });
        recordings.Add(new Recording(){ ArtistName = "Ludwig van Beethoven",
            CompositionName = "Third Symphony", ReleaseDateTime = new DateTime(1805, 2, 11) });
        recordings.Add(new Recording(){ ArtistName = "George Frideric Handel",
            CompositionName = "Serse", ReleaseDateTime = new DateTime(1737, 12, 3) });
    }
}
Then bind a ListView to the ViewModel.Recordings property.
<Window x:Class="Quickstart.MainWindow" ... >
    <Grid>
        <ListView ItemsSource="{x:Bind ViewModel.Recordings}"
                  HorizontalAlignment="Center"
                  VerticalAlignment="Center"/>
    </Grid>
</Window>
You haven't yet provided a data template for the Recording class, so the best the UI framework can do is to call ToString for each item in the ListView. The default implementation of ToString returns the type name.
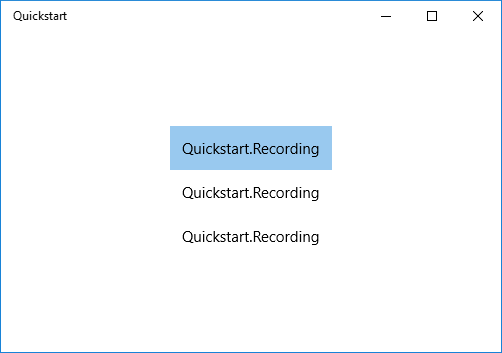
To fix this issue, you can either override ToString to return the value of OneLineSummary, or you can provide a data template. The data template option is a more common and flexible solution. You specify a data template by using the ContentTemplate property of a content control or the ItemTemplate property of an items control. Here are two ways you could design a data template for Recording together with an illustration of the result.
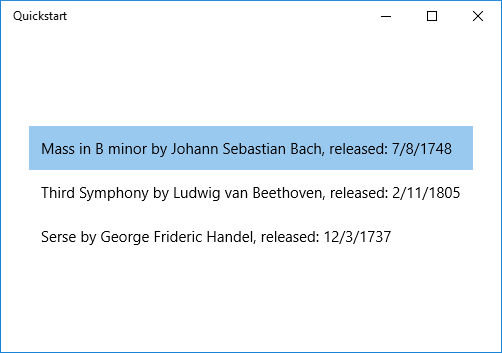
<ListView ItemsSource="{x:Bind ViewModel.Recordings}"
HorizontalAlignment="Center" VerticalAlignment="Center">
    <ListView.ItemTemplate>
        <DataTemplate x:DataType="local:Recording">
            <TextBlock Text="{x:Bind OneLineSummary}"/>
        </DataTemplate>
    </ListView.ItemTemplate>
</ListView>
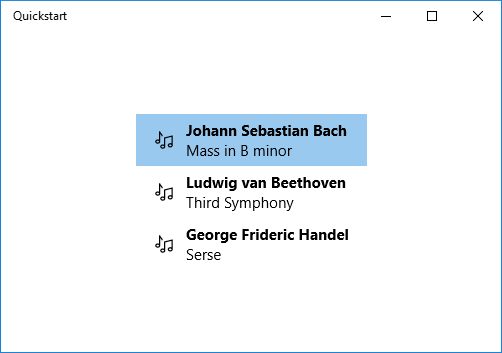
<ListView ItemsSource="{x:Bind ViewModel.Recordings}"
HorizontalAlignment="Center" VerticalAlignment="Center">
    <ListView.ItemTemplate>
        <DataTemplate x:DataType="local:Recording">
            <StackPanel Orientation="Horizontal" Margin="6">
                <SymbolIcon Symbol="Audio" Margin="0,0,12,0"/>
                <StackPanel>
                    <TextBlock Text="{x:Bind ArtistName}" FontWeight="Bold"/>
                    <TextBlock Text="{x:Bind CompositionName}"/>
                </StackPanel>
            </StackPanel>
        </DataTemplate>
    </ListView.ItemTemplate>
</ListView>
For more information about XAML syntax, see Create a UI with XAML. For more information about control layout, see Define layouts with XAML.
Add a details view
You can choose to display all the details of Recording objects in ListView items. But that approach takes up a lot of space. Instead, you can show just enough data in the item to identify it. When the user makes a selection, you can display all the details of the selected item in a separate piece of UI known as the details view. This arrangement is also known as a master/details view, or a list/details view.
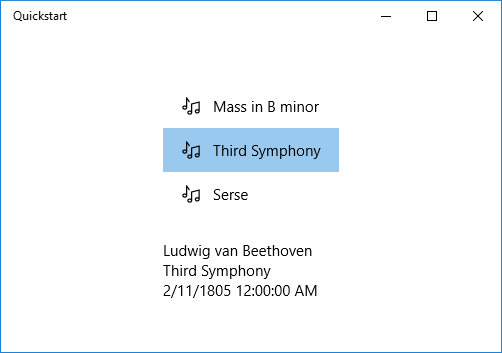
You can implement this arrangement in two ways. You can bind the details view to the SelectedItem property of the ListView. Or you can use a CollectionViewSource. In this case, you bind both the ListView and the details view to the CollectionViewSource. This approach takes care of the currently selected item for you. Both techniques are shown in the following sections, and they both give the same results (shown in the illustration).
Note
So far in this topic, you used only the {x:Bind} markup extension. But both of the techniques shown in the following sections require the more flexible (but less performant) {Binding} markup extension.
First, here's the SelectedItem technique. For a C# application, the only change necessary is to the markup.
<Window x:Class="Quickstart.MainWindow" ... >
    <Grid>
        <StackPanel HorizontalAlignment="Center" VerticalAlignment="Center">
            <ListView x:Name="recordingsListView" ItemsSource="{x:Bind ViewModel.Recordings}">
                <ListView.ItemTemplate>
                    <DataTemplate x:DataType="local:Recording">
                        <StackPanel Orientation="Horizontal" Margin="6">
                            <SymbolIcon Symbol="Audio" Margin="0,0,12,0"/>
                            <StackPanel>
                                <TextBlock Text="{x:Bind CompositionName}"/>
                            </StackPanel>
                        </StackPanel>
                    </DataTemplate>
                </ListView.ItemTemplate>
            </ListView>
            <StackPanel DataContext="{Binding SelectedItem, ElementName=recordingsListView}"
            Margin="0,24,0,0">
                <TextBlock Text="{Binding ArtistName}"/>
                <TextBlock Text="{Binding CompositionName}"/>
                <TextBlock Text="{Binding ReleaseDateTime}"/>
            </StackPanel>
        </StackPanel>
    </Grid>
</Window>
For the CollectionViewSource technique, first add a CollectionViewSource as a resource of the top-level Grid.
<Grid.Resources>
    <CollectionViewSource x:Name="RecordingsCollection" Source="{x:Bind ViewModel.Recordings}"/>
</Grid.Resources>
Note
The Window class in WinUI doesn't have a Resources property. You can add the CollectionViewSource to the top-level Grid (or other parent UI element like StackPanel) element instead. If you're working within a Page, you can add the CollectionViewSource to the Page.Resources.
Then, adjust the bindings on the ListView (which no longer needs to be named) and on the details view to use the CollectionViewSource. By binding the details view directly to the CollectionViewSource, you imply that you want to bind to the current item in bindings where the path can't be found on the collection itself. There's no need to specify the CurrentItem property as the path for the binding, although you can do that if there's any ambiguity.
...
<ListView ItemsSource="{Binding Source={StaticResource RecordingsCollection}}">
...
<StackPanel DataContext="{Binding Source={StaticResource RecordingsCollection}}" ...>
...
And here's the identical result in each case.
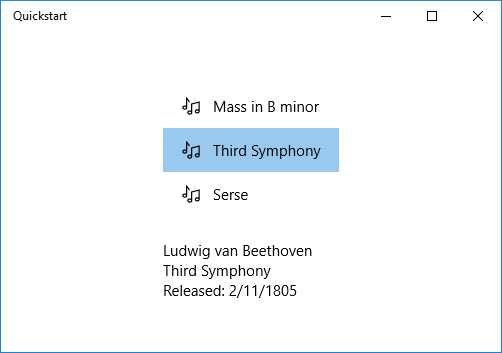
Format or convert data values for display
The rendering above has an issue. The ReleaseDateTime property isn't just a date; it's a DateTime. So, it displays with more precision than you need. One solution is to add a string property to the Recording class that returns the equivalent of ReleaseDateTime.ToString("d"). Naming that property ReleaseDate indicates that it returns a date, and not a date-and-time. Naming it ReleaseDateAsString further indicates that it returns a string.
A more flexible solution is to use a value converter. Here's an example of how to author your own value converter. Add the following code to your Recording.cs source code file.
public class StringFormatter : Microsoft.UI.Xaml.Data.IValueConverter
{
    // This converts the value object to the string to display.
    // This will work with most simple types.
    public object Convert(object value, Type targetType,
        object parameter, string language)
    {
        // Retrieve the format string and use it to format the value.
        string formatString = parameter as string;
        if (!string.IsNullOrEmpty(formatString))
        {
            return string.Format(formatString, value);
        }

        // If the format string is null or empty, simply
        // call ToString() on the value.
        return value.ToString();
    }

    // No need to implement converting back on a one-way binding
    public object ConvertBack(object value, Type targetType,
        object parameter, string language)
    {
        throw new NotImplementedException();
    }
}
Now you can add an instance of StringFormatter as a resource and use it in the binding of the TextBlock that displays the ReleaseDateTime property.
<Grid.Resources>
    ...
    <local:StringFormatter x:Key="StringFormatterValueConverter"/>
</Grid.Resources>
...
<TextBlock Text="{Binding ReleaseDateTime,
    Converter={StaticResource StringFormatterValueConverter},
    ConverterParameter=Released: \{0:d\}}"/>
...
As you can see, for formatting flexibility, the markup passes a format string into the converter by way of the converter parameter. In the code example shown in this topic, the C# value converter makes use of that parameter.
Here's the result.
Differences between Binding and x:Bind
When working with data binding in WinUI apps, you might encounter two primary binding mechanisms: Binding and x:Bind. While both serve the purpose of connecting UI elements to data sources, they have distinct differences:
x:Bind: Offers compile-time checking, better performance, and is strongly typed. It's ideal for scenarios where you know the data structure at compile time.Binding: Provides runtime evaluation and is more flexible for dynamic scenarios, such as when the data structure isn't known at compile time.
Scenarios not supported by x:Bind
While x:Bind is powerful, you can't use it in certain scenarios:
- Dynamic data structures: If the data structure isn't known at compile time, you can't use
x:Bind. - Element-to-element binding:
x:Binddoesn't support binding directly between two UI elements. - Binding to a
DataContext:x:Binddoesn't automatically inherit theDataContextof a parent element. - Two-way bindings with
Mode=TwoWay: While supported,x:Bindrequires explicit implementation ofINotifyPropertyChangedfor any property you want the UI to update when the source changes, whether using one-way or two-way binding. The key difference with two-way bindings is that changes also flow from the UI back to the source.
For practical examples and a deeper understanding of when to use each, see the following topics:
Related content
Collaborate with us on GitHub
The source for this content can be found on GitHub, where you can also create and review issues and pull requests. For more information, see our contributor guide.

Windows developer