Note
Access to this page requires authorization. You can try signing in or changing directories.
Access to this page requires authorization. You can try changing directories.
Note
The Mixed Reality Academy tutorials were designed with HoloLens (first gen) and Mixed Reality Immersive Headsets in mind. As such, we feel it's important to leave these tutorials in place for developers who are still looking for guidance in developing for those devices. These tutorials are not updated with the latest toolsets or interactions being used for HoloLens 2. They are maintained to continue working on the supported devices. There will be a new series of tutorials that will be posted in the future that demonstrate how to develop for HoloLens 2. This notice is updated with a link to those tutorials when they are posted.
In this course, you learn how to recognize visual content within a provided image, using Azure Computer Vision capabilities in a mixed reality application.
Recognition results are displayed as descriptive tags. You can use this service without needing to train a machine learning model. If your implementation requires training a machine learning model, see MR and Azure 302b.
The Microsoft Computer Vision is a set of APIs designed to provide developers with image processing and analysis (with return information), using advanced algorithms, all from the cloud. Developers upload an image or image URL, and the Microsoft Computer Vision API algorithms analyze the visual content, based upon inputs chosen the user, which then can return information, including, identifying the type and quality of an image, detect human faces (returning their coordinates), and tagging, or categorizing images. For more information, visit the Azure Computer Vision API page.
After you complete this course, you have a mixed reality HoloLens application, which can:
- Using the Tap gesture, the camera of the HoloLens captures an image.
- The image is sent to the Azure Computer Vision API Service.
- The objects recognized are listed in a simple UI group positioned in the Unity Scene.
In your application, it is up to you as to how you integrate the results with your design. This course is designed to teach you how to integrate an Azure Service with your Unity project. It is your job to use the knowledge you gain from this course to enhance your mixed reality application.
Device support
| Course | (/previous-versions/mixed-reality/hololens-1/hololens1-hardware)HoloLens | Immersive headsets |
|---|---|---|
| MR and Azure 302: Computer vision | ✔️ | ✔️ |
Note
While this course primarily focuses on HoloLens, you can also apply what you learn in this course to Windows Mixed Reality immersive (VR) headsets. Because immersive (VR) headsets do not have accessible cameras, you need an external camera connected to your PC. As you follow along with the course, you see notes on any changes you might need to employ to support immersive (VR) headsets.
Prerequisites
Note
This tutorial is designed for developers who have basic experience with Unity and C#. Also the prerequisites and written instructions within this document represent what is tested and verified at the time of writing (May 2018). You are free to use the latest software, as listed within the install the tools article, though it should not be assumed that the information in this course perfectly matches what you find in newer software than what's listed as follows.
We recommend the following hardware and software for this course:
- A development PC, compatible with Windows Mixed Reality for immersive (VR) headset development
- Windows 10 Fall Creators Update (or later) with Developer mode enabled
- The latest Windows 10 SDK
- Unity 2017.4
- Visual Studio 2017
- A Windows Mixed Reality immersive (VR) headset or Microsoft HoloLens with Developer mode enabled
- A camera connected to your PC (for immersive headset development)
- Internet access for Azure setup and Computer Vision API retrieval
Before you start
- To avoid encountering issues building this project, it is suggested that you create the project mentioned in this tutorial in a root or near-root folder (long folder paths can cause issues at build-time).
- Set up and test your HoloLens. If you need support setting up your HoloLens, make sure to visit the HoloLens setup article.
- It is a good idea to perform Calibration and Sensor Tuning when beginning developing a new HoloLens App (sometimes it can help to perform those tasks for each user).
For help on Calibration, follow this link to the HoloLens Calibration article.
For help on Sensor Tuning, follow this link to the HoloLens Sensor Tuning article.
Chapter 1 – The Azure Portal
To use the Computer Vision API service in Azure, you need to configure an instance of the service to be made available to your application.
First, log in to the Azure Portal.
Note
If you don't already have an Azure account, you need to create one. If you're following this tutorial in a classroom or lab situation, ask your instructor or one of the proctors for help setting up your new account.
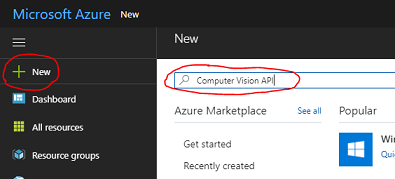
Once you are logged in, click on New in the top left corner, and search for Computer Vision API, and click Enter.
Note
The word New might be replaced with Create a resource, in newer portals.
The new page provides a description of the Computer Vision API service. At the bottom left of the page, select the Create button, to create an association with this service.

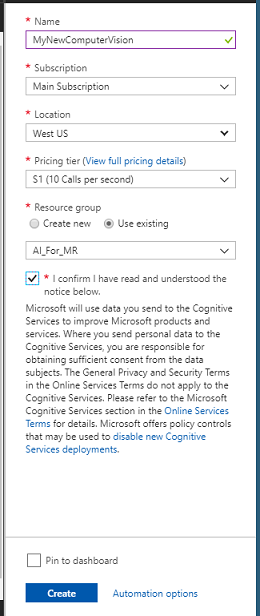
Once you select Create:
Insert your desired Name for the service instance.
Select a Subscription.
Select the Pricing Tier appropriate for you, if this is the first time creating a Computer Vision API Service, a free tier (named F0) should be available to you.
Choose a Resource Group or create a new one. A resource group provides a way to monitor, control access, provision and manage billing for a collection of Azure assets. It is recommended to keep all the Azure services associated with a single project (for example, such as these labs) under a common resource group.
If you wish to read more about Azure Resource Groups, visit the resource group article.
Determine the Location for your resource group (if you are creating a new Resource Group). The location would ideally be in the region where the application would run. Some Azure assets are only available in certain regions.
You also need to confirm that you understood the Terms and Conditions applied to this Service.
Click Create.
Once you select Create, you have to wait for the service to be created, it might take a minute.
A notification appears in the portal once the Service instance is created.

Click on the notification to explore your new Service instance.
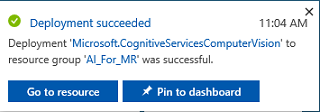
Click the Go to resource button in the notification to explore your new Service instance. You are taken to your new Computer Vision API service instance.

Within this tutorial, your application needs to make calls to your service, which is done through using your service's Subscription Key.
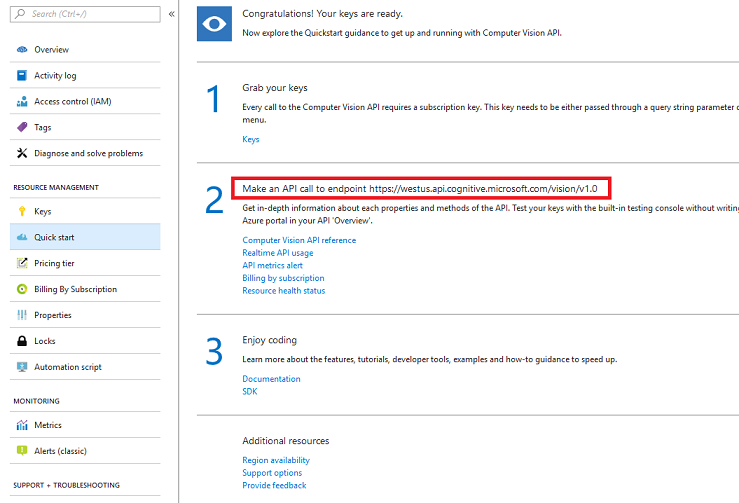
From the Quick start page, of your Computer Vision API service, navigate to the first step, Grab your keys, and click Keys (you can also achieve it by clicking the blue hyperlink Keys, located in the services navigation menu, denoted by the key icon). It reveals your service Keys.
Take a copy of one of the displayed keys, as you need it later in your project.
Go back to the Quick start page, and from there, fetch your endpoint. Be aware yours may be different, depending on your region (which if it is, you need to make a change to your code later). Take a copy of this endpoint for use later:
Tip
You can check what the various endpoints are HERE.
Chapter 2 – Set up the Unity project
The following is a typical setup for developing with mixed reality, and as such, is a good template for other projects.
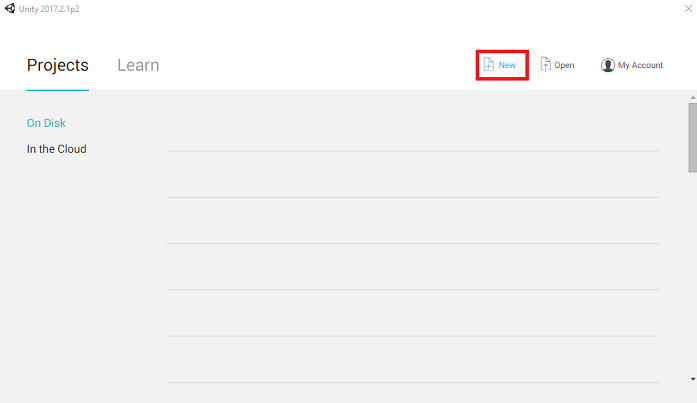
Open Unity and click New.
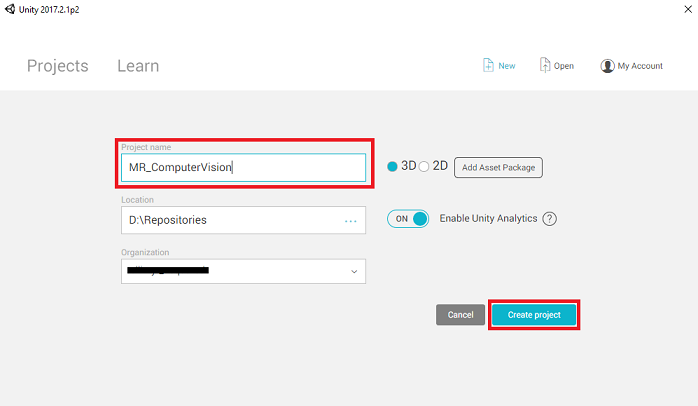
You now need to provide a Unity Project name. Insert MR_ComputerVision. Make sure the project type is set to 3D. Set the Location to somewhere appropriate for you (remember, closer to root directories is better). Then, click Create project.
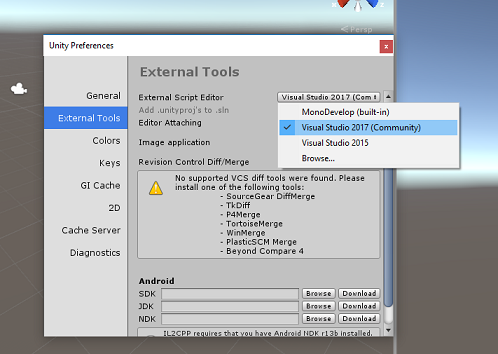
With Unity open, it is worth checking the default Script Editor is set to Visual Studio. Go to Edit > Preferences and then from the new window, navigate to External Tools. Change External Script Editor to Visual Studio 2017. Close the Preferences window.
Next, go to File > Build Settings and select Universal Windows Platform, then click on the Switch Platform button to apply your selection.
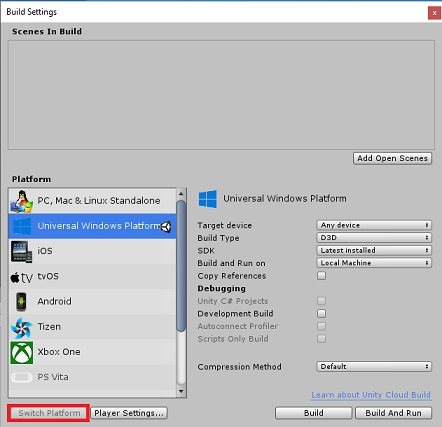
While still in File > Build Settings and make sure that:
Target Device is set to HoloLens
For the immersive headsets, set Target Device to Any Device.
Build Type is set to D3D
SDK is set to Latest installed
Visual Studio Version is set to Latest installed
Build and Run is set to Local Machine
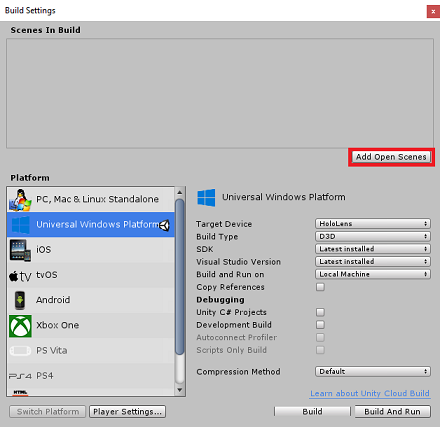
Save the scene and add it to the build.
Select Add Open Scenes. A save window appears.
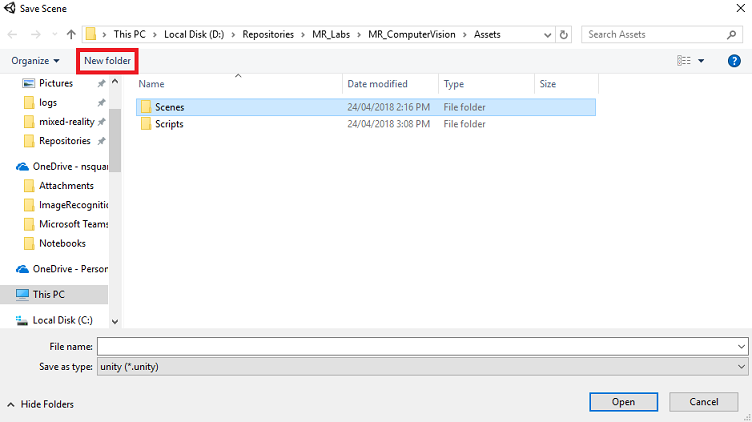
Create a new folder, and any future, scene, then select the New folder button, to create a new folder, name it Scenes.
Open your newly created Scenes folder, and then in the File name: text field, type MR_ComputerVisionScene, then click Save.
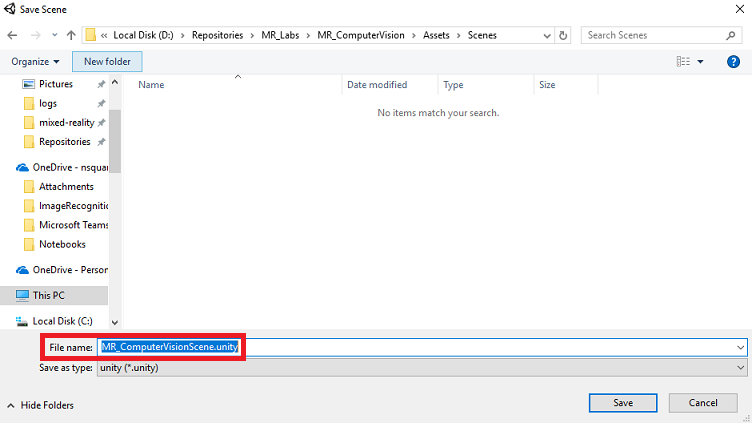
Be aware, you must save your Unity scenes within the Assets folder, as they must be associated with the Unity Project. Creating the scenes folder (and other similar folders) is a typical way of structuring a Unity project.
The remaining settings, in Build Settings, should be left as default for now.
In the Build Settings window, click on the Player Settings button, it opens the related panel in the space where the Inspector is located.
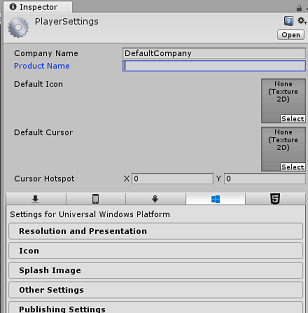
In this panel, a few settings need to be verified:
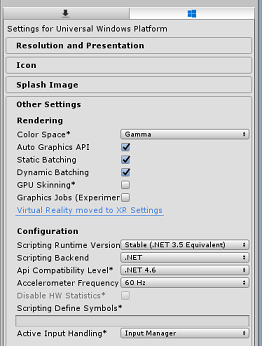
In the Other Settings tab:
Scripting Runtime Version should be Stable (.NET 3.5 Equivalent).
Scripting Backend should be .NET
API Compatibility Level should be .NET 4.6
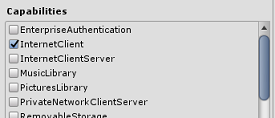
Within the Publishing Settings tab, under Capabilities, check:
InternetClient
Webcam
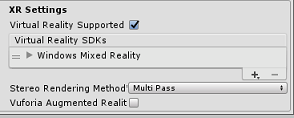
Further down the panel, in XR Settings (found below Publish Settings), tick Virtual Reality Supported, make sure the Windows Mixed Reality SDK is added.
Back in Build Settings Unity C# Projects is no longer greyed out; tick the checkbox next to it.
Close the Build Settings window.
Save your Scene and Project (FILE > SAVE SCENE / FILE > SAVE PROJECT).
Chapter 3 – Main Camera setup
Important
If you wish to skip the Unity Set up component of the course, and continue straight into code, feel free to download .unitypackage, import it into your project as a Custom Package, and then continue from Chapter 5.
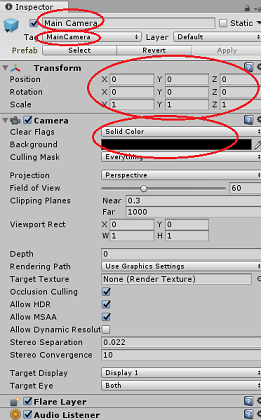
In the Hierarchy Panel, select the Main Camera.
Once selected, you are able to see all the components of the Main Camera in the Inspector Panel.
The Camera object must be named Main Camera (note the spelling!).
The Main Camera Tag must be set to MainCamera (note the spelling!).
Make sure the Transform Position is set to 0, 0, 0.
Set Clear Flags to Solid Color (ignore for immersive headset).
Set the Background Color of the Camera Component to Black, Alpha 0 (Hex Code: #00000000) (ignore for immersive headset).
Next, you have to create a simple "Cursor" object attached to the Main Camera, which helps you position the image analysis output when the application is running. This Cursor determines the center point of the camera focus.
To create the Cursor:
In the Hierarchy Panel, right-click on the Main Camera. Under 3D Object, click on Sphere.
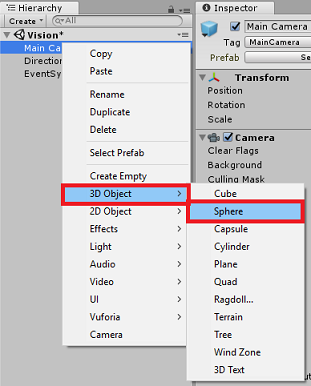
Rename the Sphere to Cursor (double click the Cursor object or press the 'F2' keyboard button with the object selected), and make sure it is located as child of the Main Camera.
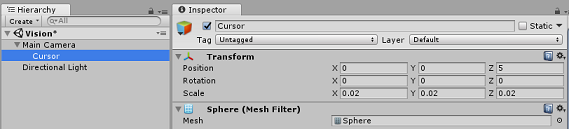
In the Hierarchy Panel, left click on the Cursor. With the Cursor selected, adjust the following variables in the Inspector Panel:
Set the Transform Position to 0, 0, 5
Set the Scale to 0.02, 0.02, 0.02
Chapter 4 – Set up the Label system
Once you capture an image with the HoloLens' camera, that image is sent to your Azure Computer Vision API Service instance for analysis.
The results of that analysis is a list of recognized objects called Tags.
You use Labels (as a 3D text in world space) to display these Tags at the location the photo was taken.
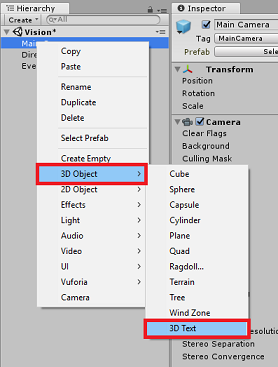
The following steps show how to setup the Label object.
Right-click anywhere in the Hierarchy Panel (the location does not matter at this point), under 3D Object, add a 3D Text. Name it LabelText.
In the Hierarchy Panel, left click on the LabelText. With the LabelText selected, adjust the following variables in the Inspector Panel:
- Set the Position to 0,0,0
- Set the Scale to 0.01, 0.01, 0.01
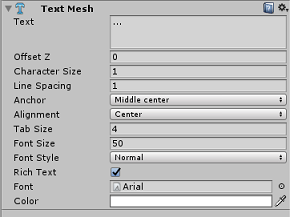
- In the component Text Mesh:
- Replace all the text within Text, with "..."
- Set the Anchor to Middle Center
- Set the Alignment to Center
- Set the Tab Size to 4
- Set the Font Size to 50
- Set the Color to #FFFFFFFF
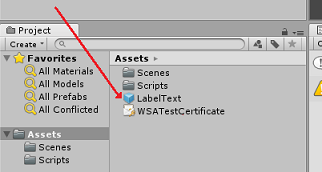
Drag the LabelText from the Hierarchy Panel, into the Asset Folder, within in the Project Panel. It makes the LabelText a Prefab, so that it can be instantiated in code.
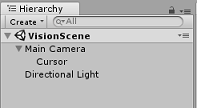
You should delete the LabelText from the Hierarchy Panel, so that it is not displayed in the opening scene. As it is now a prefab, which you call on for individual instances from your Assets folder, there is no need to keep it within the scene.
The final object structure in the Hierarchy Panel should be like the one shown in the following image:
Chapter 5 – Create the ResultsLabel class
The first script you need to create is the ResultsLabel class, which is responsible for:
- Creating the Labels in the appropriate world space, relative to the position of the Camera.
- Displaying the Tags from the Image Analysis.
To create this class:
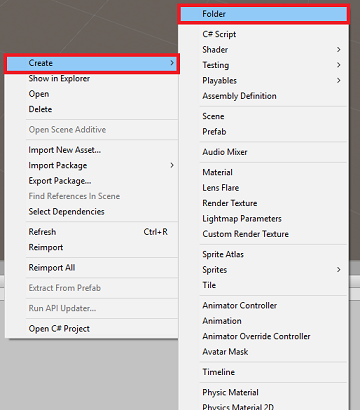
Right-click in the Project Panel, then Create > Folder. Name the folder Scripts.
With the Scripts folder created, double click it to open. Then, within that folder, right-click, and select Create > then C# Script. Name the script ResultsLabel.
Double click on the new ResultsLabel script to open it with Visual Studio.
Inside the Class, insert the following code in the ResultsLabel class:
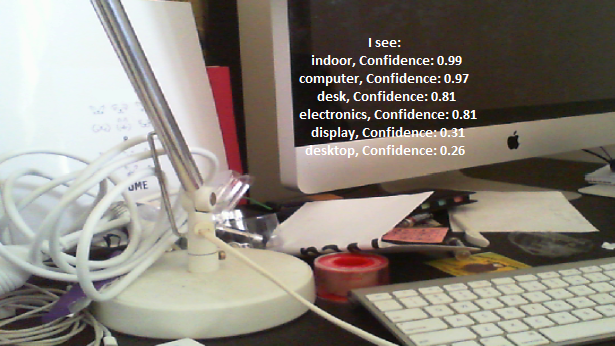
    using System.Collections.Generic;
    using UnityEngine;

    public class ResultsLabel : MonoBehaviour
    {
        public static ResultsLabel instance;

        public GameObject cursor;

        public Transform labelPrefab;

        [HideInInspector]
        public Transform lastLabelPlaced;

        [HideInInspector]
        public TextMesh lastLabelPlacedText;

        private void Awake()
        {
            // allows this instance to behave like a singleton
            instance = this;
        }

        /// <summary>
        /// Instantiate a Label in the appropriate location relative to the Main Camera.
        /// </summary>
        public void CreateLabel()
        {
            lastLabelPlaced = Instantiate(labelPrefab, cursor.transform.position, transform.rotation);

            lastLabelPlacedText = lastLabelPlaced.GetComponent<TextMesh>();

            // Change the text of the label to show that has been placed
            // The final text will be set at a later stage
            lastLabelPlacedText.text = "Analysing...";
        }

        /// <summary>
        /// Set the Tags as Text of the last Label created.
        /// </summary>
        public void SetTagsToLastLabel(Dictionary<string, float> tagsDictionary)
        {
            lastLabelPlacedText = lastLabelPlaced.GetComponent<TextMesh>();

            // At this point we go through all the tags received and set them as text of the label
            lastLabelPlacedText.text = "I see: \n";

            foreach (KeyValuePair<string, float> tag in tagsDictionary)
            {
                lastLabelPlacedText.text += tag.Key + ", Confidence: " + tag.Value.ToString("0.00 \n");
            }
        }
    }
Be sure to save your changes in Visual Studio before returning to Unity.
Back in the Unity Editor, click and drag the ResultsLabel class from the Scripts folder to the Main Camera object in the Hierarchy Panel.
Click on the Main Camera and look at the Inspector Panel.
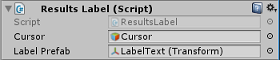
You notice that from the script you just dragged into the Camera, there are two fields: Cursor and Label Prefab.
Drag the object called Cursor from the Hierarchy Panel to the slot named Cursor, as shown in the following image.
Drag the object called LabelText from the Assets Folder in the Project Panel to the slot named Label Prefab, as shown in the following image.
Chapter 6 – Create the ImageCapture class
The next class you are going to create is the ImageCapture class. This class is responsible for:
- Capturing an Image using the HoloLens Camera and storing it in the App Folder.
- Capturing Tap gestures from the user.
To create this class:
Go to the Scripts folder you created previously.
Right-click inside the folder, Create > C# Script. Call the script ImageCapture.
Double click on the new ImageCapture script to open it with Visual Studio.
Add the following namespaces to the top of the file:
    using System.IO;
    using System.Linq;
    using UnityEngine;
    using UnityEngine.XR.WSA.Input;
    using UnityEngine.XR.WSA.WebCam;
Then add the following variables inside the ImageCapture class, above the Start() method:
    public static ImageCapture instance;
    public int tapsCount;
    private PhotoCapture photoCaptureObject = null;
    private GestureRecognizer recognizer;
    private bool currentlyCapturing = false;
The tapsCount variable stores the number of tap gestures captured from the user. This number is used in the naming of the images captured.
Code for Awake() and Start() methods now needs to be added. These are called when the class initializes:
    private void Awake()
    {
        // Allows this instance to behave like a singleton
        instance = this;
    }

    void Start()
    {
        // subscribing to the HoloLens API gesture recognizer to track user gestures
        recognizer = new GestureRecognizer();
        recognizer.SetRecognizableGestures(GestureSettings.Tap);
        recognizer.Tapped += TapHandler;
        recognizer.StartCapturingGestures();
    }
Implement a handler that is called when a Tap gesture occurs.
    /// <summary>
    /// Respond to Tap Input.
    /// </summary>
    private void TapHandler(TappedEventArgs obj)
    {
        // Only allow capturing, if not currently processing a request.
        if(currentlyCapturing == false)
        {
            currentlyCapturing = true;

            // increment taps count, used to name images when saving
            tapsCount++;

            // Create a label in world space using the ResultsLabel class
            ResultsLabel.instance.CreateLabel();

            // Begins the image capture and analysis procedure
            ExecuteImageCaptureAndAnalysis();
        }
    }
The TapHandler() method increments the number of taps captured from the user and uses the current Cursor position to determine where to position a new Label.
This method then calls the ExecuteImageCaptureAndAnalysis() method to begin the core functionality of this application.
Once an Image is captured and stored, the following handlers are called. If the process is successful, the result is passed to the VisionManager (which you are yet to create) for analysis.
    /// <summary>
    /// Register the full execution of the Photo Capture. If successful, it will begin
    /// the Image Analysis process.
    /// </summary>
    void OnCapturedPhotoToDisk(PhotoCapture.PhotoCaptureResult result)
    {
        // Call StopPhotoMode once the image has successfully captured
        photoCaptureObject.StopPhotoModeAsync(OnStoppedPhotoMode);
    }

    void OnStoppedPhotoMode(PhotoCapture.PhotoCaptureResult result)
    {
        // Dispose from the object in memory and request the image analysis
        // to the VisionManager class
        photoCaptureObject.Dispose();
        photoCaptureObject = null;
        StartCoroutine(VisionManager.instance.AnalyseLastImageCaptured());
    }
Then, add the method that the application uses to start the Image capture process and store the image.
    /// <summary>
    /// Begin process of Image Capturing and send To Azure
    /// Computer Vision service.
    /// </summary>
    private void ExecuteImageCaptureAndAnalysis()
    {
        // Set the camera resolution to be the highest possible
        Resolution cameraResolution = PhotoCapture.SupportedResolutions.OrderByDescending((res) => res.width * res.height).First();

        Texture2D targetTexture = new Texture2D(cameraResolution.width, cameraResolution.height);

        // Begin capture process, set the image format
        PhotoCapture.CreateAsync(false, delegate (PhotoCapture captureObject)
        {
            photoCaptureObject = captureObject;
            CameraParameters camParameters = new CameraParameters();
            camParameters.hologramOpacity = 0.0f;
            camParameters.cameraResolutionWidth = targetTexture.width;
            camParameters.cameraResolutionHeight = targetTexture.height;
            camParameters.pixelFormat = CapturePixelFormat.BGRA32;

            // Capture the image from the camera and save it in the App internal folder
            captureObject.StartPhotoModeAsync(camParameters, delegate (PhotoCapture.PhotoCaptureResult result)
            {
                string filename = string.Format(@"CapturedImage{0}.jpg", tapsCount);

                string filePath = Path.Combine(Application.persistentDataPath, filename);

                VisionManager.instance.imagePath = filePath;

                photoCaptureObject.TakePhotoAsync(filePath, PhotoCaptureFileOutputFormat.JPG, OnCapturedPhotoToDisk);

                currentlyCapturing = false;
            });
        });
    }
Warning
At this point, you notice an error appearing in the Unity Editor Console Panel. It is because the code references the VisionManager class, which you will create in the next Chapter.
Chapter 7 – Call to Azure and Image Analysis
The last script you need to create is the VisionManager class.
This class is responsible for:
- Loading the latest image captured as an array of bytes.
- Sending the byte array to your Azure Computer Vision API Service instance for analysis.
- Receiving the response as a JSON string.
- Deserializing the response and passing the resulting Tags to the ResultsLabel class.
To create this class:
Double click on the Scripts folder, to open it.
Right-click inside the Scripts folder, click Create > C# Script. Name the script VisionManager.
Double click on the new script to open it with Visual Studio.
Update the namespaces to be the same as the following, at the top of the VisionManager class:
    using System;
    using System.Collections;
    using System.Collections.Generic;
    using System.IO;
    using UnityEngine;
    using UnityEngine.Networking;
At the top of your script, inside the VisionManager class (above the Start() method), you now need to create two Classes that represent the deserialized JSON response from Azure:
    [System.Serializable]
    public class TagData
    {
        public string name;
        public float confidence;
    }

    [System.Serializable]
    public class AnalysedObject
    {
        public TagData[] tags;
        public string requestId;
        public object metadata;
    }
Note
The TagData and AnalysedObject classes need to have the [System.Serializable] attribute added before the declaration to be able to be deserialized with the Unity libraries.
In the VisionManager class, you should add the following variables:
    public static VisionManager instance;

    // you must insert your service key here!
    private string authorizationKey = "- Insert your key here -";
    private const string ocpApimSubscriptionKeyHeader = "Ocp-Apim-Subscription-Key";
    private string visionAnalysisEndpoint = "https://westus.api.cognitive.microsoft.com/vision/v1.0/analyze?visualFeatures=Tags";   // This is where you need to update your endpoint, if you set your location to something other than west-us.

    internal byte[] imageBytes;

    internal string imagePath;
Warning
Make sure you insert your Auth Key into the authorizationKey variable. You will have noted your Auth Key at the beginning of this course, Chapter 1.
Warning
The visionAnalysisEndpoint variable might differ from the one specified in this example. The west-us strictly refers to Service instances created for the West US region. Update it with your endpoint URL; here are some examples of what that might look like:
- West Europe:
https://westeurope.api.cognitive.microsoft.com/vision/v1.0/analyze?visualFeatures=Tags - Southeast Asia:
https://southeastasia.api.cognitive.microsoft.com/vision/v1.0/analyze?visualFeatures=Tags - Australia East:
https://australiaeast.api.cognitive.microsoft.com/vision/v1.0/analyze?visualFeatures=Tags
Code for Awake now needs to be added.
    private void Awake()
    {
        // allows this instance to behave like a singleton
        instance = this;
    }
Next, add the coroutine (with the static stream method below it), which obtains the results of the analysis of the image captured by the ImageCapture Class.
    /// <summary>
    /// Call the Computer Vision Service to submit the image.
    /// </summary>
    public IEnumerator AnalyseLastImageCaptured()
    {
        WWWForm webForm = new WWWForm();
        using (UnityWebRequest unityWebRequest = UnityWebRequest.Post(visionAnalysisEndpoint, webForm))
        {
            // gets a byte array out of the saved image
            imageBytes = GetImageAsByteArray(imagePath);
            unityWebRequest.SetRequestHeader("Content-Type", "application/octet-stream");
            unityWebRequest.SetRequestHeader(ocpApimSubscriptionKeyHeader, authorizationKey);

            // the download handler will help receiving the analysis from Azure
            unityWebRequest.downloadHandler = new DownloadHandlerBuffer();

            // the upload handler will help uploading the byte array with the request
            unityWebRequest.uploadHandler = new UploadHandlerRaw(imageBytes);
            unityWebRequest.uploadHandler.contentType = "application/octet-stream";

            yield return unityWebRequest.SendWebRequest();

            long responseCode = unityWebRequest.responseCode;

            try
            {
                string jsonResponse = null;
                jsonResponse = unityWebRequest.downloadHandler.text;

                // The response will be in Json format
                // therefore it needs to be deserialized into the classes AnalysedObject and TagData
                AnalysedObject analysedObject = new AnalysedObject();
                analysedObject = JsonUtility.FromJson<AnalysedObject>(jsonResponse);

                if (analysedObject.tags == null)
                {
                    Debug.Log("analysedObject.tagData is null");
                }
                else
                {
                    Dictionary<string, float> tagsDictionary = new Dictionary<string, float>();

                    foreach (TagData td in analysedObject.tags)
                    {
                        TagData tag = td as TagData;
                        tagsDictionary.Add(tag.name, tag.confidence);
                    }

                    ResultsLabel.instance.SetTagsToLastLabel(tagsDictionary);
                }
            }
            catch (Exception exception)
            {
                Debug.Log("Json exception.Message: " + exception.Message);
            }

            yield return null;
        }
    }
/// <summary> /// Returns the contents of the specified file as a byte array. /// </summary> private static byte[] GetImageAsByteArray(string imageFilePath) { FileStream fileStream = new FileStream(imageFilePath, FileMode.Open, FileAccess.Read); BinaryReader binaryReader = new BinaryReader(fileStream); return binaryReader.ReadBytes((int)fileStream.Length); }Be sure to save your changes in Visual Studio before returning to Unity.
Back in the Unity Editor, click and drag the VisionManager and ImageCapture classes from the Scripts folder to the Main Camera object in the Hierarchy Panel.
Chapter 8 – Before building
To perform a thorough test of your application, you need to sideload it onto your HoloLens. Before you do, ensure that:
- All the settings mentioned in Chapter 2 are set correctly.
- All the scripts are attached to the Main Camera object.
- All the fields in the Main Camera Inspector Panel are assigned properly.
- Make sure you insert your Auth Key into the authorizationKey variable.
- Ensure that you also check your endpoint in your VisionManager script, and that it aligns to your region (this document uses west-us by default).
Chapter 9 – Build the UWP Solution and sideload the application
Everything needed for the Unity section of this project is now completed, so it is time to build it from Unity.
Navigate to Build Settings - File > Build Settings….
From the Build Settings window, click Build.

If not already, tick Unity C# Projects.
Click Build. Unity launches a File Explorer window, where you need to create and then select a folder to build the app into. Create that folder now, and name it App. Then with the App folder selected, press Select Folder.
Unity begins building your project to the App folder.
Once Unity finishes building (it might take some time), it opens a File Explorer window at the location of your build (check your task bar, as it may not always appear above your windows, but notifies you of the addition of a new window).
Chapter 10 – Deploy to HoloLens
To deploy on HoloLens:
You need the IP Address of your HoloLens (for Remote Deploy), and to ensure your HoloLens is in Developer Mode. To do this:
- While wearing your HoloLens, open the Settings.
- Go to Network & Internet > Wi-Fi > Advanced Options
- Note the IPv4 address.
- Next, navigate back to Settings, and then to Update & Security > For Developers
- Set Developer Mode On.
Navigate to your new Unity build (the App folder) and open the solution file with Visual Studio.
In the Solution Configuration select Debug.
In the Solution Platform, select x86, Remote Machine.

Go to the Build menu and click on Deploy Solution, to sideload the application to your HoloLens.
Your App should now appear in the list of installed apps on your HoloLens, ready to be launched!
Note
To deploy to immersive headset, set the Solution Platform to Local Machine, and set the Configuration to Debug, with x86 as the Platform. Then deploy to the local machine, using the Build menu, selecting Deploy Solution.
Your finished Computer Vision API application
Congratulations, you built a mixed reality app that leverages the Azure Computer Vision API to recognize real world objects, and display confidence of what is seen.
Bonus exercises
Exercise 1
Just as you used the Tags parameter (as evidenced within the endpoint used within the VisionManager), extend the app to detect other information; have a look at what other parameters you have access to HERE.
Exercise 2
Display the returned Azure data, in a more conversational, and readable way, perhaps hiding the numbers. As though a bot might be speaking to the user.