Note
Access to this page requires authorization. You can try signing in or changing directories.
Access to this page requires authorization. You can try changing directories.
Note
The Mixed Reality Academy tutorials were designed with HoloLens (1st gen) and Mixed Reality Immersive Headsets in mind. As such, we feel it's important to leave these tutorials in place for developers who are looking for guidance in developing for those devices. These tutorials do not get updated with the latest toolsets or interactions being used for HoloLens 2. They're maintained to continue working on the supported devices. A new series of tutorials demonstrate how to develop for HoloLens 2. This notice is updated with a link to those tutorials when they're posted.
In this course, you learn how to connect your Azure Media Services to a Windows Mixed Reality VR experience to allow streaming 360-degree video playback on immersive headsets.
Azure Media Services are a collection of services that gives you broadcast-quality video streaming services to reach larger audiences on today’s most popular mobile devices. For more information, visit the Azure Media Services page.
On course completion, you should have a mixed reality immersive headset application able to:
Retrieve a 360-degree video from an Azure Storage, through the Azure Media Service.
Display the retrieved 360-degree video within a Unity scene.
Navigate between two scenes, with two different videos.
In your application, it's up to you as to how you integrate the results with your design. This course is designed to teach you how to integrate an Azure Service with your Unity Project. It's your job to use the knowledge you gain from this course to enhance your mixed reality application.
Device support
| Course | HoloLens | Immersive headsets |
|---|---|---|
| MR and Azure 306: Streaming video | ✔️ |
Prerequisites
Note
This tutorial is designed for developers who have basic experience with Unity and C#. The prerequisites and written instructions within this document represent what was tested and verified at the time of writing (May 2018). You're free to use the latest software, as listed within the install the tools article. It's not assumed the information in this course perfectly matches what you find in newer software.
We recommend the following hardware and software for this course:
- A development PC, compatible with Windows Mixed Reality for immersive (VR) headset development
- Windows 10 Fall Creators Update (or later) with Developer mode enabled
- The latest Windows 10 SDK
- Unity 2017.4
- Visual Studio 2017
- A Windows Mixed Reality immersive (VR) headset
- Internet access for Azure setup and data retrieval
- Two 360-degree videos in mp4 format (you can find some royalty-free videos at this download page)
Before you start
To reduce build issues with this project, create the tutorial project in a root or near-root folder. Long folder paths can cause issues at build-time.
Set up and test your Mixed Reality Immersive Headset.
Note
Motion Controllers are not required for this course. If you need support setting up the Immersive Headset, click link on how to set up Windows Mixed Reality.
Chapter 1 - The Azure Portal: creating the Azure Storage Account
To use the Azure Storage Service, you need to create and configure a Storage Account in the Azure portal.
Log in to the Azure Portal.
Note
If you don't already have an Azure account, you need to create one. If you're following this tutorial in a classroom or lab situation, ask your instructor or one of the proctors for help with setting up your new account.
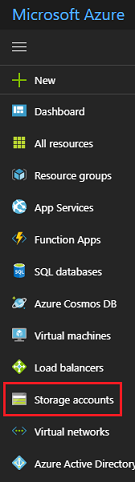
Once you're logged in, click on Storage accounts in the left menu.
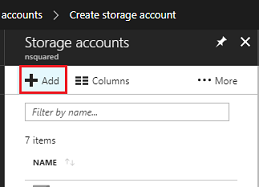
On the Storage Accounts tab, click on Add.
In the Create storage account tab:
Insert a Name for your account, be aware this field only accepts numbers, and lowercase letters.
For Deployment model, select Resource manager.
For Account kind, select Storage (general purpose v1).
For Performance, select Standard.*
For Replication select Locally-redundant storage (LRS).
Leave Secure transfer required as Disabled.
Select a Subscription.
Choose a Resource group or create a new one. A resource group provides a way to monitor, control access, provision and manage billing for a collection of Azure assets.
Determine the Location for your resource group (if you're creating a new Resource Group). The location would ideally be in the region where the application would run. Some Azure assets are only available in certain regions.
You need to confirm that you understand the Terms and Conditions applied to this Service.
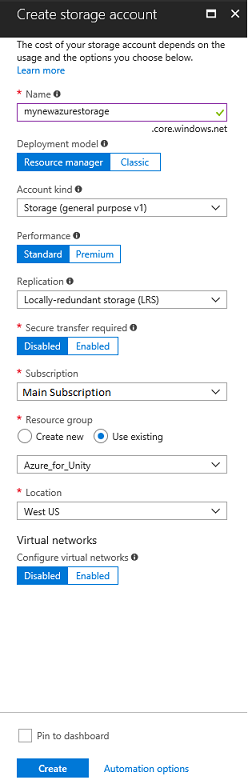
Click on Create and wait for the service to be created, as it may take a minute.
A notification appears in the portal once the Service instance is created.
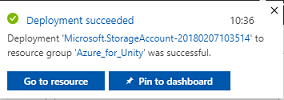
At this point you don't need to follow the resource, move to the next Chapter.
Chapter 2 - The Azure Portal: creating the Media Service
To use the Azure Media Service, you need to configure an instance of the service to be made available to your application (wherein the account holder needs to be an Admin).
In the Azure Portal, click on Create a resource in the top left corner, and search for Media Service, press Enter. Click the pink icon for the resource you want to show a new page.
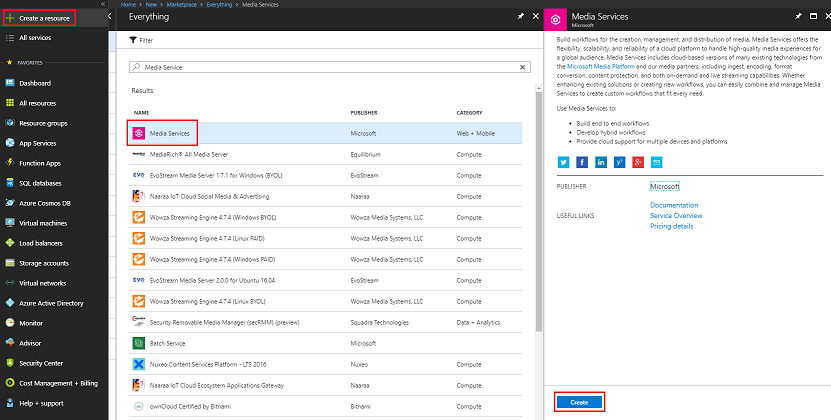
The new page provides a description of the Media Service. At the bottom left of this prompt, click the Create button, to create an association with this service.

A panel appears where you provide some details about your new Media Service:
Insert your desired Account Name for this service instance.
Select a Subscription.
Choose a Resource Group or create a new one. A resource group provides a way to monitor, control access, provision and manage billing for a collection of Azure assets. It's recommended to keep all the Azure services associated with a single project (for example, such as these labs) under a common resource group).
If you wish to read more about Azure Resource Groups, follow this link on how to manage Azure Resource Groups.
Determine the Location for your resource group (if you're creating a new Resource Group). The location would ideally be in the region where the application would run. Some Azure assets are only available in certain regions.
For the Storage Account section, click the Please select... section, then click the Storage Account you created in the last Chapter.
You also need to confirm that you understand the Terms and Conditions applied to this Service.
Click Create.

Once you click on Create, you have to wait for the service to be created, which might take a minute.
A notification appears in the portal once the Service instance is created.

Click on the notification to explore your new Service instance.
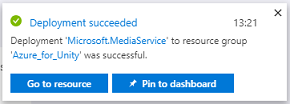
Click the Go to resource button in the notification to explore your new Service instance.
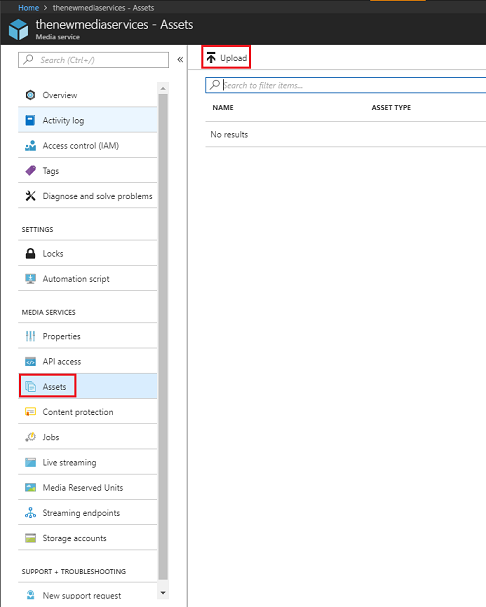
Within the new Media service page, within the panel on the left, click on the Assets link, which is about halfway down.
On the next page, in the top-left corner of the page, click Upload.
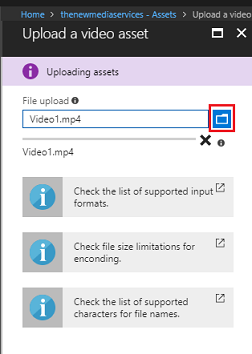
Click on the Folder icon to browse your files and select the first 360 Video that you would like to stream.
You can follow this link to download a sample video.
Warning
Long filenames may cause an issue with the encoder: so to ensure videos don't have issues, consider shortening the length of your video file names.
The progress bar turns green when the video finishes uploading.
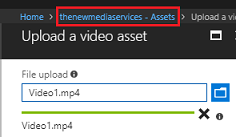
Click on the text above (yourservicename - Assets) to return to the Assets page.
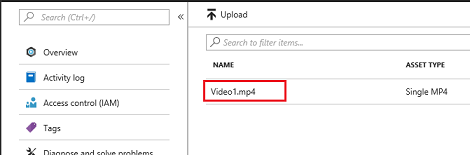
Notice that your uploaded video. Click on it.
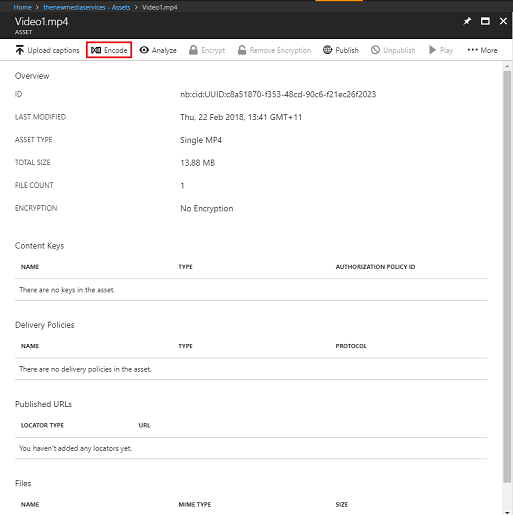
The page you're redirected to shows you detailed information about your video. To be able to use your video you need to encode it, by clicking the Encode button at the top-left of the page.
A new panel appears, where you're able to set encoding options for your file. Set the following properties (some are already set by default):
Media encoder name Media Encoder Standard
Encoding preset Content Adaptive Multiple Bitrate MP4
Job name Media Encoder Standard processing of Video1.mp4
Output media asset name Video1.mp4 -- Media Encoder Standard encoded
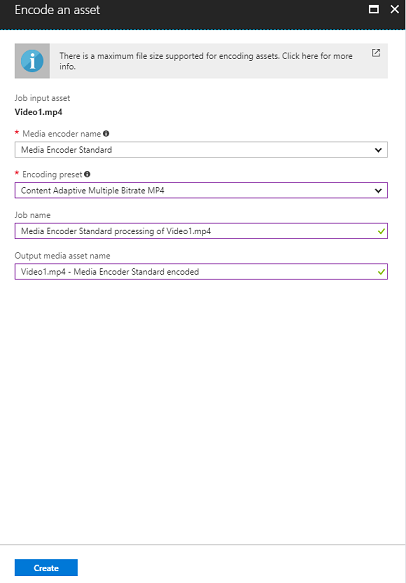
Click the Create button.
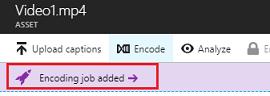
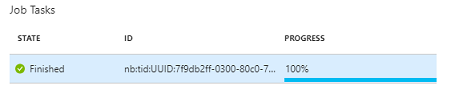
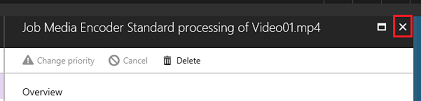
Notice a bar with Encoding job added, click on that bar, and a panel appears with the Encoding progress displayed in it.
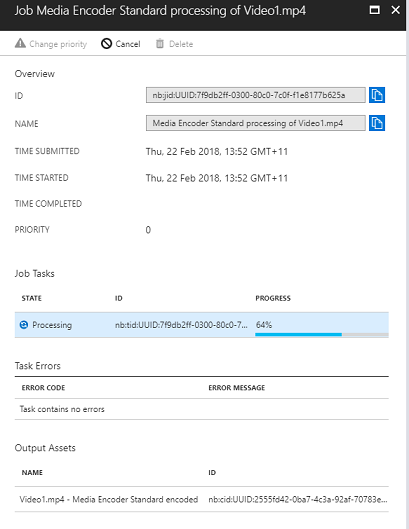
Wait for the Job to be completed. When the job is complete, feel free to close the panel with the 'X' at the top right of that panel.
Important
The Job time depends on the file size of your video. This process can take quite some time.
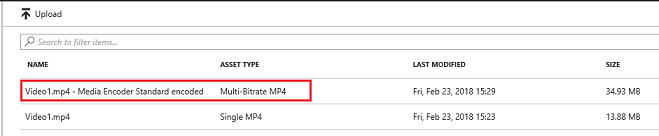
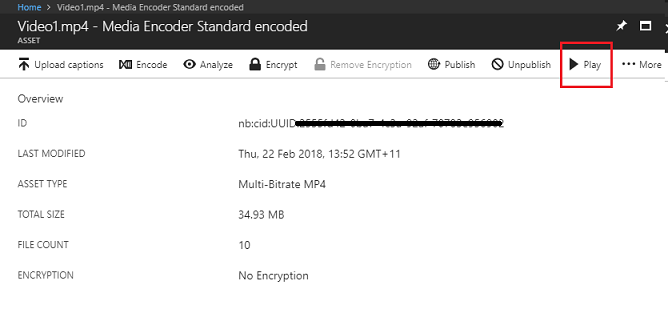
Now that the encoded version of the video is created, you can publish it to make it accessible. To do so, click the blue link Assets to go back to the assets page.

You see your video along with another, which is of Asset Type Multi-Bitrate MP4.

Note
You may notice that the new asset, alongside your initial video, is Unknown, and has '0' bytes for it's Size, just refresh your window for it to update.
Click this new asset.
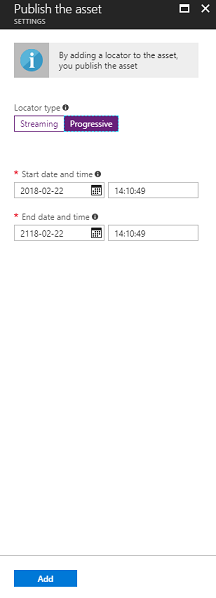
You see a similar panel to the one you used before that is a different asset. Click the Publish button located at the top-center of the page.

You're prompted to set a Locator, which is the entry point, to file/s in your Assets. For your scenario, set the following properties:
Locator type > Progressive.
The date and time is set for you, from your current date, to a time in the future (100 years in this case). Leave as is or change it to suit.
At the bottom of that panel, click on the Add button.
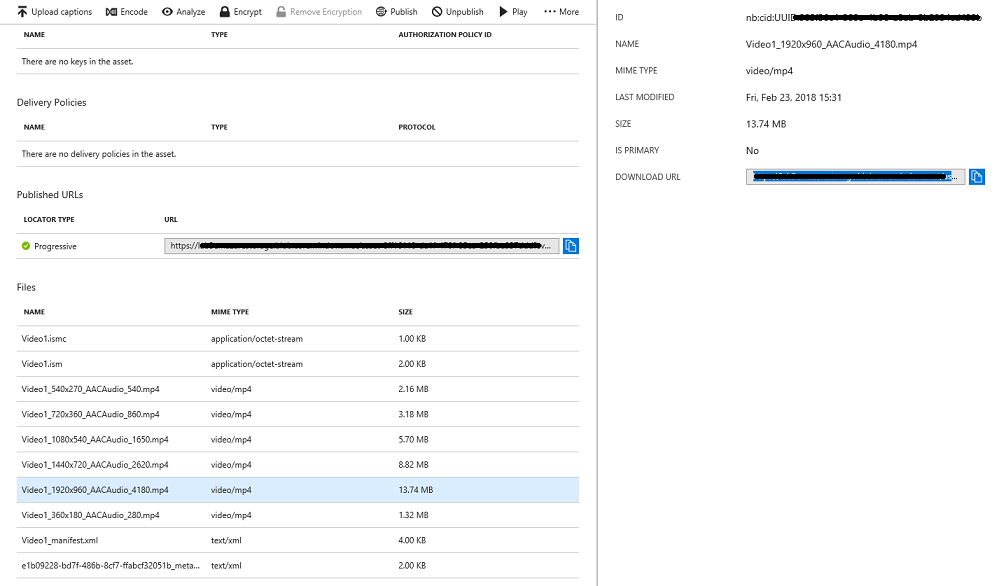
Your video is now published and can be streamed by using its endpoint. Further down the page is a Files section, where the different encoded versions of your video reside. Select the highest possible resolution one (the image is the 1920x960 file), and then a panel appears. There you find a Download URL. Copy this Endpoint as you use it later in your code.
Note
You can also press the Play button to play your video and test it.
You now need to upload the second video that you use in this Lab. Follow the steps above, repeating the same process for the second video. Ensure you copy the second Endpoint also. Use the following link to download a second video.
Once both videos are published, you're ready to move to the next Chapter.
Chapter 3 - Setting up the Unity Project
This is a typical setup for developing with the Mixed Reality, and as such, is a good template for other projects.
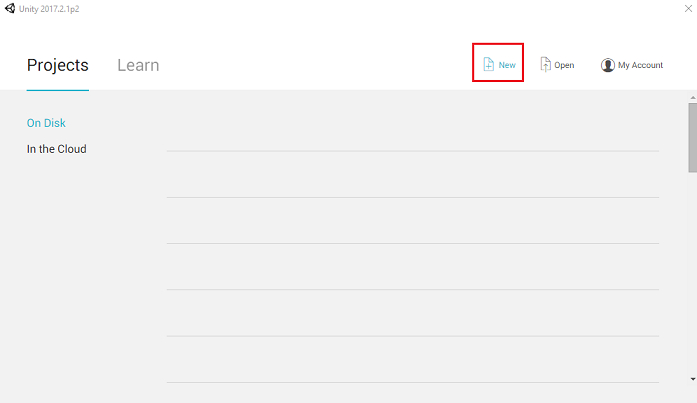
Open Unity and click New.
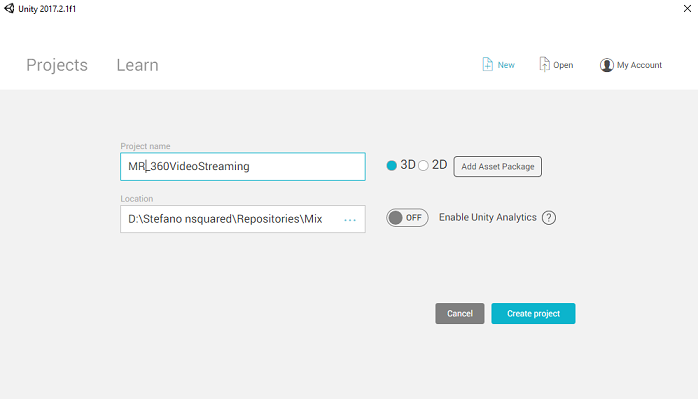
You now need to provide a Unity Project name, insert MR_360VideoStreaming.. Make sure the project type is set to 3D. Set the Location to somewhere appropriate for you (remember, closer to root directories is better). Then, click Create project.
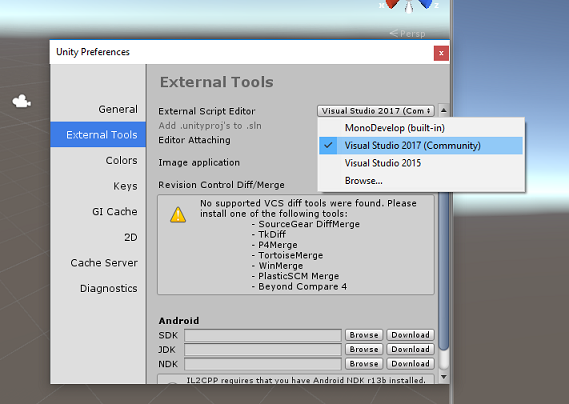
With Unity open, it's worth checking the default Script Editor is set to Visual Studio. Go to Edit Preferences and then from the new window, navigate to External Tools. Change External Script Editor to Visual Studio 2017. Close the Preferences window.
Next, go to File Build Settings and switch the platform to Universal Windows Platform, by clicking on the Switch Platform button.
Also make sure that:
Target Device is set to Any Device.
Build Type is set to D3D.
SDK is set to Latest installed.
Visual Studio Version is set to Latest installed.
Build and Run is set to Local Machine.
Don't worry about setting up Scenes right now, as you set Scenes up later.
The remaining settings should be left as default for now.
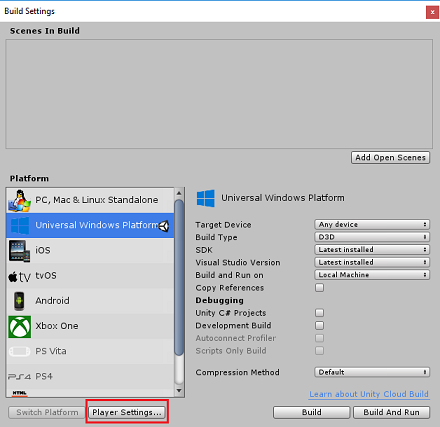
In the Build Settings window, click on the Player Settings button, which opens the related panel in the space where the Inspector is located.
In this panel, a few settings need to be verified:
In the Other Settings tab:
Scripting Runtime Version should be Stable (.NET 3.5 Equivalent).
Scripting Backend should be .NET.
API Compatibility Level should be .NET 4.6.
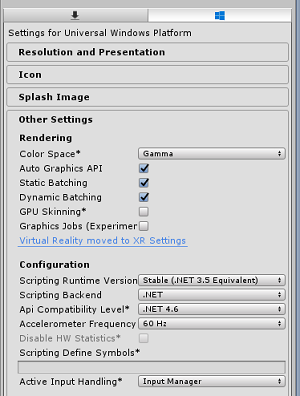
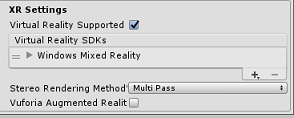
Further down the panel, in XR Settings (found below Publish Settings), tick Virtual Reality Supported, make sure the Windows Mixed Reality SDK is added.
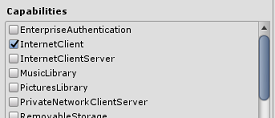
Within the Publishing Settings tab, under Capabilities, check:
InternetClient
Once you have made those changes, close the Build Settings window.
Save your Project File Save Project.
Chapter 4 - Importing the InsideOutSphere Unity package
Important
If you wish to skip the Unity Set up component of this course, and continue straight into code, feel free to download. .unitypackage, import it into your project as a Custom Package, and then continue from Chapter 5. You need to create a Unity Project.
For this course, you need to download a Unity Asset Package called InsideOutSphere.unitypackage.
How-to import the unitypackage:
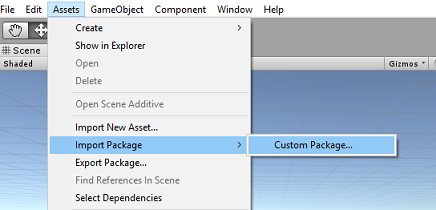
With the Unity dashboard in front of you, click on Assets in the menu at the top of the screen, then click on Import Package > Custom Package.
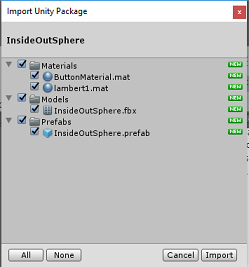
Use the file picker to select the InsideOutSphere.unitypackage package and click Open. A list of components for this asset are displayed to you. Confirm the import by clicking Import.
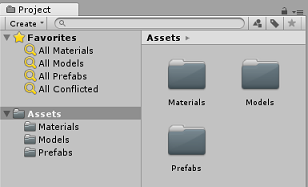
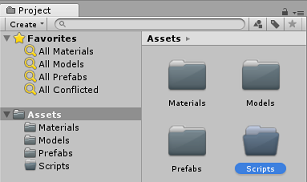
Once it's importing, three new folders, Materials, Models, and Prefabs, are added to your Assets folder. This kind of folder structure is typical for a Unity project.
Open the Models folder, and see the imported InsideOutSphere model.
Within the Materials folder find, the InsideOutSpheres material lambert1, along with a material called ButtonMaterial, which is used by the GazeButton.
The Prefabs folder contains the InsideOutSphere prefab, which contains both the InsideOutSphere model and the GazeButton.
No code is included, you write the code by following this course.
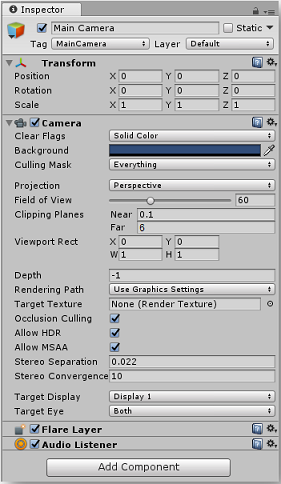
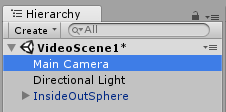
Within the Hierarchy, select the Main Camera object, and update the following components:
Transform
Position = X: 0, Y: 0, Z: 0.
Rotation = X: 0, Y: 0, Z: 0.
Scale X: 1, Y: 1, Z: 1.
Camera
Clear Flags: Solid Color.
Clipping Planes: Near: 0.1, Far: 6.
Navigate to the Prefab folder, and then drag the InsideOutSphere prefab into the Hierarchy Panel.
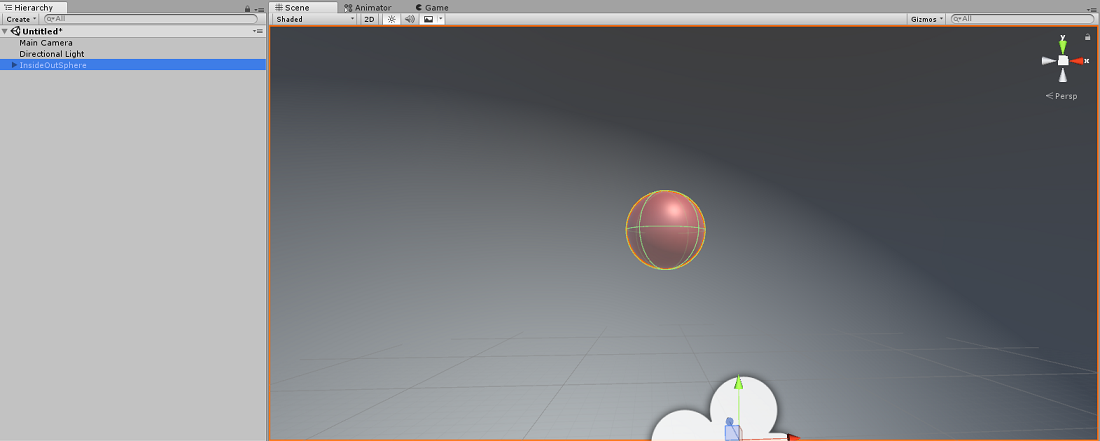
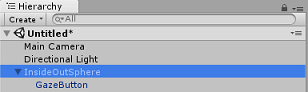
Expand the InsideOutSphere object within the Hierarchy by clicking the little arrow next to it. You see a child object beneath it called GazeButton which is used to change scenes and thus videos.
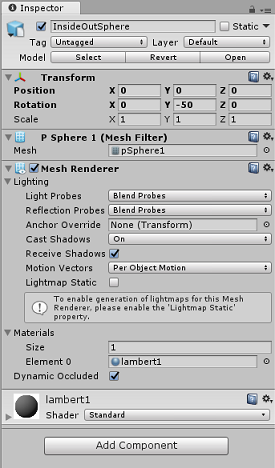
In the Inspector Window click on the InsideOutSphere's Transform component, ensure that the following properties are set:
Transform - Position
| X | Y | Z |
|---|---|---|
| 0 | 0 | 0 |
Transform - Rotation
| X | Y | Z |
|---|---|---|
| 0 | -50 | 0 |
Transform - Scale
| X | Y | Z |
|---|---|---|
| 0 | 0 | 0 |
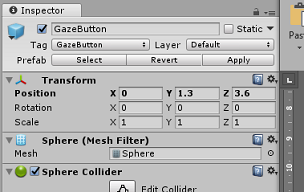
- Click on the GazeButton child object, and set it's Transform as follows:
Transform - Position
| X | Y | Z |
|---|---|---|
| 3.6 | 1.3 | 0 |
Transform - Rotation
| X | Y | Z |
|---|---|---|
| 0 | 0 | 0 |
Transform - Scale
| X | Y | Z |
|---|---|---|
| 1 | 1 | 1 |

Chapter 5 - Create the VideoController class
The VideoController class hosts the two video endpoints that are used to stream the content from the Azure Media Service.
To create this class:
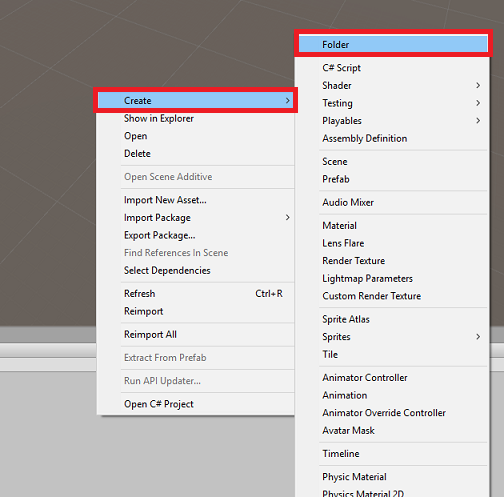
Right-click in the Asset Folder, located in the Project Panel, and click Create > Folder. Name the folder Scripts.
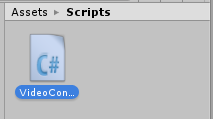
Double click on the Scripts folder to open it.
Right-click inside the folder, then click Create > C# Script. Name the script VideoController.
Double click on the new VideoController script to open it with Visual Studio 2017.
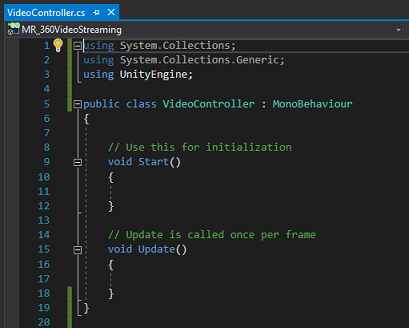
Update the namespaces at the top of the code file as follows:
using System.Collections;
using UnityEngine;
using UnityEngine.SceneManagement;
using UnityEngine.Video;
Enter the following variables in the VideoController class, along with the Awake() method:
    /// <summary>
    /// Provides Singleton-like behaviour to this class.
    /// </summary>
    public static VideoController instance;

    /// <summary>
    /// Reference to the Camera VideoPlayer Component.
    /// </summary>
    private VideoPlayer videoPlayer;

    /// <summary>
    /// Reference to the Camera AudioSource Component.
    /// </summary>
    private AudioSource audioSource;

    /// <summary>
    /// Reference to the texture used to project the video streaming
    /// </summary>
    private RenderTexture videoStreamRenderTexture;

    /// <summary>
    /// Insert here the first video endpoint
    /// </summary>
    private string video1endpoint = "-- Insert video 1 Endpoint here --";

    /// <summary>
    /// Insert here the second video endpoint
    /// </summary>
    private string video2endpoint = "-- Insert video 2 Endpoint here --";

    /// <summary>
    /// Reference to the Inside-Out Sphere.
    /// </summary>
    public GameObject sphere;

    void Awake()
    {
        instance = this;
    }
Now is the time to enter the endpoints from your Azure Media Service videos:
The first into the video1endpoint variable.
The second into the video2endpoint variable.
Warning
There's a known issue with using https within Unity, with version 2017.4.1f1. If the videos provide an error on play, try using 'http' instead.
Next, the Start() method needs to be edited. This method is triggered each time the user switches scene (which switches the video) by looking at the Gaze Button.
    // Use this for initialization
    void Start()
    {
        Application.runInBackground = true;
        StartCoroutine(PlayVideo());
    }
Following the Start() method, insert the PlayVideo() IEnumerator method, which is used to start videos seamlessly (so no stutter is seen).
    private IEnumerator PlayVideo()
    {
        // create a new render texture to display the video
        videoStreamRenderTexture = new RenderTexture(2160, 1440, 32, RenderTextureFormat.ARGB32);

        videoStreamRenderTexture.Create();

        // assign the render texture to the object material
        Material sphereMaterial = sphere.GetComponent<Renderer>().sharedMaterial;

        //create a VideoPlayer component
        videoPlayer = gameObject.AddComponent<VideoPlayer>();

        // Set the video to loop.
        videoPlayer.isLooping = true;

        // Set the VideoPlayer component to play the video from the texture
        videoPlayer.renderMode = VideoRenderMode.RenderTexture;

        videoPlayer.targetTexture = videoStreamRenderTexture;

        // Add AudioSource
        audioSource = gameObject.AddComponent<AudioSource>();

        // Pause Audio play on Awake
        audioSource.playOnAwake = true;
        audioSource.Pause();

        // Set Audio Output to AudioSource
        videoPlayer.audioOutputMode = VideoAudioOutputMode.AudioSource;
        videoPlayer.source = VideoSource.Url;

        // Assign the Audio from Video to AudioSource to be played
        videoPlayer.EnableAudioTrack(0, true);
        videoPlayer.SetTargetAudioSource(0, audioSource);

        // Assign the video Url depending on the current scene
        switch (SceneManager.GetActiveScene().name)
        {
            case "VideoScene1":
                videoPlayer.url = video1endpoint;
                break;

            case "VideoScene2":
                videoPlayer.url = video2endpoint;
                break;

            default:
                break;
        }

        //Set video To Play then prepare Audio to prevent Buffering
        videoPlayer.Prepare();

        while (!videoPlayer.isPrepared)
        {
            yield return null;
        }

        sphereMaterial.mainTexture = videoStreamRenderTexture;

        //Play Video
        videoPlayer.Play();

        //Play Sound
        audioSource.Play();

        while (videoPlayer.isPlaying)
        {
            yield return null;
        }
    }
The last method you need for this class is the ChangeScene() method, which is used to swap between scenes.
    public void ChangeScene()
    {
        SceneManager.LoadScene(SceneManager.GetActiveScene().name == "VideoScene1" ? "VideoScene2" : "VideoScene1");
    }
Tip
The ChangeScene() method uses a handy C# feature called the Conditional Operator. This feature allows for conditions to be checked, and then values returned based on the outcome of the check, all within a single statement. Follow this link to learn more about Conditional Operator.
Save your changes in Visual Studio before returning to Unity.
Back in the Unity Editor, click and drag the VideoController class [from]{.underline} the Scripts folder to the Main Camera object in the Hierarchy Panel.
Click on the Main Camera and look at the Inspector Panel. Notice that within the newly added Script component, there's a field with an empty value. This reference field targets the public variables within your code.
Drag the InsideOutSphere object from the Hierarchy Panel to the Sphere slot, as shown in the image.

Chapter 6 - Create the Gaze class
This class is responsible for creating a Raycast that are projected forward from the Main Camera, to detect which object the user is looking at. In this case, the Raycast needs to identify if the user is looking at the GazeButton object in the scene and trigger a behavior.
To create this Class:
Go to the Scripts folder you created previously.
Right-click in the Project Panel, Create C# Script. Name the script Gaze.
Double click on the new Gaze script to open it with Visual Studio 2017.
Ensure the following namespace is at the top of the script, and remove any others:
using UnityEngine;Then add the following variables inside the Gaze class:
    /// <summary>
    /// Provides Singleton-like behaviour to this class.
    /// </summary>
    public static Gaze instance;

    /// <summary>
    /// Provides a reference to the object the user is currently looking at.
    /// </summary>
    public GameObject FocusedGameObject { get; private set; }

    /// <summary>
    /// Provides a reference to compare whether the user is still looking at
    /// the same object (and has not looked away).
    /// </summary>
    private GameObject oldFocusedObject = null;

    /// <summary>
    /// Max Ray Distance
    /// </summary>
    float gazeMaxDistance = 300;

    /// <summary>
    /// Provides whether an object has been successfully hit by the raycast.
    /// </summary>
    public bool Hit { get; private set; }
Code for the Awake() and Start() methods now needs to be added.
    private void Awake()
    {
        // Set this class to behave similar to singleton
        instance = this;
    }

    void Start()
    {
        FocusedGameObject = null;
    }
Add the following code in the Update() method to project a Raycast and detect the target hit:
    void Update()
    {
        // Set the old focused gameobject.
        oldFocusedObject = FocusedGameObject;
        RaycastHit hitInfo;

        // Initialise Raycasting.
        Hit = Physics.Raycast(Camera.main.transform.position, Camera.main.transform.forward, out hitInfo, gazeMaxDistance);

        // Check whether raycast has hit.
        if (Hit == true)
        {
            // Check whether the hit has a collider.
            if (hitInfo.collider != null)
            {
                // Set the focused object with what the user just looked at.
                FocusedGameObject = hitInfo.collider.gameObject;
            }
            else
            {
                // Object looked on is not valid, set focused gameobject to null.
                FocusedGameObject = null;
            }
        }
        else
        {
            // No object looked upon, set focused gameobject to null.
            FocusedGameObject = null;
        }

        // Check whether the previous focused object is this same
        // object (so to stop spamming of function).
        if (FocusedGameObject != oldFocusedObject)
        {
            // Compare whether the new Focused Object has the desired tag we set previously.
            if (FocusedGameObject.CompareTag("GazeButton"))
            {
                FocusedGameObject.SetActive(false);
                VideoController.instance.ChangeScene();
            }
        }
    }
Save your changes in Visual Studio before returning to Unity.
Click and drag the Gaze class from the Scripts folder to the Main Camera object in the Hierarchy Panel.
Chapter 7 - Setup the two Unity Scenes
The purpose of this Chapter is to set up the two scenes, each hosting a video to stream. Duplicate the scene you created to reduce setup time. Then, edit the new scene, so that the GazeButton object is in a different location and has a different appearance to show how to change between scenes.
Go to File > Save Scene as.... A save window appears. Click the New folder button.
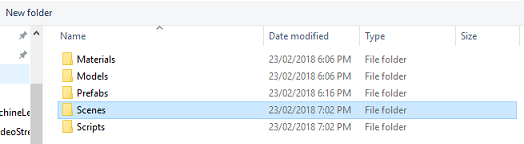
Name the folder Scenes.
The Save Scene window is open. Open your newly created Scenes folder.
In the File name: text field, type VideoScene1, then press Save.
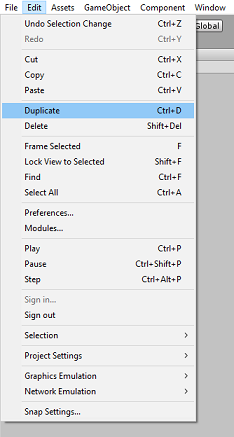
Back in Unity, open your Scenes folder, and left-click your VideoScene1 file. Use your keyboard, and press Ctrl + D you duplicate that scene
Tip
The Duplicate command can also be performed by navigating to Edit > Duplicate.
Unity automatically increments the scene names number, but check it anyway, to ensure it matches the previously inserted code.
You should have VideoScene1 and VideoScene2.
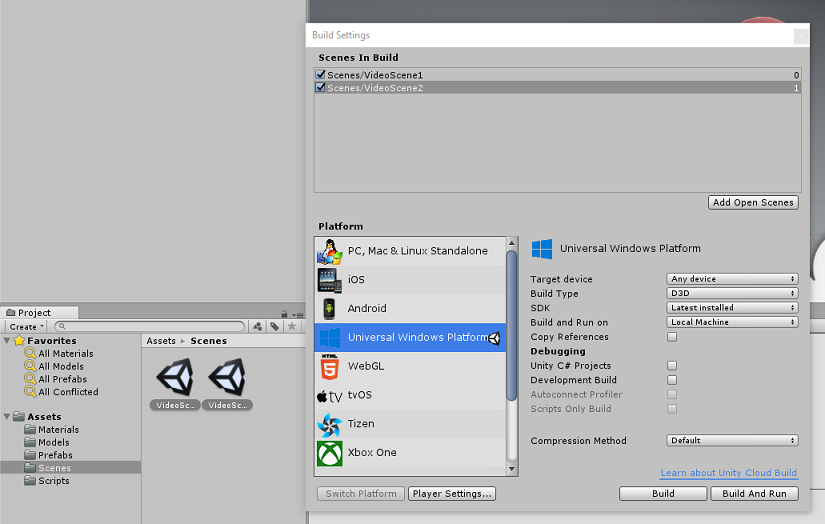
With your two scenes, go to File > Build Settings. With the Build Settings window open, drag your scenes to the Scenes in Build section.
Tip
You can select both of your scenes from your Scenes folder through holding the Ctrl button, and then left-clicking each scene, and finally drag both across.
Close the Build Settings window, and double click on VideoScene2.
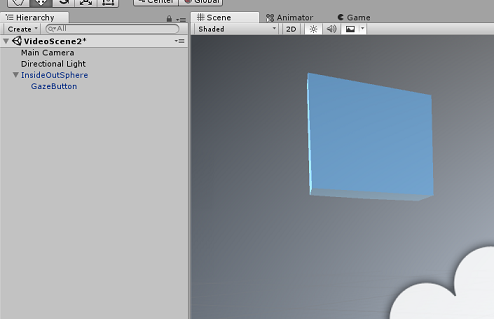
With the second scene open, click on the GazeButton child object of the InsideOutSphere, and set it's Transform as follows:
Transform - Position
| X | Y | Z |
|---|---|---|
| 0 | 1.3 | 3.6 |
Transform - Rotation
| X | Y | Z |
|---|---|---|
| 0 | 0 | 0 |
Transform - Scale
| X | Y | Z |
|---|---|---|
| 1 | 1 | 1 |
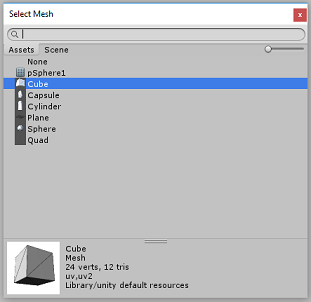
With the GazeButton child selected, look at the Inspector and at the Mesh Filter. Click the little target next to the Mesh reference field:
A Select Mesh popup window appears. Double click the Cube mesh from the list of Assets.
The Mesh Filter updates, and now be a Cube. Now, click the Gear icon next to Sphere Collider and click Remove Component, to delete the collider from this object.
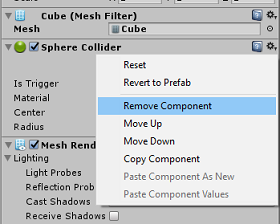
With the GazeButton selected, click the Add Component button at the bottom of the Inspector. In the search field, type box, and Box Collider is an option--click that, to add a Box Collider to your GazeButton object.
The GazeButton is now partially updated, to look different, however, now create a new Material, so that it looks different, and is easier to recognize as a different object, than the object in the first scene.
Navigate to your Materials folder, within the Project Panel. Duplicate the ButtonMaterial Material (press Ctrl + D on the keyboard, or left-click the Material, then from the Edit file menu option, select Duplicate).
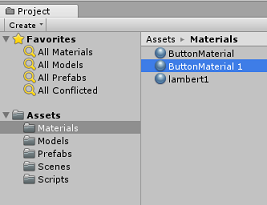
Select the new ButtonMaterial Material (here named ButtonMaterial 1), and within the Inspector, click the Albedo color window. A popup appears, where you can select another color (choose whichever you like), then close the popup. The Material is its own instance, and different to the original.
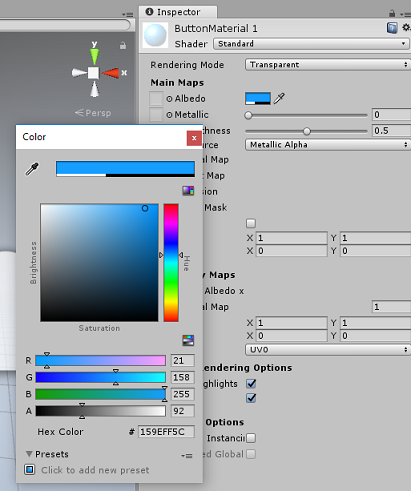
Drag the new Material onto the GazeButton child, to now update its look, so that it's easily distinguishable from the first scenes button.
At this point, you can test the project in the Editor before building the UWP project.
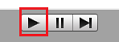
Press the Play button in the Editor and wear your headset.
Look at the two GazeButton objects to switch between the first and second video.
Chapter 8 - Build the UWP Solution
Once you ensure that the editor has no errors, you're ready to Build.
To Build:
Save the current scene by clicking on File > Save.
Check the box called Unity C# Projects (this option allows you to edit the classes after build is completed).
Go to File > Build Settings and click on Build.
You're prompted to select the folder where you want to build the Solution.
Create a BUILDS folder and within that folder create another folder with an appropriate name of your choice.
Click your new folder and then click Select Folder, so to choose that folder, to begin the build at that location.
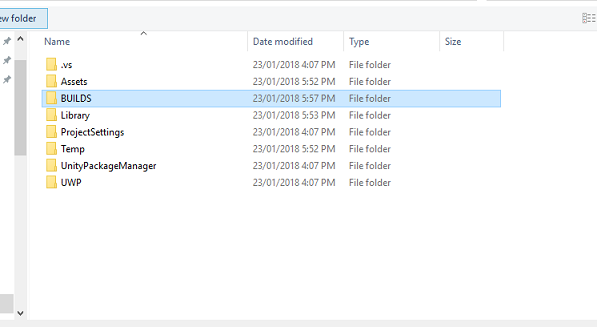

Once Unity is building (it might take some time), it opens a File Explorer window at the location of your build.
Chapter 9 - Deploy on Local Machine
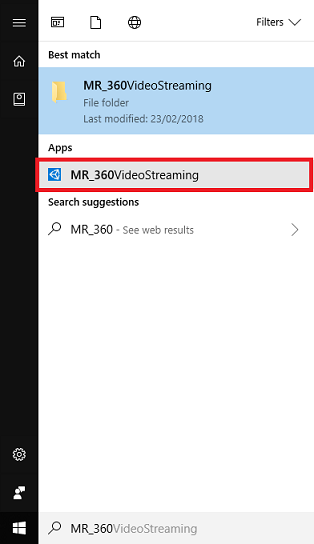
After the build completes, a File Explorer window appears at the location of your build. To open your solution with Visual Studio 2017, open the Folder you named and built to, then double click on the solution (.sln) file within that folder.
The only thing left is to deploy your app to your computer (or Local Machine).
To deploy to Local Machine:
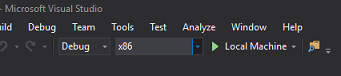
In Visual Studio 2017, open the solution file.
In the Solution Platform, select x86, Local Machine.
In the Solution Configuration select Debug.
You now need to restore any packages to your solution. Right-click on your Solution, and click Restore NuGet Packages for Solution...
Note
The packages which Unity built need to be targeted to work with your local machines references.
Go to Build menu and click on Deploy Solution to sideload the application to your machine. Visual Studio first builds and then deploy your application.
Your App should now appear in the list of installed apps, ready to be launched.
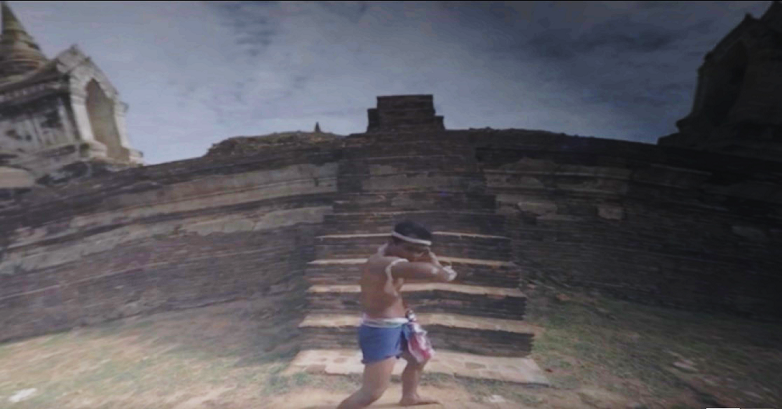
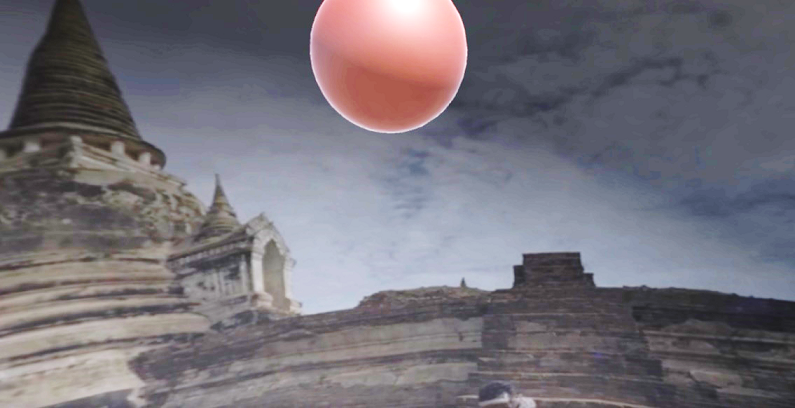
When you run the Mixed Reality application, you'll be within the InsideOutSphere model you used within your app. This sphere is where the video is streamed to and provides a 360-degree view of the incoming video filmed for this kind of perspective. The video can take a couple of seconds to load as your app is subject to the available Internet speed, while the video is fetched, downloaded and then streamed into your app. When you're ready, change scenes and open your second video, by gazing at the red sphere! Then feel free to go back, using the blue cube in the second scene!
Your finished Azure Media Service application
Congratulations, you built a mixed reality app that applies the Azure Media Service to stream 360 videos.
Bonus Exercises
Exercise 1
It's entirely possible to only use a single scene to change videos within this tutorial. Experiment with your application and make it into a single scene! Even add another video to the mix.
Exercise 2
Experiment with Azure and Unity, and attempt to implement the ability for the app to automatically select a video with a different file size, depending on the strength of an Internet connection.