Note
Access to this page requires authorization. You can try signing in or changing directories.
Access to this page requires authorization. You can try changing directories.
Note
The Mixed Reality Academy tutorials were designed with HoloLens (1st gen) and Mixed Reality Immersive Headsets in mind. As such, we feel it's important to leave these tutorials in place for developers who are still looking for guidance in developing for those devices. These tutorials won't be updated with the latest toolsets or interactions being used for HoloLens 2. They are maintained to continue working on the supported devices. A new series of tutorials may be posted in the future to demonstrate how to develop for HoloLens 2.
In this course, you learn how to create and deploy a bot using the Microsoft Bot Framework V4 and communicate with it through a Windows Mixed Reality application.
The Microsoft Bot Framework V4 is a set of APIs designed to provide developers with the tools to build an extensible and scalable bot application. For more information, visit the Microsoft Bot Framework page or the V4 Git Repository.
After completing this course, you built a Windows Mixed Reality application, which is able to:
- Use a Tap Gesture to start the bot listening for the users voice.
- When the user has said something, the bot attempts to provide a response.
- Display the bots reply as text, positioned near the bot, in the Unity Scene.
In your application, it's up to you as to how you integrate the results with your design. This course is designed to teach you how to integrate an Azure Service with your Unity project. It's your job to use the knowledge you gain from this course to enhance your mixed reality application.
Device support
| Course | HoloLens | Immersive headsets |
|---|---|---|
| MR and Azure 312: Bot integration | ✔️ | ✔️ |
Note
While this course primarily focuses on HoloLens, you can also apply what you learn in this course to Windows Mixed Reality immersive (VR) headsets. Because immersive (VR) headsets don't have accessible cameras, you need an external camera connected to your PC. As you follow along with the course, see notes on any changes you might need to employ to support immersive (VR) headsets.
Prerequisites
Note
This tutorial is designed for developers who have basic experience with Unity and C#. The prerequisites and written instructions within this document represent what was tested and verified at the time of writing (July 2018). You're free to use the latest software, as listed within the install the tools article, though it isn't assumed that the information in this course perfectly matches what you find in newer software.
We recommend the following hardware and software for this course:
- A development PC, compatible with Windows Mixed Reality for immersive (VR) headset development
- Windows 10 Fall Creators Update (or later) with Developer mode enabled
- The latest Windows 10 SDK
- Unity 2017.4
- Visual Studio 2017
- A Windows Mixed Reality immersive (VR) headset or Microsoft HoloLens with Developer mode enabled
- Internet access for Azure, and for Azure Bot retrieval. For more information, follow this link.
Before you start
- To avoid build issues related to long folder paths with this project, create the tutorial project in a root or near-root folder.
- Set up and test your HoloLens. If you need support setting up your HoloLens, make sure to visit the HoloLens setup article.
- It's a good idea to perform Calibration and Sensor Tuning when beginning developing a new HoloLens app (sometimes it can help to perform those tasks for each user).
For help on Calibration, follow this link to the HoloLens Calibration article.
For help on Sensor Tuning, follow this link to the HoloLens Sensor Tuning article.
Chapter 1 – Create the Bot application
The first step is to create your bot as a local ASP.Net Core Web application. Once you finish and test it, publish it to the Azure Portal.
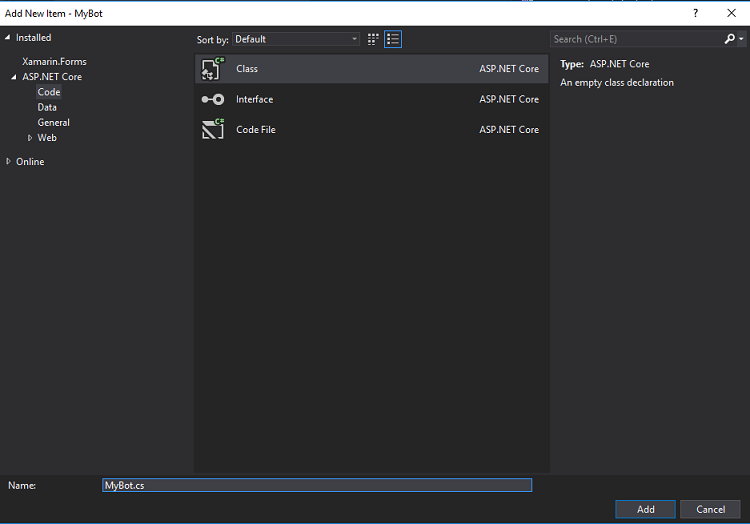
Open Visual Studio. Create a new project, select ASP NET Core Web Application as the project type (find it under the subsection .NET Core) and call it MyBot. Click OK.
In the Window that appears, select Empty. Also make sure the target is set to ASP NET Core 2.0 and the Authentication is set to No Authentication. Click OK.

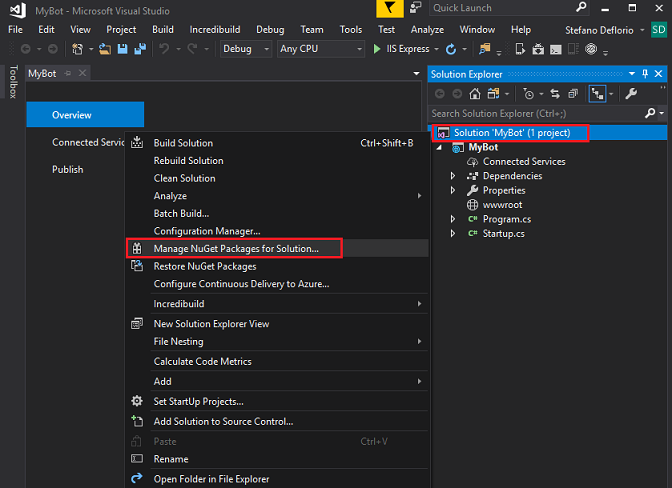
The solution opens. Right-click on Solution Mybot in the Solution Explorer and click on Manage NuGet Packages for Solution.
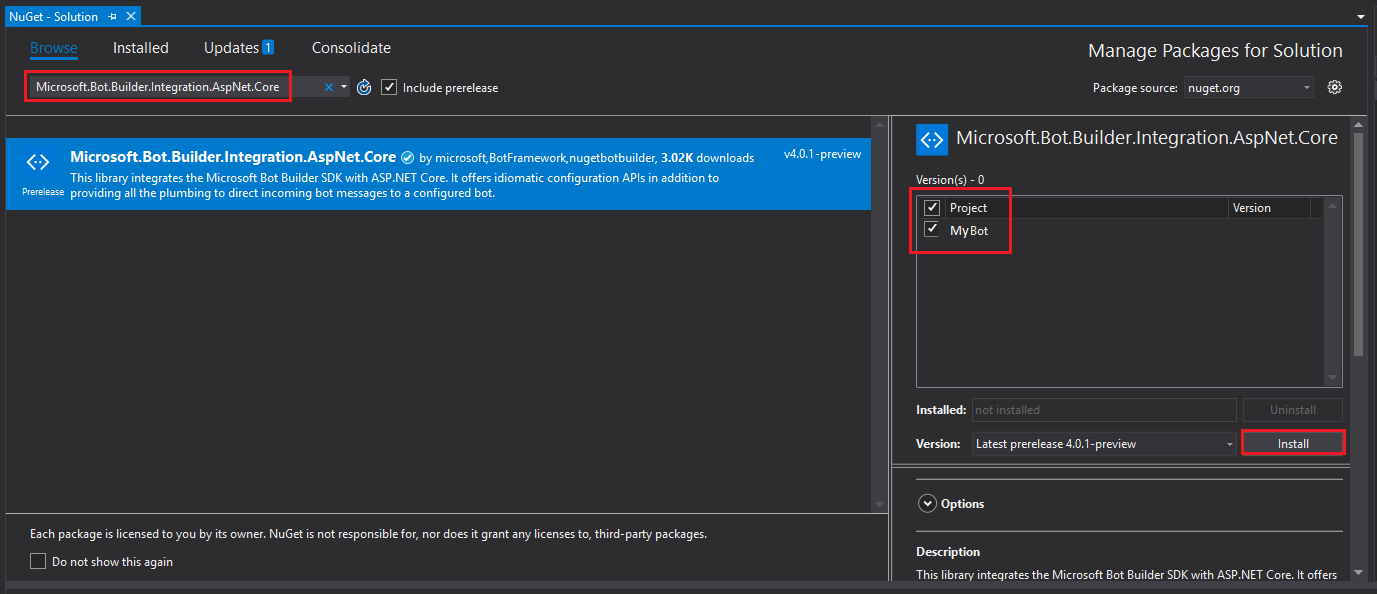
In the Browse tab, search for Microsoft.Bot.Builder.Integration.AspNet.Core (make sure you have Include pre-release checked). Select the package version 4.0.1-preview, and tick the project boxes. Then click on Install. The libraries are installed for the Bot Framework v4. Close the NuGet page.
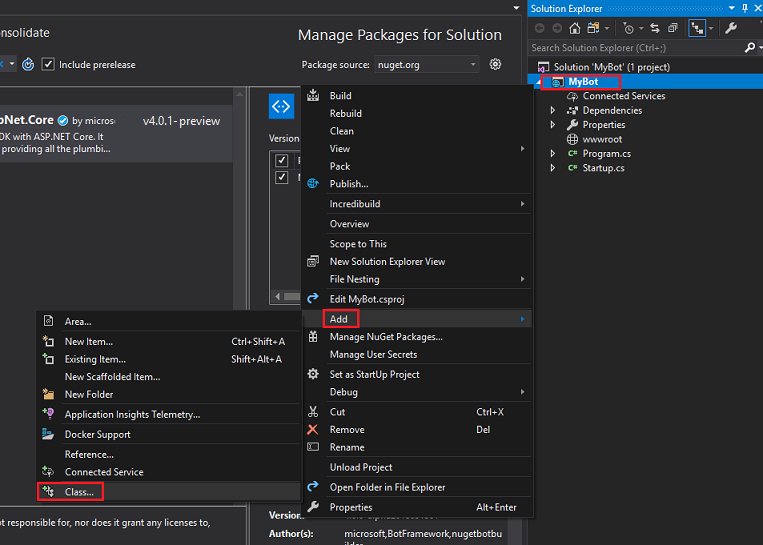
Right-click on your Project, MyBot, in the Solution Explorer and click on Add | Class.
Name the class MyBot and click on Add.
Repeat the previous point, to create another class named ConversationContext.
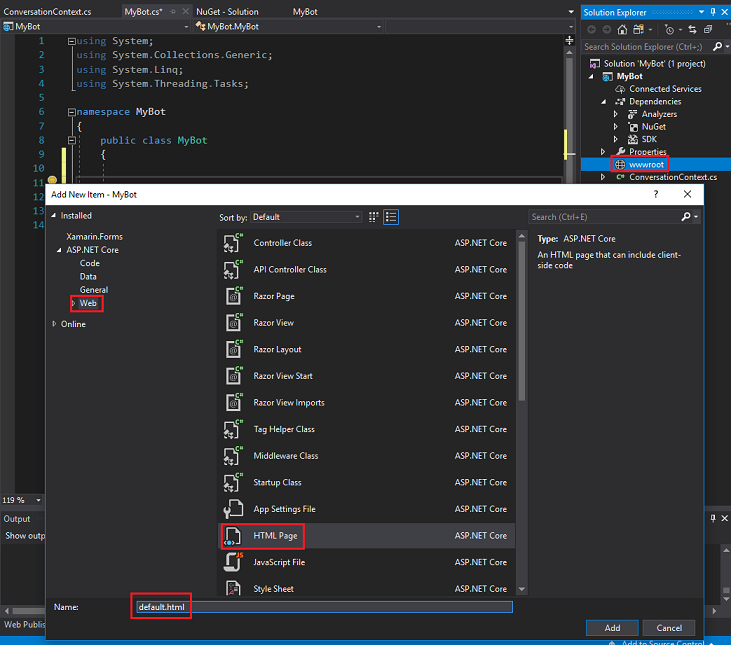
Right-click on wwwroot in the Solution Explorer and click on Add | New Item. Select HTML Page (find it under the subsection Web). Name the file default.html. Click Add.
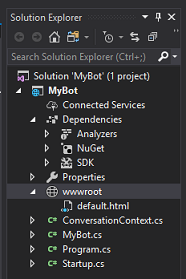
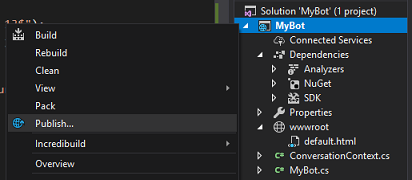
The list of classes / objects in the Solution Explorer should look like the image:
Double-click on the ConversationContext class. This class is responsible for holding the variables used by the bot to maintain the context of the conversation. These conversation context values are maintained in an instance of this class, because any instance of the MyBot class refreshes each time an activity is received. Add the following code to the class:
namespace MyBot
{
    public static class ConversationContext
    {
        internal static string userName;

        internal static string userMsg;
    }
}
Double-click on the MyBot class. This class hosts the handlers called by any incoming activity from the customer. In this class, you add the code used to build the conversation between the bot and the customer. As mentioned earlier, an instance of this class is initialized each time an activity is received. Add the following code to this class:
using Microsoft.Bot;
using Microsoft.Bot.Builder;
using Microsoft.Bot.Schema;
using System.Threading.Tasks;

namespace MyBot
{
    public class MyBot : IBot
    {
        public async Task OnTurn(ITurnContext context)
        {
            ConversationContext.userMsg = context.Activity.Text;

            if (context.Activity.Type is ActivityTypes.Message)
            {
                if (string.IsNullOrEmpty(ConversationContext.userName))
                {
                    ConversationContext.userName = ConversationContext.userMsg;
                    await context.SendActivity($"Hello {ConversationContext.userName}. Looks like today it is going to rain. \nLuckily I have umbrellas and waterproof jackets to sell!");
                }
                else
                {
                    if (ConversationContext.userMsg.Contains("how much"))
                    {
                        if (ConversationContext.userMsg.Contains("umbrella")) await context.SendActivity($"Umbrellas are $13.");
                        else if (ConversationContext.userMsg.Contains("jacket")) await context.SendActivity($"Waterproof jackets are $30.");
                        else await context.SendActivity($"Umbrellas are $13. \nWaterproof jackets are $30.");
                    }
                    else if (ConversationContext.userMsg.Contains("color") || ConversationContext.userMsg.Contains("colour"))
                    {
                        await context.SendActivity($"Umbrellas are black. \nWaterproof jackets are yellow.");
                    }
                    else
                    {
                        await context.SendActivity($"Sorry {ConversationContext.userName}. I did not understand the question");
                    }
                }
            }
            else
            {

                ConversationContext.userMsg = string.Empty;
                ConversationContext.userName = string.Empty;
                await context.SendActivity($"Welcome! \nI am the Weather Shop Bot \nWhat is your name?");
            }

        }
    }
}
Double-click on the Startup class. This class initializes the bot. Add the following code to the class:
using Microsoft.AspNetCore.Builder;
using Microsoft.AspNetCore.Hosting;
using Microsoft.Bot.Builder.BotFramework;
using Microsoft.Bot.Builder.Integration.AspNet.Core;
using Microsoft.Extensions.Configuration;
using Microsoft.Extensions.DependencyInjection;

namespace MyBot
{
public class Startup
    {
        public IConfiguration Configuration { get; }

        public Startup(IHostingEnvironment env)
        {
            var builder = new ConfigurationBuilder()
                .SetBasePath(env.ContentRootPath)
                .AddJsonFile("appsettings.json", optional: true, reloadOnChange: true)
                .AddJsonFile($"appsettings.{env.EnvironmentName}.json", optional: true)
                .AddEnvironmentVariables();
            Configuration = builder.Build();
        }

        // This method gets called by the runtime. Use this method to add services to the container.
        public void ConfigureServices(IServiceCollection services)
        {
            services.AddSingleton(_ => Configuration);
            services.AddBot<MyBot>(options =>
            {
                options.CredentialProvider = new ConfigurationCredentialProvider(Configuration);
            });
        }

        // This method gets called by the runtime. Use this method to configure the HTTP request pipeline.
        public void Configure(IApplicationBuilder app, IHostingEnvironment env)
        {
            if (env.IsDevelopment())
            {
                app.UseDeveloperExceptionPage();
            }

            app.UseDefaultFiles();
            app.UseStaticFiles();
            app.UseBotFramework();
        }
    }
}
Open the Program class file and verify the code in it is the same as the following:
using Microsoft.AspNetCore;
using Microsoft.AspNetCore.Hosting;

namespace MyBot
{
    public class Program
    {
        public static void Main(string[] args)
        {
            BuildWebHost(args).Run();
        }

        public static IWebHost BuildWebHost(string[] args) =>
            WebHost.CreateDefaultBuilder(args)
                .UseStartup<Startup>()
                .Build();
    }
}
Remember to save your changes, to do so, go to File > Save All, from the toolbar at the top of Visual Studio.
Chapter 2 - Create the Azure Bot Service
Now that you built the code for your bot, you have to publish it to an instance of the Web App Bot Service, on the Azure Portal. This Chapter shows you how to create and configure the Bot Service on Azure and then publish your code to it.
First, log in to the Azure Portal (https://portal.azure.com).
- If you don't already have an Azure account, you need to create one. If you're following this tutorial in a classroom or lab situation, ask your instructor or one of the proctors for help with setting up your new account.
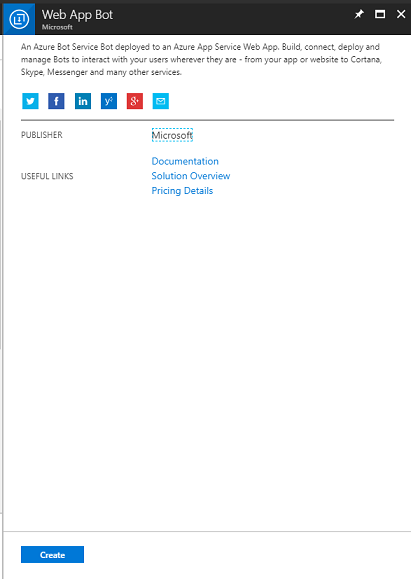
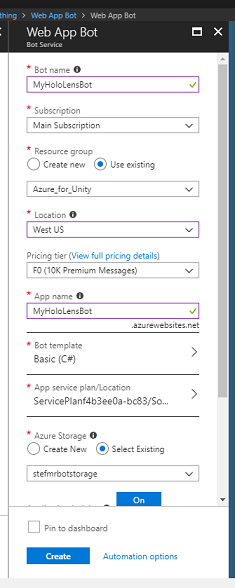
Once you're logged in, click on Create a resource in the top left corner, and search for Web App bot, and click Enter.

The new page provides a description of the Web App Bot Service. At the bottom left of this page, select the Create button, to create an association with this Service.
Once you click on Create:
Insert your desired Name for this Service instance.
Select a Subscription.
Choose a Resource Group or create a new one. A resource group provides a way to monitor, control access, provision and manage billing for a collection of Azure assets. It's recommended to keep all the Azure Services associated with a single project (for example, such as these courses) under a common resource group).
If you wish to read more about Azure Resource Groups, follow this link
Determine the Location for your resource group (if you're creating a new Resource Group). The location would ideally be in the region where the application would run. Some Azure assets are only available in certain regions.
Select the Pricing Tier appropriate for you, with the first time creating a Web App Bot Service, a free tier (named F0) should be available to you
App name can just be left the same as the Bot name.
Leave the Bot template as Basic (C#).
App service plan/Location should be autofilled for your account.
Set the Azure Storage that you wish to use to host your Bot. If you don't have one already, you can create it here.
You need to confirm that you understood the Terms and Conditions applied to this Service.
Click Create.
Once you click on Create, wait for the Service to be created, which may take a minute.
A notification appears in the Portal once the Service instance is created.

Click on the notification to explore your new Service instance.
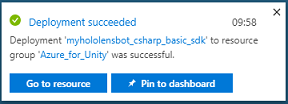
Click the Go to resource button in the notification to explore your new Service instance. you're taken to your new Azure Service instance.
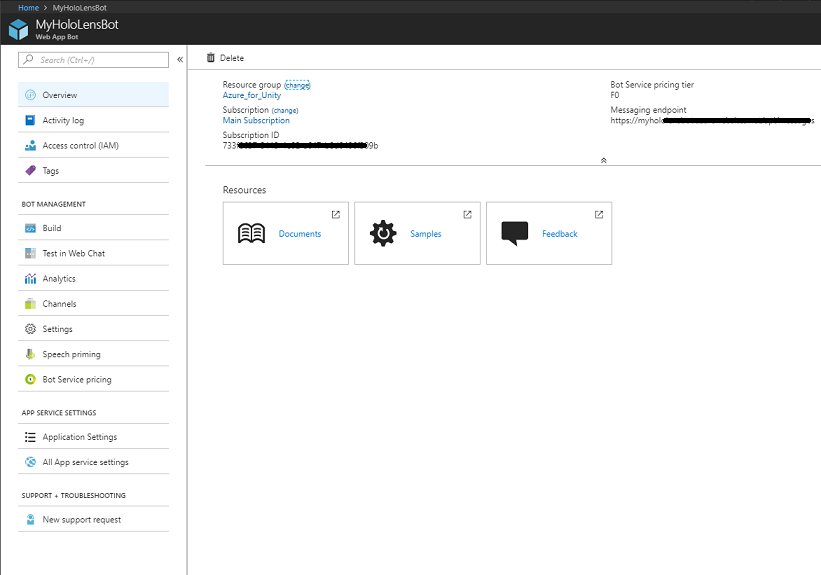
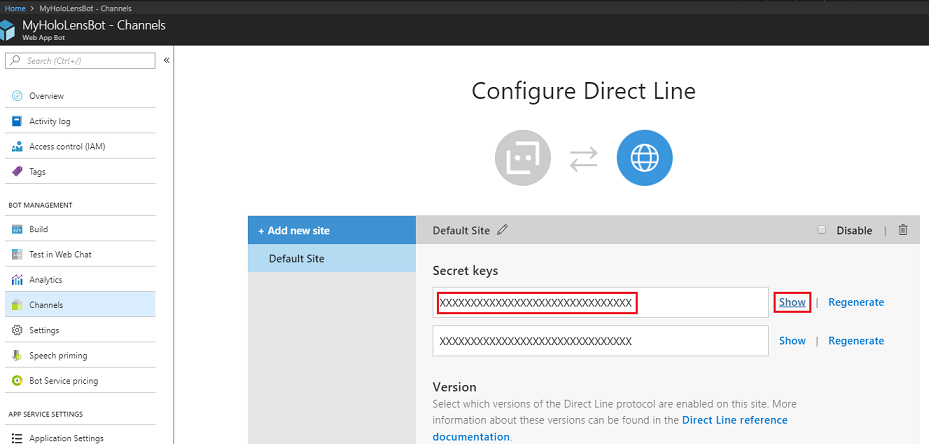
At this point you need to set up a feature called Direct Line to allow your client application to communicate with this Bot Service. Click on Channels, then in the Add a featured channel section, click on Configure Direct Line channel.
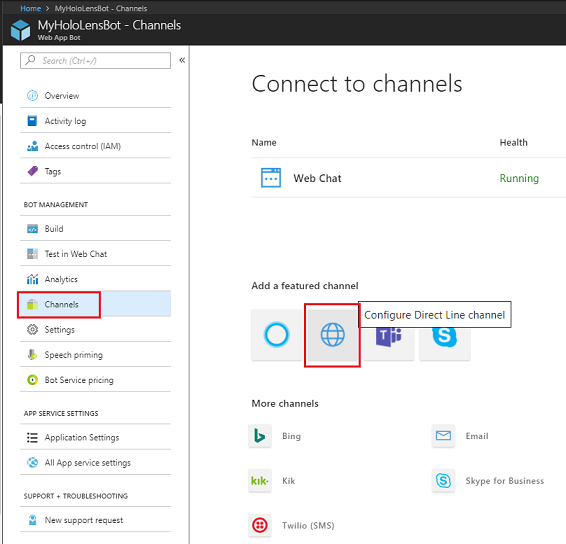
In this page, find the Secret keys that allow your client app to authenticate with the bot. Click on the Show button and take a copy of one of the displayed Keys, to use later in your project.
Chapter 3 – Publish the Bot to the Azure Web App Bot Service
Now that your Service is ready, you need to publish your Bot code, that you built previously, to your newly created Web App Bot Service.
Note
You have to publish your Bot to the Azure Service every time you make changes to the Bot solution / code.
Go back to your Visual Studio Solution that you created previously.
Right-click on your MyBot project, in the Solution Explorer, then click on Publish.
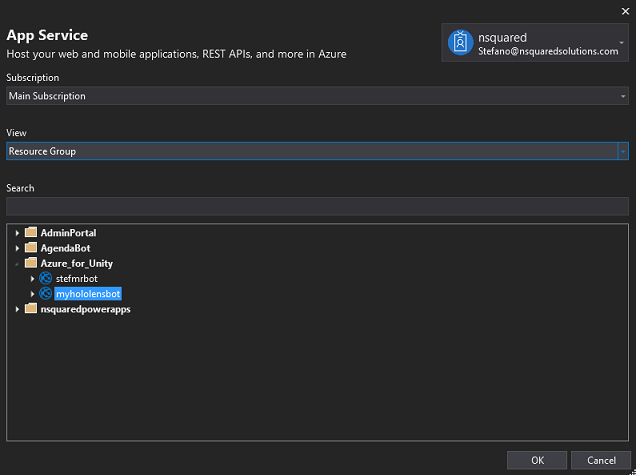
On the Pick a publish target page, click App Service, then Select Existing, lastly click on Create Profile (you may need to click on the dropdown arrow alongside the Publish button, if it isn't visible).

If you're not yet logged in into your Microsoft Account, you have to do it here.
On the Publish page you have to set the same Subscription that you used for the Web App Bot Service creation. Then set the View as Resource Group and, in the drop down folder structure, select the Resource Group you created previously. Click OK.
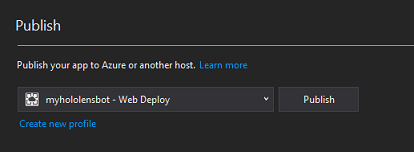
Now click on the Publish button, and wait for the Bot to be published (it might take a few minutes).
Chapter 4 – Set up the Unity project
The following steps are a typical setup for developing with mixed reality, and as such, is a good template for other projects.
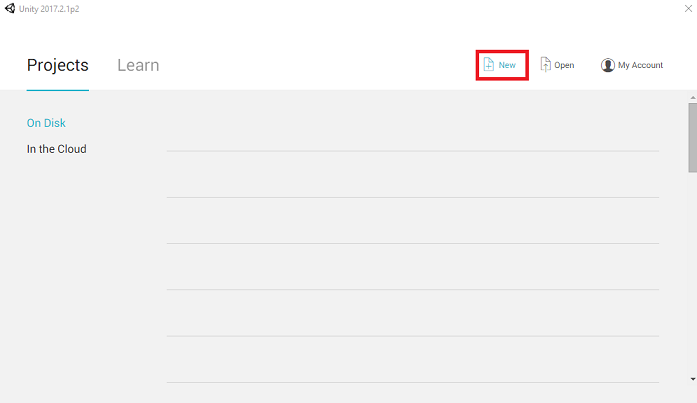
Open Unity and click New.
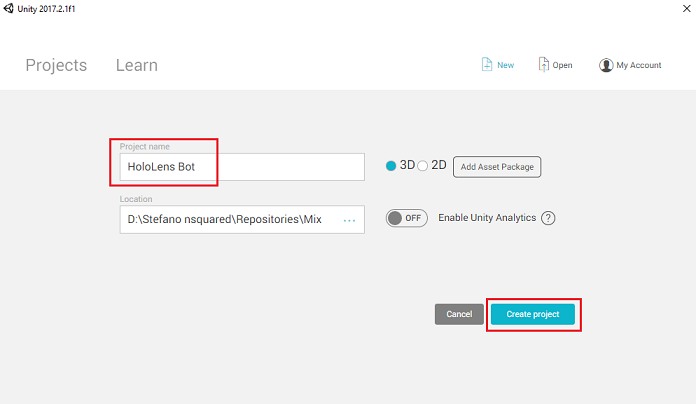
You need to provide a Unity project name. Insert HoloLens Bot. Make sure the project template is set to 3D. Set the Location to somewhere appropriate for you (remember, closer to root directories is better). Then, click Create project.
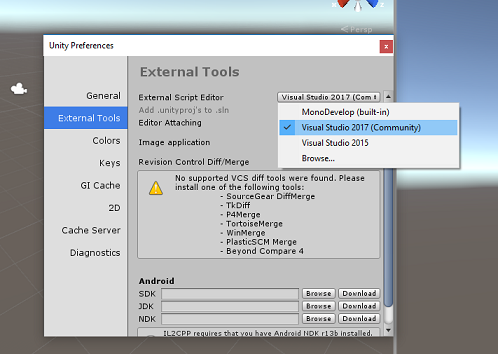
With Unity open, it's worth checking the default Script Editor is set to Visual Studio. Go to Edit > Preferences and then from the new window, navigate to External Tools. Change External Script Editor to Visual Studio 2017. Close the Preferences window.
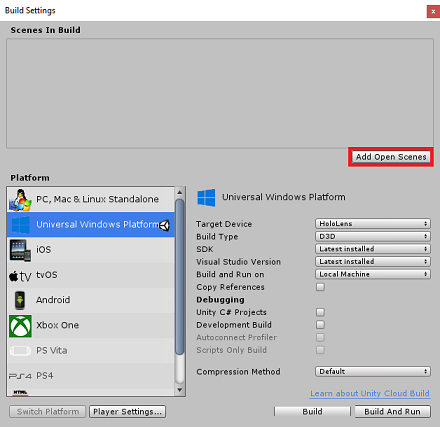
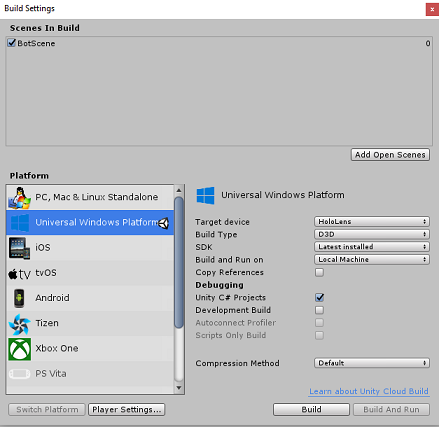
Next, go to File > Build Settings and select Universal Windows Platform, then click on the Switch Platform button to apply your selection.
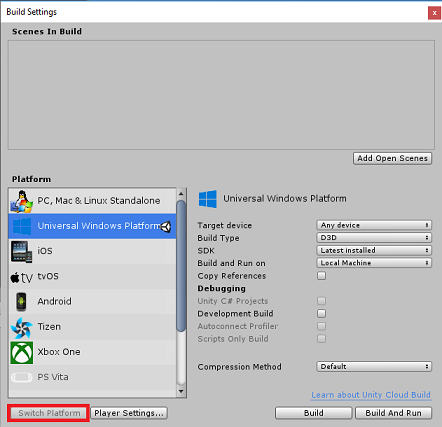
While still in File > Build Settings and make sure that:
Target Device is set to HoloLens
For the immersive headsets, set Target Device to Any Device.
Build Type is set to D3D
SDK is set to Latest installed
Visual Studio Version is set to Latest installed
Build and Run is set to Local Machine
Save the scene and add it to the build.
Do this by selecting Add Open Scenes. A save window appears.
Create a new folder for this, and any future, scene, then select the New folder button, to create a new folder, name it Scenes.
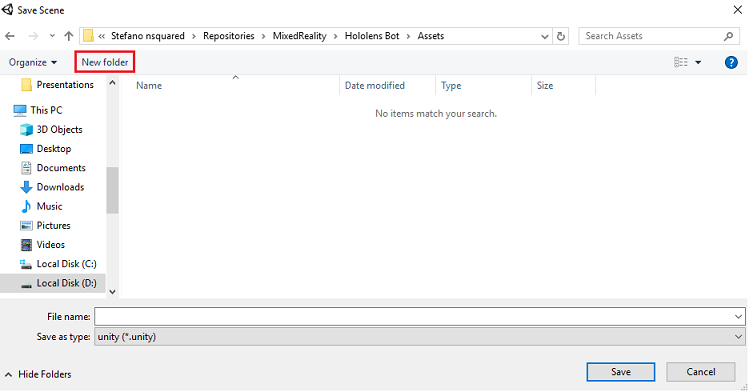
Open your newly created Scenes folder, and then in the File name: text field, type BotScene, then click on Save.

The remaining settings, in Build Settings, should be left as default for now.
In the Build Settings window, click on the Player Settings button, the related panel opens in the space where the Inspector is located.
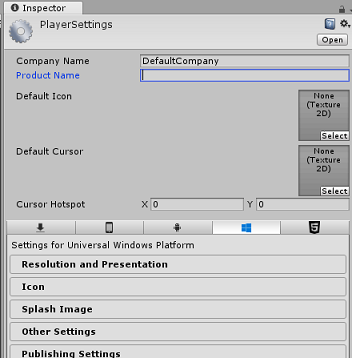
In this panel, a few settings need to be verified:
In the Other Settings tab:
Scripting Runtime Version should be Experimental (NET 4.6 Equivalent); this change requires a restart of the Editor.
Scripting Backend should be .NET
API Compatibility Level should be .NET 4.6
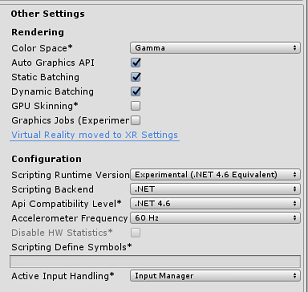
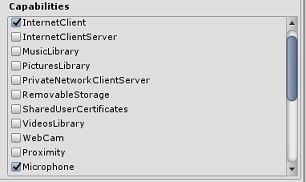
Within the Publishing Settings tab, under Capabilities, check:
InternetClient
Microphone
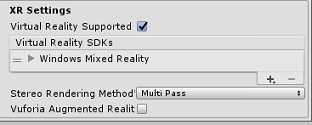
Further down the panel, in XR Settings (found below Publish Settings), tick Virtual Reality Supported, make sure the Windows Mixed Reality SDK is added.
Back in Build Settings Unity C# Projects is no longer greyed out; tick the checkbox next to this.
Close the Build Settings window.
Save your scene and project (FILE > SAVE SCENE / FILE > SAVE PROJECT).
Chapter 5 – Camera setup
Important
If you wish to skip the Unity Set up component of this course, and continue straight into code, feel free to download this Azure-MR-312-Package.unitypackage, import it into your project as a Custom Package, and then continue from Chapter 7.
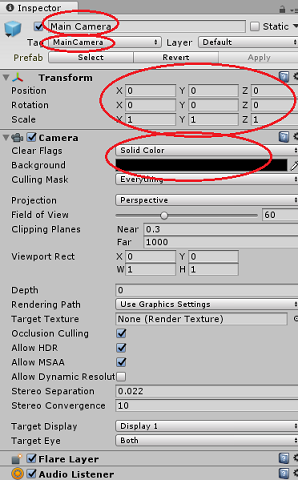
In the Hierarchy panel, select the Main Camera.
Once selected, see all the components of the Main Camera in the Inspector panel.
- The Camera object must be named Main Camera (note the spelling)
- The Main Camera Tag must be set to MainCamera (note the spelling)
- Make sure the Transform Position is set to 0, 0, 0
- Set Clear Flags to Solid Color.
- Set the Background Color of the Camera component to Black, Alpha 0 (Hex Code: #00000000)
Chapter 6 – Import the Newtonsoft library
To help you deserialize and serialize objects received and sent to the Bot Service you need to download the Newtonsoft library. You find a compatible version already organized with the correct Unity folder structure here.
To import the Newtonsoft library into your project, use the Unity Package that came with this course.
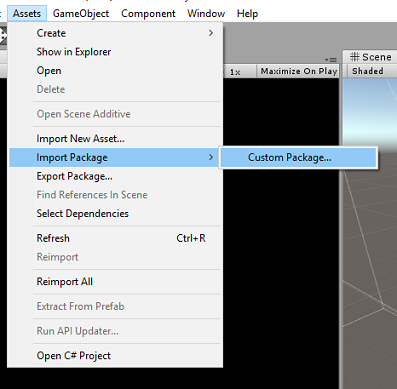
Add the .unitypackage to Unity by using the Assets > Import Package > Custom Package menu option.
In the Import Unity Package box that pops up, ensure everything under (and including) Plugins is selected.
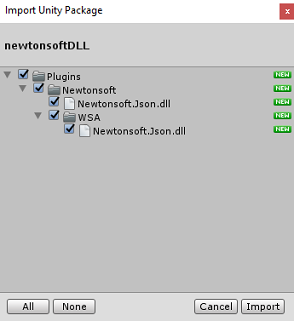
Click the Import button to add the items to your project.
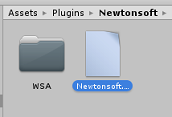
Go to the Newtonsoft folder under Plugins in the project view and select the Newtonsoft plugin.
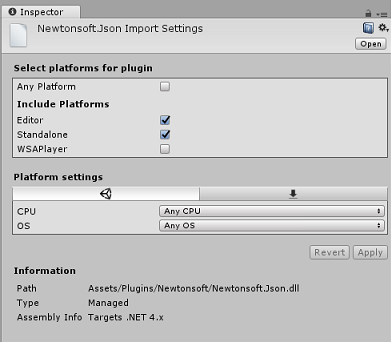
With the Newtonsoft plugin selected, ensure that Any Platform is unchecked, then ensure that WSAPlayer is also unchecked, then click Apply to confirm that the files are configured correctly.
Note
Marking these plugins configures them to only be used in the Unity Editor. There are a different set of them in the WSA folder, which are used after the project is exported from Unity.
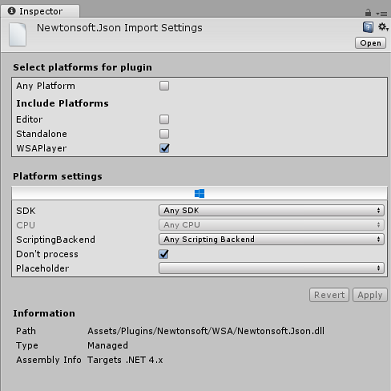
Next, you need to open the WSA folder, within the Newtonsoft folder and find a copy of the same file you configured. Select the file, and then in the inspector, ensure that
- Any Platform is unchecked
- only WSAPlayer is checked
- Don't process is checked
Chapter 7 – Create the BotTag
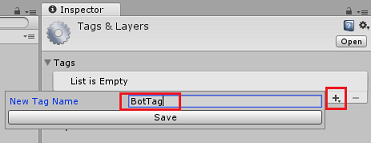
Create a new Tag object called BotTag. Select the Main Camera in the scene. Click on the Tag drop down menu in the Inspector panel. Click on Add Tag.
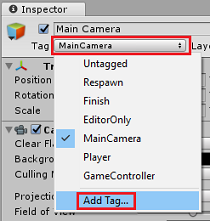
Click on the + symbol. Name the new Tag as BotTag, Save.
Warning
Do not apply the BotTag to the Main Camera. If accidentally set, make sure to change the Main Camera tag back to MainCamera.
Chapter 8 – Create the BotObjects class
The first script you need to create is the BotObjects class, which is an empty class created so that a series of other class objects can be stored within the same script and accessed by other scripts in the scene.
The creation of this class is purely an architectural choice. These objects could instead be hosted in the Bot script that you create later in this course.
To create this class:
Right-click in the Project panel, then Create > Folder. Name the folder Scripts.
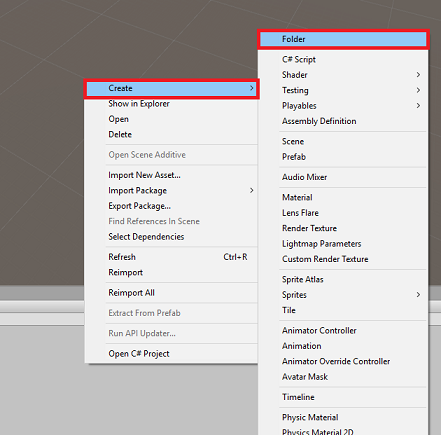
Double-click on the Scripts folder to open it. Then within that folder, right-click, and select Create > C# Script. Name the script BotObjects.
Double-click on the new BotObjects script to open it with Visual Studio.
Delete the content of the script and replace it with the following code:
using System;
using System.Collections;
using System.Collections.Generic;
using UnityEngine;

public class BotObjects : MonoBehaviour{}

/// <summary>
/// Object received when first opening a conversation
/// </summary>
[Serializable]
public class ConversationObject
{
    public string ConversationId;
    public string token;
    public string expires_in;
    public string streamUrl;
    public string referenceGrammarId;
}

/// <summary>
/// Object including all Activities
/// </summary>
[Serializable]
public class ActivitiesRootObject
{
    public List<Activity> activities { get; set; }
    public string watermark { get; set; }
}
[Serializable]
public class Conversation
{
    public string id { get; set; }
}
[Serializable]
public class From
{
    public string id { get; set; }
    public string name { get; set; }
}
[Serializable]
public class Activity
{
    public string type { get; set; }
    public string channelId { get; set; }
    public Conversation conversation { get; set; }
    public string id { get; set; }
    public From from { get; set; }
    public string text { get; set; }
    public string textFormat { get; set; }
    public DateTime timestamp { get; set; }
    public string serviceUrl { get; set; }
}
Be sure to save your changes in Visual Studio before returning to Unity.
Chapter 9 – Create the GazeInput class
The next class you're going to create is the GazeInput class. This class is responsible for:
- Creating a cursor that represents the gaze of the player.
- Detecting objects hit by the gaze of the player, and holding a reference to detected objects.
To create this class:
Go to the Scripts folder you created previously.
Right-click inside the folder, Create > C# Script. Call the script GazeInput.
Double-click on the new GazeInput script to open it with Visual Studio.
Insert the following line right on top of the class name:
/// <summary>
/// Class responsible for the User's gaze interactions
/// </summary>
[System.Serializable]
public class GazeInput : MonoBehaviour
Then add the following variables inside the GazeInput class, above the Start() method:
    [Tooltip("Used to compare whether an object is to be interacted with.")]
    internal string InteractibleTag = "BotTag";

    /// <summary>
    /// Length of the gaze
    /// </summary>
    internal float GazeMaxDistance = 300;

    /// <summary>
    /// Object currently gazed
    /// </summary>
    internal GameObject FocusedObject { get; private set; }

    internal GameObject _oldFocusedObject { get; private set; }

    internal RaycastHit HitInfo { get; private set; }

    /// <summary>
    /// Cursor object visible in the scene
    /// </summary>
    internal GameObject Cursor { get; private set; }

    internal bool Hit { get; private set; }

    internal Vector3 Position { get; private set; }

    internal Vector3 Normal { get; private set; }

    private Vector3 _gazeOrigin;

    private Vector3 _gazeDirection;
Code for Start() method should be added and is called when the class initializes:
    /// <summary>
    /// Start method used upon initialization.
    /// </summary>
    internal virtual void Start()
    {
        FocusedObject = null;
        Cursor = CreateCursor();
    }
Implement a method that instantiates and sets up the gaze cursor:
    /// <summary>
    /// Method to create a cursor object.
    /// </summary>
    internal GameObject CreateCursor()
    {
        GameObject newCursor = GameObject.CreatePrimitive(PrimitiveType.Sphere);
        newCursor.SetActive(false);
        // Remove the collider, so it does not block Raycast.
        Destroy(newCursor.GetComponent<SphereCollider>());
        newCursor.transform.localScale = new Vector3(0.05f, 0.05f, 0.05f);
        Material mat = new Material(Shader.Find("Diffuse"));
        newCursor.GetComponent<MeshRenderer>().material = mat;
        mat.color = Color.HSVToRGB(0.0223f, 0.7922f, 1.000f);
        newCursor.SetActive(true);

        return newCursor;
    }
Implement the methods that set up the Raycast from the Main Camera and keep track of the current focused object.
    /// <summary>
    /// Called every frame
    /// </summary>
    internal virtual void Update()
    {
        _gazeOrigin = Camera.main.transform.position;

        _gazeDirection = Camera.main.transform.forward;

        UpdateRaycast();
    }


    /// <summary>
    /// Reset the old focused object, stop the gaze timer, and send data if it
    /// is greater than one.
    /// </summary>
    private void ResetFocusedObject()
    {
        // Ensure the old focused object is not null.
        if (_oldFocusedObject != null)
        {
            if (_oldFocusedObject.CompareTag(InteractibleTag))
            {
                // Provide the OnGazeExited event.
                _oldFocusedObject.SendMessage("OnGazeExited",
                    SendMessageOptions.DontRequireReceiver);
            }
        }
    }


    private void UpdateRaycast()
    {
        // Set the old focused gameobject.
        _oldFocusedObject = FocusedObject;
        RaycastHit hitInfo;

        // Initialize Raycasting.
        Hit = Physics.Raycast(_gazeOrigin,
            _gazeDirection,
            out hitInfo,
            GazeMaxDistance);
        HitInfo = hitInfo;

        // Check whether raycast has hit.
        if (Hit == true)
        {
            Position = hitInfo.point;
            Normal = hitInfo.normal;

            // Check whether the hit has a collider.
            if (hitInfo.collider != null)
            {
                // Set the focused object with what the user just looked at.
                FocusedObject = hitInfo.collider.gameObject;
            }
            else
            {
                // Object looked on is not valid, set focused gameobject to null.
                FocusedObject = null;
            }
        }
        else
        {
            // No object looked upon, set focused gameobject to null.
            FocusedObject = null;

            // Provide default position for cursor.
            Position = _gazeOrigin + (_gazeDirection * GazeMaxDistance);

            // Provide a default normal.
            Normal = _gazeDirection;
        }

        // Lerp the cursor to the given position, which helps to stabilize the gaze.
        Cursor.transform.position = Vector3.Lerp(Cursor.transform.position, Position, 0.6f);

        // Check whether the previous focused object is this same. If so, reset the focused object.
        if (FocusedObject != _oldFocusedObject)
        {
            ResetFocusedObject();
            if (FocusedObject != null)
            {
                if (FocusedObject.CompareTag(InteractibleTag))
                {
                    // Provide the OnGazeEntered event.
                    FocusedObject.SendMessage("OnGazeEntered",
                        SendMessageOptions.DontRequireReceiver);
                }
            }
        }
    }
Be sure to save your changes in Visual Studio before returning to Unity.
Chapter 10 – Create the Bot class
The script you're going to create now is called Bot and is the core class of your application, it stores:
- Your Web App Bot credentials
- The method that collects the user voice commands
- The method necessary to initiate conversations with your Web App Bot
- The method necessary to send messages to your Web App Bot
To send messages to the Bot Service, the SendMessageToBot() coroutine builds an activity, which is an object recognized by the Bot Framework as data sent by the user.
To create this class:
Double-click on the Scripts folder, to open it.
Right-click inside the Scripts folder, click Create > C# Script. Name the script Bot.
Double-click on the new script to open it with Visual Studio.
Update the namespaces to be the same as the following, at the top of the Bot class:
using Newtonsoft.Json;
using System.Collections;
using System.Text;
using UnityEngine;
using UnityEngine.Networking;
using UnityEngine.Windows.Speech;
Inside the Bot class add the following variables:
    /// <summary>
    /// Static instance of this class
    /// </summary>
    public static Bot Instance;

    /// <summary>
    /// Material of the sphere representing the Bot in the scene
    /// </summary>
    internal Material botMaterial;

    /// <summary>
    /// Speech recognizer class reference, which will convert speech to text.
    /// </summary>
    private DictationRecognizer dictationRecognizer;

    /// <summary>
    /// Use this variable to identify the Bot Id
    /// Can be any value
    /// </summary>
    private string botId = "MRBotId";

    /// <summary>
    /// Use this variable to identify the Bot Name
    /// Can be any value
    /// </summary>
    private string botName = "MRBotName";

    /// <summary>
    /// The Bot Secret key found on the Web App Bot Service on the Azure Portal
    /// </summary>
    private string botSecret = "-- Add your Secret Key here --";

    /// <summary>
    /// Bot Endpoint, v4 Framework uses v3 endpoint at this point in time
    /// </summary>
    private string botEndpoint = "https://directline.botframework.com/v3/directline";

    /// <summary>
    /// The conversation object reference
    /// </summary>
    private ConversationObject conversation;

    /// <summary>
    /// Bot states to regulate the application flow
    /// </summary>
    internal enum BotState {ReadyToListen, Listening, Processing}

    /// <summary>
    /// Flag for the Bot state
    /// </summary>
    internal BotState botState;

    /// <summary>
    /// Flag for the conversation status
    /// </summary>
    internal bool conversationStarted = false;
Note
Make sure you insert your Bot Secret Key into the botSecret variable. Your Bot Secret Key is covered in this course, in Chapter 2, step 10.
Code for Awake() and Start() now needs to be added.
    /// <summary>
    /// Called on Initialization
    /// </summary>
    void Awake()
    {
        Instance = this;
    }

    /// <summary>
    /// Called immediately after Awake method
    /// </summary>
    void Start()
    {
        botState = BotState.ReadyToListen;
    }
Add the two handlers that are called by the speech libraries when voice capture begins and ends. The DictationRecognizer automatically stops capturing the user voice when the user stops speaking.
    /// <summary>
    /// Start microphone capture.
    /// </summary>
    public void StartCapturingAudio()
    {
        botState = BotState.Listening;
        botMaterial.color = Color.red;

        // Start dictation
        dictationRecognizer = new DictationRecognizer();
        dictationRecognizer.DictationResult += DictationRecognizer_DictationResult;
        dictationRecognizer.Start();
    }


    /// <summary>
    /// Stop microphone capture.
    /// </summary>
    public void StopCapturingAudio()
    {
        botState = BotState.Processing;
        dictationRecognizer.Stop();
    }
The following handler collects the result of the user voice input and calls the coroutine responsible for sending the message to the Web App Bot Service.
    /// <summary>
    /// This handler is called every time the Dictation detects a pause in the speech.
    /// </summary>
    private void DictationRecognizer_DictationResult(string text, ConfidenceLevel confidence)
    {
        // Update UI with dictation captured
        Debug.Log($"User just said: {text}");

        // Send dictation to Bot
        StartCoroutine(SendMessageToBot(text, botId, botName, "message"));
        StopCapturingAudio();
    }
The following coroutine is called to begin a conversation with the Bot. When the conversation call is complete, it calls the SendMessageToCoroutine() by passing a series of parameters that sets the activity to be sent to the Bot Service as an empty message that prompts the Bot Service to initiate the dialogue.
    /// <summary>
    /// Request a conversation with the Bot Service
    /// </summary>
    internal IEnumerator StartConversation()
    {
        string conversationEndpoint = string.Format("{0}/conversations", botEndpoint);

        WWWForm webForm = new WWWForm();

        using (UnityWebRequest unityWebRequest = UnityWebRequest.Post(conversationEndpoint, webForm))
        {
            unityWebRequest.SetRequestHeader("Authorization", "Bearer " + botSecret);
            unityWebRequest.downloadHandler = new DownloadHandlerBuffer();

            yield return unityWebRequest.SendWebRequest();
            string jsonResponse = unityWebRequest.downloadHandler.text;

            conversation = new ConversationObject();
            conversation = JsonConvert.DeserializeObject<ConversationObject>(jsonResponse);
            Debug.Log($"Start Conversation - Id: {conversation.ConversationId}");
            conversationStarted = true;
        }

        // The following call is necessary to create and inject an activity of type //"conversationUpdate" to request a first "introduction" from the Bot Service.
        StartCoroutine(SendMessageToBot("", botId, botName, "conversationUpdate"));
    }
The following coroutine is called to build the activity to be sent to the Bot Service.
    /// <summary>
    /// Send the user message to the Bot Service in form of activity
    /// and call for a response
    /// </summary>
    private IEnumerator SendMessageToBot(string message, string fromId, string fromName, string activityType)
    {
        Debug.Log($"SendMessageCoroutine: {conversation.ConversationId}, message: {message} from Id: {fromId} from name: {fromName}");

        // Create a new activity here
        Activity activity = new Activity();
        activity.from = new From();
        activity.conversation = new Conversation();
        activity.from.id = fromId;
        activity.from.name = fromName;
        activity.text = message;
        activity.type = activityType;
        activity.channelId = "DirectLineChannelId";
        activity.conversation.id = conversation.ConversationId;

        // Serialize the activity
        string json = JsonConvert.SerializeObject(activity);

        string sendActivityEndpoint = string.Format("{0}/conversations/{1}/activities", botEndpoint, conversation.ConversationId);

        // Send the activity to the Bot
        using (UnityWebRequest www = new UnityWebRequest(sendActivityEndpoint, "POST"))
        {
            www.uploadHandler = new UploadHandlerRaw(Encoding.UTF8.GetBytes(json));

            www.downloadHandler = new DownloadHandlerBuffer();
            www.SetRequestHeader("Authorization", "Bearer " + botSecret);
            www.SetRequestHeader("Content-Type", "application/json");

            yield return www.SendWebRequest();

            // extrapolate the response Id used to keep track of the conversation
            string jsonResponse = www.downloadHandler.text;
            string cleanedJsonResponse = jsonResponse.Replace("\r\n", string.Empty);
            string responseConvId = cleanedJsonResponse.Substring(10, 30);

            // Request a response from the Bot Service
            StartCoroutine(GetResponseFromBot(activity));
        }
    }
The following coroutine is called to request a response after sending an activity to the Bot Service.
    /// <summary>
    /// Request a response from the Bot by using a previously sent activity
    /// </summary>
    private IEnumerator GetResponseFromBot(Activity activity)
    {
        string getActivityEndpoint = string.Format("{0}/conversations/{1}/activities", botEndpoint, conversation.ConversationId);

        using (UnityWebRequest unityWebRequest1 = UnityWebRequest.Get(getActivityEndpoint))
        {
            unityWebRequest1.downloadHandler = new DownloadHandlerBuffer();
            unityWebRequest1.SetRequestHeader("Authorization", "Bearer " + botSecret);

            yield return unityWebRequest1.SendWebRequest();

            string jsonResponse = unityWebRequest1.downloadHandler.text;

            ActivitiesRootObject root = new ActivitiesRootObject();
            root = JsonConvert.DeserializeObject<ActivitiesRootObject>(jsonResponse);

            foreach (var act in root.activities)
            {
                Debug.Log($"Bot Response: {act.text}");
                SetBotResponseText(act.text);
            }

            botState = BotState.ReadyToListen;
            botMaterial.color = Color.blue;
        }
    }
The last method to be added to this class, is required to display the message in the scene:
    /// <summary>
    /// Set the UI Response Text of the bot
    /// </summary>
    internal void SetBotResponseText(string responseString)
    {
        SceneOrganiser.Instance.botResponseText.text =  responseString;
    }
Note
You may see an error within the Unity Editor Console, about missing the SceneOrganiser class. Disregard this message, this class is created later in the tutorial.
Be sure to save your changes in Visual Studio before returning to Unity.
Chapter 11 – Create the Interactions class
The class you're going to create now is called Interactions. This class is used to detect the HoloLens Tap Input from the user.
If the user taps while looking at the Bot object in the scene, and the Bot is ready to listen for voice inputs, the Bot object changes color to red and begin listening for voice inputs.
This class inherits from the GazeInput class, and so is able to reference the Start() method and variables from that class, denoted by the use of base.
To create this class:
Double-click on the Scripts folder, to open it.
Right-click inside the Scripts folder, click Create > C# Script. Name the script Interactions.
Double-click on the new script to open it with Visual Studio.
Update the namespaces and the class inheritance to be the same as the following, at the top of the Interactions class:
using UnityEngine.XR.WSA.Input;

public class Interactions : GazeInput
{
Inside the Interactions class add the following variable:
    /// <summary>
    /// Allows input recognition with the HoloLens
    /// </summary>
    private GestureRecognizer _gestureRecognizer;
Then add the Start() method:
    /// <summary>
    /// Called on initialization, after Awake
    /// </summary>
    internal override void Start()
    {
        base.Start();

        //Register the application to recognize HoloLens user inputs
        _gestureRecognizer = new GestureRecognizer();
        _gestureRecognizer.SetRecognizableGestures(GestureSettings.Tap);
        _gestureRecognizer.Tapped += GestureRecognizer_Tapped;
        _gestureRecognizer.StartCapturingGestures();
    }
Add the handler that to be triggered when the user performs the tap gesture in front of the HoloLens camera
    /// <summary>
    /// Detects the User Tap Input
    /// </summary>
    private void GestureRecognizer_Tapped(TappedEventArgs obj)
    {
        // Ensure the bot is being gazed upon.
        if(base.FocusedObject != null)
        {
            // If the user is tapping on Bot and the Bot is ready to listen
            if (base.FocusedObject.name == "Bot" && Bot.Instance.botState == Bot.BotState.ReadyToListen)
            {
                // If a conversation has not started yet, request one
                if(Bot.Instance.conversationStarted)
                {
                    Bot.Instance.SetBotResponseText("Listening...");
                    Bot.Instance.StartCapturingAudio();
                }
                else
                {
                    Bot.Instance.SetBotResponseText("Requesting Conversation...");
                    StartCoroutine(Bot.Instance.StartConversation());
                }
            }
        }
    }
Be sure to save your changes in Visual Studio before returning to Unity.
Chapter 12 – Create the SceneOrganiser class
The last class required in this Lab is called SceneOrganiser. This class sets up the scene programmatically, by adding components and scripts to the Main Camera, and creating the appropriate objects in the scene.
To create this class:
Double-click on the Scripts folder, to open it.
Right-click inside the Scripts folder, click Create > C# Script. Name the script SceneOrganiser.
Double-click on the new script to open it with Visual Studio.
Inside the SceneOrganiser class add the following variables:
    /// <summary>
    /// Static instance of this class
    /// </summary>
    public static SceneOrganiser Instance;

    /// <summary>
    /// The 3D text representing the Bot response
    /// </summary>
    internal TextMesh botResponseText;
Then add the Awake() and Start() methods:
    /// <summary>
    /// Called on Initialization
    /// </summary>
    private void Awake()
    {
        Instance = this;
    }

    /// <summary>
    /// Called immediately after Awake method
    /// </summary>
    void Start ()
    {
        // Add the GazeInput class to this object
        gameObject.AddComponent<GazeInput>();

        // Add the Interactions class to this object
        gameObject.AddComponent<Interactions>();

        // Create the Bot in the scene
        CreateBotInScene();
    }
Add the following method, responsible for creating the Bot object in the scene and setting up the parameters and components:
    /// <summary>
    /// Create the Sign In button object in the scene
    /// and sets its properties
    /// </summary>
    private void CreateBotInScene()
    {
        GameObject botObjInScene = GameObject.CreatePrimitive(PrimitiveType.Sphere);
        botObjInScene.name = "Bot";

        // Add the Bot class to the Bot GameObject
        botObjInScene.AddComponent<Bot>();

        // Create the Bot UI
        botResponseText = CreateBotResponseText();

        // Set properties of Bot GameObject
        Bot.Instance.botMaterial = new Material(Shader.Find("Diffuse"));
        botObjInScene.GetComponent<Renderer>().material = Bot.Instance.botMaterial;
        Bot.Instance.botMaterial.color = Color.blue;
        botObjInScene.transform.position = new Vector3(0f, 2f, 10f);
        botObjInScene.tag = "BotTag";
    }
Add the following method, responsible for creating the UI object in the scene, representing the responses from the Bot:
    /// <summary>
    /// Spawns cursor for the Main Camera
    /// </summary>
    private TextMesh CreateBotResponseText()
    {
        // Create a sphere as new cursor
        GameObject textObject = new GameObject();
        textObject.transform.parent = Bot.Instance.transform;
        textObject.transform.localPosition = new Vector3(0,1,0);

        // Resize the new cursor
        textObject.transform.localScale = new Vector3(0.1f, 0.1f, 0.1f);

        // Creating the text of the Label
        TextMesh textMesh = textObject.AddComponent<TextMesh>();
        textMesh.anchor = TextAnchor.MiddleCenter;
        textMesh.alignment = TextAlignment.Center;
        textMesh.fontSize = 50;
        textMesh.text = "Hi there, tap on me and I will start listening.";

        return textMesh;
    }
Be sure to save your changes in Visual Studio before returning to Unity.
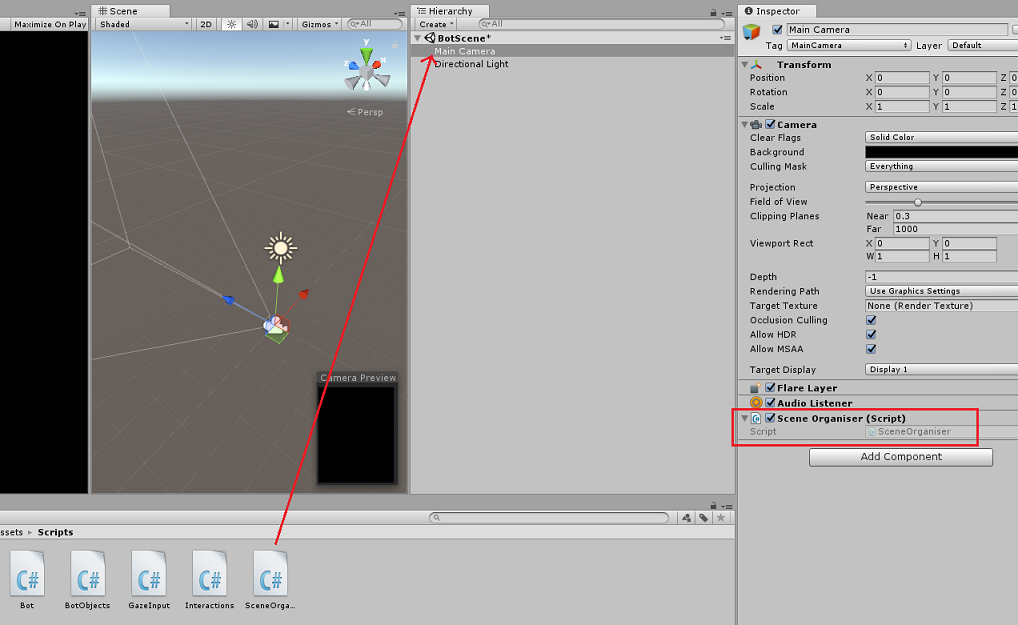
In the Unity Editor, drag the SceneOrganiser script from the Scripts folder to the Main Camera. The Scene Organiser component should now appear on the Main Camera object, as shown in the image.
Chapter 13 – Before building
To perform a thorough test of your application, you need to sideload it onto your HoloLens. Before you do, ensure that:
- All the settings mentioned in the Chapter 4 are set correctly.
- The script SceneOrganiser is attached to the Main Camera object.
- In the Bot class, make sure you inserted your Bot Secret Key into the botSecret variable.
Chapter 14 – Build and Sideload to the HoloLens
Everything needed for the Unity section of this project is complete, so it's time to build it from Unity.
Navigate to Build Settings, File > Build Settings….
From the Build Settings window, click Build.
If not already, tick Unity C# Projects.
Click Build. Unity launches a File Explorer window, where you need to create and then select a folder to build the app into. Create that folder now, and name it App. Then with the App folder selected, click Select Folder.
Unity begins building your project to the App folder.
Once Unity has finished building (it might take some time), it opens a File Explorer window at the location of your build (check your task bar, as it may not always appear above your windows, but notifies you of the addition of a new window).
Chapter 15 – Deploy to HoloLens
To deploy on HoloLens:
You need the IP Address of your HoloLens (for Remote Deploy), and to ensure your HoloLens is in Developer Mode. To do this:
- While wearing your HoloLens, open the Settings.
- Go to Network & Internet > Wi-Fi > Advanced Options
- Note the IPv4 address.
- Next, navigate back to Settings, and then to Update & Security > For Developers
- Set Developer Mode On.
Navigate to your new Unity build (the App folder) and open the solution file with Visual Studio.
In the Solution Configuration select Debug.
In the Solution Platform, select x86, Remote Machine.
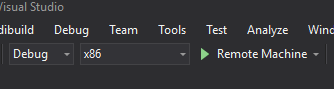
Go to the Build menu and click on Deploy Solution, to sideload the application to your HoloLens.
Your app should now appear in the list of installed apps on your HoloLens, ready to be launched!
Note
To deploy to immersive headset, set the Solution Platform to Local Machine, and set the Configuration to Debug, with x86 as the Platform. Then deploy to the local machine, using the Build menu, selecting Deploy Solution.
Chapter 16 – Using the application on the HoloLens
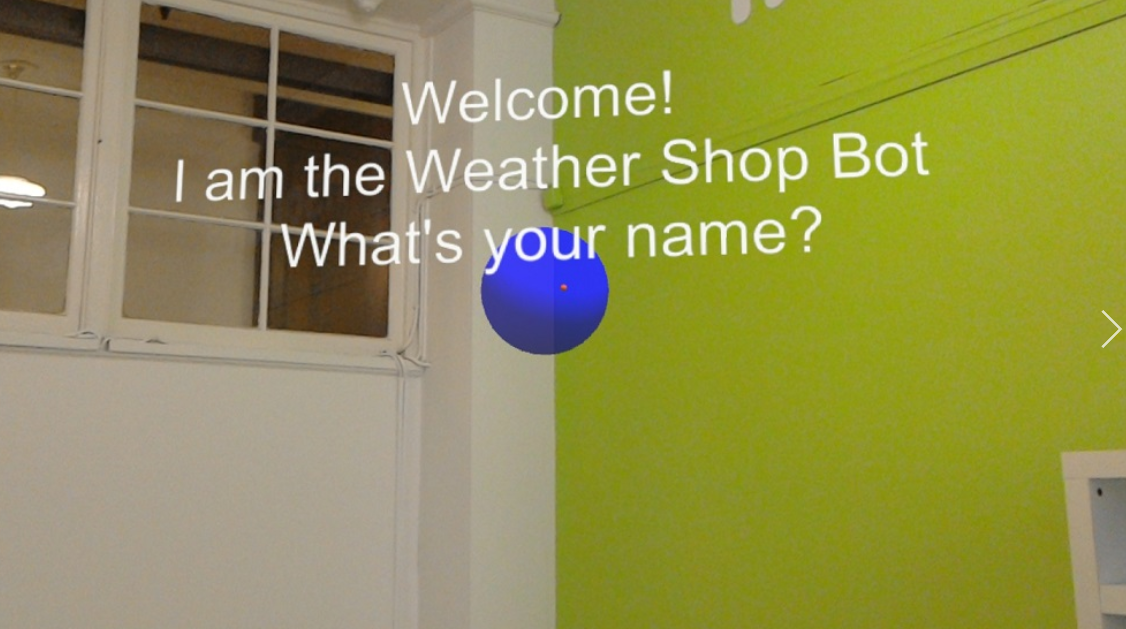
Once you launch the application, the Bot appears as a blue sphere in front of you.
Use the Tap Gesture while you're gazing at the sphere to initiate a conversation.
Wait for the conversation to start (The UI displays a message when it happens). Once you receive the introductory message from the Bot, tap again on the Bot so it turns red and begin to listen to your voice.
Once you stop talking, your application sends your message to the Bot and displays a response in the UI.
Repeat the process to send more messages to your Bot (you have to tap each time you want to sen a message).
This conversation demonstrates how the Bot can retain information (your name), while also providing known information such as items that are stocked.
Some questions to ask the Bot:
what do you sell?

how much are umbrellas?

how much are raincoats?
Your finished Web App Bot (v4) application
Congratulations, you built a mixed reality app that applies the Azure Web App Bot, Microsoft Bot Framework v4.
Bonus exercises
Exercise 1
The conversation structure in this Lab is basic. Use Microsoft LUIS to give your bot natural language understanding capabilities.
Exercise 2
This example does not include terminating a conversation and restarting a new one. To make the Bot feature complete, try to implement closure to the conversation.