Note
Access to this page requires authorization. You can try signing in or changing directories.
Access to this page requires authorization. You can try changing directories.
Setting up an advertiser with insertion orders, line items, and targeting can seem complicated. This guide is here to walk you through the process. Just follow along and you'll have advertisers and line items up and running in no time.
Prerequisites
Before you work with the API you should read the API Getting Started section of this documentation. This section provides information on testing environments, usage constraints, API semantics (running commands, filtering, sorting, etc.) and best practices.
Order of operations
When you set up your buy-side objects, the process will be much simpler if you set those objects up in the correct order. If you don't go in the correct order you'll get partway through something and realize "Oops, I should have created <abc> first." You can always go back and update anything you've already set up, but if you follow this order of operations and you'll make things much easier on yourself.
Also, by following the order we've set out here you're less likely to miss important settings along the way. For example, you can create a line item and campaign without a profile, but that's rarely, if ever, a good idea. The profile determines your targeting, and if you activate a campaign without a profile you'll be bidding on any available impression, possibly missing everyone in your target audience and exhausting your budget very quickly. If you methodically go in order, you're much less likely to forget something.
Here is the order of operations for setting up your buy-side objects:
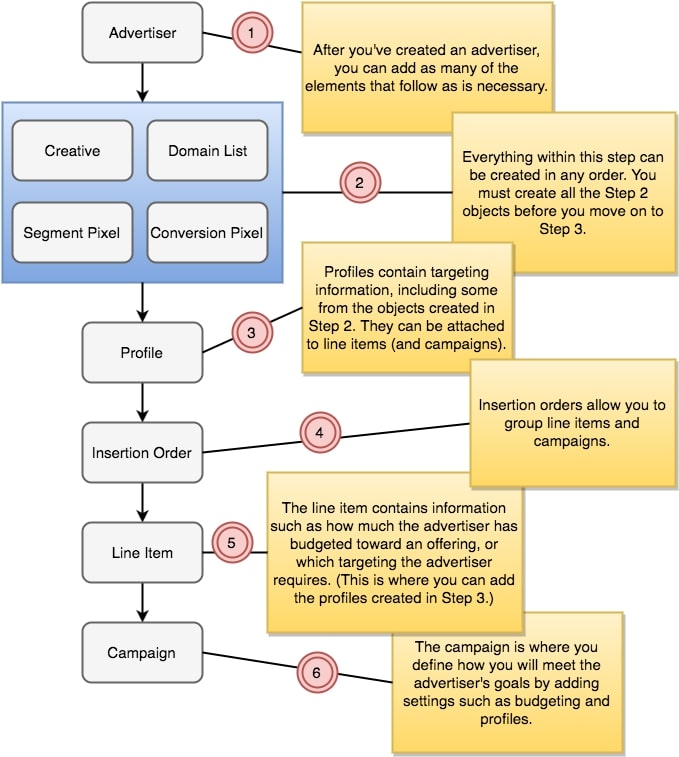
Advertiser
At the top of the order is the advertiser. Creating the advertiser is always the first step. You can have multiple advertisers within your network, and each advertiser can have many insertion orders and line items.
Non-Spending Objects
The next step encompasses several sub-steps. All the sub-steps within this step can be created in any order. If you want to create a segment pixel before a creative or a creative before a segment pixel, that's entirely up to you. But - and here's the important part - you should create all the Step 2 objects before you move on to Step 3 because you'll most likely be using some of the Step 2 objects in Step 3. (Note that there are more options in this step than are shown here. The objects we create in this set are an example of the non-spending objects you can create.)
Profile
Next comes the profile. Profiles define all the ways you can target users and inventory in your line items or campaigns. If you don't create your profiles before you move on to the next steps, you'll have to update everything later with the profile information.
Insertion Order
In this step you create your insertion orders. The insertion order contains information such as the total budget an advertiser allocates for a period of time, or which third-party verification the advertiser utilizes. Insertion orders also allow you to group line items and campaigns. You can create multiple insertion orders under an advertiser.
Line Item
In Step 5 we create the line item. The line item contains information such as how much the advertiser has budgeted toward an offering, or which targeting the advertiser requires. (This is where you can add the profiles created in Step 3.) You can create multiple line items under an advertiser or insertion order.
Campaign
In the final step we create the campaign. The campaign is where you get more granular in defining how you will meet the advertiser's goals. You can attach a profile to a campaign.
Step-by-step walkthrough
Now that you understand the pieces of the buy-side puzzle and how to place them in order, let's walk through the creation of your buy-side implementation. These examples will take you through a very simple setup. There are many more fields and settings available for each service than what is shown here. See the Reference section for details on each service.
Step 1: Advertiser
We begin, of course, with the advertiser. We create a JSON file containing the name of the advertiser and their status. We've left most of the advertisers fields as their default values. However, in Step 4 we're going to create an insertion order. To include insertion orders, you need to set use_insertion_orders to true on your advertiser. See Advertiser Service for more information.
Note
We've set the advertiser state to active. You might prefer to initially set the state of all objects to inactive to ensure you don't begin spending before your advertiser is ready.
$ cat advertiser.json

{
        "advertiser": {
                "name": "Advertiser1",
                "state": "active",
        "use_insertion_orders": "true"
        }
}
Now we do a POST call to the advertiser service, passing it our JSON file.
$ curl -b cookies -X POST -d @advertiser.json 'https://api.appnexus.com/advertiser'
{
   "response":{
      "status":"OK",
      "id":10
   }
}
We've now created an advertiser named Advertiser1. The preceding command will return a message showing your new advertiser, including the advertiser ID. Make a note of this ID; you'll be using it in subsequent commands.
Step 2: Non-spending objects
The objects you'll create in this step are "non-spending" objects, meaning there are no monetary amounts associated with them. They are all independent of one another and can be used across different line items and campaigns. You can create these objects in any order. Our diagram shows four types of objects, but there are many more, including third-party pixels, batch segments, and IP range lists. We'll show just a few examples here.
Creatives
Here is the command that calls the creative service:
$ curl -b cookies -X POST -d @creative.json 'https://api.appnexus.com/creative?advertiser_id=10'
Notice that we've passed the advertiser_id in our query string. This allows us to associate the creative with the advertiser we just created.
The contents of the creative.json file depend on the type of creative. There are numerous options; too many to go over here. See the Creative Service to find out more about the types of creatives and how to build a JSON file to create them.
Conversion pixels
The pixel service generates an ID that can be used to create conversion pixels. These pixels can be placed on advertiser pages to track both view- and click-based conversions. Here is the process for creating a conversion pixel:
$cat conversionpixel.json
{
        "pixel": {
        "name": "Conversion Pixel 1",
        "state": "active",
        "trigger_type": "hybrid",
        "post_click_value": 8,
        "post_view_value": 8
    }
}

$ curl -b cookies -X POST -d @conversionpixel.json 'https://api.appnexus.com/pixel?advertiser_id=10'

{
   "response":{
      "status":"OK",
      "id":15
   }
}
Notice that we once again pass the advertiser_id in the query string to associate this pixel with a particular advertiser.
Segment pixels
Use the segment service to generate an ID to create segment pixels, which are placed on inventory pages to enable segment targeting. Segment targeting gives you the ability to target users based on the segments they belong to. Users are generally added to segments based on an action, such as clicking on a creative.
$cat segmentpixel.json
{
    "segment": {
        "state": "active",
        "short_name": "Segment Pixel 1"
    }
}

$ curl -b cookies -X POST -d @segmentpixel.json 'https://api.appnexus.com/segment?advertiser_id=10'

{
    "response": {
        "status": "OK",
        "id": "500"
    }
}
Be sure to make note of the ID that's returned, you'll need to add this ID in the next step when you create a profile.
Note
If you forget to keep track of your ID, you can always make another call to the segment service to look it up. Keep in mind, however, that you do have rate limits, so you'll want to be sure you're being efficient in your API calls.
Domain lists
Domain lists allow you to create allowlists or blocklists. Allowlists contain domains that you want to include in your campaign targeting, and blocklists contain domains that you want to exclude.
$ cat domain-list.json
{
    "domain-list":{
        "name":"Domains to target",
        "type":"white",
        "domains":["domain-a.com", "domain-b.net", "domain-c.org"]
    }
}

$ curl -b cookies -X POST -d @domain-list.json 'https://api.appnexus.com/domain-list'
{
    "response":{
        "status":"OK",
        "id":9
    }
}
Notice that the domain list is created by using the domains array. If you need to update a domain list, remember to use the append flag with your PUT command. For example, let's say you want to add domain-d.com and domain-e.com to the list we just created. You would create a new JSON file like this:
$cat updated-domain-list.json
{
    "domain-list": {
        "id": 9
        "domains": ["domain-d.com", "domain-e.com"]
    }
}
To add these fields to the existing list, run this command:
$ curl -b cookies -X PUT -d @update-domain-list.json 'https://api.appnexus.com/domain-list?id=9&append=true'
This will append the new domains and your list will now look like this:
"domain-list": {
    "id": 9,
    "name": "Domains to Target",
    "description": null,
    "type": "white",
    "last_modified": "2016-12-01 22:36:41",
    "domains": [
        "domain-a.com",
        "domain-b.net",
        "domain-c.org",
        "domain-d.com",
        "domain-e.com"
    ],
    "num_domains": 5
If you leave off the append=true flag in your query string, your current list will be replaced by the list in your update. For example, the same PUT command we just ran without append=true would produce this domain list:
"domain-list": {
    "id": 9,
    "name": "Domains to Target",
    "description": null,
    "type": "white",
    "last_modified": "2016-12-01 22:36:41",
    "domains": [
        "domain-d.com",
        "domain-e.com"
    ],
    "num_domains": 2
Note
Domains you upload must generally conform to the URI spec to be accepted by our API. In practical terms, you probably don't need to worry about this requirement unless you're trying to upload Internationalized Domain Names, in which case you should ensure that any domains that include non-ASCII characters are encoded with Punycode before upload.
Step 3: Profile
After creating the non-spending objects, the next step is to create a profile. The profile is also a non-spending object, but this one must be created after the objects in step 2 because you can use some of those objects in your profile. A profile is a set of targeting parameters, such as gender, age, geography, and frequency. It can be created with several objects in the system, including segment pixels.
$cat profile.json
{
        "profile": {
                "segment_group_targets": [
                        {
                                "segments": [
                                        {
                                                "id": 500,
                                                "action": "include",
                                                "name": "Segment Pixel 1"
                                        }
                                ]
                        }
                ],
                "domain_action": "exclude",
        "domain_targets": [
            {
                "domain": "competitorURL.com"
            },
            {
                "domain": "badURL.com"
            }
        ]
        }
}

$ curl -b cookies -X POST -d @profile.json 'https://api.appnexus.com/profile?advertiser_id=10'

{
    "response": {
        "status": "OK",
        "count": 1,
        "id": 200,
        ...
    }
}
In our example, we've used the segment pixel (Segment Pixel 1) that we created in Step 2. This profile will target users based on that segment, and also target domains that are not in the list of excluded domains specified here (competitorURL.com and badURL.com). We could also have used our domain list that we created in Step 2 by using the domain_list_action and domain_list_targets fields.
We'll associate this profile with a line item in Step 5: Line Items. So again, keep track of the returned ID.
Step 4: Insertion orders
Now it's time to create an insertion order. This is the first of the "spending" objects. These are the objects that determine how much money will be spent over what period of time and on which advertising campaigns. There are two types of insertion orders: seamless and non-seamless. See Insertion Order Service for a detailed description of the difference. Because seamless insertion orders are the preferred model, that's what we're going to create here.
$ cat insertion-order.json
{
    "insertion-order": {
        "name": "Insertion Order 1",
        "budget_intervals": [
            {
                "start_date": "2017-10-10 00:00:00",
                "end_date": "2017-11-12 00:00:00",
                "daily_budget": null,
                "daily_budget_imps": 100,
                "enable_pacing": true,
                "lifetime_budget": null,
                "lifetime_budget_imps": 2000,
                "lifetime_pacing": false
            },
            {
                "start_date": "2017-11-13 00:00:00",
                "end_date": "2017-11-18 00:00:00",
                "daily_budget": null,
                "daily_budget_imps": 60,
                "enable_pacing": true,
                "lifetime_budget": null,
                "lifetime_budget_imps": 300,
                "lifetime_pacing": false
            }
        ]
    }
}
$ curl -b cookies -X POST -d @insertion-order.json "https://api.appnexus.com/insertion-order?advertiser_id=10'

{
   "response": {
    "status": "OK",
    "count": 1,
    "start_element": 0,
    "num_elements": 100,
    "insertion-orders": [
        {
            "id": 450450,
            "name": "Insertion Order 1",
            "code": null,
            "state": "active",
            "advertiser_id": 10,
            "start_date": null,
            "end_date": null,
            "last_modified": "2016-11-1718: 41: 57",
            "timezone": "EST5EDT",
            "currency": "USD",
            "comments": null,
            "billing_code": null,
            "line_items": null,
            "labels": null,
            "broker_fees": null,
            "budget_intervals": [
                {
                    "id": 111,
                    "start_date": "2017-10-1000: 00: 00",
                    "end_date": "2017-11-1200: 00: 00",
                    "parent_interval_id": null,
                    "lifetime_budget": null,
                    "lifetime_budget_imps": 2000,
                    "lifetime_pacing": false,
                    "enable_pacing": false,
                    "daily_budget_imps": 100,
                    "daily_budget": null
                },
                {
                    "id": 112,
                    "start_date": "2017-11-1300: 00: 00",
                    "end_date": "2017-11-1800: 00: 00",
                    "parent_interval_id": null,
                    "lifetime_budget": null,
                    "lifetime_budget_imps": 300,
                    "lifetime_pacing": false,
                    "enable_pacing": false,
                    "daily_budget_imps": 60,
                    "daily_budget": null
                }
            ],
            "lifetime_pacing": null,
            "lifetime_budget": null,
            "lifetime_budget_imps": null,
            "enable_pacing": null,
            "lifetime_pacing_span": null,
            "allow_safety_pacing": null,
            "daily_budget": null,
            "daily_budget_imps": null
            }
        ]
    }
}
In our next step we're going to create a line item that we'll associate with this insertion order, so once again, keep track of the ID for the insertion order we just created. You'll also need to keep track of the budget interval IDs. You'll use these IDs to associate the budget interval information with the line item.
Step 5: Line items
As with insertion orders, line items can be seamless or non-seamless. See Line Item Service for details. You can't mix seamless and non-seamless, so we'll be creating a seamless line item to go with our seamless insertion order from Step 4. You can create multiple line items under a single insertion order. We'll also be attaching the profile we created in step 3 to this line item by assigning the profile ID to the profile_id field.
$ cat line-item.json
{
    "line-item": {
        "name": "Line Item 1",
        "state": "active",
        "insertion_orders": [
            {
                "id": 450450
            }
        ],
        "budget_intervals": [
            {
                "parent_interval_id": 111
            },
            {
                "parent_interval_id": 112
            }
        ],
        "profile_id": 200
    }
}
$ curl -b cookies -X POST -d @line-item.json "https://api.appnexus.com/line-item?advertiser_id=10"
{
  "response": {
    "status": "OK",
    "count": 1,
    "id": 230230,
    "start_element": 0,
    "num_elements": 100,
    "line-item": {
      "id": 230230,
      "code": null,
      "name": "Line Item 1",
      "advertiser_id": 10,
      "state": "active",
      "start_date": null,
      "end_date": null,
      "timezone": "EST5EDT",
      "discrepancy_pct": 0,
      "publishers_allowed": "all",
      "revenue_value": 0,
      "revenue_type": "cpm",
      "goal_type": "none",
      "goal_value": null,
      "last_modified": "2016-11-17 14:17:50",
      "click_url": null,
      "currency": "USD",
      "require_cookie_for_tracking": true,
      "profile_id": null,
      "member_id": 1234,
      "comments": null,
      "remaining_days": null,
      "total_days": null,
      "manage_creative": false,
      "advertiser": {
        "id": 10,
        "name": "AdvertiserA"
      },
      "flat_fee": null,
      "delivery_goal": null,
      "labels": null,
      "broker_fees": null,
      "pixels": null,
      "insertion_orders": [
        {
          "id": 450450,
          "state": "active",
          "code": null,
          "name": "Insertion Order 1",
          "advertiser_id": 10,
          "start_date": null,
          "end_date": null,
          "timezone": "EST5EDT",
          "last_modified": "2016-11-17 13:56:56",
          "currency": "USD",
          "budget_intervals": [
            {
              "id": 111,
              "object_id": 450450,
              "object_type": "insertion_order",
              "start_date": "2017-10-1000: 00: 00",
              "end_date": "2017-11-1200: 00: 00",
              "timezone": "EST5EDT",
              "lifetime_budget": 1000,
              "lifetime_budget_imps": null,
              "lifetime_pacing": false,
              "enable_pacing": false,
              "daily_budget_imps": null,
              "daily_budget": null
            },
            {
              "id": 112,
              "object_id": 450450,
              "object_type": "insertion_order",
              "start_date": "2017-11-1300: 00: 00",
              "end_date": "2017-11-1800: 00: 00",
              "timezone": "EST5EDT",
              "lifetime_budget": 1000,
              "lifetime_budget_imps": null,
              "lifetime_pacing": false,
              "enable_pacing": false,
              "daily_budget_imps": null,
              "daily_budget": null
            }
          ]
        }
      ],
      "goal_pixels": null,
      "imptrackers": null,
      "clicktrackers": null,
      "campaigns": null,
      "valuation": {
        "performance_mkt_managed": false,
      },
      "creatives": null,
      "budget_intervals": [
        {
          "id": 1379,
          "object_id": 2304000,
          "object_type": "campaign_group",
          "start_date": "2017-10-1000: 00: 00",
          "end_date": "2017-11-1200: 00: 00",
          "timezone": "EST5EDT",
          "parent_interval_id": 111,
          "budget_allocation": null
        },
        {
          "id": 1380,
          "object_id": 2304001,
          "object_type": "campaign_group",
          "start_date": "2017-11-1300: 00: 00",
          "end_date": "2017-11-1800: 00: 00",
          "timezone": "EST5EDT",
          "parent_interval_id": 112,
          "budget_allocation": null
        }
      ],
      "click_model": null,
      "lifetime_budget": null,
      "lifetime_budget_imps": null,
      "daily_budget": null,
      "daily_budget_imps": null,
      "enable_pacing": null,
      "allow_safety_pacing": null,
      "lifetime_pacing": null,
      "lifetime_pacing_span": null,
      "lifetime_pacing_pct": null,
      "payout_margin": null
    }
  }
}
Note the ID from your new line item and we'll continue on to the next step.
Step 6: Campaigns
Last but not least, it's time to create the campaign. You can associated a profile to a campaign rather than to a line item. You can create multiple campaigns for each line item.
$ cat campaign.json

{
    "campaign": {
    "state": "inactive",
    "name": "Campaign 1",
    "advertiser_id": 10,
    "line_item_id": 230230,
    "inventory_type": "direct"
    }
}
$ curl -b cookies -X POST -d @campaign.json 'https://api.appnexus.com/campaign?advertiser_id=10'
{
  "response": {
    "status": "OK",
    "id": 123456,
    "dbg_info": {
      ...
    }
  }
}
And that's it.
There are many more options on each of these services. We've shown you a very basic setup in this walkthrough; you'll most likely want to add much more information as you create your objects. But hopefully this walkthrough has given you a good starting point.
Summary
Follow the Order of Operations
- Everything is associated with an advertiser, so if you haven't created the advertiser, do that first.
- Create your non-spending objects (creatives, segments, etc.) in any order ...
- ... except profiles. A profile is a non-spending object, but it needs to be the last non-spending object created. It may depend on some of the other non-spending objects, such as segments.
- Create spending objects in order: insertion order, line item, campaign (if necessary).
Follow these general guidelines
Include a budget and flight dates on your spending objects. If an object higher in the the order already has these, lower objects will inherit them unless explicitly changed. Budget and flight dates of lower objects must be within budgets and flight dates for higher objects. (In other words, if your insertion order has a budget interval starting April 2, 2017 and ending April 30, 2017, you can't create a line item under that insertion order with a budget interval of April 20, 2017 - May 5, 2017.)
Attach a profile to your line item (or campaign). You could have serious targeting and spending issues if you don't attach a profile.
Set the state field on all spending objects to active when you're ready to start spending on the specified start dates. (If you do not want your objects to start spending on their start dates, set the state to inactive.)