Note
Access to this page requires authorization. You can try signing in or changing directories.
Access to this page requires authorization. You can try changing directories.
Setting up a Xandr API implementation for your sell-side activities can seem complicated. This page will guide you through the process of creating and configuring sell-side objects for a typical API setup.
Overview
Setting up a publisher typically involves making requests to the following API service endpoints to create and configure the corresponding sell-side objects:
| API Endpoint | Sell-Side Object | Detailed Reference |
|---|---|---|
https://api.appnexus.com/publisher |
publisher |
Publisher Service |
https://api.appnexus.com/site |
site |
Site Service |
https://api.appnexus.com/placement |
placement |
Placement Service |
https://api.appnexus.com/payment-rule |
payment rule |
Payment Rule Service |
https://api.appnexus.com/ad-profile |
ad profile |
Ad Profile Service |
https://api.appnexus.com//ad-quality-rule |
ad quality rule |
Ad Quality Rule Service |
This guide uses cURL examples for all requests. You can use other API request tools, for example, Postman, but you’ll then need to adjust the examples accordingly.
Note
For simplicity, the configuration examples provided do not customize the objects to particular use cases. See Sell-Side Services for more information on the settings available within each service.
Prerequisites
Before beginning this setup, be sure to read API Getting Started. It provides information on testing environments, usage constraints, API semantics (running commands, filtering, sorting, etc.), and best practices.
Dependencies and order of operations
Sell-side objects often have dependencies on other sell-side objects. For example, when you create or update a payment rule, you must provide a publisher ID in the POST request. But you must create (or already have access to) a publisher to obtain the system generated publisher ID you’ll need. There are many other similar dependencies among sell-side objects. Following the order of operations outlined on this page can make configuration easier and reduce the number of requests you'll have to make to the API.
Note
A good way to know if a sell-side object has a dependency with another sell-side object is to note which fields are required in the JSON used to create or update it. For example, if there are object IDs (e.g., publisher_id, ad_profile_id) required on a POST request to create an object, then that object is dependent on the object with the required ID.
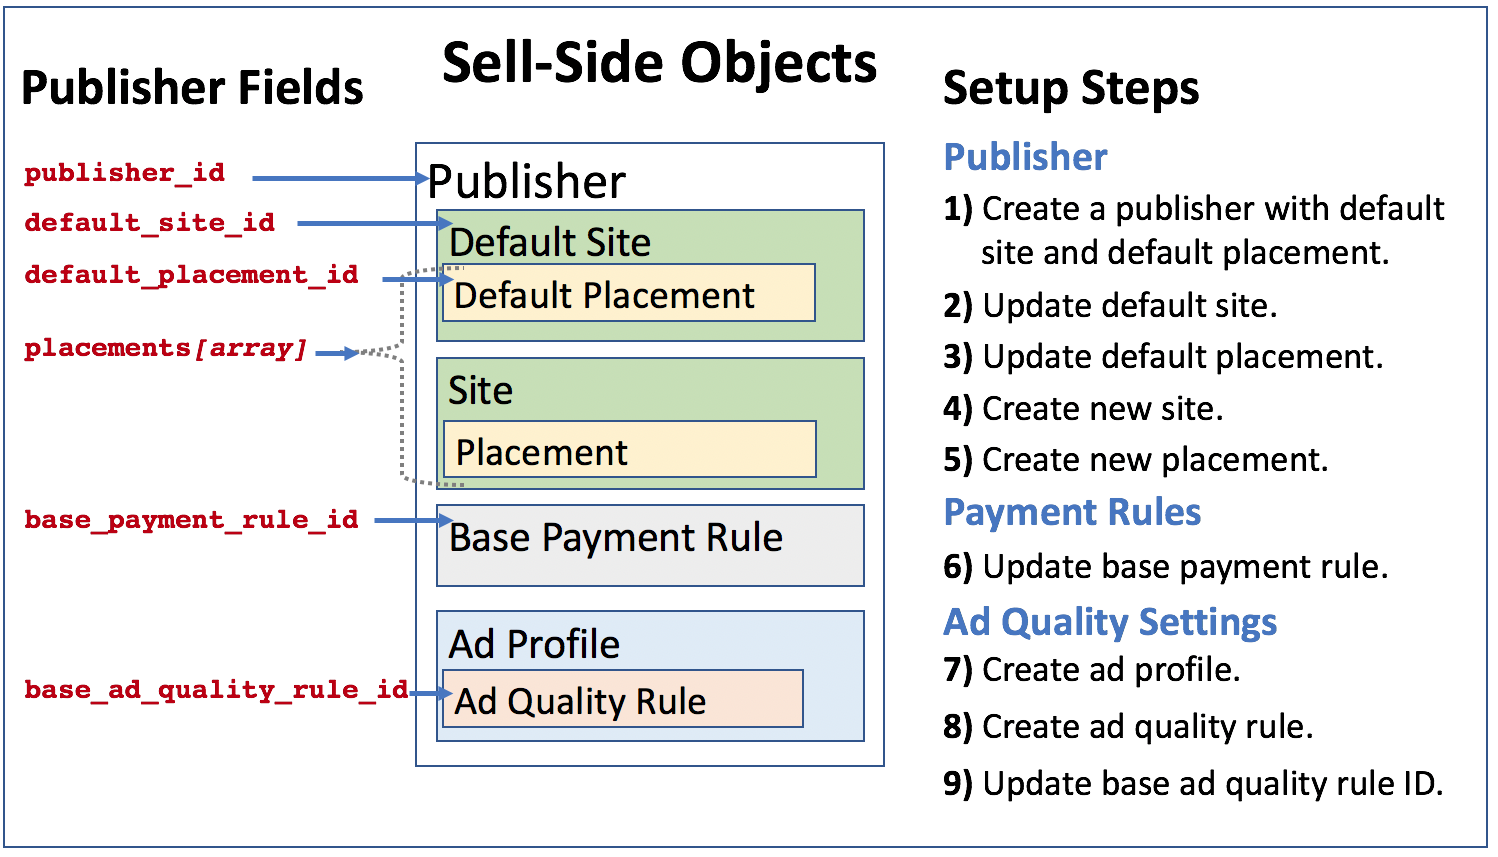
The diagram below indicates the publisher fields used, sell-side objects created or configured, and setup steps required for setting up a simple sell-side implementation:
Note
The API "site" object is referred to as a "placement group" when created and configured using.
Best practices
For a general list of best practices to follow when working with the API, see API Best Practices. The following are some best practices that are specific to the sell-side API setup:
- Use a default site and default placement. While you can create a publisher without a default site and default placement (see Publisher Service for more information), you’ll usually want a default site and default placement to provide a “catchall” for potential targeting misconfigurations.
- Set ad quality rules on the publisher. If there are no ad quality rules assigned to the publisher, the publisher's default ad profile is automatically applied. If there is no publisher default ad profile, the network ad profile is applied. Setting ad quality rules on the publisher provides the publisher more control over what kinds of ads are served on the publisher’s inventory.
- Assign the base ad quality rule ID of the publisher. The base ad quality rule of a publisher acts as a “catchall” and is applied in two situations:
- If there are no conditional ad quality rules defined.
- If none of the defined conditional ad quality rules match the current impression.
- Set the
statefield of the publisher to"inactive"until the publisher is fully configured and ready for testing. - Note the ID of any objects you create. The IDs of objects you create are returned in the response body of requests. You'll often need these IDs later so copying them when they're returned can reduce the number of additional
GETrequests you have to make to obtain them.
Setup procedure
The following steps will guide you through the process of setting up a publisher with typical configurations:
- Create a publisher with default site and default placement.
- Update the default site.
- Update the default placement.
- Create a new site.
- Create a new placement.
- Update the base payment rule.
- Create an ad profile.
- Create an ad quality rule.
- Update the base ad quality rule ID.
Authentication
First, you’ll need to obtain an authorization token. You must then include this authorization token in all subsequent requests (see Authentication Service for more information). To obtain an authorization token, do the following:
Create a JSON file containing your username and password.
{
    "auth": {
        "username" : "USERNAME",
        "password" : "PASSWORD"
    }
}
Make a
POSTrequest to the/authendpoint with this JSON file in the request body (see Authentication Service for more information). In thecURLrequest below, the authorization token returned is stored in the “cookies” file.curl -c cookies -X POST -d @authentication.json 'https://api.appnexus.com/auth'Check the response body of your request (see Example Response below). If your request was successful, you’ll get a
"status"of"OK"and the"token"field will be populated with the authentication token value.
Example response{ "response" : { "token" : "authn:225692:2d787d1838283:lax1", "status" : "OK" } }
Publisher
Step 1: Creating a publisher
There are two options for creating a publisher (see Publisher Service for more information):
- Create a publisher with a default site and default placement.
- Create a publisher without a default site or default placement.
It’s a best practice for publishers to have both a default site and default placement, so that’s the option we’ll focus on in this setup guide. A default site and default placement can provide a "catchall" if targeting is misconfigured and they can help in resolving discrepancies.
To create a publisher with a default site and default placement, do the following:
Create a JSON file with the required fields for a publisher (see Publisher Service for more information).
Note
Replace the placeholders (e.g.,
"PUBLISHER_NAME") in the below JSON example with your own values.Since the
inventory_relationshipfield is required, we’ve set it to"direct", (but it can be set to other values). We’ve also setstateto"inactive"for now. Since we don’t provide the other publisher fields in our request, they will be set to their default values and display in the response body.{ "publisher": { "name": "PUBLISHER_NAME", "inventory_relationship": "direct", "billing_dba": "PUBLISHER_DBA", "billing_address1": "PUBLISHER_ADDRESS", "billing_city": "PUBLISHER_CITY", "billing_state": "PUBLISHER_STATE", "billing_zip": "PUBLISHER_ZIP", "billing_country": "PUBLISHER_COUNTRY", "contact": { "phone": "CONTACT_PHONE", "email": "CONTACT_EMAIL", "name": "CONTACT_NAME" } } }Make a
POSTrequest to the/publisherendpoint with this JSON file in the request body.curl -b cookies -X POST -d @Publisher.json 'https://api.appnexus.com/publisher'Check the response body of your request (see Example Response below). If your request was successful, you’ll get a
"status"of"OK"and a publisher ID ("id"in the"publisher"object) returned in the response body. Notice that thedefault_site_id,default_placement_id, andbase_payment_rule_idfields are populated (along with many other fields). Copy the values of thepublisherID,default_site_id,default_placement_id, andbase_payment_rule_idfor later use.Example response
{
   "response" : {
      "status" : "OK",
      "id" : "1256104",
      "start_element" : 0,
      "num_elements" : 100,
      "publisher" : {
         "contact" : {
            "phone" : "CONTACT_PHONE_NUMBER",
            "name" : "CONTACT_NAME",
            "email" : "CONTACT_EMAIL",
            "id" : 931326
         },
         "billing_zip" : "BILLING_ZIP",
         "allow_cpc_external" : false,
         "allow_report_on_default_imps" : false,
         "platform_ops_notes" : null,
         "inventory_relationship" : "direct",
         "billing_state" : "BILLING_STATE",
         "publisher_brand_exceptions" : null,
         "allow_cpm_external" : true,
         "default_site_id" : 3758012,
         "billing_dba" : "BILLING_DBA_NAME",
         "accept_data_provider_usersync" : null,
         "allow_cpc_managed" : true,
         "default_placement_id" : 13814496,
         "description" : "",
         "expose_domains" : true,
         "base_payment_rule_id" : 1579248,
         "default_ad_profile_id" : null,
         "name" : "PUBLISHER_NAME",
         "reselling_exposure" : "private",
         "code" : null,
         "is_oo" : false,
         "pitbull_segment_id" : 0,
         "learn_bypass_cpm" : 5,
         "managed_cpa_bias_pct" : 100,
         "billing_address2" : null,
         "max_learn_pct" : 0,
         "cpc_reselling_disabled" : false,
         "last_modified" : "2018-08-10 18:05:08",
         "billing_city" : "BILLING_CITY",
         "pitbull_segment_value" : 0,
         "base_ad_quality_rule_id" : null,
         "billing_country" : "BILLING_COUNTRY",
         "id" : 1256104,
         "inventory_source_name" : null,
         "disclosure_status" : "disclosed_pending",
         "seller_page_cap_enabled" : false,
         "currency" : "USD",
         "external_cpc_bias_pct" : 100,
         "billing_address1" : "BILLING_ADDRESS",
         "allow_cpa_managed" : true,
         "external_inv_codes" : null,
         "reselling_exposed_on" : "1970-01-01 00:00:01",
         "allow_cpa_external" : false,
         "cpm_reselling_disabled" : false,
         "billing_internal_user" : null,
         "allow_cpm_managed" : true,
         "labels" : null,
         "inventory_source" : null,
         "reselling_name" : null,
         "visibility_profile_id" : null,
         "ym_profile_id" : null,
         "contact_info" : null,
         "use_anx_auction_logic" : false,
         "ad_quality_advanced_mode_enabled" : true,
         "accept_demand_partner_usersync" : null,
         "state" : "inactive",
         "placements" : [
            {
               "id" : 13814496,
               "code" : null
            }
         ],
         "is_rtb" : false,
         "accept_supply_partner_usersync" : null,
         "timezone" : "CET",
         "enable_cookie_tracking_default" : true,
         "managed_cpc_bias_pct" : 100,
         "external_cpa_bias_pct" : 100
      },
      "count" : 1
   }
}
Step 2: Updating the default site
A default site was created when you created the publisher in Creating a Publisher above. While this default site doesn’t need additional configuration to function, you can update some fields if necessary. To update the default site, do the following:
Tip
The API "site" object is referred to as a "placement group" when created and configured using.
Create a JSON file containing the fields of the default site you want to update (see Site Service for more information). In this example, we are updating the
content_categoriesarray.{ "site": { "content_categories": [{ "id": 8, "name": "Business & Industry", "is_system": true }, { "name": "Arts & Entertainment", "id": 10, "is_system": true }, { "is_system": true, "id": 29, "name": "Sports" } ] } }Make a
PUTrequest to the/siteendpoint with this JSON file in the request body. You’ll need to indicate the site ID of the default site you’re updating in the query string of the request.Tip
If you copied the default site ID in Creating a Publisher above, you can use that. Otherwise, you can obtain the default site ID by making a
GETrequest to the/publisherendpoint using the publisher ID of the publisher that has the default site you want to update (see Publisher Service for more information).curl -b cookies -X PUT -d @DefaultSiteUpdate.json 'https://api.appnexus.com/site?id=DEFAULT_SITE_ID'Check the response body of your request (see Example response below). If your request was successful, you’ll get a
"status"of"OK"and you’ll see the updates you made.Example response
{
   "response" : {
      "site" : {
         "url" : "",
         "publisher_name" : "PUBLISHER_NAME",
         "creative_format_action" : "exclude",
         "code" : null,
         "managed_optimization_zone_id" : "262",
         "audited" : false,
         "intended_audience" : null,
         "content_categories" : [
            {
               "name" : "Business & Industry",
               "is_system" : true,
               "id" : 8
            },
            {
               "name" : "Arts & Entertainment",
               "is_system" : true,
               "id" : 10
            },
            {
               "name" : "Sports",
               "is_system" : true,
               "id" : 29
            }
         ],
         "marketplace_map" : {
            "rtb" : true,
            "an_audit_perf_only" : false,
            "rtb_suspended" : false,
            "deals_suspended" : false,
            "deals_allowed" : true,
            "performance" : false
         },
         "creative_formats" : null,
         "name" : "[DEFAULT_SITE_NAME] - ROS",
         "id" : 3731466,
         "mobile_app_instance" : null,
         "allowed_click_actions" : null,
         "last_modified" : "2018-08-17 23:44:07",
         "inventory_attributes" : null,
         "primary_content_category_id" : null,
         "state" : "active",
         "publisher_id" : 1240580,
         "rtb_optimization_zone_id" : null,
         "supply_type" : "web",
         "placements" : [
            {
               "code" : null,
               "id" : 13741957
            }
         ]
      },
      "id" : "3731466",
      "start_element" : 0,
      "count" : 1,
      "status" : "OK",
      "num_elements" : 100
   }
}
Step 3: Updating the default placement
A default placement was created when you created the publisher in Creating a Publisher above. While this default placement doesn’t need additional configuration to function, you can update some fields if necessary. To update the default placement, do the following:
Create a JSON file containing the fields of the default placement you want to update (see Placement Service for more information). In this example, we are updating the
default_positionfield of the default placement.{ "placement" : { "default_position" : "above" } }Make a
PUTrequest to the/placementendpoint with this JSON file in the request body. You’ll need to indicate the placement ID of the default placement you’re updating in the query string of the request.Note
If you copied the default placement ID in Creating a Publisher above, you can use that. Otherwise, you can obtain the default placement ID by making a
GETrequest to the/publisherendpoint using the publisher ID of the publisher that has the default placement you want to update (see Publisher Service for more information).curl -b cookies -X PUT -d @DefaultPlacementUpdate.json 'https://api.appnexus.com/placement?id=DEFAULT_PLACEMENT_ID'Check the response body of your request (see Example response below). If your request was successful, you’ll get a
"status"of"OK"and you’ll see the updates you made.Example response
{
   "response" : {
      "start_element" : 0,
      "status" : "OK",
      "id" : "13741957",
      "num_elements" : 100,
      "placement" : {
         "private_sizes" : null,
         "publisher_id" : 1240580,
         "code3" : null,
         "width" : null,
         "ad_types" : null,
         "pixel_type" : "image",
         "acb_code" : null,
         "cost_cpm" : null,
         "inventory_attributes" : null,
         "estimated_clear_prices" : [
            {
               "width" : 0,
               "geo_country" : "",
               "height" : 0,
               "clear_price" : 1,
               "average_price" : 0.5,
               "verified" : true
            }
         ],
         "demand_filter_action" : "default",
         "content_categories" : null,
         "is_prohibited" : false,
         "site_name" : "[DEFAULT_SITE_NAME] - ROS",
         "code2" : null,
         "reserve_price" : null,
         "site_audit_status" : "unaudited",
         "audited" : false,
         "id" : 13741957,
         "state" : "active",
         "name" : "[PLACEMENT_NAME] - Default",
         "filtered_advertisers" : null,
         "default_creative_id" : null,
         "pop_values" : null,
         "exclusive" : false,
         "toolbar" : null,
         "default_creatives" : null,
         "enable_for_mediation" : false,
         "mime_types" : null,
         "segments" : null,
         "visibility_profile_id" : null,
         "pixel_url_secure" : null,
         "default_calculation_type" : "gross",
         "code" : null,
         "default_position" : "above",
         "filtered_campaigns" : null,
         "filtered_line_items" : null,
         "supported_mime_types_action_include" : false,
         "supported_media_subtypes" : null,
         "ad_profile_id" : null,
         "content_retrieval_timeout_ms" : 0,
         "audit_level" : "site",
         "tag_data" : null,
         "use_detected_domain" : true,
         "is_resizable" : false,
         "vendor_id" : null,
         "intended_audience" : null,
         "hide_referer" : false,
         "supported_media_types" : [
            {
               "id" : 1,
               "name" : "Banner",
               "is_private" : false
            }
         ],
         "default_referrer_url" : null,
         "floor_application_target" : "all",
         "pixel_url" : null,
         "site_id" : 3731466,
         "publisher_name" : "PUBLISHER_NAME",
         "media_subtypes" : null,
         "video" : null,
         "last_modified" : "2018-08-20 17:17:42",
         "height" : null,
         "is_prebid_enabled" : false,
         "buy_it_now_price" : 0
      },
      "count" : 1
   }
}
Step 4: Creating a new site
While a default site was created when you created the publisher in Creating a Publisher above, this typically is used as a “catchall” for targeting misconfigurations and usually only contains the default placement. Since you’ll want to add a new placement to the publisher, you should first create a new site to contain any new placements. To create a new site, do the following:
Create a JSON file containing the fields of the new site (see Site Service for more information). In this example, we are including fields in the
content_categoriesarray along with any required fields.{ "site" : { "name" : "NEW_SITE_NAME", "rtb" : true, "content_categories" : [ { "id" : 8, "name" : "Business & Industry", "is_system" : true }, { "name" : "Arts & Entertainment", "id" : 10, "is_system" : true }, { "is_system" : true, "id" : 29, "name" : "Sports" } ] } }Make a
POSTrequest to the/siteendpoint with this JSON file in the request body. You’ll need to indicate thepublisher_idof the publisher you’re adding the site to in the query string of the request.Tip
If you copied the publisher ID in Creating a Publisher above you can use that.
curl -b cookies -X POST -d @NewSite.json 'https://api.appnexus.com/site publisher_id=PUBLISHER_ID'Check the response body of your request (see Example response below). If your request was successful, you’ll get a
"status"of"OK"and you’ll see the fields of the new site. Copy the site ID so you'll have it available when you add a placement to the new site.Example response
 {
   "response" : {
      "status" : "OK",
      "start_element" : 0,
      "id" : 3804119,
      "num_elements" : 100,
      "site" : {
         "content_categories" : [
            {
               "id" : 8,
               "is_system" : true,
               "name" : "Business & Industry"
            },
            {
               "name" : "Arts & Entertainment",
               "is_system" : true,
               "id" : 10
            },
            {
               "is_system" : true,
               "id" : 29,
               "name" : "Sports"
            }
         ],
         "id" : 3804119,
         "creative_formats" : [
            "text"
         ],
         "mobile_app_instance" : null,
         "audited" : false,
         "rtb_optimization_zone_id" : null,
         "marketplace_map" : {
            "rtb" : true,
            "performance" : false,
            "deals_suspended" : false,
            "rtb_suspended" : false,
            "an_audit_perf_only" : false,
            "deals_allowed" : true
         },
         "supply_type" : "web",
         "code" : null,
         "creative_format_action" : "exclude",
         "inventory_attributes" : null,
         "name" : "NEW_SITE_NAME",
         "allowed_click_actions" : [
            "click-to-web"
         ],
         "intended_audience" : null,
         "publisher_id" : 1229638,
         "primary_content_category_id" : null,
         "managed_optimization_zone_id" : "262",
         "publisher_name" : "MarkD_Test05",
         "placements" : null,
         "url" : "",
         "state" : "active",
         "last_modified" : "2018-09-08 00:01:40"
      },
      "count" : 1
   }
}
Step 5: Creating a new placement
While a default placement was created when you created the publisher in Creating a Publisher above, you’ll want to create one or more placements and add them to the publisher to handle ad placement targeting. To create a placement and add it to your publisher, do the following:
Create a JSON file containing the fields for the placement you want to add (see Placement Service for more information). In this example, we have included the required fields along with some supported media type information.
 {
      "placement" :
         {
            "name" : "NEW_PLACEMENT_NAME",
            "state" : "inactive",
            "supported_media_types" : [
               {
                  "name" : "Banner",
                  "is_private" : false,
                  "id" : 1
               }
            ]
         }
}
Make a
POSTrequest to the/placementendpoint with this JSON file in the request body. You'll need to add thesite_idof the site you're adding the placement to in the query string of the request (see Placement Service for more information).Tip
If you copied the site ID in Creating a New Site above, you can use this when adding a placement. To obtain the site IDs for a publisher, make a GET request to the
/siteendpoint using the publisher ID of the publisher that has the sites (see Site Service for more information).curl -b cookies -X POST -d @NewPlacement.json 'https://api.appnexus.com/placement?site_id=SITE_ID'Check the response body of your request (see Example response below). If your request was successful, you’ll get a
"status"of"OK"and you'll see the fields of the new placement.Example response
{
   "response" : {
      "num_elements" : 100,
      "placement" : {
         "supported_mime_types_action_include" : false,
         "video" : null,
         "default_creative_id" : null,
         "private_sizes" : null,
         "code" : null,
         "height" : null,
         "audited" : false,
         "state" : "inactive",
         "filtered_line_items" : null,
         "last_modified" : "2018-08-20 22:40:09",
         "tag_data" : null,
         "content_retrieval_timeout_ms" : 0,
         "is_prebid_enabled" : false,
         "toolbar" : null,
         "pixel_url_secure" : null,
         "vendor_id" : null,
         "supported_media_types" : [
            {
               "id" : 1,
               "is_private" : false,
               "name" : "Banner"
            }
         ],
         "default_position" : "unknown",
         "is_resizable" : false,
         "code3" : null,
         "filtered_advertisers" : null,
         "exclusive" : false,
         "site_id" : 3731466,
         "estimated_clear_prices" : [
            {
               "average_price" : 0.5,
               "verified" : true,
               "clear_price" : 1,
               "width" : 0,
               "geo_country" : "",
               "height" : 0
            }
         ],
         "name" : "NEW_PLACEMENT_NAME",
         "site_audit_status" : "unaudited",
         "site_name" : "SITE_NAME",
         "pop_values" : null,
         "media_subtypes" : null,
         "enable_for_mediation" : true,
         "supported_media_subtypes" : null,
         "segments" : null,
         "pixel_url" : null,
         "publisher_id" : 1240580,
         "pixel_type" : "image",
         "reserve_price" : null,
         "content_categories" : null,
         "audit_level" : "site",
         "mime_types" : null,
         "visibility_profile_id" : null,
         "id" : 13847262,
         "use_detected_domain" : true,
         "default_creatives" : null,
         "hide_referer" : false,
         "intended_audience" : null,
         "width" : null,
         "default_referrer_url" : null,
         "default_calculation_type" : "gross",
         "buy_it_now_price" : 0,
         "ad_profile_id" : null,
         "floor_application_target" : "all",
         "demand_filter_action" : "default",
         "filtered_campaigns" : null,
         "inventory_attributes" : null,
         "ad_types" : null,
         "cost_cpm" : null,
         "code2" : null,
         "acb_code" : null,
         "publisher_name" : "PUBLISHER_NAME",
         "is_prohibited" : false
      },
      "status" : "OK",
      "start_element" : 0,
      "id" : 13847262,
      "count" : 1
   }
}
Payment rules
You need to configure the financial arrangement between the network and publisher. You do this using base and conditional payment rules (see Payment Rule Service for more information).
Step 6: Updating the base payment rule
A base payment rule was created by default when you created a publisher in Creating a Publisher above. You'll typically need to update this base payment rule to reflect the actual financial arrangement between the network and publisher. To update the base payment rule, do the following:
Create a JSON file containing the fields with the updates you want (see Payment Rule Service for more information). In this example, we are updating the
pricing_typeandcost_cpmfields.Note
Changes to one field might require changes to another dependent field. For example, if you change the value of the
pricing_typefield from"revshare"to"cpm", you’ll need to update thecost_cpmfield as well. See Payment Rule Service for more information.{ "payment-rule":{ "pricing_type": "cpm", "cost_cpm": "0.4" } }Make a
PUTrequest to the/payment-ruleendpoint with this JSON file in the request body. You’ll need to indicate the base payment rule ID and the publisher ID in the query string of the request.Note
If you copied the basepayment rule ID and the publisher ID in Creating a Publisher above, you can use these. Otherwise, you can make a
GETrequest to the/publisherendpoint using the publisher ID of the publisher to find the base payment rule ID you want to update (see Publisher Service for more information).curl -b cookies -X PUT -d @UpdatePaymentRule.json 'https://api.appnexus.com/payment-rule?id=BASE_PAYMENT_RULE_ID&publisher_id=PUBLISHER_ID'Check the response body of your request (see Example response below). If your request was successful, you’ll get a
"status"of"OK"and you’ll see the updates you made.Example response
{
   "response" : {
      "id" : "1570229",
      "start_element" : 0,
      "count" : 1,
      "num_elements" : 100,
      "status" : "OK",
      "payment-rule" : {
         "id" : 1570229,
         "target_ecpm" : null,
         "priority" : 1,
         "lifetime_budget_imps" : null,
         "start_date" : null,
         "lifetime_budget" : null,
         "filtered_advertisers" : null,
         "description" : "",
         "last_modified" : "2018-08-21 22:26:19",
         "code" : null,
         "state" : "active",
         "daily_budget_imps" : null,
         "name" : "Base Payment Rule",
         "apply_cost_on_default" : false,
         "end_date" : null,
         "pricing_type" : "cpm",
         "buyer_type" : "both",
         "profile_id" : null,
         "revshare" : 0,
         "demand_filter_action" : "default",
         "filtered_campaigns" : null,
         "cost_cpm" : 0.4,
         "daily_budget" : null,
         "max_revshare" : null,
         "timezone" : "EST5EDT",
         "filtered_line_items" : null
      }
   }
}
Ad quality settings
You can now configure the ad quality settings for your publisher. A newly created publisher will use network ad quality settings unless you create and configure ad quality settings for the publisher. Ad quality settings let publishers determine the quality of ads served on their inventory. These ad quality settings consist of ad profiles (see Ad Profile Service for more information) and base and conditional ad quality rules (see Ad Quality Rule Service for more information).
Ad quality rules require an ad profile ID, so you'll need to create an ad profile (or use an existing one) before you can create and apply ad quality rules.
Step 7: Creating an ad profile
An ad profile indicates the eligibility ("trusted" or "banned") of characteristics of ads to be served by a publisher. These ad characteristics include buyers, brands, categories, technical attributes, languages, ad servers, and so on. An ad profile is then applied using ad quality rules.
Note
If there are no ad quality rules assigned to the publisher, the publisher's default ad profile is automatically applied. If there is no publisher default ad profile, the network ad profile is applied.
To create an ad profile, do the following:
Create a JSON file containing the fields with the updates you want (see Ad Profile Service for more information). In this example, we are adding eligibility information to the
technical_attributesand categories arrays.{ "ad-profile" : { "technical_attributes" : [ { "id" : 2, "status" : "banned" }, { "id" : 8, "status" : "banned" }, { "status" : "banned", "id" : 22 }, { "status" : "banned", "id" : 104 } ], "categories" : [ { "id" : 37, "status" : "banned" }, { "status" : "banned", "id" : 109 }, { "id" : 166, "status" : "banned" } ], "description" : "AD_PROFILE_DESCRIPTION" } }Make a
POSTrequest to the/ad-profileendpoint with this JSON file in the request body. You’ll need to indicate thepublisher_idof the publisher you want to associate the ad profile with in the query string of the requestNote
If you copied the publisher ID in Creating a Publisher above, you can use that.
curl -b cookies -X POST -d @AdProfile.json 'https://api.appnexus.com/ad-profile?publisher_id=PUBLISHER_ID'Check the response body of your request (see Example response below). If your request was successful, you’ll get a
"status"of"OK"and you’ll see the values you added along with other default settings.Example response
{
   "response" : {
      "ad-profile" : {
         "require_msft_audit" : false,
         "creatives" : null,
         "default_ad_server_status" : "trusted",
         "exclude_unaudited_direct" : false,
         "default_brand_status" : "trusted",
         "inventory_type" : "real_time",
         "excluded_landing_page_urls" : null,
         "default_category_status" : "trusted",
         "exclude_direct" : false,
         "categories" : [
            {
               "status" : "banned",
               "id" : 37
            },
            {
               "status" : "banned",
               "id" : 109
            },
            {
               "id" : 166,
               "status" : "banned"
            }
         ],
         "exclude_unaudited" : true,
         "member_id" : 958,
         "require_google_audit" : false,
         "check_attributes_direct" : false,
         "description" : "AD_PROFILE_DESCRIPTION",
         "last_modified" : "2018-08-24 23:37:40",
         "technical_attributes" : [
            {
               "status" : "banned",
               "id" : 2
            },
            {
               "id" : 8,
               "status" : "banned"
            },
            {
               "id" : 22,
               "status" : "banned"
            },
            {
               "status" : "banned",
               "id" : 104
            }
         ],
         "audit_type_direct" : "platform_or_self",
         "require_landing_page_url" : false,
         "require_seller_audit_default" : false,
         "id" : 1223520,
         "ad_servers" : null,
         "allow_pending_creatives_direct" : false,
         "default_member_status" : "case-by-case",
         "members" : null,
         "languages" : null,
         "state" : "active",
         "require_msft_external_audit" : false,
         "default_audit_type" : "platform",
         "default_technical_attribute_status" : "trusted",
         "brands" : null,
         "frequency_caps" : null,
         "require_appnexus_review" : false,
         "publisher_id" : 1240580,
         "notes" : null,
         "default_language_status" : "trusted"
      },
      "count" : 1,
      "start_element" : 0,
      "id" : 1223520,
      "num_elements" : 100,
      "status" : "OK"
   }
}
Step 8: Creating an ad quality rule
While configuring ad quality settings beyond the Network Profile is optional, it’s a best practice to use ad quality rules on the publisher level as well to control ad quality. If you choose to configure ad quality settings at the publisher level, you are required to have a base ad quality rule for the publisher. Having this will ensure at least some ad quality controls are applied at the publisher level in case none of the conditional ad quality rules apply. The base ad quality rule is an ad quality rule that is assigned to the publisher’s base_ad_quality_rule_id field (see Updating Base Ad Quality Rule ID of Publisher below).
To create an ad quality rule, do the following:
Create a JSON file containing the fields you want (see Ad Quality Rule Service for more information). In this example, we are adding the ID of the ad profile (see Creating an Ad Profile above) we want this ad quality rule to use along with the name and priority of this rule.
{
      "ad-quality-rule" : {
            "name" : "New_Ad_Quality_Rule",
            "ad_profile_id" : 1223520,
            "priority" : 1
         }
}
Make a
POSTrequest to the/ad-quality-ruleendpoint with this JSON file in the request body. You’ll need to indicate thepublisher_idin the query string of the request.Note
If you copied the publisher ID in Creating a Publisher above, you can use this.
curl -b cookies -X POST -d @AdQualityRule.json 'https://api.appnexus.com/ad-quality-rule?publisher_id=PUBLISHER_ID'Check the response body of your request (see Example Response below). If your request was successful, you’ll get a
"status"of"OK"and you’ll see the fields of the ad quality rule you created. Copy the ad quality rule ID so you'll have it when you update the base ad quality rule ID of the publisher in next step.Example response
{
   "response" : {
      "count" : 1,
      "start_element" : 0,
      "num_elements" : 100,
      "ad-quality-rule" : {
         "active" : true,
         "publisher_id" : 1240580,
         "id" : 632112,
         "member_id" : 958,
         "description" : null,
         "code" : null,
         "profile_id" : null,
         "priority" : 1,
         "name" : "New_Ad_Quality_Rule",
         "last_modified" : "2018-08-26 21:47:12",
         "ad_profile_id" : 1223520
      },
      "id" : 632112,
      "status" : "OK"
   }
}
Step 9: Updating the base ad quality rule ID of publisher
You’ll typically want to have a base ad quality rule assigned to your publisher. The base ad quality rule acts as a "catchall" ad quality rule if there are no conditional ad quality rules defined or if no conditional ad quality rules match an impression. Once you’ve created an ad quality rule that you want to use for a base ad quality rule, you simply assign the ID of that ad quality rule to the publisher with a PUT request.
To assign a base ad quality rule to a publisher, do the following:
Create a JSON file containing a value for the
base_ad_quality_rule_idfield of your publisher (see Publisher Service for more information). In this example, we are adding the ID of the ad quality rule we created in Creating an Ad Quality Rule above.Tip
If you copied the ad quality rule ID in Creating an Ad Quality Rule above, you can use this. Otherwise, you can make a
GETrequest to the/ad-quality-ruleendpoint (see Ad Quality Rule Service for more information) using the publisher ID you used in Creating an Ad Quality Rule above to find the ad quality rule ID.{ "publisher" : { "base_ad_quality_rule_id" : 632112 } } ```Make a
PUTrequest to the/publisherendpoint with this JSON file in the request body (see Publisher Service for more information). You’ll need to indicate the publisher ID in the query string of the request.Tip
If you copied the publisher ID in Creating a Publisher above you can use this.
curl -b cookies -X PUT -d @PublisherBaseAdQualityRuleUpdate.json 'https://api.appnexus.com/publisher?id=PUBLISHER_ID'
    ```
Check the response body of your request (see Example response below). If your request was successful, you’ll get a
"status"of"OK"and you’ll see the updates you made.Example response
{
   "response" : {
      "count" : 1,
      "status" : "OK",
      "start_element" : 0,
      "id" : "1240580",
      "publisher" : {
         "billing_address1" : "BILLING_ADDRESS",
         "managed_cpa_bias_pct" : 100,
         "inventory_source" : null,
         "external_cpc_bias_pct" : 100,
         "ym_profile_id" : null,
         "currency" : "USD",
         "allow_cpa_managed" : true,
         "inventory_source_name" : null,
         "use_anx_auction_logic" : false,
         "learn_bypass_cpm" : 5,
         "platform_ops_notes" : null,
         "contact" : {
            "phone" : "555-555-1212",
            "email" : "CONTACT_EMAIL@EMAIL.COM",
            "id" : CONTACT_ID,
            "name" : "CONTACT_NAME"
         },
         "allow_cpc_managed" : true,
         "is_rtb" : false,
         "disclosure_status" : "disclosed_pending",
         "visibility_profile_id" : null,
         "billing_dba" : "BILLING_DBA",
         "reselling_exposure" : "private",
         "managed_cpc_bias_pct" : 100,
         "default_placement_id" : 13741957,
         "labels" : null,
         "accept_supply_partner_usersync" : null,
         "expose_domains" : true,
         "reselling_name" : null,
         "billing_internal_user" : null,
         "placements" : [
            {
               "id" : 13741957,
               "code" : null
            },
            {
               "id" : 13847262,
               "code" : null
            }
         ],
         "enable_cookie_tracking_default" : true,
         "external_inv_codes" : null,
         "inventory_relationship" : "direct",
         "pitbull_segment_value" : 0,
         "default_site_id" : 3731466,
         "publisher_brand_exceptions" : null,
         "billing_address2" : null,
         "timezone" : "CET",
         "contact_info" : null,
         "last_modified" : "2018-08-26 22:33:13",
         "code" : null,
         "billing_zip" : "BILLING_ZIP",
         "billing_country" : "US",
         "reselling_exposed_on" : "1970-01-01 00:00:01",
         "is_oo" : false,
         "billing_state" : "BILLING_STATE",
         "ad_quality_advanced_mode_enabled" : true,
         "allow_cpm_external" : true,
         "pitbull_segment_id" : 0,
         "base_ad_quality_rule_id" : 632112,
         "default_ad_profile_id" : null,
         "seller_page_cap_enabled" : false,
         "description" : "",
         "allow_cpa_external" : false,
         "id" : 1240580,
         "state" : "inactive",
         "billing_city" : "Portland",
         "max_learn_pct" : 0,
         "cpc_reselling_disabled" : false,
         "allow_report_on_default_imps" : false,
         "cpm_reselling_disabled" : false,
         "base_payment_rule_id" : 1570229,
         "name" : "PUBLISHER_NAME",
         "allow_cpm_managed" : true,
         "accept_demand_partner_usersync" : null,
         "accept_data_provider_usersync" : null,
         "external_cpa_bias_pct" : 100,
         "allow_cpc_external" : false
      },
      "num_elements" : 100
   }
}