Note
Access to this page requires authorization. You can try signing in or changing directories.
Access to this page requires authorization. You can try changing directories.
Azure OpenAI GPT Realtime API for speech and audio is part of the GPT-4o model family that supports low-latency, "speech in, speech out" conversational interactions.
You can use the Realtime API via WebRTC, SIP, or WebSocket to send audio input to the model and receive audio responses in real time.
Follow the instructions in this article to get started with the Realtime API via WebSockets. Use the Realtime API via WebSockets in server-to-server scenarios where low latency isn't a requirement.
Tip
In most cases, use the Realtime API via WebRTC for real-time audio streaming in client-side applications such as a web application or mobile app. WebRTC is designed for low-latency, real-time audio streaming and is the best choice for most scenarios.
Use the following table to help you choose the right protocol for your scenario:
| Protocol | Best for | Latency | Complexity |
|---|---|---|---|
| WebRTC | Client-side apps (web, mobile) | Lowest (~50-100ms) | Higher |
| WebSocket | Server-to-server, batch processing | Moderate (~100-300ms) | Lower |
| SIP | Telephony integration | Varies | Highest |
Prerequisites
Before you can use GPT real-time audio, you need:
- An Azure subscription. Create one for free.
- A Microsoft Foundry resource. Create the resource in one of the supported regions. For setup steps, see Create a Microsoft Foundry resource.
- A deployment of a GPT realtime model in a supported region as described in the supported models section in this article.
- In the Foundry portal, load your project. Select Build in the upper-right menu, then select the Models tab on the left pane, and select Deploy a base model. Search for the model you want, and select Deploy on the model page.
- Required libraries:
- Python:
pip install websockets azure-identity - JavaScript/Node.js:
npm install ws @azure/identity
- Python:
Voice-agent quickstart
Follow the instructions in this section to get started with a voice-agent session via the Realtime API over WebSockets. Use this quickstart for conversation-style speech-to-speech experiences where your app sends input, receives model responses, and can invoke tools. Use the transcription and translation sections later in this article for those dedicated session types.
Language-specific prerequisites
Microsoft Entra ID prerequisites
For the recommended keyless authentication with Microsoft Entra ID, you need to:
- Install the Azure CLI used for keyless authentication with Microsoft Entra ID.
- Assign the
Cognitive Services OpenAI Userrole to your user account. You can assign roles in the Azure portal under Access control (IAM) > Add role assignment.
Deploy a model for real-time audio
To deploy the gpt-realtime model in the Microsoft Foundry portal:
- Go to the Foundry portal and create or select your project.
- Select your model deployments:
- For Azure OpenAI resource, select Deployments from Shared resources section in the left pane.
- For Foundry resource, select Models + endpoints from under My assets in the left pane.
- Select + Deploy model > Deploy base model to open the deployment window.
- Search for and select the
gpt-realtimemodel and then select Confirm. - Review the deployment details and select Deploy.
- Follow the wizard to finish deploying the model.
Now that you have a deployment of the gpt-realtime model, you can interact with it in the Foundry portal Audio playground or Realtime API.
Set up
Create a new folder
realtime-audio-quickstart-jsand go to the quickstart folder with the following command:mkdir realtime-audio-quickstart-js && cd realtime-audio-quickstart-jsCreate the
package.jsonwith the following command:npm init -yUpdate the
typetomoduleinpackage.jsonwith the following command:npm pkg set type=moduleInstall the OpenAI client library for JavaScript with:
npm install openaiInstall the
wspackage, which is required for WebSocket support:npm install wsFor the recommended keyless authentication with Microsoft Entra ID, install the
@azure/identitypackage with:npm install @azure/identity
Retrieve resource information
You need to retrieve the following information to authenticate your application with your Azure OpenAI resource:
| Variable name | Value |
|---|---|
AZURE_OPENAI_ENDPOINT |
This value can be found in the Keys and Endpoint section when examining your resource from the Azure portal. |
AZURE_OPENAI_DEPLOYMENT_NAME |
This value will correspond to the custom name you chose for your deployment when you deployed a model. This value can be found under Resource Management > Model Deployments in the Azure portal. |
Learn more about keyless authentication and setting environment variables.
Caution
To use the recommended keyless authentication with the SDK, make sure that the AZURE_OPENAI_API_KEY environment variable isn't set.
Send text, receive audio response
Create the
index.jsfile with the following code:import OpenAI from 'openai'; import { OpenAIRealtimeWS } from 'openai/realtime/ws'; import { DefaultAzureCredential, getBearerTokenProvider } from '@azure/identity'; import { OpenAIRealtimeError } from 'openai/realtime/internal-base'; let isCreated = false; let isConfigured = false; let responseDone = false; // Set this to false, if you want to continue receiving events after an error is received. const throwOnError = true; async function main() { // The endpoint of your Azure OpenAI resource is required. You can set it in the AZURE_OPENAI_ENDPOINT // environment variable or replace the default value below. // You can find it in the Microsoft Foundry portal in the Overview page of your Azure OpenAI resource. // Example: https://{your-resource}.openai.azure.com const endpoint = process.env.AZURE_OPENAI_ENDPOINT || 'AZURE_OPENAI_ENDPOINT'; const baseUrl = endpoint.replace(/\/$/, "") + '/openai/v1'; // The deployment name of your Azure OpenAI model is required. You can set it in the AZURE_OPENAI_DEPLOYMENT_NAME // environment variable or replace the default value below. // You can find it in the Foundry portal in the "Models + endpoints" page of your Azure OpenAI resource. // Example: gpt-realtime const deploymentName = process.env.AZURE_OPENAI_DEPLOYMENT_NAME || 'gpt-realtime'; // Keyless authentication const credential = new DefaultAzureCredential(); const scope = 'https://ai.azure.com/.default'; const azureADTokenProvider = getBearerTokenProvider(credential, scope); const token = await azureADTokenProvider(); // The APIs are compatible with the OpenAI client library. // You can use the OpenAI client library to access the Azure OpenAI APIs. // Make sure to set the baseURL and apiKey to use the Azure OpenAI endpoint and token. const openAIClient = new OpenAI({ baseURL: baseUrl, apiKey: token, }); const realtimeClient = await OpenAIRealtimeWS.create(openAIClient, { model: deploymentName }); realtimeClient.on('error', (receivedError) => receiveError(receivedError)); realtimeClient.on('session.created', (receivedEvent) => receiveEvent(receivedEvent)); realtimeClient.on('session.updated', (receivedEvent) => receiveEvent(receivedEvent)); realtimeClient.on('response.output_audio.delta', (receivedEvent) => receiveEvent(receivedEvent)); realtimeClient.on('response.output_audio_transcript.delta', (receivedEvent) => receiveEvent(receivedEvent)); realtimeClient.on('response.done', (receivedEvent) => receiveEvent(receivedEvent)); console.log('Waiting for events...'); while (!isCreated) { console.log('Waiting for session.created event...'); await new Promise((resolve) => setTimeout(resolve, 100)); } // After the session is created, configure it to enable audio input and output. const sessionConfig = { 'type': 'realtime', 'instructions': 'You are a helpful assistant. You respond by voice and text.', 'output_modalities': ['audio'], 'audio': { 'input': { 'transcription': { 'model': 'whisper-1' }, 'format': { 'type': 'audio/pcm', 'rate': 24000, }, 'turn_detection': { 'type': 'server_vad', 'threshold': 0.5, 'prefix_padding_ms': 300, 'silence_duration_ms': 200, 'create_response': true } }, 'output': { 'voice': 'alloy', 'format': { 'type': 'audio/pcm', 'rate': 24000, } } } }; realtimeClient.send({ 'type': 'session.update', 'session': sessionConfig }); while (!isConfigured) { console.log('Waiting for session.updated event...'); await new Promise((resolve) => setTimeout(resolve, 100)); } // After the session is configured, data can be sent to the session. realtimeClient.send({ 'type': 'conversation.item.create', 'item': { 'type': 'message', 'role': 'user', 'content': [{ type: 'input_text', text: 'Please assist the user.' } ] } }); realtimeClient.send({ type: 'response.create' }); // While waiting for the session to finish, the events can be handled in the event handlers. // In this example, we just wait for the first response.done event. while (!responseDone) { console.log('Waiting for response.done event...'); await new Promise((resolve) => setTimeout(resolve, 100)); } console.log('The sample completed successfully.'); realtimeClient.close(); } function receiveError(err) { if (err instanceof OpenAIRealtimeError) { console.error('Received an error event.'); console.error(`Message: ${err.cause.message}`); console.error(`Stack: ${err.cause.stack}`); } if (throwOnError) { throw err; } } function receiveEvent(event) { console.log(`Received an event: ${event.type}`); switch (event.type) { case 'session.created': console.log(`Session ID: ${event.session.id}`); isCreated = true; break; case 'session.updated': console.log(`Session ID: ${event.session.id}`); isConfigured = true; break; case 'response.output_audio_transcript.delta': console.log(`Transcript delta: ${event.delta}`); break; case 'response.output_audio.delta': let audioBuffer = Buffer.from(event.delta, 'base64'); console.log(`Audio delta length: ${audioBuffer.length} bytes`); break; case 'response.done': console.log(`Response ID: ${event.response.id}`); console.log(`The final response is: ${event.response.output[0].content[0].transcript}`); responseDone = true; break; default: console.warn(`Unhandled event type: ${event.type}`); } } main().catch((err) => { console.error('The sample encountered an error:', err); }); export { main };Sign in to Azure with the following command:
az loginRun the JavaScript file.
node index.js
Wait a few moments to get the response.
Output
The script gets a response from the model and prints the transcript and audio data received.
The output will look similar to the following:
Waiting for events...
Waiting for session.created event...
Received an event: session.created
Session ID: sess_CQx8YO3vKxD9FaPxrbQ9R
Waiting for session.updated event...
Received an event: session.updated
Session ID: sess_CQx8YO3vKxD9FaPxrbQ9R
Waiting for response.done event...
Waiting for response.done event...
Waiting for response.done event...
Received an event: response.output_audio_transcript.delta
Transcript delta: Sure
Received an event: response.output_audio_transcript.delta
Transcript delta: ,
Received an event: response.output_audio_transcript.delta
Transcript delta:  I
Waiting for response.done event...
Waiting for response.done event...
Received an event: response.output_audio.delta
Audio delta length: 4800 bytes
Received an event: response.output_audio.delta
Audio delta length: 7200 bytes
Waiting for response.done event...
Received an event: response.output_audio.delta
Audio delta length: 12000 bytes
Received an event: response.output_audio_transcript.delta
Transcript delta: 'm
Received an event: response.output_audio_transcript.delta
Transcript delta:  here
Received an event: response.output_audio_transcript.delta
Transcript delta:  to
Received an event: response.output_audio_transcript.delta
Transcript delta:  help
Received an event: response.output_audio_transcript.delta
Transcript delta: .
Received an event: response.output_audio.delta
Audio delta length: 12000 bytes
Waiting for response.done event...
Received an event: response.output_audio.delta
Audio delta length: 12000 bytes
Received an event: response.output_audio_transcript.delta
Transcript delta:  What
Received an event: response.output_audio_transcript.delta
Transcript delta:  do
Received an event: response.output_audio_transcript.delta
Transcript delta:  you
Waiting for response.done event...
Received an event: response.output_audio.delta
Audio delta length: 12000 bytes
Received an event: response.output_audio.delta
Audio delta length: 12000 bytes
Received an event: response.output_audio.delta
Audio delta length: 12000 bytes
Received an event: response.output_audio_transcript.delta
Transcript delta:  need
Received an event: response.output_audio_transcript.delta
Transcript delta:  assistance
Received an event: response.output_audio_transcript.delta
Transcript delta:  with
Received an event: response.output_audio_transcript.delta
Transcript delta: ?
Waiting for response.done event...
Received an event: response.output_audio.delta
Audio delta length: 12000 bytes
Received an event: response.output_audio.delta
Audio delta length: 12000 bytes
Waiting for response.done event...
Received an event: response.output_audio.delta
Audio delta length: 12000 bytes
Received an event: response.output_audio.delta
Audio delta length: 12000 bytes
Waiting for response.done event...
Received an event: response.output_audio.delta
Audio delta length: 12000 bytes
Received an event: response.output_audio.delta
Audio delta length: 28800 bytes
Received an event: response.done
Response ID: resp_CQx8YwQCszDqSUXRutxP9
The final response is: Sure, I'm here to help. What do you need assistance with?
The sample completed successfully.
Send audio, receive audio response
The Realtime API's primary use case is "speech in, speech out" voice conversations. This section shows how to send audio input from a file and receive audio output.
To run this sample, you need an audio file in PCM16 format at 24kHz mono. You can convert an existing audio file using FFmpeg:
ffmpeg -i input.wav -ar 24000 -ac 1 -f s16le input.pcm
Create the
audio-in-audio-out.jsfile with the following code:import OpenAI from 'openai'; import { OpenAIRealtimeWS } from 'openai/realtime/ws'; import { DefaultAzureCredential, getBearerTokenProvider } from '@azure/identity'; import fs from 'fs'; async function main() { const endpoint = process.env.AZURE_OPENAI_ENDPOINT || 'AZURE_OPENAI_ENDPOINT'; const baseUrl = endpoint.replace(/\/$/, "") + '/openai/v1'; const deploymentName = process.env.AZURE_OPENAI_DEPLOYMENT_NAME || 'gpt-realtime'; // Keyless authentication const credential = new DefaultAzureCredential(); const scope = 'https://ai.azure.com/.default'; const azureADTokenProvider = getBearerTokenProvider(credential, scope); const token = await azureADTokenProvider(); const openAIClient = new OpenAI({ baseURL: baseUrl, apiKey: token, }); const inputAudioFile = 'input.pcm'; const outputAudioFile = 'output.pcm'; let outputAudio = Buffer.alloc(0); let isConfigured = false; let responseDone = false; const realtimeClient = await OpenAIRealtimeWS.create(openAIClient, { model: deploymentName }); realtimeClient.on('session.updated', () => { console.log('Session configured for audio input/output.'); isConfigured = true; }); realtimeClient.on('response.audio.delta', (event) => { const audioChunk = Buffer.from(event.delta, 'base64'); outputAudio = Buffer.concat([outputAudio, audioChunk]); }); realtimeClient.on('response.audio_transcript.delta', (event) => { process.stdout.write(event.delta); }); realtimeClient.on('conversation.item.input_audio_transcription.completed', (event) => { console.log(`\n[User said]: ${event.transcript}`); }); realtimeClient.on('response.done', () => { responseDone = true; }); realtimeClient.on('error', (err) => { console.error('Error:', err); }); // Wait for session to be created await new Promise(resolve => setTimeout(resolve, 500)); // Configure session for audio realtimeClient.send({ type: 'session.update', session: { instructions: 'You are a helpful assistant. Respond conversationally.', input_audio_format: 'pcm16', output_audio_format: 'pcm16', input_audio_transcription: { model: 'whisper-1' }, turn_detection: { type: 'server_vad', threshold: 0.5, prefix_padding_ms: 300, silence_duration_ms: 500, create_response: true, }, voice: 'alloy', } }); while (!isConfigured) { await new Promise(resolve => setTimeout(resolve, 100)); } // Read and send audio file in chunks console.log(`Reading audio from ${inputAudioFile}...`); const audioData = fs.readFileSync(inputAudioFile); const chunkSize = 4800; // 100ms of audio at 24kHz, 16-bit for (let i = 0; i < audioData.length; i += chunkSize) { const chunk = audioData.slice(i, i + chunkSize); realtimeClient.send({ type: 'input_audio_buffer.append', audio: chunk.toString('base64') }); await new Promise(resolve => setTimeout(resolve, 50)); } console.log('Audio sent. Waiting for response...'); // Commit the audio buffer realtimeClient.send({ type: 'input_audio_buffer.commit' }); // Wait for response to complete while (!responseDone) { await new Promise(resolve => setTimeout(resolve, 100)); } // Save output audio if (outputAudio.length > 0) { fs.writeFileSync(outputAudioFile, outputAudio); console.log(`\n\nSaved ${outputAudio.length} bytes of audio to ${outputAudioFile}`); console.log('Play with: ffplay -f s16le -ar 24000 -ac 1 output.pcm'); } realtimeClient.close(); } main().catch(console.error);Sign in to Azure:
az loginRun the JavaScript file:
node audio-in-audio-out.js
The script transcribes your audio input, generates a response, and saves the audio output to output.pcm. You can play the output audio with FFplay or convert it to another format with FFmpeg.
Language-specific prerequisites
- Python 3.8 or later version. We recommend using Python 3.10 or later, but having at least Python 3.8 is required. If you don't have a suitable version of Python installed, you can follow the instructions in the VS Code Python Tutorial for the easiest way of installing Python on your operating system.
Microsoft Entra ID prerequisites
For the recommended keyless authentication with Microsoft Entra ID, you need to:
- Install the Azure CLI used for keyless authentication with Microsoft Entra ID.
- Assign the
Cognitive Services OpenAI Userrole to your user account. You can assign roles in the Azure portal under Access control (IAM) > Add role assignment.
Deploy a model for real-time audio
To deploy the gpt-realtime model in the Microsoft Foundry portal:
- Go to the Foundry portal and create or select your project.
- Select your model deployments:
- For Azure OpenAI resource, select Deployments from Shared resources section in the left pane.
- For Foundry resource, select Models + endpoints from under My assets in the left pane.
- Select + Deploy model > Deploy base model to open the deployment window.
- Search for and select the
gpt-realtimemodel and then select Confirm. - Review the deployment details and select Deploy.
- Follow the wizard to finish deploying the model.
Now that you have a deployment of the gpt-realtime model, you can interact with it in the Foundry portal Audio playground or Realtime API.
Set up
Create a new folder
realtime-audio-quickstart-pyand go to the quickstart folder with the following command:mkdir realtime-audio-quickstart-py && cd realtime-audio-quickstart-pyCreate a virtual environment. If you already have Python 3.10 or higher installed, you can create a virtual environment using the following commands:
Activating the Python environment means that when you run
pythonorpipfrom the command line, you then use the Python interpreter contained in the.venvfolder of your application. You can use thedeactivatecommand to exit the python virtual environment, and can later reactivate it when needed.Tip
We recommend that you create and activate a new Python environment to use to install the packages you need for this tutorial. Don't install packages into your global python installation. You should always use a virtual or conda environment when installing python packages, otherwise you can break your global installation of Python.
Install the OpenAI Python client library with:
pip install openai[realtime]Note
This library is maintained by OpenAI. Refer to the release history to track the latest updates to the library.
For the recommended keyless authentication with Microsoft Entra ID, install the
azure-identitypackage with:pip install azure-identity
Retrieve resource information
You need to retrieve the following information to authenticate your application with your Azure OpenAI resource:
| Variable name | Value |
|---|---|
AZURE_OPENAI_ENDPOINT |
This value can be found in the Keys and Endpoint section when examining your resource from the Azure portal. |
AZURE_OPENAI_DEPLOYMENT_NAME |
This value will correspond to the custom name you chose for your deployment when you deployed a model. This value can be found under Resource Management > Model Deployments in the Azure portal. |
Learn more about keyless authentication and setting environment variables.
Caution
To use the recommended keyless authentication with the SDK, make sure that the AZURE_OPENAI_API_KEY environment variable isn't set.
Send text, receive audio response
Create the
text-in-audio-out.pyfile with the following code:import os import base64 import asyncio from openai import AsyncOpenAI from azure.identity import DefaultAzureCredential, get_bearer_token_provider async def main() -> None: """ When prompted for user input, type a message and hit enter to send it to the model. Enter "q" to quit the conversation. """ credential = DefaultAzureCredential() token_provider = get_bearer_token_provider(credential, "https://ai.azure.com/.default") token = token_provider() # The endpoint of your Azure OpenAI resource is required. You can set it in the AZURE_OPENAI_ENDPOINT # environment variable. # You can find it in the Microsoft Foundry portal in the Overview page of your Azure OpenAI resource. # Example: https://{your-resource}.openai.azure.com endpoint = os.environ["AZURE_OPENAI_ENDPOINT"] # The deployment name of the model you want to use is required. You can set it in the AZURE_OPENAI_DEPLOYMENT_NAME # environment variable. # You can find it in the Foundry portal in the "Models + endpoints" page of your Azure OpenAI resource. # Example: gpt-realtime deployment_name = os.environ["AZURE_OPENAI_DEPLOYMENT_NAME"] base_url = endpoint.replace("https://", "wss://").rstrip("/") + "/openai/v1" # The APIs are compatible with the OpenAI client library. # You can use the OpenAI client library to access the Azure OpenAI APIs. # Make sure to set the baseURL and apiKey to use the Azure OpenAI endpoint and token. client = AsyncOpenAI( websocket_base_url=base_url, api_key=token ) async with client.realtime.connect( model=deployment_name, ) as connection: # after the connection is created, configure the session. await connection.session.update(session={ "type": "realtime", "instructions": "You are a helpful assistant. You respond by voice and text.", "output_modalities": ["audio"], "audio": { "input": { "transcription": { "model": "whisper-1", }, "format": { "type": "audio/pcm", "rate": 24000, }, "turn_detection": { "type": "server_vad", "threshold": 0.5, "prefix_padding_ms": 300, "silence_duration_ms": 200, "create_response": True, } }, "output": { "voice": "alloy", "format": { "type": "audio/pcm", "rate": 24000, } } } }) # After the session is configured, data can be sent to the session. while True: user_input = input("Enter a message: ") if user_input == "q": print("Stopping the conversation.") break await connection.conversation.item.create( item={ "type": "message", "role": "user", "content": [{"type": "input_text", "text": user_input}], } ) await connection.response.create() async for event in connection: if event.type == "response.output_text.delta": print(event.delta, flush=True, end="") elif event.type == "session.created": print(f"Session ID: {event.session.id}") elif event.type == "response.output_audio.delta": audio_data = base64.b64decode(event.delta) print(f"Received {len(audio_data)} bytes of audio data.") elif event.type == "response.output_audio_transcript.delta": print(f"Received text delta: {event.delta}") elif event.type == "response.output_text.done": print() elif event.type == "error": print("Received an error event.") print(f"Error code: {event.error.code}") print(f"Error Event ID: {event.error.event_id}") print(f"Error message: {event.error.message}") elif event.type == "response.done": break print("Conversation ended.") credential.close() asyncio.run(main())Sign in to Azure with the following command:
az loginRun the Python file.
python text-in-audio-out.pyWhen prompted for user input, type a message and hit enter to send it to the model. Enter "q" to quit the conversation.
Wait a few moments to get the response.
Output
The script gets a response from the model and prints the transcript and audio data received.
The output looks similar to the following:
Enter a message: How are you today?
Session ID: sess_CgAuonaqdlSNNDTdqBagI
Received text delta: I'm
Received text delta:  doing
Received text delta:  well
Received text delta: ,
Received 4800 bytes of audio data.
Received 7200 bytes of audio data.
Received 12000 bytes of audio data.
Received text delta:  thank
Received text delta:  you
Received text delta:  for
Received text delta:  asking
Received text delta: !
Received 12000 bytes of audio data.
Received 12000 bytes of audio data.
Received text delta:  How
Received 12000 bytes of audio data.
Received 12000 bytes of audio data.
Received 12000 bytes of audio data.
Received text delta:  about
Received text delta:  you
Received text delta: —
Received text delta: how
Received text delta:  are
Received text delta:  you
Received text delta:  feeling
Received text delta:  today
Received text delta: ?
Received 12000 bytes of audio data.
Received 12000 bytes of audio data.
Received 12000 bytes of audio data.
Received 12000 bytes of audio data.
Received 12000 bytes of audio data.
Received 12000 bytes of audio data.
Received 12000 bytes of audio data.
Received 12000 bytes of audio data.
Received 12000 bytes of audio data.
Received 12000 bytes of audio data.
Received 12000 bytes of audio data.
Received 24000 bytes of audio data.
Enter a message: q
Stopping the conversation.
Conversation ended.
Send audio, receive audio response
The Realtime API's primary use case is "speech in, speech out" voice conversations. This section shows how to send audio input from a file and receive audio output.
To run this sample, you need an audio file in PCM16 format at 24kHz mono. You can convert an existing audio file using FFmpeg:
ffmpeg -i input.wav -ar 24000 -ac 1 -f s16le input.pcm
Create the
audio-in-audio-out.pyfile with the following code:import os import base64 import asyncio from openai import AsyncOpenAI from azure.identity import DefaultAzureCredential, get_bearer_token_provider async def main() -> None: """ Send audio from a file to the Realtime API and receive an audio response. The input file should be in PCM16 format at 24kHz mono. """ credential = DefaultAzureCredential() token_provider = get_bearer_token_provider( credential, "https://ai.azure.com/.default" ) token = token_provider() endpoint = os.environ["AZURE_OPENAI_ENDPOINT"] deployment_name = os.environ["AZURE_OPENAI_DEPLOYMENT_NAME"] base_url = endpoint.replace("https://", "wss://").rstrip("/") + "/openai/v1" # Path to your input audio file (PCM16, 24kHz, mono) input_audio_file = "input.pcm" output_audio_file = "output.pcm" client = AsyncOpenAI(websocket_base_url=base_url, api_key=token) async with client.realtime.connect(model=deployment_name) as connection: # Configure the session for audio input and output await connection.session.update( session={ "type": "realtime", "instructions": "You are a helpful assistant. Respond conversationally.", "output_modalities": ["audio"], "audio": { "input": { "transcription": {"model": "whisper-1"}, "format": { "type": "audio/pcm", "rate": 24000, }, "turn_detection": { "type": "server_vad", "threshold": 0.5, "prefix_padding_ms": 300, "silence_duration_ms": 500, "create_response": True, "interrupt_response": False, }, }, "output": { "voice": "alloy", "format": { "type": "audio/pcm", "rate": 24000, }, }, }, } ) # Read and send audio file in chunks print(f"Reading audio from {input_audio_file}...") with open(input_audio_file, "rb") as f: audio_data = f.read() # Send audio in chunks (the Realtime API expects base64-encoded audio) chunk_size = 4800 # 100ms of audio at 24kHz, 16-bit audio_data += b"\x00" * chunk_size * 10 # 1 second of silence for i in range(0, len(audio_data), chunk_size): chunk = audio_data[i : i + chunk_size] await connection.input_audio_buffer.append(audio=base64.b64encode(chunk).decode()) # Small delay to simulate real-time streaming await asyncio.sleep(0.1) print("Audio sent. Waiting for response...") # Collect audio response output_audio = bytearray() transcript = "" async for event in connection: if event.type == "response.output_audio.delta": audio_chunk = base64.b64decode(event.delta) output_audio.extend(audio_chunk) elif event.type == "response.output_audio_transcript.delta": transcript += event.delta print(event.delta, end="", flush=True) elif event.type == "conversation.item.input_audio_transcription.completed": print(f"\n[User said]: {event.transcript}") elif event.type == "error": raise RuntimeError(f"Realtime API error: {event.error.message}") elif event.type == "response.done": break # Save output audio if output_audio: with open(output_audio_file, "wb") as f: f.write(output_audio) print(f"\n\nSaved {len(output_audio)} bytes of audio to {output_audio_file}") print("Play with: ffplay -nodisp -autoexit -hide_banner -f s16le -sample_rate 24000 -ch_layout mono output.pcm") credential.close() asyncio.run(main())Sign in to Azure:
az loginRun the Python file:
python audio-in-audio-out.py
The script transcribes your audio input, generates a response, and saves the audio output to output.pcm. You can play the output audio with FFplay or convert it to another format with FFmpeg.
Language-specific prerequisites
- Node.js LTS or ESM support.
- TypeScript installed globally.
Microsoft Entra ID prerequisites
For the recommended keyless authentication with Microsoft Entra ID, you need to:
- Install the Azure CLI used for keyless authentication with Microsoft Entra ID.
- Assign the
Cognitive Services OpenAI Userrole to your user account. You can assign roles in the Azure portal under Access control (IAM) > Add role assignment.
Deploy a model for real-time audio
To deploy the gpt-realtime model in the Microsoft Foundry portal:
- Go to the Foundry portal and create or select your project.
- Select your model deployments:
- For Azure OpenAI resource, select Deployments from Shared resources section in the left pane.
- For Foundry resource, select Models + endpoints from under My assets in the left pane.
- Select + Deploy model > Deploy base model to open the deployment window.
- Search for and select the
gpt-realtimemodel and then select Confirm. - Review the deployment details and select Deploy.
- Follow the wizard to finish deploying the model.
Now that you have a deployment of the gpt-realtime model, you can interact with it in the Foundry portal Audio playground or Realtime API.
Set up
Create a new folder
realtime-audio-quickstart-tsand go to the quickstart folder with the following command:mkdir realtime-audio-quickstart-ts && cd realtime-audio-quickstart-tsCreate the
package.jsonwith the following command:npm init -yUpdate the
package.jsonto ECMAScript with the following command:npm pkg set type=moduleInstall the OpenAI client library for JavaScript with:
npm install openaiInstall the dependent packages used by the OpenAI client library for JavaScript with:
npm install wsFor the recommended keyless authentication with Microsoft Entra ID, install the
@azure/identitypackage with:npm install @azure/identity
Retrieve resource information
You need to retrieve the following information to authenticate your application with your Azure OpenAI resource:
| Variable name | Value |
|---|---|
AZURE_OPENAI_ENDPOINT |
This value can be found in the Keys and Endpoint section when examining your resource from the Azure portal. |
AZURE_OPENAI_DEPLOYMENT_NAME |
This value will correspond to the custom name you chose for your deployment when you deployed a model. This value can be found under Resource Management > Model Deployments in the Azure portal. |
Learn more about keyless authentication and setting environment variables.
Caution
To use the recommended keyless authentication with the SDK, make sure that the AZURE_OPENAI_API_KEY environment variable isn't set.
Send text, receive audio response
Create the
index.tsfile with the following code:import OpenAI from 'openai'; import { OpenAIRealtimeWS } from 'openai/realtime/ws'; import { OpenAIRealtimeError } from 'openai/realtime/internal-base'; import { DefaultAzureCredential, getBearerTokenProvider } from "@azure/identity"; import { RealtimeSessionCreateRequest } from 'openai/resources/realtime/realtime'; let isCreated = false; let isConfigured = false; let responseDone = false; // Set this to false, if you want to continue receiving events after an error is received. const throwOnError = true; async function main(): Promise<void> { // The endpoint of your Azure OpenAI resource is required. You can set it in the AZURE_OPENAI_ENDPOINT // environment variable or replace the default value below. // You can find it in the Microsoft Foundry portal in the Overview page of your Azure OpenAI resource. // Example: https://{your-resource}.openai.azure.com const endpoint = process.env.AZURE_OPENAI_ENDPOINT || 'AZURE_OPENAI_ENDPOINT'; const baseUrl = endpoint.replace(/\/$/, "") + '/openai/v1'; // The deployment name of your Azure OpenAI model is required. You can set it in the AZURE_OPENAI_DEPLOYMENT_NAME // environment variable or replace the default value below. // You can find it in the Foundry portal in the "Models + endpoints" page of your Azure OpenAI resource. // Example: gpt-realtime const deploymentName = process.env.AZURE_OPENAI_DEPLOYMENT_NAME || 'gpt-realtime'; // Keyless authentication const credential = new DefaultAzureCredential(); const scope = "https://ai.azure.com/.default"; const azureADTokenProvider = getBearerTokenProvider(credential, scope); const token = await azureADTokenProvider(); // The APIs are compatible with the OpenAI client library. // You can use the OpenAI client library to access the Azure OpenAI APIs. // Make sure to set the baseURL and apiKey to use the Azure OpenAI endpoint and token. const openAIClient = new OpenAI({ baseURL: baseUrl, apiKey: token, }); const realtimeClient = await OpenAIRealtimeWS.create(openAIClient, { model: deploymentName }); realtimeClient.on('error', (receivedError) => receiveError(receivedError)); realtimeClient.on('session.created', (receivedEvent) => receiveEvent(receivedEvent)); realtimeClient.on('session.updated', (receivedEvent) => receiveEvent(receivedEvent)); realtimeClient.on('response.output_audio.delta', (receivedEvent) => receiveEvent(receivedEvent)); realtimeClient.on('response.output_audio_transcript.delta', (receivedEvent) => receiveEvent(receivedEvent)); realtimeClient.on('response.done', (receivedEvent) => receiveEvent(receivedEvent)); console.log('Waiting for events...'); while (!isCreated) { console.log('Waiting for session.created event...'); await new Promise((resolve) => setTimeout(resolve, 100)); } // After the session is created, configure it to enable audio input and output. const sessionConfig: RealtimeSessionCreateRequest = { 'type': 'realtime', 'instructions': 'You are a helpful assistant. You respond by voice and text.', 'output_modalities': ['audio'], 'audio': { 'input': { 'transcription': { 'model': 'whisper-1' }, 'format': { 'type': 'audio/pcm', 'rate': 24000, }, 'turn_detection': { 'type': 'server_vad', 'threshold': 0.5, 'prefix_padding_ms': 300, 'silence_duration_ms': 200, 'create_response': true } }, 'output': { 'voice': 'alloy', 'format': { 'type': 'audio/pcm', 'rate': 24000, } } } }; realtimeClient.send({ 'type': 'session.update', 'session': sessionConfig }); while (!isConfigured) { console.log('Waiting for session.updated event...'); await new Promise((resolve) => setTimeout(resolve, 100)); } // After the session is configured, data can be sent to the session. realtimeClient.send({ 'type': 'conversation.item.create', 'item': { 'type': 'message', 'role': 'user', 'content': [{ type: 'input_text', text: 'Please assist the user.' }] } }); realtimeClient.send({ type: 'response.create' }); // While waiting for the session to finish, the events can be handled in the event handlers. // In this example, we just wait for the first response.done event. while (!responseDone) { console.log('Waiting for response.done event...'); await new Promise((resolve) => setTimeout(resolve, 100)); } console.log('The sample completed successfully.'); realtimeClient.close(); } function receiveError(errorEvent: OpenAIRealtimeError): void { if (errorEvent instanceof OpenAIRealtimeError) { console.error('Received an error event.'); console.error(`Message: ${errorEvent.message}`); console.error(`Stack: ${errorEvent.stack}`); errorEvent } if (throwOnError) { throw errorEvent; } } function receiveEvent(event: any): void { console.log(`Received an event: ${event.type}`); switch (event.type) { case 'session.created': console.log(`Session ID: ${event.session.id}`); isCreated = true; break; case 'session.updated': console.log(`Session ID: ${event.session.id}`); isConfigured = true; break; case 'response.output_audio_transcript.delta': console.log(`Transcript delta: ${event.delta}`); break; case 'response.output_audio.delta': let audioBuffer = Buffer.from(event.delta, 'base64'); console.log(`Audio delta length: ${audioBuffer.length} bytes`); break; case 'response.done': console.log(`Response ID: ${event.response.id}`); console.log(`The final response is: ${event.response.output[0].content[0].transcript}`); responseDone = true; break; default: console.warn(`Unhandled event type: ${event.type}`); } } main().catch((err) => { console.error("The sample encountered an error:", err); }); export { main };Create the
tsconfig.jsonfile to transpile the TypeScript code and copy the following code for ECMAScript.{ "compilerOptions": { "module": "NodeNext", "target": "ES2022", // Supports top-level await "moduleResolution": "NodeNext", "skipLibCheck": true, // Avoid type errors from node_modules "strict": true // Enable strict type-checking options }, "include": ["*.ts"] }Install type definitions for Node
npm i --save-dev @types/nodeTranspile from TypeScript to JavaScript.
tscSign in to Azure with the following command:
az loginRun the code with the following command:
node index.js
Wait a few moments to get the response.
Output
The script gets a response from the model and prints the transcript and audio data received.
The output will look similar to the following:
Waiting for events...
Waiting for session.created event...
Waiting for session.created event...
Waiting for session.created event...
Waiting for session.created event...
Waiting for session.created event...
Waiting for session.created event...
Waiting for session.created event...
Waiting for session.created event...
Waiting for session.created event...
Waiting for session.created event...
Received an event: session.created
Session ID: sess_CWQkREiv3jlU3gk48bm0a
Waiting for session.updated event...
Waiting for session.updated event...
Received an event: session.updated
Session ID: sess_CWQkREiv3jlU3gk48bm0a
Waiting for response.done event...
Waiting for response.done event...
Waiting for response.done event...
Waiting for response.done event...
Waiting for response.done event...
Received an event: response.output_audio_transcript.delta
Transcript delta: Sure
Received an event: response.output_audio_transcript.delta
Transcript delta: ,
Received an event: response.output_audio_transcript.delta
Transcript delta:  I'm
Received an event: response.output_audio_transcript.delta
Transcript delta:  here
Waiting for response.done event...
Received an event: response.output_audio.delta
Audio delta length: 4800 bytes
Waiting for response.done event...
Received an event: response.output_audio.delta
Audio delta length: 7200 bytes
Waiting for response.done event...
Received an event: response.output_audio.delta
Audio delta length: 12000 bytes
Received an event: response.output_audio_transcript.delta
Transcript delta:  to
Received an event: response.output_audio_transcript.delta
Transcript delta:  help
Received an event: response.output_audio_transcript.delta
Transcript delta: .
Waiting for response.done event...
Received an event: response.output_audio.delta
Audio delta length: 12000 bytes
Received an event: response.output_audio.delta
Audio delta length: 12000 bytes
Received an event: response.output_audio_transcript.delta
Transcript delta:  What
Received an event: response.output_audio_transcript.delta
Transcript delta:  would
Received an event: response.output_audio_transcript.delta
Transcript delta:  you
Received an event: response.output_audio_transcript.delta
Transcript delta:  like
Waiting for response.done event...
Received an event: response.output_audio.delta
Audio delta length: 12000 bytes
Received an event: response.output_audio.delta
Audio delta length: 12000 bytes
Received an event: response.output_audio.delta
Audio delta length: 12000 bytes
Received an event: response.output_audio_transcript.delta
Transcript delta:  to
Received an event: response.output_audio_transcript.delta
Transcript delta:  do
Received an event: response.output_audio_transcript.delta
Transcript delta:  or
Received an event: response.output_audio_transcript.delta
Transcript delta:  know
Received an event: response.output_audio_transcript.delta
Transcript delta:  about
Received an event: response.output_audio_transcript.delta
Transcript delta: ?
Waiting for response.done event...
Received an event: response.output_audio.delta
Audio delta length: 12000 bytes
Received an event: response.output_audio.delta
Audio delta length: 12000 bytes
Received an event: response.output_audio.delta
Audio delta length: 12000 bytes
Waiting for response.done event...
Received an event: response.output_audio.delta
Audio delta length: 12000 bytes
Received an event: response.output_audio.delta
Audio delta length: 12000 bytes
Waiting for response.done event...
Received an event: response.output_audio.delta
Audio delta length: 12000 bytes
Received an event: response.output_audio.delta
Audio delta length: 12000 bytes
Received an event: response.output_audio.delta
Audio delta length: 24000 bytes
Received an event: response.done
Response ID: resp_CWQkRBrCcCjtHgIEapA92
The final response is: Sure, I'm here to help. What would you like to do or know about?
The sample completed successfully.
Deploy a model for real-time audio
To deploy the gpt-realtime model in the Microsoft Foundry portal:
- Go to the Foundry portal and create or select your project.
- Select your model deployments:
- For Azure OpenAI resource, select Deployments from Shared resources section in the left pane.
- For Foundry resource, select Models + endpoints from under My assets in the left pane.
- Select + Deploy model > Deploy base model to open the deployment window.
- Search for and select the
gpt-realtimemodel and then select Confirm. - Review the deployment details and select Deploy.
- Follow the wizard to finish deploying the model.
Now that you have a deployment of the gpt-realtime model, you can interact with it in the Foundry portal Audio playground or Realtime API.
Use the GPT real-time audio
To chat with your deployed gpt-realtime model in the Microsoft Foundry Real-time audio playground, follow these steps:
Go to the Foundry portal and select your project that has your deployed
gpt-realtimemodel.Select Playgrounds from the left pane.
Select Audio playground > Try the Audio playground.
Note
The Chat playground doesn't support the
gpt-realtimemodel. Use the Audio playground as described in this section.Select your deployed
gpt-realtimemodel from the Deployment dropdown.Optionally, you can edit contents in the Give the model instructions and context text box. Give the model instructions about how it should behave and any context it should reference when generating a response. You can describe the assistant's personality, tell it what it should and shouldn't answer, and tell it how to format responses.
Optionally, change settings such as threshold, prefix padding, and silence duration.
Select Start listening to start the session. You can speak into the microphone to start a chat.
You can interrupt the chat at any time by speaking. You can end the chat by selecting the Stop listening button.
Deploy a model for real-time audio
To deploy the gpt-realtime model in the Microsoft Foundry portal:
- Go to the Foundry portal and create or select your project.
- Select your model deployments:
- For Azure OpenAI resource, select Deployments from Shared resources section in the left pane.
- For Foundry resource, select Models + endpoints from under My assets in the left pane.
- Select + Deploy model > Deploy base model to open the deployment window.
- Search for and select the
gpt-realtimemodel and then select Confirm. - Review the deployment details and select Deploy.
- Follow the wizard to finish deploying the model.
Now that you have a deployment of the gpt-realtime model, you can interact with it in the Foundry portal Audio playground or Realtime API.
Microsoft Entra ID
Currently Microsoft Entra ID authentication isn't supported for .NET scenario. You need to use API Key authentication.
Retrieve resource information
You need to retrieve the following information to authenticate your application with your Azure OpenAI resource:
| Variable name | Value |
|---|---|
AZURE_OPENAI_ENDPOINT |
This value can be found in the Keys and Endpoint section when examining your resource from the Azure portal. |
AZURE_OPENAI_API_KEY |
This value can be found in the Keys and Endpoint section when examining your resource from the Azure portal. You can use either KEY1 or KEY2. |
AZURE_OPENAI_DEPLOYMENT_NAME |
This value corresponds to the custom name you chose for your deployment when you deployed a model. This value can be found under Resource Management > Model Deployments in the Azure portal. |
Learn more about finding API keys and setting environment variables.
Important
Use API keys with caution. Don't include the API key directly in your code, and never post it publicly. If you use an API key, store it securely in Azure Key Vault. For more information about using API keys securely in your apps, see API keys with Azure Key Vault.
For more information about AI services security, see Authenticate requests to Azure AI services.
Set up Visual Studio project
Create new Visual Studio project. In Visual Studio interface select File -> New -> Project...
Select Console App C# project type.
Use
RealtimeAudioQuickstartCSharpas Project name.Select .NET Framework to use and finish creating the project.
In Solution Explorer window right-click project name (
RealtimeAudioQuickstartCSharp) and select Add -> New Folder.Rename the created folder to
Properties.Right-click
Propertiesand select Add -> New Item...Use
launchSettings.jsonas new item file name.Replace the contents of
launchSettings.jsonfile with the following code. Use actual parameters of your resource for environment variable values:{ "profiles": { "RealtimeAudioQuickstartCSharp": { "commandName": "Project", "environmentVariables": { "AZURE_OPENAI_ENDPOINT": "https://<your-endpoint-name>.openai.azure.com/", "AZURE_OPENAI_DEPLOYMENT_NAME": "gpt-realtime", "AZURE_OPENAI_API_KEY": "<your-resource-api-key>" } } } }Right-click Dependencies and select Manage NuGet Packages...
Select Browse tab and search for
openai.Download OpenAI NuGet Package and add it to your solution. Make sure, that OpenAI library version is 2.9.1 or later.
Send text, receive audio response
Replace the contents of
Program.cswith this code:#pragma warning disable OPENAI002 #pragma warning disable SCME0001 using System.ClientModel; using OpenAI.Realtime; static string GetRequiredEnvironmentVariable(string name) { string? value = Environment.GetEnvironmentVariable(name); return !string.IsNullOrWhiteSpace(value) ? value : throw new InvalidOperationException($"Environment variable '{name}' is required."); } static Uri BuildRealtimeEndpointUri(string endpoint) { string normalized = endpoint.TrimEnd('/'); if (!normalized.EndsWith("/openai/v1", StringComparison.OrdinalIgnoreCase)) { normalized = $"{normalized}/openai/v1"; } return new Uri(normalized, UriKind.Absolute); } string endpoint = GetRequiredEnvironmentVariable("AZURE_OPENAI_ENDPOINT"); string deploymentName = GetRequiredEnvironmentVariable("AZURE_OPENAI_DEPLOYMENT_NAME"); string apiKey = GetRequiredEnvironmentVariable("AZURE_OPENAI_API_KEY"); RealtimeClient client = new(new ApiKeyCredential(apiKey), new RealtimeClientOptions { Endpoint = BuildRealtimeEndpointUri(endpoint), }); using RealtimeSessionClient sessionClient = await client.StartConversationSessionAsync(model: deploymentName); RealtimeConversationSessionOptions sessionOptions = new() { Instructions = "You are a helpful assistant. You respond by voice and text.", AudioOptions = new() { InputAudioOptions = new() { AudioTranscriptionOptions = new() { Model = "whisper-1", }, TurnDetection = new RealtimeServerVadTurnDetection(), }, OutputAudioOptions = new() { Voice = RealtimeVoice.Alloy, }, }, }; await sessionClient.ConfigureConversationSessionAsync(sessionOptions); while (true) { Console.Write("Enter a message: "); string? userInput = Console.ReadLine(); if (string.Equals(userInput, "q", StringComparison.OrdinalIgnoreCase)) { Console.WriteLine("Stopping the conversation."); break; } if (string.IsNullOrWhiteSpace(userInput)) { continue; } await sessionClient.AddItemAsync(RealtimeItem.CreateUserMessageItem(userInput)); await sessionClient.StartResponseAsync(); bool responseDone = false; await foreach (RealtimeServerUpdate update in sessionClient.ReceiveUpdatesAsync()) { switch (update) { case RealtimeServerUpdateSessionCreated sessionCreatedUpdate: Console.WriteLine($"Session ID: {sessionCreatedUpdate.Session.Patch.GetString("$.id"u8)}"); break; case RealtimeServerUpdateResponseOutputTextDelta textDeltaUpdate: Console.Write(textDeltaUpdate.Delta); break; case RealtimeServerUpdateResponseOutputAudioDelta audioDeltaUpdate: Console.WriteLine($"Received {audioDeltaUpdate.Delta.Length} bytes of audio data."); break; case RealtimeServerUpdateResponseOutputAudioTranscriptDelta transcriptDeltaUpdate: Console.WriteLine($"Received text delta: {transcriptDeltaUpdate.Delta}"); break; case RealtimeServerUpdateResponseOutputTextDone: Console.WriteLine(); break; case RealtimeServerUpdateError errorUpdate: Console.WriteLine("Received an error event."); Console.WriteLine($"Error code: {errorUpdate.Error.Code}"); Console.WriteLine($"Error Event ID: {errorUpdate.Error.EventId}"); Console.WriteLine($"Error message: {errorUpdate.Error.Message}"); responseDone = true; break; case RealtimeServerUpdateResponseDone: responseDone = true; break; } if (responseDone) { break; } } } Console.WriteLine("Conversation ended."); #pragma warning restore OPENAI002 #pragma warning restore SCME0001Build the solution.
To run the built
RealtimeAudioQuickstartCSharp.exeyou need to create the following environment variables with the values, corresponding to your resource:AZURE_OPENAI_ENDPOINTAZURE_OPENAI_DEPLOYMENT_NAMEAZURE_OPENAI_API_KEY
Alternatively if you built your solution in Debug configuration you might either use Start Debugging command in Visual Studio user interface (F5 key) or
dotnet runcommand. In both cases the system uses configuration parameters defined inlaunchSettings.jsonfile. To usedotnet runcommand:- Open Windows command prompt, go the folder containing
RealtimeAudioQuickstartCSharp.csprojfile and executedotnet runcommand.
- Open Windows command prompt, go the folder containing
When prompted for user input, type a message and hit enter to send it to the model. Enter "q" to quit the conversation. Wait a few moments to get the response.
Output
The client program gets a response from the model and prints the transcript and audio data received.
The output looks similar to the following:
Enter a message: How are you?
Session ID: sess_DKexmpK2z10zLGGEC2eGV
Received text delta: I'm
Received text delta:  doing
Received text delta:  well
Received text delta: ,
Received 4800 bytes of audio data.
Received 7200 bytes of audio data.
Received 12000 bytes of audio data.
Received text delta:  thank
Received text delta:  you
Received text delta:  for
Received text delta:  asking
Received text delta: !
Received 12000 bytes of audio data.
Received 12000 bytes of audio data.
Received text delta:  How
Received text delta:  about
Received 12000 bytes of audio data.
Received 12000 bytes of audio data.
Received 12000 bytes of audio data.
Received text delta:  you
Received text delta: ?
Received text delta:  How
Received text delta: 's
Received text delta:  your
Received text delta:  day
Received text delta:  going
Received text delta: ?
Received 12000 bytes of audio data.
Received 12000 bytes of audio data.
Received 12000 bytes of audio data.
Received 12000 bytes of audio data.
Received 12000 bytes of audio data.
Received 12000 bytes of audio data.
Received 12000 bytes of audio data.
Received 12000 bytes of audio data.
Received 28800 bytes of audio data.
Enter a message: q
Stopping the conversation.
Conversation ended.
Supported models
The GPT real-time models are available for global deployments in the East US 2 and Sweden Central regions.
gpt-4o-mini-realtime-preview(2024-12-17)gpt-4o-realtime-preview(2024-12-17)gpt-realtime(2025-08-28)gpt-realtime-mini(2025-10-06)gpt-realtime-mini(2025-12-15)gpt-realtime-1.5(2026-02-23)gpt-realtime-2(2026-05-07)gpt-realtime-translate(2026-05-06)gpt-realtime-whisper(2026-05-06)
For more information about supported models, see the models and versions documentation.
Connection and authentication
The Realtime API (via /realtime) is built on the WebSockets API to facilitate fully asynchronous streaming communication between the end user and model.
The Realtime API is accessed via a secure WebSocket connection to the /realtime endpoint of your Azure OpenAI resource.
You can construct a full request URI by concatenating:
- The secure WebSocket (
wss://) protocol. - Your Azure OpenAI resource endpoint hostname, for example,
my-aoai-resource.openai.azure.com - The API path:
openai/v1/realtimefor GA, oropenai/realtimefor preview. - A
modelquery string parameter with the name of yourgpt-realtime,gpt-realtime-1.5, orgpt-realtime-minimodel deployment. - (Preview version only) An
api-versionquery string parameter for a supported API version such as2025-04-01-previewand adeploymentquery parameter instead ofmodel.
The following example is a well-constructed /realtime request URI:
wss://my-eastus2-openai-resource.openai.azure.com/openai/v1/realtime?model=gpt-realtime-deployment-name
Note
The GA API uses the /openai/v1/realtime path with model= as the query parameter. The preview API uses /openai/realtime with api-version= and deployment= parameters. Using the wrong path or mixing GA/preview formats results in a 404 error.
To authenticate:
- Microsoft Entra (recommended): Use token-based authentication with the
/realtimeAPI for an Azure OpenAI resource with managed identity enabled. Apply a retrieved authentication token using aBearertoken with theAuthorizationheader. - API key: An
api-keycan be provided in one of two ways:- Using an
api-keyconnection header on the pre-handshake connection. This option isn't available in a browser environment. - Using an
api-keyquery string parameter on the request URI. Query string parameters are encrypted when using HTTPS/WSS.
- Using an
Transcribe audio in real-time
The following examples show how to stream microphone audio to the gpt-realtime-whisper model for real-time transcription.
Prerequisites for Python
Install required packages:
pip install websockets sounddevice azure-identity
Set environment variables:
export AZURE_OPENAI_ENDPOINT=https://<resource-name>.openai.azure.com
export AZURE_OPENAI_API_KEY=<api-key>
export AZURE_OPENAI_DEPLOYMENT_NAME=<deployment-name>
Transcription example
import asyncio
import base64
import json
import os
import signal
from urllib.parse import urlencode

import sounddevice as sd
import websockets

# Configuration
LANGUAGE = ""  # Optional: language hint like "en"
TRANSCRIPTION_DELAY = "medium"  # Supported values: minimal, low, medium, high, xhigh
SAMPLE_RATE = 24000
CHANNELS = 1
DTYPE = "int16"
BLOCK_MS = 100
COMMIT_SECONDS = 3


def azure_realtime_url() -> str:
    """Construct WebSocket URL for transcription."""
    endpoint = os.environ["AZURE_OPENAI_ENDPOINT"].strip().rstrip("/")
    if endpoint.lower().startswith("https://"):
        endpoint = "wss://" + endpoint[8:]
    endpoint_complete = f"{endpoint}/openai/v1/realtime?intent=transcription"
    return endpoint_complete


def session_update_message(language: str) -> str:
    """Create session configuration message."""
    deployment = os.environ["AZURE_OPENAI_DEPLOYMENT_NAME"].strip()
    transcription = {"model": deployment}
    if TRANSCRIPTION_DELAY.strip():
        transcription["delay"] = TRANSCRIPTION_DELAY.strip()
    if language.strip():
        transcription["language"] = language.strip()

    return json.dumps({
        "type": "session.update",
        "session": {
            "type": "transcription",
            "audio": {
                "input": {
                    "format": {
                        "type": "audio/pcm",
                        "rate": SAMPLE_RATE,
                    },
                    "turn_detection": None,
                    "transcription": transcription,
                },
            },
        },
    })


async def transcribe_audio() -> None:
    """Stream microphone audio and transcribe in real-time."""
    headers = {"api-key": os.environ["AZURE_OPENAI_API_KEY"].strip()}
    url = azure_realtime_url()
    stop = asyncio.Event()

    async def microphone_sender(ws):
        """Send microphone audio to WebSocket."""
        loop = asyncio.get_running_loop()
        queue = asyncio.Queue(maxsize=20)

        def enqueue_audio(audio_bytes: bytes) -> None:
            try:
                queue.put_nowait(audio_bytes)
            except asyncio.QueueFull:
                pass

        def on_audio(indata, frames, time, status):
            if status:
                print(f"Microphone warning: {status}")
            audio_bytes = bytes(indata)
            loop.call_soon_threadsafe(enqueue_audio, audio_bytes)

        blocksize = int(SAMPLE_RATE * BLOCK_MS / 1000)
        print(f"Starting transcription. Press Ctrl+C to stop.\n")

        with sd.RawInputStream(
            samplerate=SAMPLE_RATE,
            blocksize=blocksize,
            channels=CHANNELS,
            dtype=DTYPE,
            callback=on_audio,
        ):
            append_count = 0
            commit_count = 0
            chunks_since_commit = 0
            chunks_per_commit = max(1, int(COMMIT_SECONDS * 1000 / BLOCK_MS))

            while not stop.is_set():
                chunk = await queue.get()
                if stop.is_set():
                    break

                append_count += 1
                await ws.send(json.dumps({
                    "type": "input_audio_buffer.append",
                    "event_id": f"append_{append_count}",
                    "audio": base64.b64encode(chunk).decode("ascii"),
                }))

                chunks_since_commit += 1
                if chunks_since_commit >= chunks_per_commit:
                    commit_count += 1
                    await ws.send(json.dumps({
                        "type": "input_audio_buffer.commit",
                        "event_id": f"commit_{commit_count}",
                    }))
                    chunks_since_commit = 0

    async def transcription_receiver(ws):
        """Receive and print transcription results."""
        try:
            async for raw_message in ws:
                if stop.is_set():
                    break
                event = json.loads(raw_message)
                event_type = event.get("type")

                if event_type in {
                    "conversation.item.input_audio_transcription.completed",
                    "response.text.done",
                }:
                    text = event.get("text") or event.get("transcript")
                    if text:
                        print(text, flush=True)
                elif event_type == "conversation.item.input_audio_transcription.failed":
                    print(f"Transcription failed: {event.get('error', event)}")
        except asyncio.CancelledError:
            pass

    async with websockets.connect(url, additional_headers=headers) as ws:
        # Configure session
        await ws.send(session_update_message(LANGUAGE))
        async for raw_message in ws:
            event = json.loads(raw_message)
            if event.get("type") == "session.updated":
                print("Transcription session configured.")
                break

        # Start sender and receiver tasks
        sender = asyncio.create_task(microphone_sender(ws))
        receiver = asyncio.create_task(transcription_receiver(ws))

        try:
            await asyncio.sleep(3600)  # Run for 1 hour or until Ctrl+C
        except KeyboardInterrupt:
            print("\nStopping transcription.")
        finally:
            stop.set()
            sender.cancel()
            receiver.cancel()
            await asyncio.gather(sender, receiver, return_exceptions=True)


if __name__ == "__main__":
    try:
        asyncio.run(transcribe_audio())
    except KeyboardInterrupt:
        pass
Translate audio in real time
The following examples show how to stream microphone audio to the gpt-realtime-translate model for real-time translation. Translation sessions use the /openai/v1/realtime/translations endpoint with the model query parameter.
Translation example
import asyncio
import base64
import json
import os

import sounddevice as sd
import websockets

# Configuration
TARGET_LANGUAGE = "de"  # German - set to desired target language
SAMPLE_RATE = 24_000
CHANNELS = 1
DTYPE = "int16"
BLOCK_MS = 100


def azure_realtime_url() -> str:
    """Construct WebSocket URL for translation."""
    endpoint = os.environ["AZURE_OPENAI_ENDPOINT"].strip().rstrip("/")
    if endpoint.lower().startswith("https://"):
        endpoint = "wss://" + endpoint[8:]
    deployment = os.environ["AZURE_OPENAI_DEPLOYMENT_NAME"].strip()
    endpoint_complete = f"{endpoint}/openai/v1/realtime/translations?model={deployment}"
    return endpoint_complete


def session_update_message(target_language: str) -> str:
    """Create session configuration message for translation."""
    return json.dumps({
        "type": "session.update",
        "session": {
            "audio": {
                "output": {
                    "language": target_language,
                },
            },
        },
    })


async def translate_audio() -> None:
    """Stream microphone audio and translate in real-time."""
    headers = {"api-key": os.environ["AZURE_OPENAI_API_KEY"].strip()}
    url = azure_realtime_url()
    stop = asyncio.Event()

    async def microphone_sender(ws):
        """Send microphone audio to WebSocket."""
        loop = asyncio.get_running_loop()
        queue = asyncio.Queue(maxsize=20)

        def enqueue_audio(audio_bytes: bytes) -> None:
            try:
                queue.put_nowait(audio_bytes)
            except asyncio.QueueFull:
                pass

        def on_audio(indata, frames, time, status):
            if status:
                print(f"Microphone warning: {status}")
            audio_bytes = bytes(indata)
            loop.call_soon_threadsafe(enqueue_audio, audio_bytes)

        blocksize = int(SAMPLE_RATE * BLOCK_MS / 1000)
        print(f"Starting translation to {TARGET_LANGUAGE}. Press Ctrl+C to stop.\n")

        with sd.RawInputStream(
            samplerate=SAMPLE_RATE,
            blocksize=blocksize,
            channels=CHANNELS,
            dtype=DTYPE,
            callback=on_audio,
        ):
            while not stop.is_set():
                chunk = await queue.get()
                if stop.is_set():
                    break
                await ws.send(json.dumps({
                    "type": "session.input_audio_buffer.append",
                    "audio": base64.b64encode(chunk).decode("ascii"),
                }))

    async def translation_receiver(ws):
        """Receive and print translation results."""
        try:
            async for raw_message in ws:
                if stop.is_set():
                    break
                event = json.loads(raw_message)
                event_type = event.get("type")

                # Print translation deltas and final translations
                if event_type == "response.text.delta":
                    text = event.get("text", "")
                    if text:
                        print(text, end="", flush=True)
                elif event_type == "response.text.done":
                    print()  # Newline after translation completes
        except asyncio.CancelledError:
            pass

    async with websockets.connect(url, additional_headers=headers) as ws:
        # Configure session
        await ws.send(session_update_message(TARGET_LANGUAGE))
        async for raw_message in ws:
            event = json.loads(raw_message)
            if event.get("type") == "session.updated":
                print("Translation session configured.")
                break

        # Start sender and receiver tasks
        sender = asyncio.create_task(microphone_sender(ws))
        receiver = asyncio.create_task(translation_receiver(ws))

        try:
            await asyncio.sleep(3600)
        except KeyboardInterrupt:
            print("\nStopping translation.")
        finally:
            stop.set()
            sender.cancel()
            receiver.cancel()
            await asyncio.gather(sender, receiver, return_exceptions=True)


if __name__ == "__main__":
    try:
        asyncio.run(translate_audio())
    except KeyboardInterrupt:
        pass
Realtime API via WebSockets architecture
Once the WebSocket connection session to /realtime is established and authenticated, the functional interaction takes place via events for sending and receiving WebSocket messages. These events each take the form of a JSON object.
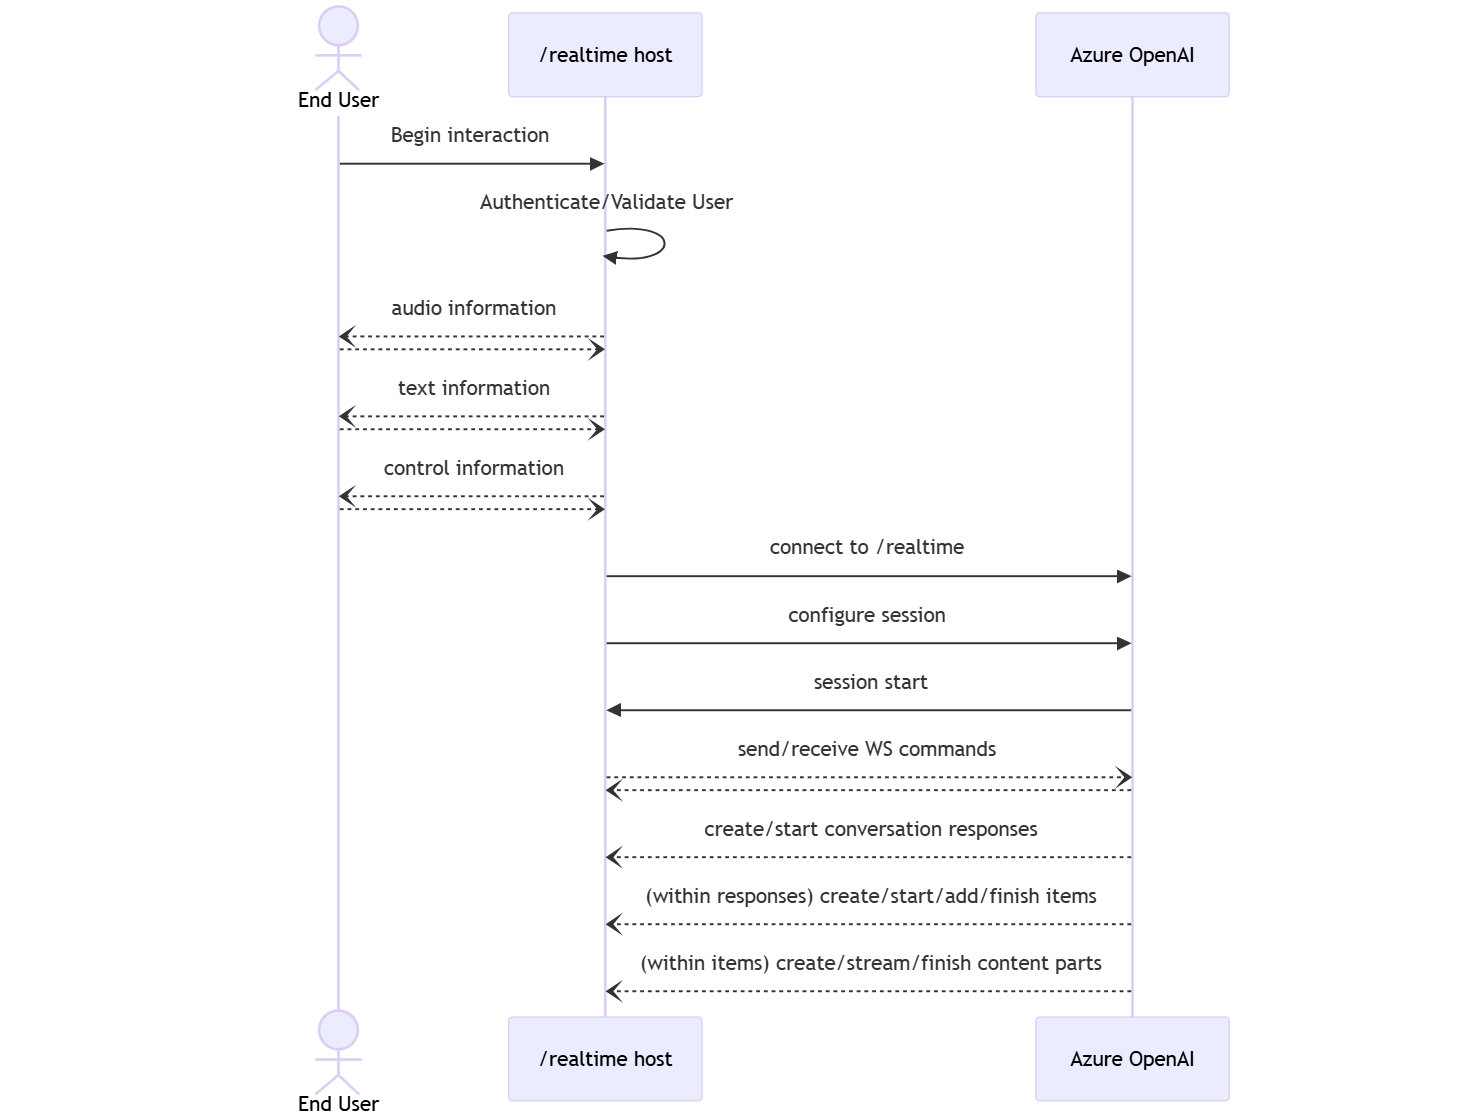
Events can be sent and received in parallel and applications should generally handle them both concurrently and asynchronously.
- A client-side caller establishes a connection to
/realtime, which starts a newsession. - A
sessionautomatically creates a defaultconversation. Multiple concurrent conversations aren't supported. - The
conversationaccumulates input signals until aresponseis started, either via a direct event by the caller or automatically by voice activity detection (VAD). - Each
responseconsists of one or moreitems, which can encapsulate messages, function calls, and other information. - Each message
itemhascontent_part, allowing multiple modalities (text and audio) to be represented across a single item. - The
sessionmanages configuration of caller input handling (for example, user audio) and common output generation handling. - Each caller-initiated
response.createcan override some of the outputresponsebehavior, if desired. - Server-created
itemand thecontent_partin messages can be populated asynchronously and in parallel. For example, receiving audio, text, and function information concurrently in a round robin fashion.
Try the quickstart
After completing the preceding steps, follow the instructions in the Realtime API quickstart to get started with the Realtime API via WebSockets.
Related content
- Try the real-time audio quickstart.
- See the Realtime API reference
- Learn more about Azure OpenAI quotas and limits