Nota:
El acceso a esta página requiere autorización. Puede intentar iniciar sesión o cambiar directorios.
El acceso a esta página requiere autorización. Puede intentar cambiar los directorios.
El RichTextBox control permite mostrar o editar contenido de flujo, incluidos párrafos, imágenes, tablas, etc. En este tema se introduce la clase TextBox y se proporcionan ejemplos de cómo usarla tanto en Extensible Application Markup Language (XAML) como en C#.
¿TextBox o RichTextBox?
Sin embargo, tanto RichTextBox como TextBox permiten a los usuarios editar texto, los dos controles se usan en escenarios diferentes. Es RichTextBox una mejor opción cuando es necesario que el usuario edite texto con formato, imágenes, tablas u otro contenido enriquecido. Por ejemplo, editar un documento, artículo o blog que requiera formato, imágenes, etc., es mejor realizado con un RichTextBox. Un TextBox requiere menos recursos del sistema que RichTextBox un y es ideal cuando solo es necesario editar texto sin formato (es decir, el uso en formularios). Consulte TextBox Overview para obtener más información sobre TextBox. En la tabla siguiente se resumen las características principales de TextBox y RichTextBox.
| Supervisión | Revisión ortográfica en tiempo real | Menú contextual | Comandos de formato como ToggleBold (Ctrl+B) | Contenido FlowDocument como imágenes, párrafos, tablas, etc. |
|---|---|---|---|---|
| TextBox | Sí | Sí | No | No. |
| RichTextBox | Sí | Sí | Sí | Sí |
Nota:
Aunque TextBox no admite el formato de comandos ToggleBold relacionados como (Ctr+B), muchos comandos básicos son compatibles con ambos controles, como MoveToLineEnd.
Las características de la tabla anterior se tratan con más detalle más adelante.
Crear un RichTextBox
El código siguiente muestra cómo crear un objeto RichTextBox en el que un usuario puede editar contenido enriquecido.
<Page xmlns="http://schemas.microsoft.com/winfx/2006/xaml/presentation"
  xmlns:x="http://schemas.microsoft.com/winfx/2006/xaml">

    <!-- A RichTextBox with no initial content in it. -->
    <RichTextBox />

</Page>
En concreto, el contenido editado en un RichTextBox es contenido de flujo. El contenido de flujo puede contener muchos tipos de elementos, como texto con formato, imágenes, listas y tablas. Consulte Información general del documento de flujo para obtener información detallada sobre los documentos de flujo. Para contener contenido de flujo, un RichTextBox hospeda un FlowDocument objeto que, a su vez, contiene el contenido editable. Para demostrar el contenido de flujo en un RichTextBox, el código siguiente muestra cómo crear un RichTextBox con un párrafo y algún texto en negrita.
<Page xmlns="http://schemas.microsoft.com/winfx/2006/xaml/presentation"
  xmlns:x="http://schemas.microsoft.com/winfx/2006/xaml">

  <StackPanel>
    <RichTextBox>
      <FlowDocument>
        <Paragraph>
          This is flow content and you can <Bold>edit me!</Bold>
        </Paragraph>
      </FlowDocument>
    </RichTextBox>
  </StackPanel>

</Page>
using System;
using System.Windows;
using System.Windows.Controls;
using System.Windows.Media;
using System.Windows.Documents;
namespace SDKSample
{
    public partial class BasicRichTextBoxWithContentExample : Page
    {
        public BasicRichTextBoxWithContentExample()
        {
            StackPanel myStackPanel = new StackPanel();

            // Create a FlowDocument to contain content for the RichTextBox.
            FlowDocument myFlowDoc = new FlowDocument();

            // Create a Run of plain text and some bold text.
            Run myRun = new Run("This is flow content and you can ");
            Bold myBold = new Bold(new Run("edit me!"));

            // Create a paragraph and add the Run and Bold to it.
            Paragraph myParagraph = new Paragraph();
            myParagraph.Inlines.Add(myRun);
            myParagraph.Inlines.Add(myBold);

            // Add the paragraph to the FlowDocument.
            myFlowDoc.Blocks.Add(myParagraph);

            RichTextBox myRichTextBox = new RichTextBox();

            // Add initial content to the RichTextBox.
            myRichTextBox.Document = myFlowDoc;

            myStackPanel.Children.Add(myRichTextBox);
            this.Content = myStackPanel;
        }
    }
}
Imports System.Windows
Imports System.Windows.Controls
Imports System.Windows.Media
Imports System.Windows.Documents
Namespace SDKSample
    Partial Public Class BasicRichTextBoxWithContentExample
        Inherits Page
        Public Sub New()
            Dim myStackPanel As New StackPanel()

            ' Create a FlowDocument to contain content for the RichTextBox.
            Dim myFlowDoc As New FlowDocument()

            ' Create a Run of plain text and some bold text.
            Dim myRun As New Run("This is flow content and you can ")
            Dim myBold As New Bold(New Run("edit me!"))

            ' Create a paragraph and add the Run and Bold to it.
            Dim myParagraph As New Paragraph()
            myParagraph.Inlines.Add(myRun)
            myParagraph.Inlines.Add(myBold)

            ' Add the paragraph to the FlowDocument.
            myFlowDoc.Blocks.Add(myParagraph)

            Dim myRichTextBox As New RichTextBox()

            ' Add initial content to the RichTextBox.
            myRichTextBox.Document = myFlowDoc

            myStackPanel.Children.Add(myRichTextBox)
            Me.Content = myStackPanel

        End Sub
    End Class
End Namespace
En la ilustración siguiente se muestra cómo se representa este ejemplo.

Elementos como Paragraph y Bold determinan cómo aparece el contenido dentro de .RichTextBox A medida que un usuario edita el contenido RichTextBox, cambia el contenido del flujo. Para obtener más información sobre las características del contenido de flujo y cómo trabajar con él, consulte Información general del documento de flow.
Nota:
El contenido de flujo dentro de un RichTextBox no se comporta exactamente igual que el contenido de flujo contenido en otros controles. Por ejemplo, no hay columnas en RichTextBox y, por lo tanto, no hay ningún comportamiento de cambio de tamaño automático. Además, las características integradas, como la búsqueda, el modo de visualización, la navegación por páginas y el zoom, no están disponibles en un RichTextBox.
Revisión ortográfica en tiempo real
Puede habilitar la revisión ortográfica en tiempo real en o TextBoxRichTextBox. Cuando se activa la revisión ortográfica, aparece una línea roja debajo de las palabras con errores de ortografía (consulte la siguiente imagen).
 Textbox con revisión ortográficaEditing_TextBox_with_Spellchecking
** Consulte Habilitar la revisión ortográfica en un control de edición de texto para aprender cómo habilitar el corrector ortográfico.
Menú contextual
Por defecto, tanto TextBox como RichTextBox tienen un menú contextual que aparece cuando el usuario hace clic con el botón derecho dentro del control. El menú contextual permite al usuario cortar, copiar o pegar (vea la ilustración siguiente).
TextBox con menú contextual: Editing_TextBox_with_Context_Menu
Puede crear su propio menú contextual personalizado para invalidar el predeterminado. Vea Colocar un menú contextual personalizado en un RichTextBox para obtener más información.
Comandos de edición
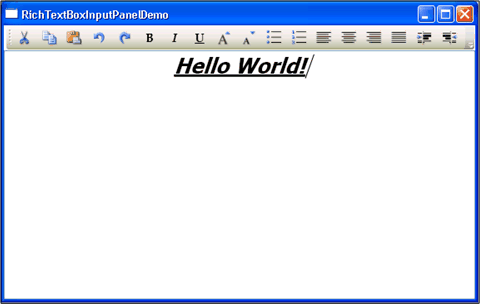
Los comandos de edición permiten a los usuarios dar formato al contenido editable dentro de .RichTextBox Además de los comandos de edición básicos, RichTextBox incluye comandos de formato que TextBox no admiten. Por ejemplo, al editar en , RichTextBoxun usuario podría presionar Ctr+B para alternar el formato de texto en negrita. Consulte EditingCommands para obtener una lista completa de los comandos disponibles. Además de usar métodos abreviados de teclado, puede enlazar comandos a otros controles como botones. En el ejemplo siguiente se muestra cómo crear una barra de herramientas sencilla que contenga botones que el usuario puede usar para cambiar el formato de texto.
<Window x:Class="RichTextBoxInputPanelDemo.Window1"
    xmlns="http://schemas.microsoft.com/winfx/2006/xaml/presentation"
    xmlns:x="http://schemas.microsoft.com/winfx/2006/xaml" Height="400" Width="600"
    >
  <Grid>

    <!-- Set the styles for the tool bar. -->
    <Grid.Resources>
      <Style TargetType="{x:Type Button}" x:Key="formatTextStyle">
        <Setter Property="FontFamily" Value="Palatino Linotype"></Setter>
        <Setter Property="Width" Value="30"></Setter>
        <Setter Property="FontSize" Value ="14"></Setter>
        <Setter Property="CommandTarget" Value="{Binding ElementName=mainRTB}"></Setter>
      </Style>

      <Style TargetType="{x:Type Button}" x:Key="formatImageStyle">
        <Setter Property="Width" Value="30"></Setter>
        <Setter Property="CommandTarget" Value="{Binding ElementName=mainRTB}"></Setter>
      </Style>
    </Grid.Resources>

    <DockPanel Name="mainPanel">

      <!-- This tool bar contains all the editing buttons. -->
      <ToolBar Name="mainToolBar" Height="30" DockPanel.Dock="Top">

        <Button Style="{StaticResource formatImageStyle}" Command="ApplicationCommands.Cut" ToolTip="Cut">
          <Image Source="Images\EditCut.png"></Image>
        </Button>
        <Button Style="{StaticResource formatImageStyle}" Command="ApplicationCommands.Copy" ToolTip="Copy">
          <Image Source="Images\EditCopy.png"></Image>
        </Button>
        <Button Style="{StaticResource formatImageStyle}" Command="ApplicationCommands.Paste" ToolTip="Paste">
          <Image Source="Images\EditPaste.png"></Image>
        </Button>
        <Button Style="{StaticResource formatImageStyle}" Command="ApplicationCommands.Undo" ToolTip="Undo">
          <Image Source="Images\EditUndo.png"></Image>
        </Button>
        <Button Style="{StaticResource formatImageStyle}" Command="ApplicationCommands.Redo" ToolTip="Redo">
          <Image Source="Images\EditRedo.png"></Image>
        </Button>

        <Button Style="{StaticResource formatTextStyle}" Command="EditingCommands.ToggleBold" ToolTip="Bold">
          <TextBlock FontWeight="Bold">B</TextBlock>
        </Button>
        <Button Style="{StaticResource formatTextStyle}" Command="EditingCommands.ToggleItalic" ToolTip="Italic">
          <TextBlock FontStyle="Italic" FontWeight="Bold">I</TextBlock>
        </Button>
        <Button Style="{StaticResource formatTextStyle}" Command="EditingCommands.ToggleUnderline" ToolTip="Underline">
          <TextBlock TextDecorations="Underline" FontWeight="Bold">U</TextBlock>
        </Button>
        <Button Style="{StaticResource formatImageStyle}" Command="EditingCommands.IncreaseFontSize" ToolTip="Grow Font">
          <Image Source="Images\CharacterGrowFont.png"></Image>
        </Button>
        <Button Style="{StaticResource formatImageStyle}" Command="EditingCommands.DecreaseFontSize" ToolTip="Shrink Font">
          <Image Source="Images\CharacterShrinkFont.png"></Image>
        </Button>

        <Button Style="{StaticResource formatImageStyle}" Command="EditingCommands.ToggleBullets" ToolTip="Bullets">
          <Image Source="Images\ListBullets.png"></Image>
        </Button>
        <Button Style="{StaticResource formatImageStyle}" Command="EditingCommands.ToggleNumbering" ToolTip="Numbering">
          <Image Source="Images/ListNumbering.png"></Image>
        </Button>
        <Button Style="{StaticResource formatImageStyle}" Command="EditingCommands.AlignLeft" ToolTip="Align Left">
          <Image Source="Images\ParagraphLeftJustify.png"></Image>
        </Button>
        <Button Style="{StaticResource formatImageStyle}" Command="EditingCommands.AlignCenter" ToolTip="Align Center">
          <Image Source="Images\ParagraphCenterJustify.png"></Image>
        </Button>
        <Button Style="{StaticResource formatImageStyle}" Command="EditingCommands.AlignRight" ToolTip="Align Right">
          <Image Source="Images\ParagraphRightJustify.png"></Image>
        </Button>
        <Button Style="{StaticResource formatImageStyle}" Command="EditingCommands.AlignJustify" ToolTip="Align Justify">
          <Image Source="Images\ParagraphFullJustify.png"></Image>
        </Button>
        <Button Style="{StaticResource formatImageStyle}" Command="EditingCommands.IncreaseIndentation" ToolTip="Increase Indent">
          <Image Source="Images\ParagraphIncreaseIndentation.png"></Image>
        </Button>
        <Button Style="{StaticResource formatImageStyle}" Command="EditingCommands.DecreaseIndentation" ToolTip="Decrease Indent">
          <Image Source="Images\ParagraphDecreaseIndentation.png"></Image>
        </Button>

      </ToolBar>

      <!-- By default pressing tab moves focus to the next control. Setting AcceptsTab to true allows the
           RichTextBox to accept tab characters. -->
      <RichTextBox Name="mainRTB" AcceptsTab="True"></RichTextBox>
    </DockPanel>
  </Grid>
</Window>
En la ilustración siguiente se muestra cómo se muestra este ejemplo.
Detectar cuándo cambia el contenido
Normalmente, el TextChanged evento debe usarse para detectar cada vez que el texto de un TextBox o RichTextBox cambia en lugar de KeyDown, como podría esperarse. Consulte Detectar cuándo cambiad el texto en un control TextBox para ver un ejemplo.
Guardar, cargar e imprimir contenido richTextBox
En el ejemplo siguiente se muestra cómo guardar el contenido de un RichTextBox en un archivo, volver a cargar ese contenido en el RichTextBox e imprimirlo. A continuación se muestra el marcado del ejemplo.
<Page xmlns="http://schemas.microsoft.com/winfx/2006/xaml/presentation"
  xmlns:x="http://schemas.microsoft.com/winfx/2006/xaml"
  x:Class="SDKSample.SaveLoadPrintRTB" >

  <StackPanel>
    <RichTextBox Name="richTB">
      <FlowDocument>
        <Paragraph>
          <Run>Paragraph 1</Run>
        </Paragraph>
      </FlowDocument>
    </RichTextBox>

    <Button Click="SaveRTBContent">Save RTB Content</Button>
    <Button Click="LoadRTBContent">Load RTB Content</Button>
    <Button Click="PrintRTBContent">Print RTB Content</Button>
  </StackPanel>

</Page>
A continuación se muestra el código subyacente del ejemplo.
using System;
using System.IO;
using System.Windows;
using System.Windows.Controls;
using System.Windows.Documents;
using System.Windows.Media;

namespace SDKSample
{

    public partial class SaveLoadPrintRTB : Page
    {

        // Handle "Save RichTextBox Content" button click.
        void SaveRTBContent(Object sender, RoutedEventArgs args)
        {

            // Send an arbitrary URL and file name string specifying
            // the location to save the XAML in.
            SaveXamlPackage("C:\\test.xaml");
        }

        // Handle "Load RichTextBox Content" button click.
        void LoadRTBContent(Object sender, RoutedEventArgs args)
        {
            // Send URL string specifying what file to retrieve XAML
            // from to load into the RichTextBox.
            LoadXamlPackage("C:\\test.xaml");
        }

        // Handle "Print RichTextBox Content" button click.
        void PrintRTBContent(Object sender, RoutedEventArgs args)
        {
            PrintCommand();
        }

        // Save XAML in RichTextBox to a file specified by _fileName
        void SaveXamlPackage(string _fileName)
        {
            TextRange range;
            FileStream fStream;
            range = new TextRange(richTB.Document.ContentStart, richTB.Document.ContentEnd);
            fStream = new FileStream(_fileName, FileMode.Create);
            range.Save(fStream, DataFormats.XamlPackage);
            fStream.Close();
        }

        // Load XAML into RichTextBox from a file specified by _fileName
        void LoadXamlPackage(string _fileName)
        {
            TextRange range;
            FileStream fStream;
            if (File.Exists(_fileName))
            {
                range = new TextRange(richTB.Document.ContentStart, richTB.Document.ContentEnd);
                fStream = new FileStream(_fileName, FileMode.OpenOrCreate);
                range.Load(fStream, DataFormats.XamlPackage);
                fStream.Close();
            }
        }

        // Print RichTextBox content
        private void PrintCommand()
        {
            PrintDialog pd = new PrintDialog();
            if ((pd.ShowDialog() == true))
            {
                //use either one of the below
                pd.PrintVisual(richTB as Visual, "printing as visual");
                pd.PrintDocument((((IDocumentPaginatorSource)richTB.Document).DocumentPaginator), "printing as paginator");
            }
        }
    }
}
Imports System.IO
Imports System.Windows
Imports System.Windows.Controls
Imports System.Windows.Documents
Imports System.Windows.Media

Namespace SDKSample

    Partial Public Class SaveLoadPrintRTB
        Inherits Page

        ' Handle "Save RichTextBox Content" button click.
        Private Sub SaveRTBContent(ByVal sender As Object, ByVal args As RoutedEventArgs)

            ' Send an arbitrary URL and file name string specifying
            ' the location to save the XAML in.
            SaveXamlPackage("C:\test.xaml")
        End Sub

        ' Handle "Load RichTextBox Content" button click.
        Private Sub LoadRTBContent(ByVal sender As Object, ByVal args As RoutedEventArgs)
            ' Send URL string specifying what file to retrieve XAML
            ' from to load into the RichTextBox.
            LoadXamlPackage("C:\test.xaml")
        End Sub

        ' Handle "Print RichTextBox Content" button click.
        Private Sub PrintRTBContent(ByVal sender As Object, ByVal args As RoutedEventArgs)
            PrintCommand()
        End Sub

        ' Save XAML in RichTextBox to a file specified by _fileName
        Private Sub SaveXamlPackage(ByVal _fileName As String)
            Dim range As TextRange
            Dim fStream As FileStream
            range = New TextRange(richTB.Document.ContentStart, richTB.Document.ContentEnd)
            fStream = New FileStream(_fileName, FileMode.Create)
            range.Save(fStream, DataFormats.XamlPackage)
            fStream.Close()
        End Sub

        ' Load XAML into RichTextBox from a file specified by _fileName
        Private Sub LoadXamlPackage(ByVal _fileName As String)
            Dim range As TextRange
            Dim fStream As FileStream
            If File.Exists(_fileName) Then
                range = New TextRange(richTB.Document.ContentStart, richTB.Document.ContentEnd)
                fStream = New FileStream(_fileName, FileMode.OpenOrCreate)
                range.Load(fStream, DataFormats.XamlPackage)
                fStream.Close()
            End If
        End Sub

        ' Print RichTextBox content
        Private Sub PrintCommand()
            Dim pd As New PrintDialog()
            If (pd.ShowDialog() = True) Then
                'use either one of the below
                pd.PrintVisual(TryCast(richTB, Visual), "printing as visual")
                pd.PrintDocument(((CType(richTB.Document, IDocumentPaginatorSource)).DocumentPaginator), "printing as paginator")
            End If
        End Sub
    End Class
End Namespace
Consulte también
- Temas de procedimiento
- Información general sobre TextBox
Colaborar con nosotros en GitHub
El origen de este contenido se puede encontrar en GitHub, donde también puede crear y revisar problemas y solicitudes de incorporación de cambios. Para más información, consulte nuestra guía para colaboradores.
.NET Desktop feedback