Nota:
El acceso a esta página requiere autorización. Puede intentar iniciar sesión o cambiar directorios.
El acceso a esta página requiere autorización. Puede intentar cambiar los directorios.
Este tutorial le guiará a través de la creación de un entorno de Active Directory básico.

Puede usar el entorno que cree en el tutorial para probar varios aspectos de los escenarios de identidad híbrida. Este es un requisito previo para algunos de los tutoriales. Si tiene un entorno de Active Directory existente, puede usarlo como sustituto. Esta información se proporciona para las personas que no empiezan de nada.
Requisitos previos
A continuación, se indican los requisitos previos necesarios para completar este tutorial:
- Un equipo con Hyper-V instalado. Se recomienda hacerlo en un equipo con Windows 10 o Windows Server 2022 .
- Un adaptador de red externo para permitir que la máquina virtual se comunique con Internet.
- Una suscripción a Azure
- Una copia de Windows Server 2022
- Microsoft .NET Framework 4.7.1
Nota
En este tutorial se utilizan scripts de PowerShell para que pueda crear el entorno de tutorial de la forma más rápida posible. Cada uno de los scripts usa variables que se declaran al principio de estos. Puede y debe cambiar las variables para reflejar su entorno.
Los scripts usados crean un entorno general de Active Directory antes de instalar el agente de aprovisionamiento en la nube de Microsoft Entra Connect. Son relevantes para todos los tutoriales.
Puede encontrar copias de los scripts de PowerShell que se usan en este tutorial disponibles en GitHub aquí.
Creación de una máquina virtual
Lo primero que debe hacer es crear una máquina virtual. Esta máquina virtual se usa como nuestro servidor de Active Directory local. Este paso es esencial para poner en marcha el entorno de identidad híbrida. Haga lo siguiente:
- Abra PowerShell ISE como administrador.
- Ejecute el siguiente script.
#Declare variables
$VMName = 'DC1'
$Switch = 'External'
$InstallMedia = 'D:\ISO\en_windows_server_2016_updated_feb_2018_x64_dvd_11636692.iso'
$Path = 'D:\VM'
$VHDPath = 'D:\VM\DC1\DC1.vhdx'
$VHDSize = '64424509440'

#Create New Virtual Machine
New-VM -Name $VMName -MemoryStartupBytes 16GB -BootDevice VHD -Path $Path -NewVHDPath $VHDPath -NewVHDSizeBytes $VHDSize -Generation 2 -Switch $Switch

#Set the memory to be non-dynamic
Set-VMMemory $VMName -DynamicMemoryEnabled $false

#Add DVD Drive to Virtual Machine
Add-VMDvdDrive -VMName $VMName -ControllerNumber 0 -ControllerLocation 1 -Path $InstallMedia

#Mount Installation Media
$DVDDrive = Get-VMDvdDrive -VMName $VMName

#Configure Virtual Machine to Boot from DVD
Set-VMFirmware -VMName $VMName -FirstBootDevice $DVDDrive
Finalización de la implementación de sistema operativo
Para terminar de crear la máquina virtual, deberá finalizar la instalación del sistema operativo.
- En el Administrador de Hyper-V, haga doble clic en la máquina virtual.
- Seleccione en el botón Iniciar.
- Se le pedirá que "Presione cualquier tecla para arrancar desde CD o DVD". Continúe.
- En la pantalla de inicio de Windows Server, seleccione el idioma y seleccione Siguiente.
- Seleccione Instalar ahora.
- Escriba la clave de licencia y seleccione Siguiente.
- Compruebe **Acepto los términos de licencia y seleccione Siguiente.
- Seleccione Personalizada: instalar solo Windows (avanzado).
- Seleccione Siguiente
- Una vez finalizada la instalación, reinicie la máquina virtual, inicie sesión y ejecute las actualizaciones de Windows para asegurarse de que la versión de la máquina virtual es la más actualizada. Instale las actualizaciones más recientes.
Requisitos previos de la instalación de Active Directory
Ahora que tiene una máquina virtual en funcionamiento, debe realizar algunas acciones antes de instalar Active Directory. Es necesario cambiar el nombre de la máquina virtual, establecer una dirección IP estática y la información de DNS e instalar las herramientas de administración remota del servidor. Haga lo siguiente:
- Abra PowerShell ISE como administrador.
- Ejecute el siguiente script.
#Declare variables
$ipaddress = "10.0.1.117"
$ipprefix = "24"
$ipgw = "10.0.1.1"
$ipdns = "10.0.1.117"
$ipdns2 = "8.8.8.8"
$ipif = (Get-NetAdapter).ifIndex
$featureLogPath = "c:\poshlog\featurelog.txt"
$newname = "DC1"
$addsTools = "RSAT-AD-Tools"

#Set static IP address
New-NetIPAddress -IPAddress $ipaddress -PrefixLength $ipprefix -InterfaceIndex $ipif -DefaultGateway $ipgw

# Set the DNS servers
Set-DnsClientServerAddress -InterfaceIndex $ipif -ServerAddresses ($ipdns, $ipdns2)

#Rename the computer
Rename-Computer -NewName $newname -force

#Install features
New-Item $featureLogPath -ItemType file -Force
Add-WindowsFeature $addsTools
Get-WindowsFeature | Where installed >>$featureLogPath

#Restart the computer
Restart-Computer
Creación de un entorno de Windows Server AD
Ahora que ha creado y cambiado el nombre de la máquina virtual creada, y tiene una dirección IP estática, puede instalar y configurar Active Directory Domain Services. Haga lo siguiente:
- Abra PowerShell ISE como administrador.
- Ejecute el siguiente script.
#Declare variables
$DatabasePath = "c:\windows\NTDS"
$DomainMode = "WinThreshold"
$DomainName = "contoso.com"
$DomainNetBIOSName = "CONTOSO"
$ForestMode = "WinThreshold"
$LogPath = "c:\windows\NTDS"
$SysVolPath = "c:\windows\SYSVOL"
$featureLogPath = "c:\poshlog\featurelog.txt"
$Password = "Pass1w0rd"
$SecureString = ConvertTo-SecureString $Password -AsPlainText -Force

#Install AD DS, DNS and GPMC
start-job -Name addFeature -ScriptBlock {
Add-WindowsFeature -Name "ad-domain-services" -IncludeAllSubFeature -IncludeManagementTools
Add-WindowsFeature -Name "dns" -IncludeAllSubFeature -IncludeManagementTools
Add-WindowsFeature -Name "gpmc" -IncludeAllSubFeature -IncludeManagementTools }
Wait-Job -Name addFeature
Get-WindowsFeature | Where installed >>$featureLogPath

#Create New AD Forest
Install-ADDSForest -CreateDnsDelegation:$false -DatabasePath $DatabasePath -DomainMode $DomainMode -DomainName $DomainName -SafeModeAdministratorPassword $SecureString -DomainNetbiosName $DomainNetBIOSName -ForestMode $ForestMode -InstallDns:$true -LogPath $LogPath -NoRebootOnCompletion:$false -SysvolPath $SysVolPath -Force:$true
Creación de un usuario de Windows Server AD
Ahora que tiene nuestro entorno de Active Directory, debe crear una cuenta de prueba. Esta cuenta se crea en nuestro entorno de AD local y, a continuación, se sincroniza con el identificador de Microsoft Entra. Haga lo siguiente:
- Abra PowerShell ISE como administrador.
- Ejecute el siguiente script.
# Filename:  4_CreateUser.ps1
# Description: Creates a user in Active Directory. This is part of
#       the Azure AD Connect password hash sync tutorial.
#
# DISCLAIMER:
# Copyright (c) Microsoft Corporation. All rights reserved. This
# script is made available to you without any express, implied or
# statutory warranty, not even the implied warranty of
# merchantability or fitness for a particular purpose, or the
# warranty of title or non-infringement. The entire risk of the
# use or the results from the use of this script remains with you.
#
#
#
#
#Declare variables
$Givenname = "Allie"
$Surname = "McCray"
$Displayname = "Allie McCray"
$Name = "amccray"
$Password = "Pass1w0rd"
$Identity = "CN=ammccray,CN=Users,DC=contoso,DC=com"
$SecureString = ConvertTo-SecureString $Password -AsPlainText -Force


#Create the user
New-ADUser -Name $Name -GivenName $Givenname -Surname $Surname -DisplayName $Displayname -AccountPassword $SecureString

#Set the password to never expire
Set-ADUser -Identity $Identity -PasswordNeverExpires $true -ChangePasswordAtLogon $false -Enabled $true
Creación de un inquilino de Microsoft Entra
Ahora debe crear un inquilino de Microsoft Entra para poder sincronizar nuestros usuarios con la nube. Para crear un nuevo inquilino de Microsoft Entra, haga lo siguiente.
- Inicie sesión en el Centro de administración de Microsoft Entra e inicie sesión con una cuenta que tenga su suscripción a Microsoft Entra.
- Seleccione Información general.
- Seleccione Administrar inquilinos.
- Seleccione Crear.
- Proporcione un nombre para la organización, junto con el nombre de dominio inicial. Seleccione Crear. Esto crea tu directorio.
- Cuando haya finalizado, seleccione el vínculo aquí para administrar el directorio.
Creación de un administrador de identidades híbridas en Microsoft Entra ID
Ahora que tiene un inquilino de Microsoft Entra, puede crear una cuenta de administrador de identidad híbrida. Haga lo siguiente para crear una cuenta de administrador de identidad híbrida.
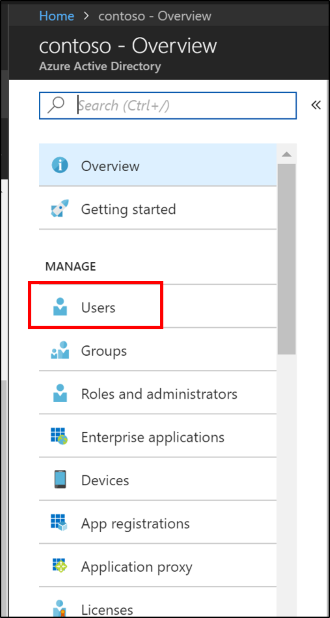
- En Administrar, seleccione Usuarios.
- Seleccione Todos los usuarios y, a continuación, seleccione + Nuevo usuario.
- Proporcione un nombre y el nombre de usuario para este usuario. Este es el administrador de identidad híbrida del inquilino. Cambie el Rol del directorio a Administrador de identidad híbrida. También puede mostrar la contraseña temporal. Cuando haya terminado, seleccione Crear.
- Una vez completado, abra un nuevo explorador web e inicie sesión en myapps.microsoft.com con la nueva cuenta de administrador de identidad híbrida y la contraseña temporal.
- Cambie la contraseña del administrador de identidades híbridas a algo que pueda recordar.
Opcional: otro servidor y bosque
La siguiente es una sección opcional que proporciona los pasos necesarios para crear otro servidor o bosque. Puede usarse en algunos de los tutoriales más avanzados, como Realización de una prueba piloto para la sincronización en la nube de Microsoft Entra Connect.
Si solo necesita otro servidor, puede detenerse después del paso Crear la máquina virtual y unir el servidor al dominio existente que creó anteriormente.
Creación de una máquina virtual
- Abra PowerShell ISE como administrador.
- Ejecute el siguiente script.
# Filename:  1_CreateVM_CP.ps1
# Description: Creates a VM to be used in the tutorial.
#
# DISCLAIMER:
# Copyright (c) Microsoft Corporation. All rights reserved. #This script is made available to you without any express, implied or statutory warranty, not even the implied warranty of merchantability or fitness for a particular purpose, or the warranty of title or non-infringement. The entire risk of the use or the results from the use of this script remains with you.
#
#
#
#
#Declare variables
$VMName = 'CP1'
$Switch = 'External'
$InstallMedia = 'D:\ISO\en_windows_server_2016_updated_feb_2018_x64_dvd_11636692.iso'
$Path = 'D:\VM'
$VHDPath = 'D:\VM\CP1\CP1.vhdx'
$VHDSize = '64424509440'

#Create New Virtual Machine
New-VM -Name $VMName -MemoryStartupBytes 16GB -BootDevice VHD -Path $Path -NewVHDPath $VHDPath -NewVHDSizeBytes $VHDSize -Generation 2 -Switch $Switch

#Set the memory to be non-dynamic
Set-VMMemory $VMName -DynamicMemoryEnabled $false

#Add DVD Drive to Virtual Machine
Add-VMDvdDrive -VMName $VMName -ControllerNumber 0 -ControllerLocation 1 -Path $InstallMedia

#Mount Installation Media
$DVDDrive = Get-VMDvdDrive -VMName $VMName

#Configure Virtual Machine to Boot from DVD
Set-VMFirmware -VMName $VMName -FirstBootDevice $DVDDrive
Finalización de la implementación de sistema operativo
Para terminar de crear la máquina virtual, deberá finalizar la instalación del sistema operativo.
- En el Administrador de Hyper-V, haga doble clic en la máquina virtual.
- Seleccione en el botón Iniciar.
- Se le pedirá que "Presione cualquier tecla para arrancar desde CD o DVD". Continúe.
- En la pantalla de inicio de Windows Server, seleccione el idioma y seleccione Siguiente.
- Seleccione Instalar ahora.
- Escriba la clave de licencia y seleccione Siguiente.
- Compruebe **Acepto los términos de licencia y seleccione Siguiente.
- Seleccione Personalizada: instalar solo Windows (avanzado).
- Seleccione Siguiente
- Una vez finalizada la instalación, reinicie la máquina virtual, inicie sesión y ejecute las actualizaciones de Windows para asegurarse de que la versión de la máquina virtual es la más actualizada. Instale las actualizaciones más recientes.
Requisitos previos de la instalación de Active Directory
Ahora que tiene una máquina virtual activa, debe hacer algunas cosas antes de instalar Active Directory. Es necesario cambiar el nombre de la máquina virtual, establecer una dirección IP estática y la información de DNS e instalar las herramientas de administración remota del servidor. Haga lo siguiente:
- Abra PowerShell ISE como administrador.
- Ejecute el siguiente script.
# Filename:  2_ADPrep_CP.ps1
# Description: Prepares your environment for Active Directory. This is part of
#       the Azure AD Connect password hash sync tutorial.
#
# DISCLAIMER:
# Copyright (c) Microsoft Corporation. All rights reserved. This
# script is made available to you without any express, implied or
# statutory warranty, not even the implied warranty of
# merchantability or fitness for a particular purpose, or the
# warranty of title or non-infringement. The entire risk of the
# use or the results from the use of this script remains with you.
#
#
#
#
#Declare variables
$ipaddress = "10.0.1.118"
$ipprefix = "24"
$ipgw = "10.0.1.1"
$ipdns = "10.0.1.118"
$ipdns2 = "8.8.8.8"
$ipif = (Get-NetAdapter).ifIndex
$featureLogPath = "c:\poshlog\featurelog.txt"
$newname = "CP1"
$addsTools = "RSAT-AD-Tools"

#Set static IP address
New-NetIPAddress -IPAddress $ipaddress -PrefixLength $ipprefix -InterfaceIndex $ipif -DefaultGateway $ipgw

#Set the DNS servers
Set-DnsClientServerAddress -InterfaceIndex $ipif -ServerAddresses ($ipdns, $ipdns2)

#Rename the computer
Rename-Computer -NewName $newname -force

#Install features
New-Item $featureLogPath -ItemType file -Force
Add-WindowsFeature $addsTools
Get-WindowsFeature | Where installed >>$featureLogPath

#Restart the computer
Restart-Computer
Creación de un entorno de Windows Server AD
Ahora que ha creado y cambiado el nombre de la máquina virtual y tiene una dirección IP estática, está listo para instalar y configurar Active Directory Domain Services. Haga lo siguiente:
- Abra PowerShell ISE como administrador.
- Ejecute el siguiente script.
# Filename:  3_InstallAD_CP.ps1
# Description: Creates an on-premises AD environment. This is part of
#       the Azure AD Connect password hash sync tutorial.
#
# DISCLAIMER:
# Copyright (c) Microsoft Corporation. All rights reserved. This
# script is made available to you without any express, implied or
# statutory warranty, not even the implied warranty of
# merchantability or fitness for a particular purpose, or the
# warranty of title or non-infringement. The entire risk of the
# use or the results from the use of this script remains with you.
#
#
#
#
#Declare variables
$DatabasePath = "c:\windows\NTDS"
$DomainMode = "WinThreshold"
$DomainName = "fabrikam.com"
$DomaninNetBIOSName = "FABRIKAM"
$ForestMode = "WinThreshold"
$LogPath = "c:\windows\NTDS"
$SysVolPath = "c:\windows\SYSVOL"
$featureLogPath = "c:\poshlog\featurelog.txt"
$Password = "Pass1w0rd"
$SecureString = ConvertTo-SecureString $Password -AsPlainText -Force

#Install AD DS, DNS and GPMC
start-job -Name addFeature -ScriptBlock {
Add-WindowsFeature -Name "ad-domain-services" -IncludeAllSubFeature -IncludeManagementTools
Add-WindowsFeature -Name "dns" -IncludeAllSubFeature -IncludeManagementTools
Add-WindowsFeature -Name "gpmc" -IncludeAllSubFeature -IncludeManagementTools }
Wait-Job -Name addFeature
Get-WindowsFeature | Where installed >>$featureLogPath

#Create New AD Forest
Install-ADDSForest -CreateDnsDelegation:$false -DatabasePath $DatabasePath -DomainMode $DomainMode -DomainName $DomainName -SafeModeAdministratorPassword $SecureString -DomainNetbiosName $DomainNetBIOSName -ForestMode $ForestMode -InstallDns:$true -LogPath $LogPath -NoRebootOnCompletion:$false -SysvolPath $SysVolPath -Force:$true
Creación de un usuario de Windows Server AD
Ahora que tiene nuestro entorno de Active Directory, necesita una cuenta de prueba. Esta cuenta se crea en nuestro entorno de AD local y, a continuación, se sincroniza con el identificador de Microsoft Entra. Haga lo siguiente:
- Abra PowerShell ISE como administrador.
- Ejecute el siguiente script.
# Filename:  4_CreateUser_CP.ps1
# Description: Creates a user in Active Directory. This is part of
#       the Azure AD Connect password hash sync tutorial.
#
# DISCLAIMER:
# Copyright (c) Microsoft Corporation. All rights reserved. This
# script is made available to you without any express, implied or
# statutory warranty, not even the implied warranty of
# merchantability or fitness for a particular purpose, or the
# warranty of title or non-infringement. The entire risk of the
# use or the results from the use of this script remains with you.
#
#
#
#
#Declare variables
$Givenname = "Anna"
$Surname = "Ringdal"
$Displayname = "Anna Ringdal"
$Name = "aringdal"
$Password = "Pass1w0rd"
$Identity = "CN=aringdal,CN=Users,DC=fabrikam,DC=com"
$SecureString = ConvertTo-SecureString $Password -AsPlainText -Force


#Create the user
New-ADUser -Name $Name -GivenName $Givenname -Surname $Surname -DisplayName $Displayname -AccountPassword $SecureString

#Set the password to never expire
Set-ADUser -Identity $Identity -PasswordNeverExpires $true -ChangePasswordAtLogon $false -Enabled $true
Conclusión
Ahora tiene un entorno que se puede usar para los tutoriales existentes y para probar otras características que proporciona la sincronización en la nube.