Crear aplicaciones UWP con Microsoft Graph
Este tutorial te enseña a crear una aplicación para la Plataforma universal de Windows (UWP) que usa la API de Microsoft Graph para recuperar información de calendario para un usuario.
Sugerencia
Si prefiere descargar el tutorial completado, puede descargar o clonar el repositorio GitHub archivo.
Requisitos previos
Antes de iniciar este tutorial, debes tener Visual Studio instalado en un equipo que ejecute Windows 10 modo programador activado. Si no tiene Visual Studio, visite el vínculo anterior para ver las opciones de descarga.
También debe tener una cuenta personal de Microsoft con un buzón en Outlook.com, o una cuenta de Trabajo o escuela de Microsoft. Si no tienes una cuenta de Microsoft, hay un par de opciones para obtener una cuenta gratuita:
- Puedes suscribirte a una nueva cuenta personal de Microsoft.
- Puedes suscribirte al programa Microsoft 365 desarrolladores para obtener una suscripción Microsoft 365 gratuita.
Nota
Este tutorial se escribió con Visual Studio 2019 versión 16.8.3. Los pasos de esta guía pueden funcionar con otras versiones, pero eso no se ha probado.
Comentarios
Proporcione cualquier comentario sobre este tutorial en el repositorio GitHub usuario.
Crear una aplicación de la Plataforma universal de Windows
En esta sección, crearás una nueva aplicación para UWP.
Abra Visual Studio y seleccione Crear un nuevo proyecto. Elija la opción Aplicación en blanco (Windows universal) que usa C# y, a continuación, seleccione Siguiente.
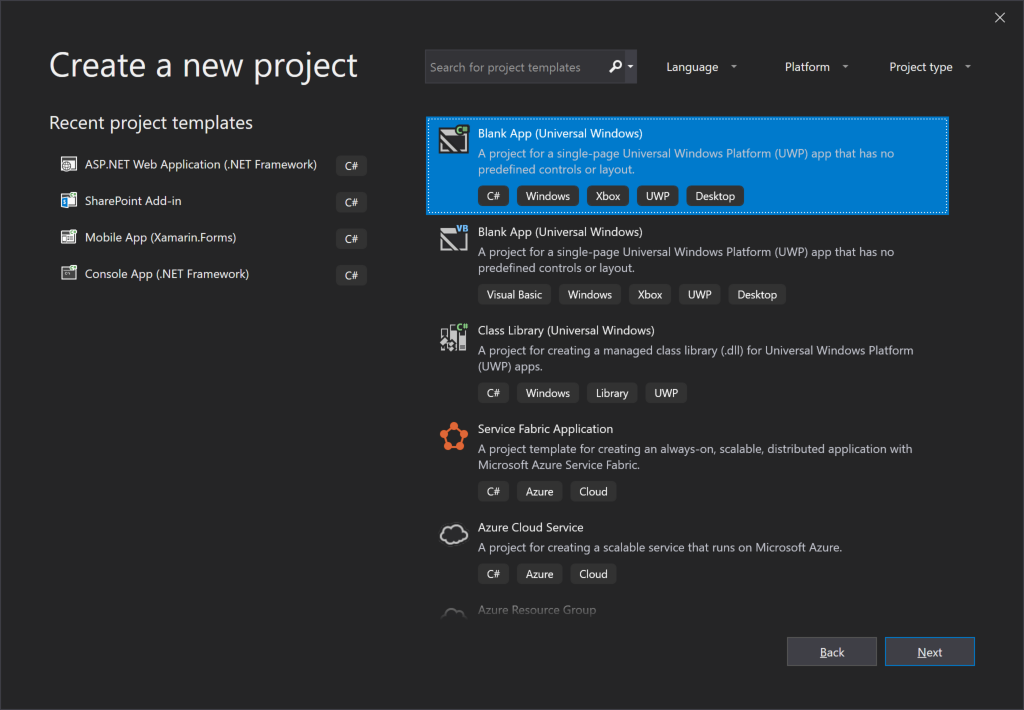
En el cuadro de diálogo Configurar el nuevo proyecto, escriba en el campo Project nombre
GraphTutorialy seleccione Crear.
Importante
Asegúrese de escribir exactamente el mismo nombre para el Visual Studio Project que se especifica en estas instrucciones de laboratorio. El nombre del Proyecto de Visual Studio pasa a formar parte del espacio de nombres en el código. El código dentro de estas instrucciones depende de que el espacio de nombres coincida con el nombre del Proyecto de Visual Studio especificado en estas instrucciones. Si usa otro nombre de proyecto, el código no se compilará a menos que ajuste todos los espacios de nombres para que coincidan con el nombre del Proyecto de Visual Studio que especifique al crear el proyecto.
Seleccione Aceptar. En el cuadro de diálogo Nueva plataforma Windows universal Project, asegúrese de que la versión Mínima esté establecida en o posterior y
Windows 10, Version 1809 (10.0; Build 17763)seleccione Aceptar.
Instalar paquetes NuGet
Antes de seguir, instala algunos paquetes NuGet que usarás más adelante.
- Microsoft. Toolkit. Uwp.Ui.Controls.DataGrid para mostrar la información devuelta por Microsoft Graph.
- Microsoft. Toolkit. Graph. Controles para controlar la recuperación de tokens de acceso y inicio de sesión.
Seleccione Herramientas > Administrador de paquetes de NuGet > Consola del Administrador de paquetes. En la Consola del Administrador de paquetes, escriba los siguientes comandos:
Install-Package Microsoft.Toolkit.Uwp.Ui.Controls.DataGrid -IncludePrerelease
Install-Package Microsoft.Toolkit.Graph.Controls -IncludePrerelease
Diseñar la aplicación
En esta sección, crearás la interfaz de usuario de la aplicación.
Empiece agregando una variable de nivel de aplicación para realizar un seguimiento del estado de autenticación. En el Explorador de soluciones, expanda App.xaml y abra App.xaml.cs. Agregue la siguiente propiedad a la clase
App.public bool IsAuthenticated { get; set; }Defina el diseño de la página principal. Abra
MainPage.xamly reemplace todo su contenido por lo siguiente.<Page x:Class="GraphTutorial.MainPage" xmlns="http://schemas.microsoft.com/winfx/2006/xaml/presentation" xmlns:x="http://schemas.microsoft.com/winfx/2006/xaml" xmlns:local="using:GraphTutorial" xmlns:d="http://schemas.microsoft.com/expression/blend/2008" xmlns:mc="http://schemas.openxmlformats.org/markup-compatibility/2006" xmlns:controls="using:Microsoft.Toolkit.Uwp.UI.Controls" xmlns:Interactivity="using:Microsoft.Xaml.Interactivity" xmlns:providers="using:Microsoft.Toolkit.Graph.Providers" xmlns:wgt="using:Microsoft.Toolkit.Graph.Controls" mc:Ignorable="d" Background="{ThemeResource ApplicationPageBackgroundThemeBrush}"> <Interactivity:Interaction.Behaviors> <providers:InteractiveProviderBehavior x:Name="MsalProvider" /> </Interactivity:Interaction.Behaviors> <Grid> <NavigationView x:Name="NavView" IsSettingsVisible="False" ItemInvoked="NavView_ItemInvoked"> <NavigationView.Header> <wgt:LoginButton x:Name="Login" VerticalAlignment="Top" HorizontalAlignment="Right" /> </NavigationView.Header> <NavigationView.MenuItems> <NavigationViewItem Content="Home" x:Name="Home" Tag="home"> <NavigationViewItem.Icon> <FontIcon Glyph=""/> </NavigationViewItem.Icon> </NavigationViewItem> <NavigationViewItem Content="Calendar" x:Name="Calendar" Tag="calendar"> <NavigationViewItem.Icon> <FontIcon Glyph=""/> </NavigationViewItem.Icon> </NavigationViewItem> <NavigationViewItem Content="New event" x:Name="NewEvent" Tag="newevent"> <NavigationViewItem.Icon> <FontIcon Glyph=""/> </NavigationViewItem.Icon> </NavigationViewItem> </NavigationView.MenuItems> <StackPanel> <controls:InAppNotification x:Name="Notification" ShowDismissButton="true" /> <Frame x:Name="RootFrame" Margin="24, 0" /> </StackPanel> </NavigationView> </Grid> </Page>Esto define un control NavigationView básico con vínculos de navegación home, Calendar y New event para que actúen como la vista principal de la aplicación. También agrega un control LoginButton en el encabezado de la vista. Ese control permitirá al usuario iniciar y cerrar sesión. El control aún no está totalmente habilitado, lo configurará en un ejercicio posterior.
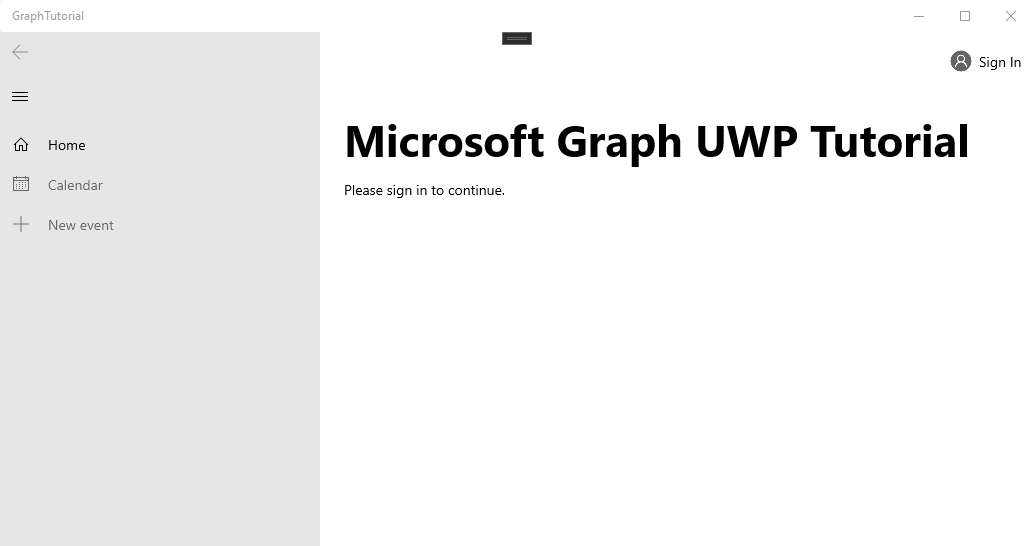
Haga clic con el botón secundario en el proyecto graph-tutorial en el Explorador de soluciones y seleccione Agregar > Nuevo elemento.... Elija Página en blanco, escriba
HomePage.xamlen el campo Nombre y seleccione Agregar. Reemplace el elemento<Grid>existente en el archivo por lo siguiente.<Grid> <StackPanel> <TextBlock FontSize="44" FontWeight="Bold" Margin="0, 12">Microsoft Graph UWP Tutorial</TextBlock> <TextBlock x:Name="HomePageMessage">Please sign in to continue.</TextBlock> </StackPanel> </Grid>Expande MainPage.xaml en el Explorador de soluciones y abre
MainPage.xaml.cs. Agregue la siguiente función a laMainPageclase para administrar el estado de autenticación.private void SetAuthState(bool isAuthenticated) { (Application.Current as App).IsAuthenticated = isAuthenticated; // Toggle controls that require auth Calendar.IsEnabled = isAuthenticated; NewEvent.IsEnabled = isAuthenticated; }Agregue el siguiente código al
MainPage()constructor después de lathis.InitializeComponent();línea.// Initialize auth state to false SetAuthState(false); // Configure MSAL provider // TEMPORARY MsalProvider.ClientId = "11111111-1111-1111-1111-111111111111"; // Navigate to HomePage.xaml RootFrame.Navigate(typeof(HomePage));Cuando se inicie la aplicación por primera vez, inicializará el estado de autenticación y
falsenavegará a la página principal.Agregue el siguiente controlador de eventos para cargar la página solicitada cuando el usuario seleccione un elemento de la vista de navegación.
private void NavView_ItemInvoked(NavigationView sender, NavigationViewItemInvokedEventArgs args)
{
    var invokedItem = args.InvokedItem as string;

    switch (invokedItem.ToLower())
    {
        case "new event":
            throw new NotImplementedException();
            break;
        case "calendar":
            throw new NotImplementedException();
            break;
        case "home":
        default:
            RootFrame.Navigate(typeof(HomePage));
            break;
    }
}
Guarde todos los cambios y, a continuación, presione F5 o seleccione Depurar > Iniciar depuración en Visual Studio.
Nota
Asegúrese de seleccionar la configuración adecuada para el equipo (ARM, x64, x86).
Registrar la aplicación en el portal
En este ejercicio, creará una nueva aplicación nativa de Azure AD con el centro Azure Active Directory administración.
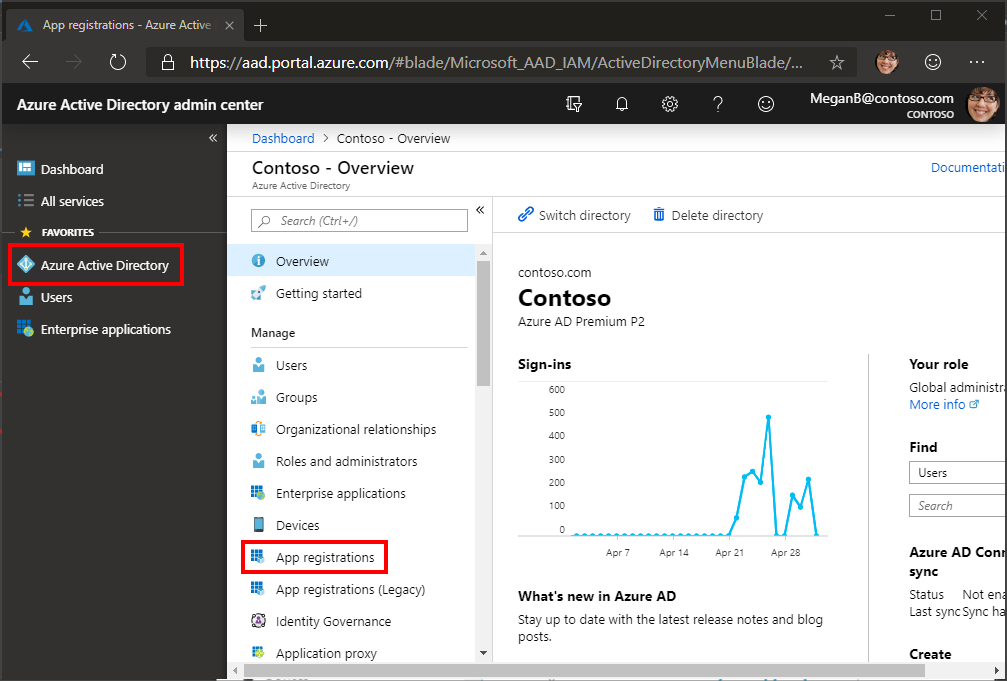
Abra un explorador y vaya al centro de administración de Azure Active Directory e inicie sesión con una cuenta personal (también conocida como: cuenta Microsoft) o una cuenta profesional o educativa.
Seleccione Azure Active Directory en el panel de navegación izquierdo y, a continuación, seleccione Registros de aplicaciones en Administrar.
Seleccione Nuevo registro. En la página Registrar una aplicación, establezca los valores siguientes.
- Establezca Nombre como
UWP Graph Tutorial. - Establezca Tipos de cuenta admitidos en Cuentas en cualquier directorio de organización y cuentas personales de Microsoft.
- En URI de redireccionamiento, cambie el desplegable a Cliente público (escritorio & móvil) y establezca el valor en
https://login.microsoftonline.com/common/oauth2/nativeclient.
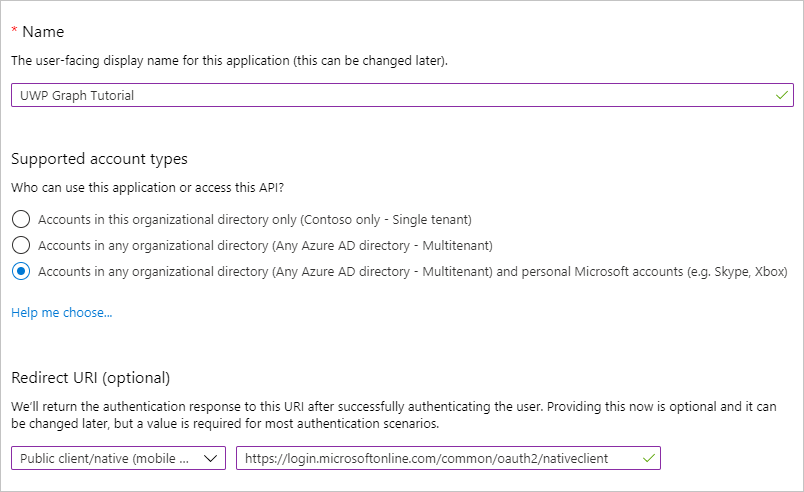
- Establezca Nombre como
Seleccione Registrar. En la página Tutorial de Graph UWP, copia el valor del identificador de aplicación (cliente) y guárdalo, lo necesitarás en el siguiente paso.

Agregar autenticación de Azure AD
En este ejercicio, extenderá la aplicación desde el ejercicio anterior para admitir la autenticación con Azure AD. Esto es necesario para obtener el token de acceso OAuth necesario para llamar a Microsoft Graph. En este paso, integrará el control LoginButton de los controles Windows Graph en la aplicación.
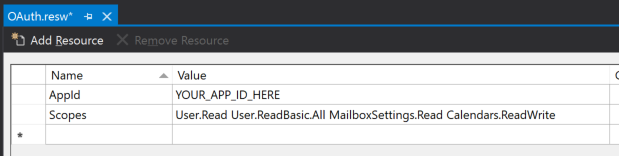
Haga clic con el botón secundario en el proyecto GraphTutorial en el Explorador de soluciones y seleccione Agregar > Nuevo elemento.... Elija Archivo de recursos (.resw), asigne un nombre al archivo y seleccione
OAuth.reswAgregar. Cuando se abra el nuevo archivo en Visual Studio, cree dos recursos de la siguiente manera.- Nombre:
AppId, Valor: el identificador de aplicación que generó en el Portal de registro de aplicaciones - Nombre:
Scopes, Valor:User.Read User.ReadBasic.All People.Read MailboxSettings.Read Calendars.ReadWrite
Importante
Si usas el control de código fuente como git, ahora sería un buen momento para excluir el archivo del control de código fuente para evitar la pérdida involuntaria del identificador de la
OAuth.reswaplicación.- Nombre:
Configurar el control LoginButton
Abra
MainPage.xaml.csy agregue la siguiente instrucción a la parte superior delusingarchivo.using Microsoft.Toolkit.Graph.Providers;Reemplace el constructor existente por lo siguiente.
public MainPage()
{
    this.InitializeComponent();

    // Load OAuth settings
    var oauthSettings = Windows.ApplicationModel.Resources.ResourceLoader.GetForCurrentView("OAuth");
    var appId = oauthSettings.GetString("AppId");
    var scopes = oauthSettings.GetString("Scopes");

    if (string.IsNullOrEmpty(appId) || string.IsNullOrEmpty(scopes))
    {
        Notification.Show("Could not load OAuth Settings from resource file.");
    }
    else
    {
        // Configure MSAL provider
        MsalProvider.ClientId = appId;
        MsalProvider.Scopes = new ScopeSet(scopes.Split(' '));

        // Handle auth state change
        ProviderManager.Instance.ProviderUpdated += ProviderUpdated;

        // Navigate to HomePage.xaml
        RootFrame.Navigate(typeof(HomePage));
    }
}
Este código carga la configuración desde
OAuth.reswe inicializa el proveedor MSAL con esos valores.Ahora agregue un controlador de eventos para el
ProviderUpdatedevento enProviderManager. Agregue la siguiente función a la claseMainPage.private void ProviderUpdated(object sender, ProviderUpdatedEventArgs e) { var globalProvider = ProviderManager.Instance.GlobalProvider; SetAuthState(globalProvider != null && globalProvider.State == ProviderState.SignedIn); RootFrame.Navigate(typeof(HomePage)); }Este evento se desencadena cuando cambia el proveedor o cuando cambia el estado del proveedor.
En el Explorador de soluciones, expanda HomePage.xaml y abra
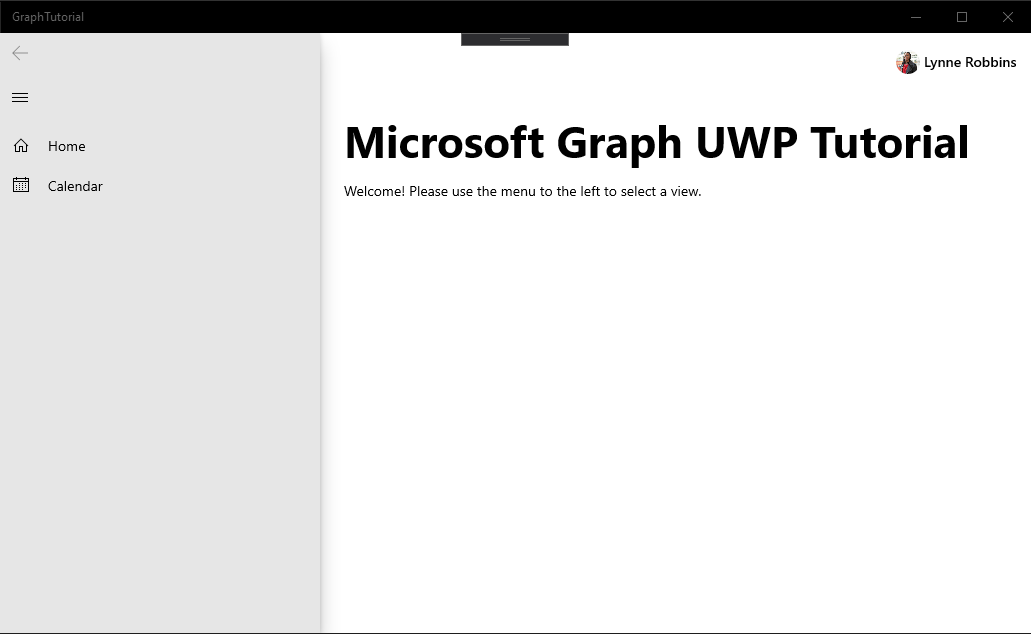
HomePage.xaml.cs. Reemplace el constructor existente por lo siguiente.public HomePage() { this.InitializeComponent(); if ((App.Current as App).IsAuthenticated) { HomePageMessage.Text = "Welcome! Please use the menu to the left to select a view."; } }Reinicia la aplicación y haz clic en el control Iniciar sesión en la parte superior de la aplicación. Una vez que hayas iniciado sesión, la interfaz de usuario debe cambiar para indicar que has iniciado sesión correctamente.
Nota
El
ButtonLogincontrol implementa la lógica para almacenar y actualizar el token de acceso. Los tokens se almacenan en almacenamiento seguro y se actualizan según sea necesario.
Obtener una vista de calendario
En este ejercicio, incorporará el Graph Microsoft en la aplicación. Para esta aplicación, usará la Biblioteca de cliente de Microsoft Graph para .NET para realizar llamadas a Microsoft Graph.
Obtener eventos del calendario desde Outlook
Agregue una página nueva para la vista de calendario. Haga clic con el botón secundario en el proyecto GraphTutorial en el Explorador de soluciones y seleccione Agregar > Nuevo elemento.... Elija Página en blanco, escriba
CalendarPage.xamlen el campo Nombre y seleccione Agregar.Abra
CalendarPage.xamly agregue la siguiente línea dentro del elemento<Grid>existente.<TextBlock x:Name="Events" TextWrapping="Wrap"/>Abra
CalendarPage.xaml.csy agregue las siguientes instrucciones en la parte superior delusingarchivo.using Microsoft.Graph; using Microsoft.Toolkit.Graph.Providers; using Microsoft.Toolkit.Uwp.UI.Controls; using Newtonsoft.Json;Agregue las siguientes funciones a la
CalendarPageclase.private void ShowNotification(string message) { // Get the main page that contains the InAppNotification var mainPage = (Window.Current.Content as Frame).Content as MainPage; // Get the notification control var notification = mainPage.FindName("Notification") as InAppNotification; notification.Show(message); } protected override async void OnNavigatedTo(NavigationEventArgs e) { // Get the Graph client from the provider var graphClient = ProviderManager.Instance.GlobalProvider.Graph; try { // Get the user's mailbox settings to determine // their time zone var user = await graphClient.Me.Request() .Select(u => new { u.MailboxSettings }) .GetAsync(); var startOfWeek = GetUtcStartOfWeekInTimeZone(DateTime.Today, user.MailboxSettings.TimeZone); var endOfWeek = startOfWeek.AddDays(7); var queryOptions = new List<QueryOption> { new QueryOption("startDateTime", startOfWeek.ToString("o")), new QueryOption("endDateTime", endOfWeek.ToString("o")) }; // Get the events var events = await graphClient.Me.CalendarView.Request(queryOptions) .Header("Prefer", $"outlook.timezone=\"{user.MailboxSettings.TimeZone}\"") .Select(ev => new { ev.Subject, ev.Organizer, ev.Start, ev.End }) .OrderBy("start/dateTime") .Top(50) .GetAsync(); // TEMPORARY: Show the results as JSON Events.Text = JsonConvert.SerializeObject(events.CurrentPage); } catch (ServiceException ex) { ShowNotification($"Exception getting events: {ex.Message}"); } base.OnNavigatedTo(e); } private static DateTime GetUtcStartOfWeekInTimeZone(DateTime today, string timeZoneId) { TimeZoneInfo userTimeZone = TimeZoneInfo.FindSystemTimeZoneById(timeZoneId); // Assumes Sunday as first day of week int diff = System.DayOfWeek.Sunday - today.DayOfWeek; // create date as unspecified kind var unspecifiedStart = DateTime.SpecifyKind(today.AddDays(diff), DateTimeKind.Unspecified); // convert to UTC return TimeZoneInfo.ConvertTimeToUtc(unspecifiedStart, userTimeZone); }Tenga en cuenta que el código
OnNavigatedToestá haciendo.- La dirección URL a la que se llamará es
/me/calendarview.- Los
startDateTimeparámetros y definen el inicio y el final de la vista deendDateTimecalendario. - El
Prefer: outlook.timezoneencabezado hace que el y de los eventos sestartenddevuelvan en la zona horaria del usuario. - La
Selectfunción limita los campos devueltos para cada evento a solo aquellos que la aplicación usará realmente. - La
OrderByfunción ordena los resultados por la fecha y hora de inicio. - La
Topfunción solicita como máximo 50 eventos.
- Los
- La dirección URL a la que se llamará es
Modifique el
NavView_ItemInvokedmétodo del archivo para reemplazar la instrucción existente por laMainPage.xaml.csswitchsiguiente.switch (invokedItem.ToLower()) { case "new event": throw new NotImplementedException(); break; case "calendar": RootFrame.Navigate(typeof(CalendarPage)); break; case "home": default: RootFrame.Navigate(typeof(HomePage)); break; }
Ahora puedes ejecutar la aplicación, iniciar sesión y hacer clic en el elemento de navegación Calendario en el menú de la izquierda. Debería ver un volcado JSON de los eventos en el calendario del usuario.
Mostrar los resultados
Reemplace todo el contenido de
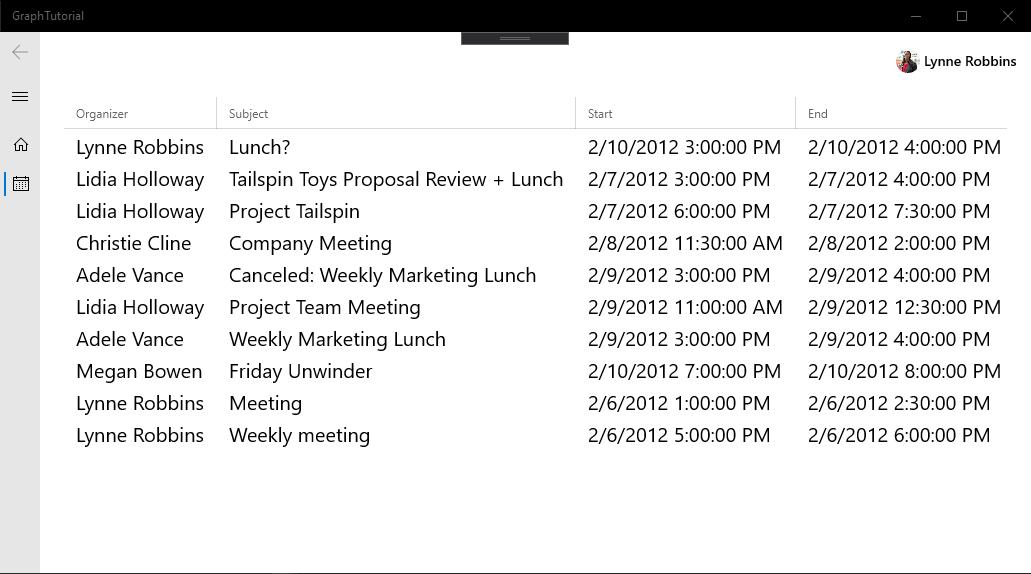
CalendarPage.xamlpor lo siguiente.<Page x:Class="GraphTutorial.CalendarPage" xmlns="http://schemas.microsoft.com/winfx/2006/xaml/presentation" xmlns:x="http://schemas.microsoft.com/winfx/2006/xaml" xmlns:local="using:GraphTutorial" xmlns:d="http://schemas.microsoft.com/expression/blend/2008" xmlns:mc="http://schemas.openxmlformats.org/markup-compatibility/2006" xmlns:controls="using:Microsoft.Toolkit.Uwp.UI.Controls" mc:Ignorable="d" Background="{ThemeResource ApplicationPageBackgroundThemeBrush}"> <Grid> <controls:DataGrid x:Name="EventList" Grid.Row="1" AutoGenerateColumns="False"> <controls:DataGrid.Columns> <controls:DataGridTextColumn Header="Organizer" Width="SizeToCells" Binding="{Binding Organizer.EmailAddress.Name}" FontSize="20" /> <controls:DataGridTextColumn Header="Subject" Width="SizeToCells" Binding="{Binding Subject}" FontSize="20" /> <controls:DataGridTextColumn Header="Start" Width="SizeToCells" Binding="{Binding Start.DateTime}" FontSize="20" /> <controls:DataGridTextColumn Header="End" Width="SizeToCells" Binding="{Binding End.DateTime}" FontSize="20" /> </controls:DataGrid.Columns> </controls:DataGrid> </Grid> </Page>Abra
CalendarPage.xaml.csy reemplace la línea por loEvents.Text = JsonConvert.SerializeObject(events.CurrentPage);siguiente.EventList.ItemsSource = events.CurrentPage.ToList();Si ejecutas la aplicación ahora y seleccionas el calendario, debes obtener una lista de eventos en una cuadrícula de datos. Sin embargo, los valores Start y End se muestran de forma no fácil de usar. Puede controlar cómo se muestran esos valores mediante un convertidor de valores.
Haga clic con el botón secundario en el proyecto GraphTutorial en el Explorador de soluciones y seleccione Agregar > clase.... Asigne un nombre a
GraphDateTimeTimeZoneConverter.csla clase y seleccione Agregar. Reemplace todo el contenido del archivo por lo siguiente.using Microsoft.Graph; using Microsoft.Graph.Extensions; using System; namespace GraphTutorial { class GraphDateTimeTimeZoneConverter : Windows.UI.Xaml.Data.IValueConverter { public object Convert(object value, Type targetType, object parameter, string language) { DateTimeTimeZone date = value as DateTimeTimeZone; if (date != null) { return date.ToDateTime().ToString(); } return string.Empty; } public object ConvertBack(object value, Type targetType, object parameter, string language) { throw new NotImplementedException(); } } }Este código toma la estructura dateTimeTimeZone devuelta por Microsoft Graph y la analiza en un
DateTimeOffsetobjeto. A continuación, convierte el valor en la zona horaria del usuario y devuelve el valor con formato.Abra
CalendarPage.xamly agregue lo siguiente antes del<Grid>elemento.<Page.Resources> <local:GraphDateTimeTimeZoneConverter x:Key="DateTimeTimeZoneValueConverter" /> </Page.Resources>Reemplace los dos
DataGridTextColumnúltimos elementos por los siguientes.<controls:DataGridTextColumn Header="Start" Width="SizeToCells" Binding="{Binding Start, Converter={StaticResource DateTimeTimeZoneValueConverter}}" FontSize="20" /> <controls:DataGridTextColumn Header="End" Width="SizeToCells" Binding="{Binding End, Converter={StaticResource DateTimeTimeZoneValueConverter}}" FontSize="20" />Ejecute la aplicación, inicie sesión y haga clic en el elemento de navegación Calendario. Debería ver la lista de eventos con los valores Start y End con formato.
Crear un nuevo evento
En esta sección, agregará la capacidad de crear eventos en el calendario del usuario.
Agregue una página nueva para la nueva vista de eventos. Haga clic con el botón secundario en el proyecto GraphTutorial en el Explorador de soluciones y seleccione Agregar > Nuevo elemento.... Elija Página en blanco, escriba
NewEventPage.xamlen el campo Nombre y seleccione Agregar.Abre NewEventPage.xaml y reemplaza su contenido por lo siguiente.
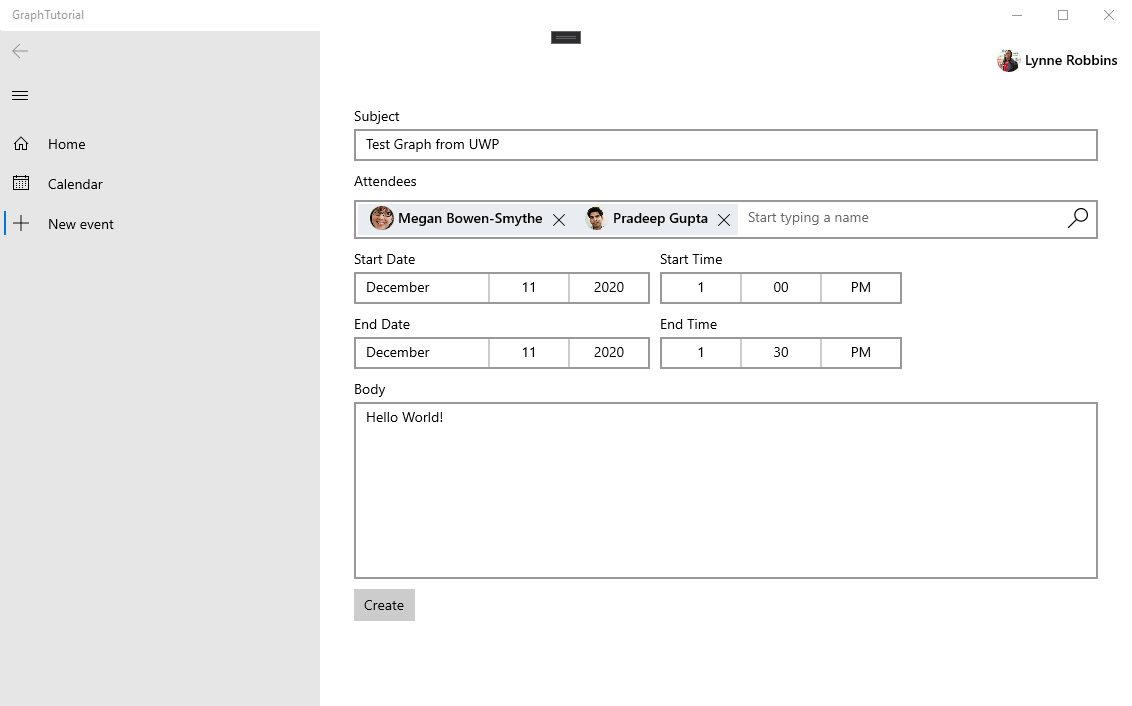
<Page xmlns:wgt="using:Microsoft.Toolkit.Graph.Controls"
    x:Class="GraphTutorial.NewEventPage"
    xmlns="http://schemas.microsoft.com/winfx/2006/xaml/presentation"
    xmlns:x="http://schemas.microsoft.com/winfx/2006/xaml"
    xmlns:local="using:GraphTutorial"
    xmlns:d="http://schemas.microsoft.com/expression/blend/2008"
    xmlns:mc="http://schemas.openxmlformats.org/markup-compatibility/2006"
    mc:Ignorable="d"
    Background="{ThemeResource ApplicationPageBackgroundThemeBrush}">

    <StackPanel Margin="10" Spacing="10">
        <TextBox Header="Subject" Text="{Binding Subject, Mode=TwoWay}" />
        <TextBlock Text="Attendees"/>
        <wgt:PeoplePicker Name="AttendeePicker" />
        <Grid ColumnSpacing="10" RowSpacing="10">
            <Grid.ColumnDefinitions>
                <ColumnDefinition Width="auto" />
                <ColumnDefinition Width="auto" />
            </Grid.ColumnDefinitions>
            <Grid.RowDefinitions>
                <RowDefinition Height="auto" />
                <RowDefinition Height="auto" />
            </Grid.RowDefinitions>
            <DatePicker Header="Start Date" Date="{Binding StartDate, Mode=TwoWay}" />
            <TimePicker Header="Start Time" Time="{Binding StartTime, Mode=TwoWay}" Grid.Column="2" />
            <DatePicker Header="End Date" Date="{Binding EndDate, Mode=TwoWay}" Grid.Row="2" />
            <TimePicker Header="End Time" Time="{Binding EndTime, Mode=TwoWay}" Grid.Row="2" Grid.Column="2" />
        </Grid>
        <TextBox Header="Body" Text="{Binding Body, Mode=TwoWay}"
                 AcceptsReturn="True" TextWrapping="Wrap"
                 Height="200" ScrollViewer.VerticalScrollBarVisibility="Auto" />
        <Button Content="Create" Click="CreateEvent" IsEnabled="{Binding IsValid}"/>
        <ProgressRing Name="CreateProgress" Visibility="Collapsed" IsActive="False" />
    </StackPanel>
</Page>
Abra NewEventPage.xaml.cs y agregue las siguientes
usinginstrucciones a la parte superior del archivo.using System.ComponentModel; using Microsoft.Graph; using Microsoft.Graph.Extensions; using Microsoft.Toolkit.Graph.Providers; using Microsoft.Toolkit.Uwp.UI.Controls; using System.Runtime.CompilerServices;Agregue la interfaz INotifyPropertyChange a la clase NewEventPage. Reemplace la declaración de clase existente por la siguiente.
public sealed partial class NewEventPage : Page, INotifyPropertyChanged
{
    public NewEventPage()
    {
        this.InitializeComponent();
        DataContext = this;
    }
}
Agregue las siguientes propiedades a la clase NewEventPage.
private TimeZoneInfo _userTimeZone = null;

// Value of the Subject text box
private string _subject = "";
public string Subject
{
    get { return _subject; }
    set
    {
        _subject = value;
        OnPropertyChanged();
    }
}

// Value of the Start date picker
private DateTimeOffset _startDate = DateTimeOffset.Now;
public DateTimeOffset StartDate
{
    get { return _startDate; }
    set
    {
        _startDate = value;
        OnPropertyChanged();
    }
}

// Value of the Start time picker
private TimeSpan _startTime = TimeSpan.Zero;
public TimeSpan StartTime
{
    get { return _startTime; }
    set
    {
        _startTime = value;
        OnPropertyChanged();
    }
}

// Value of the End date picker
private DateTimeOffset _endDate = DateTimeOffset.Now;
public DateTimeOffset EndDate
{
    get { return _endDate; }
    set
    {
        _endDate = value;
        OnPropertyChanged();
    }
}

// Value of the End time picker
private TimeSpan _endTime = TimeSpan.Zero;
public TimeSpan EndTime
{
    get { return _endTime; }
    set
    {
        _endTime = value;
        OnPropertyChanged();
    }
}

// Value of the Body text box
private string _body = "";
public string Body
{
    get { return _body; }
    set
    {
        _body = value;
        OnPropertyChanged();
    }
}

// Combine the date from date picker with time from time picker
private DateTimeOffset CombineDateAndTime(DateTimeOffset date, TimeSpan time)
{
    // Use the year, month, and day from the supplied DateTimeOffset
    // to create a new DateTime at midnight
    var dt = new DateTime(date.Year, date.Month, date.Day);

    // Add the TimeSpan, and use the user's timezone offset
    return new DateTimeOffset(dt + time, _userTimeZone.BaseUtcOffset);
}

// Combined value of Start date and time pickers
public DateTimeOffset Start
{
    get
    {
        return CombineDateAndTime(StartDate, StartTime);
    }
}

// Combined value of End date and time pickers
public DateTimeOffset End
{
    get
    {
        return CombineDateAndTime(EndDate, EndTime);
    }
}

public bool IsValid
{
    get
    {
        // Subject is required, Start must be before
        // End
        return !string.IsNullOrWhiteSpace(Subject) &&
               DateTimeOffset.Compare(Start, End) < 0;
    }
}
Agregue el siguiente código para obtener la zona horaria del usuario desde Microsoft Graph cuando se cargue la página.
protected override async void OnNavigatedTo(NavigationEventArgs e)
{
    // Get the Graph client from the provider
    var graphClient = ProviderManager.Instance.GlobalProvider.Graph;

    try
    {
        // Get the user's mailbox settings to determine
        // their time zone
        var user = await graphClient.Me.Request()
            .Select(u => new { u.MailboxSettings })
            .GetAsync();

        _userTimeZone = TimeZoneInfo.FindSystemTimeZoneById(user.MailboxSettings.TimeZone);
    }
    catch (ServiceException graphException)
    {
        ShowNotification($"Exception getting user's mailbox settings from Graph, defaulting to local time zone: {graphException.Message}");
        _userTimeZone = TimeZoneInfo.Local;
    }
    catch (Exception ex)
    {
        ShowNotification($"Exception loading time zone from system: {ex.Message}");
    }
}

private void ShowNotification(string message)
{
    // Get the main page that contains the InAppNotification
    var mainPage = (Window.Current.Content as Frame).Content as MainPage;

    // Get the notification control
    var notification = mainPage.FindName("Notification") as InAppNotification;

    notification.Show(message);
}
Agregue el siguiente código para crear el evento.
private async void CreateEvent(object sender, RoutedEventArgs e)
{
    CreateProgress.IsActive = true;
    CreateProgress.Visibility = Visibility.Visible;

    // Get the Graph client from the provider
    var graphClient = ProviderManager.Instance.GlobalProvider.Graph;

    // Initialize a new Event object with the required fields
    var newEvent = new Event
    {
        Subject = Subject,
        Start = Start.ToDateTimeTimeZone(_userTimeZone),
        End = End.ToDateTimeTimeZone(_userTimeZone)
    };

    // If there's a body, add it
    if (!string.IsNullOrEmpty(Body))
    {
        newEvent.Body = new ItemBody
        {
            Content = Body,
            ContentType = BodyType.Text
        };
    }

    // Add any attendees
    var peopleList = AttendeePicker.Items.ToList();
    var attendeeList = new List<Attendee>();

    foreach (object entry in peopleList)
    {
        // People Picker can contain Microsoft.Graph.Person objects
        // or text entries (for email addresses not found in the user's people list)
        if (entry is Person)
        {
            var person = entry as Person;

            attendeeList.Add(new Attendee
            {
                Type = AttendeeType.Required,
                EmailAddress = new EmailAddress
                {
                    Address = person.EmailAddresses.First().Address
                }
            });
        }
        else if (entry is ITokenStringContainer)
        {
            var container = entry as ITokenStringContainer;

            // Treat any unrecognized text as a list of email addresses
            var emails = container.Text
                .Split(new[] { ';', ',', ' ' }, StringSplitOptions.RemoveEmptyEntries);

            foreach (var email in emails)
            {
                try
                {
                    // Validate the email address
                    var addr = new System.Net.Mail.MailAddress(email);
                    if (addr.Address == email)
                    {
                        attendeeList.Add(new Attendee
                        {
                            Type = AttendeeType.Required,
                            EmailAddress = new EmailAddress
                            {
                                Address = email
                            }
                        });
                    }
                }
                catch { /* Invalid, skip */ }
            }
        }
    }

    if (attendeeList.Count > 0)
    {
        newEvent.Attendees = attendeeList;
    }

    try
    {
        await graphClient.Me.Events.Request().AddAsync(newEvent);
    }
    catch (ServiceException graphException)
    {
        ShowNotification($"Exception creating new event: ${graphException.Message}");
    }

    CreateProgress.IsActive = false;
    CreateProgress.Visibility = Visibility.Collapsed;

    ShowNotification("Event created");
}
Modifique el
NavView_ItemInvokedmétodo del archivo MainPage.xaml.cs para reemplazar la instrucciónswitchexistente por la siguiente.switch (invokedItem.ToLower()) { case "new event": RootFrame.Navigate(typeof(NewEventPage)); break; case "calendar": RootFrame.Navigate(typeof(CalendarPage)); break; case "home": default: RootFrame.Navigate(typeof(HomePage)); break; }Guarde los cambios y ejecute la aplicación. Inicie sesión, seleccione el elemento de menú Nuevo evento, rellene el formulario y seleccione Crear para agregar un evento al calendario del usuario.
¡Enhorabuena!
Has completado el tutorial de microsoft Graph UWP. Ahora que tienes una aplicación de trabajo que llama a Microsoft Graph, puedes experimentar y agregar nuevas características. Visite la información general de Microsoft Graph para ver todos los datos a los que puede acceder con Microsoft Graph.
Comentarios
Proporcione cualquier comentario sobre este tutorial en el repositorio GitHub archivo.
¿Tiene algún problema con esta sección? Si es así, envíenos sus comentarios para que podamos mejorarla.