Manage authentication and access to Microsoft Teams
Microsoft Teams supports all the identity models that are available with Microsoft 365, including:
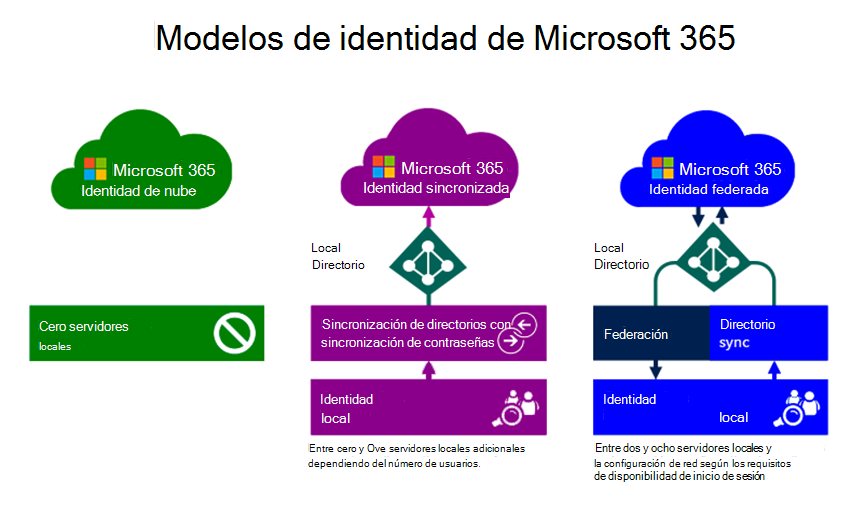
- Cloud Identity. In this model, a user is created and managed in Microsoft 365. The user account is stored in Microsoft Entra ID and only exists there. The user’s password is also verified by Microsoft Entra ID.
- Synchronized Identity. In this model, the user identity is managed in an on-premises server, and the account and its password hash are synchronized to the cloud. The user enters the same password in both the on-premises server and in the cloud. At sign-in, the password is verified by Microsoft Entra ID. This model uses the Microsoft Entra Connect Tool.
- Federated Identity. This model requires a synchronized identity where the user password is verified by the on-premises identity provider. With this model, the password hash isn't synchronized to Microsoft Entra ID. It's not synchronized because Active Directory Federation Services (ADFS) or a third-party identity provider is used to authenticate users against the on-premises Active Directory.
Each of these models is represented in the following graphic:
Depending on which Microsoft 365 identity model an organization decides to use, the implementation requirements may vary. That being said, the configuration steps for implementing these models are outside the scope of this training.
Additional reading. For more information, see Microsoft 365 identity models and Microsoft Entra ID.
Ensuring the correct users are accessing an organization's system resources is critical to securing data. Access to Microsoft Teams is enabled or disabled on a per-user basis. Access is configured by assigning or removing the Microsoft Teams product license to a user account. Specific Microsoft Teams’ features can't be turned on or off at an individual user level.
Tip
It's recommended that organizations enable Microsoft Teams for all their users. This design enables teams to be formed organically for projects and other dynamic initiatives. Even if you're deciding to pilot a feature set of Teams, it may still be helpful to keep Microsoft Teams enabled for all users, but only target communications to the pilot group of users.
User-level licenses for Microsoft Teams are managed directly through the user management interfaces in the Microsoft 365 admin center. An administrator can assign licenses to new users when new user accounts are created, or to users with existing accounts. The administrator must have Microsoft 365 Global Administrator or User Management Administrator privileges to manage Microsoft Teams licenses.
When a license SKU such as Office 365 Enterprise E3 or E5 is assigned to a user, a Microsoft Teams license is automatically assigned to the user. This license enables the user to use Microsoft Teams. Administrators can have granular control over all the Microsoft 365 services and licenses. The Microsoft Teams license for a specific user or a group of users can also be enabled or disabled.
A Microsoft Teams user license can be disabled at any time. When a license is disabled for a user, the user is prevented from accessing Microsoft Teams. The user is also prevented from seeing Microsoft Teams in the Office 365 app launcher and homepage.
Maintaining licenses with Windows PowerShell
Besides using the Microsoft 365 admin center, Microsoft 365 administrators can also use Windows PowerShell to assign and remove licenses.
The following PowerShell command can assign a license to a user:
Set-MsolUserLicense -UserPrincipalName "\<Account\>" -AddLicenses "\<AccountSkuId\>"
The following example assigns a license to an unlicensed user in the fictitious company known as Litware, Inc.
In PowerShell, ENTERPRISEPACK is the official designation for an Office 365 Enterprise E3 license. This sample command assigns a "litwareinc:ENTERPRISEPACK" licensing plan to the unlicensed user belindan@litwareinc.com.
Set-MsolUserLicense -UserPrincipalName "belindan@litwareinc.com" -AddLicenses "litwareinc:ENTERPRISEPACK"
Additional reading. For more information, see Assign licenses to user accounts with Office 365 PowerShell.