Exercise - Use Dataverse Healthcare APIs with Azure Logic apps
In this exercise, you learn how to call Dataverse Healthcare APIs within Microsoft Azure Logic Apps to write the FHIR resource bundle to Dataverse and then retrieve the newly created record from Dataverse.
Note
For this exercise, all Azure resources are provisioned in the East US region.
Tip
To complete this exercise, create all Azure resources in the same subscription and resource group unless otherwise stated.
Task: Create a user-assigned, managed identity in Azure
In this task, you create a user-assigned, managed identity in Azure.
While signed in to your Microsoft 365 tenant as global administrator, open a new browser tab and then go to the Azure portal.
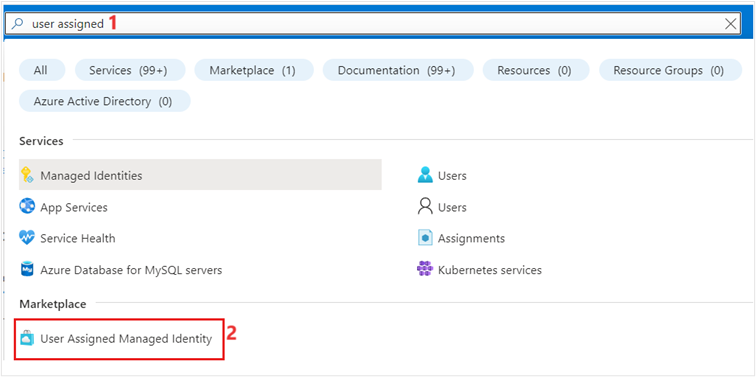
Search for the string user assigned in the search box.
Select User Assigned Managed Identity under the Marketplace section.
On the Create User Assigned Managed Identity page, select your subscription. Then, select a resource group if you already have one; if not, select Create new to create a new resource group. In the Region dropdown menu, select East US, and then enter FHIRRelayIdentity in the Name field.
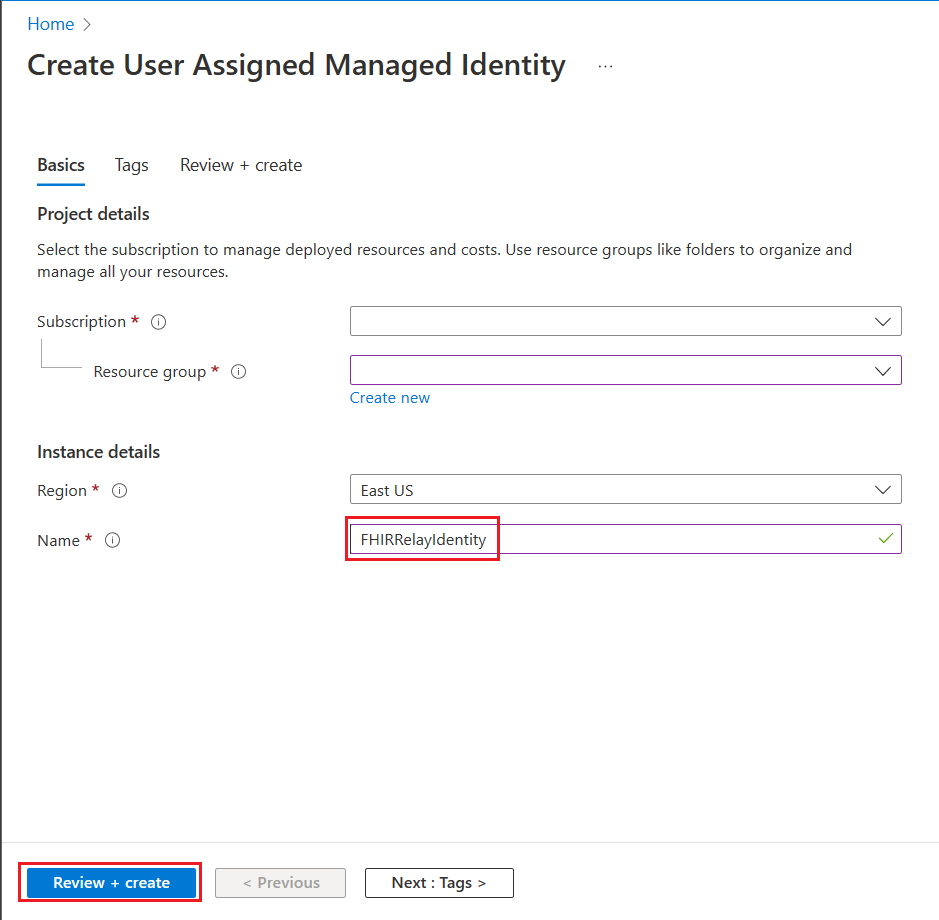
Select Review + create.
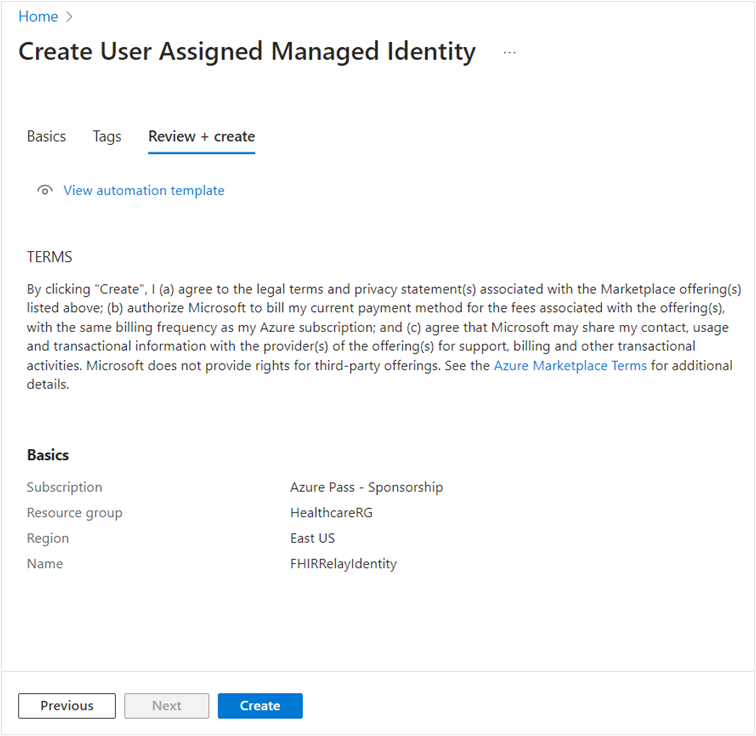
On the Review + create page, select Create.
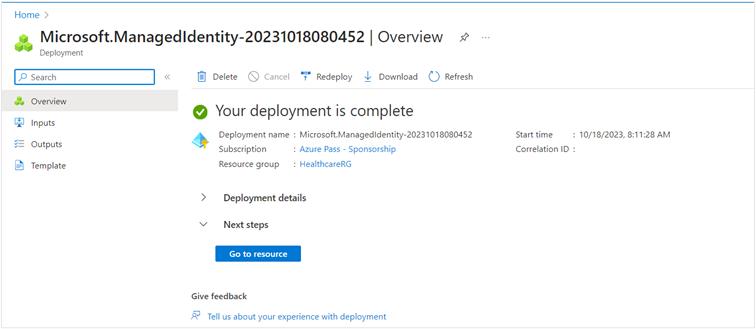
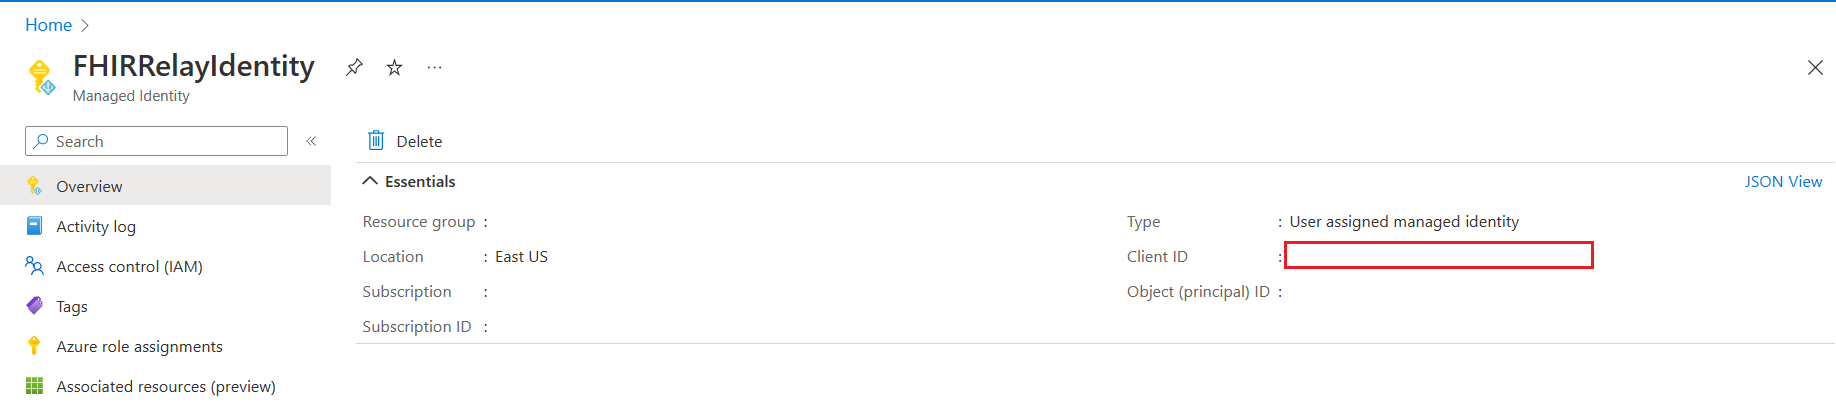
After the deployment is complete, select Go to resource.
Copy the Client ID of FHIRRelayIdentity and then save it in a notepad to use in the subsequent tasks.


Task: Create an app from Azure Logic Apps
In this task, you create an app from Azure Logic Apps.
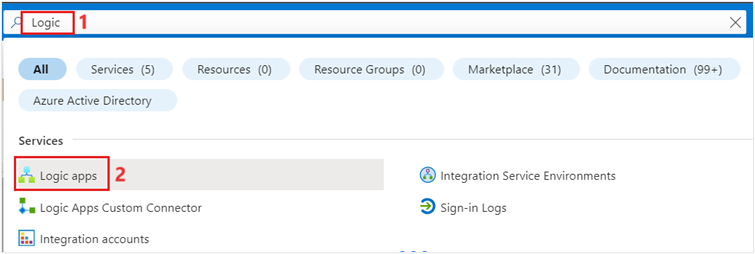
Search for the string logic in the search box.
Select Logic apps under the Services section.
On the Logic apps page, select Add.

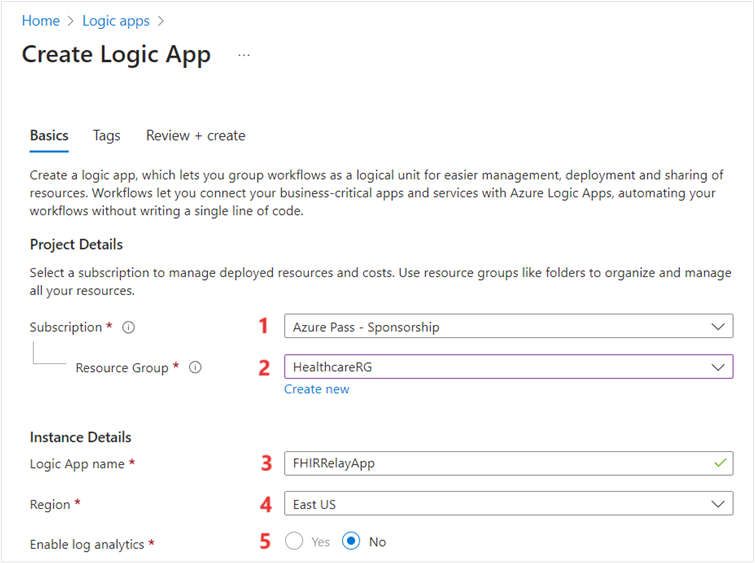
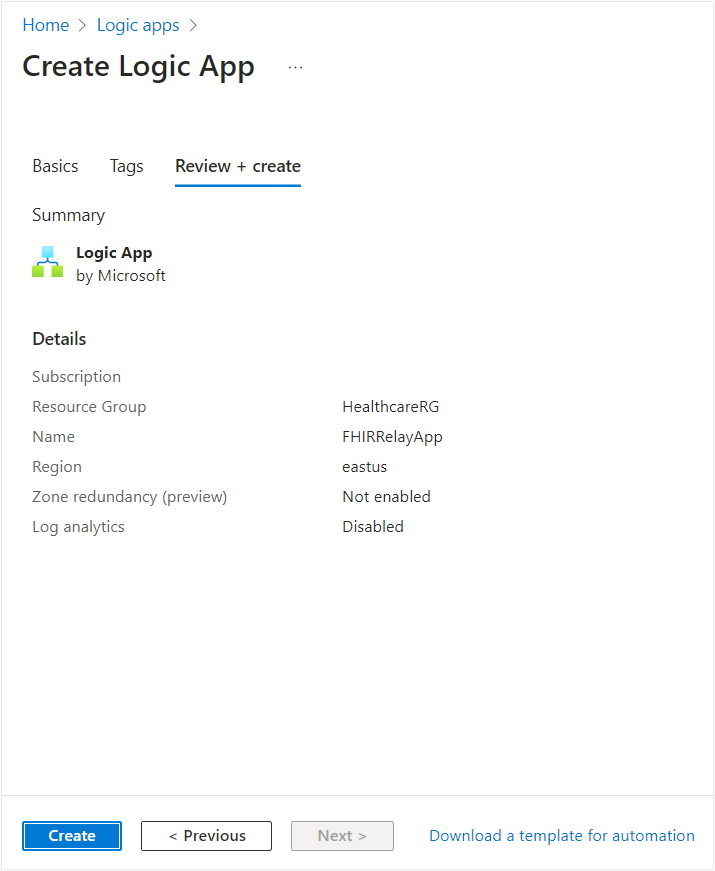
On the Create Logic App page, enter the following details:
Subscription - Select your desired subscription
Resource Group - Select your resource group name
Logic App name - FHIRRelayApp
Region - East US (default)
Enable log analytics - No (default)
Plan type - Consumption
Zone redundancy - Disabled (default)
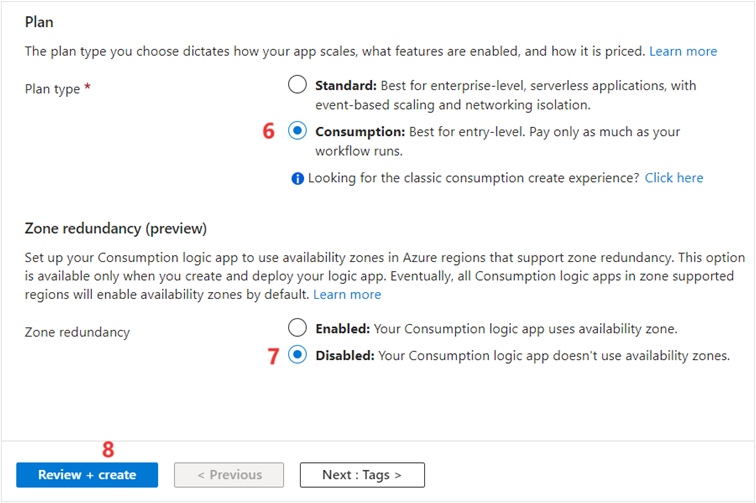
Select Review + create.
On the Review + create page, select Create.
Select Go to resource.


The Logic Apps Designer page opens. Select X to close the page.
Add the user-assigned managed identity as an identity to the logic app
In this task, you add the previously created user-assigned managed identity FHIRRelayIdentity as an identity to the FHIRRelayApp logic app. This task is a continuation of the previous task.
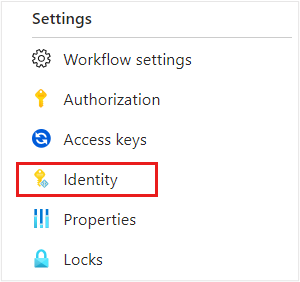
On the Logic app main page you created in the previous task, select Identity on the left pane.
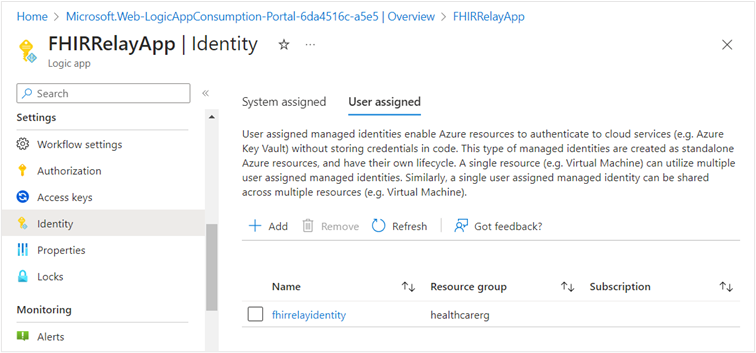
On the right pane, select User assigned.
Select Add.
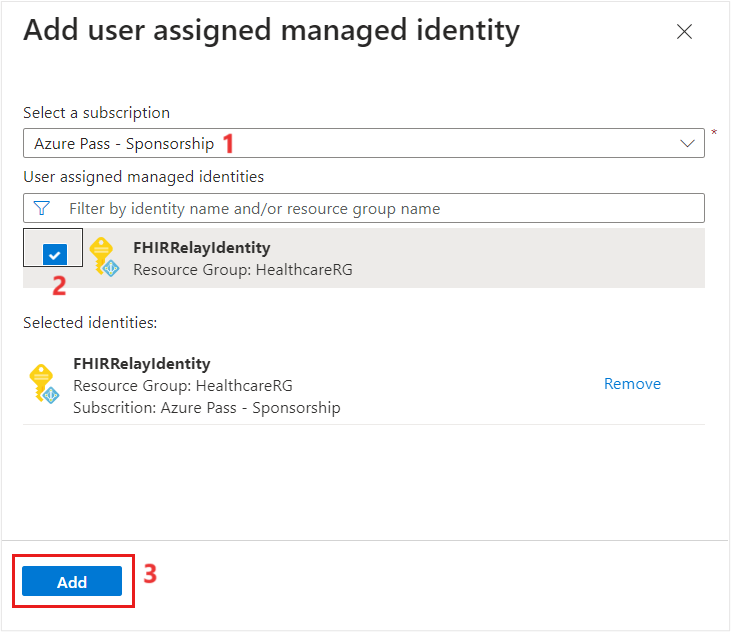
On the Add user assigned managed identity panel, select the subscription in which you created the FHIRRelayIdentity user-assigned managed identity.
Select FHIRRelayIdentity as the user-assigned managed identity, as shown in the following image.
Select Add.
FHIRRelayIdentity is added to FHIRRelayApp as the user-assigned managed identity.


Add the user assigned managed identity as an application user in Dataverse
In this task, you add the FHIRRelayIdentity user-assigned managed identity as an application user in Dataverse and then you assign the Sync admin for FHIR App Reg user security role.
While signed in to your Microsoft 365 tenant as global administrator, open a new tab and then go to Microsoft Power Platform admin center.
On the left navigation, select Environments.
On the right pane, select the Lamna Healthcare environment.
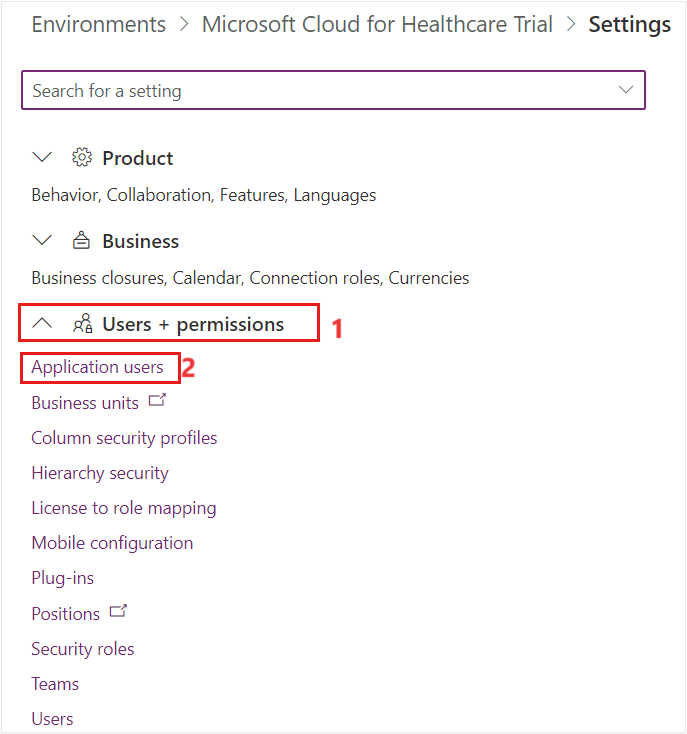
On the upper command bar, select Settings, as shown in the following screenshot.

On the Settings page, select Users + permissions > Application users.
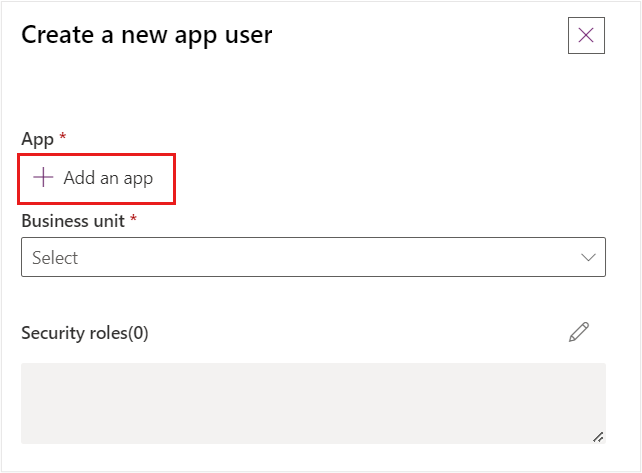
Select + New app user.
In the Create a new app user panel, select + Add an app.
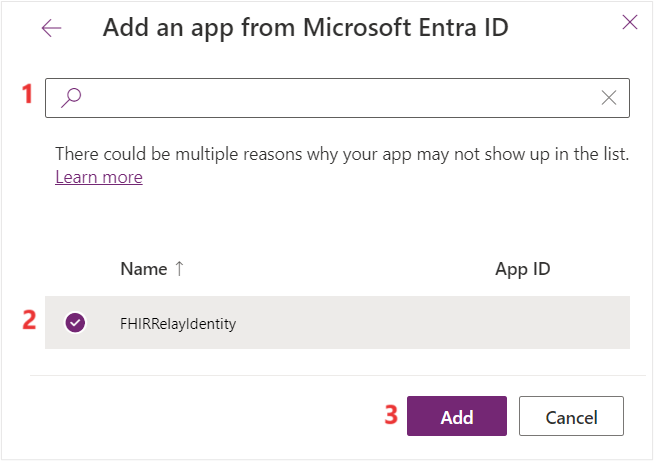
In the Add an app from Microsoft Entra ID panel, use the search box to search for the FHIRRelayIdentity by using its client ID that you copied in a previous step.
Select FHIRRelayIdentity and then select Add.
After adding the Microsoft Entra ID app, you'll be redirected to the Create a new app user panel. In the Business unit dropdown menu, select the client ID and then select the edit icon beside the Security roles option.
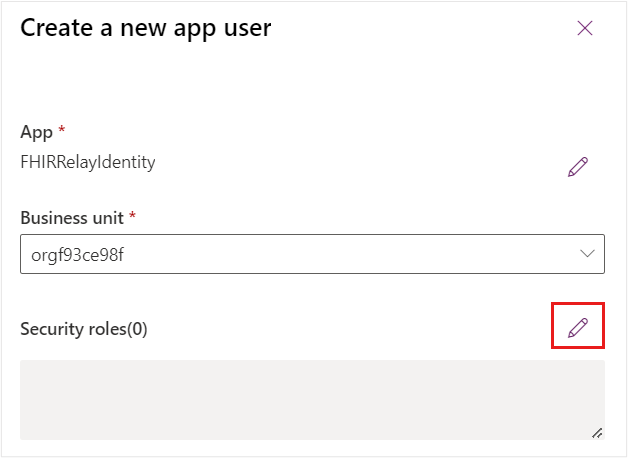
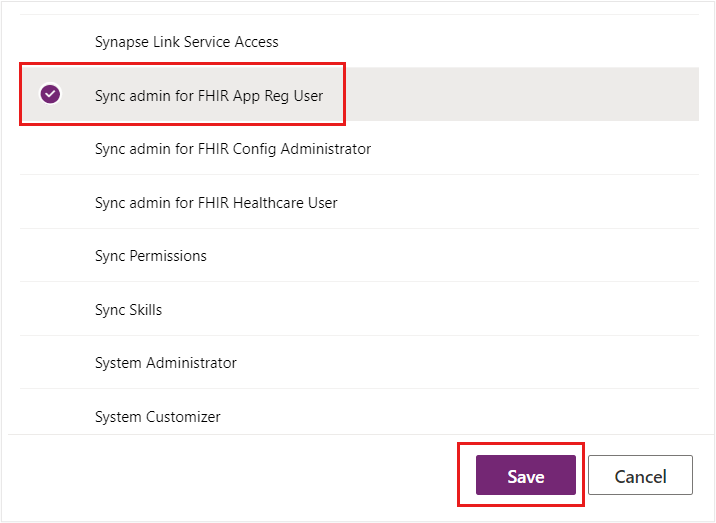
On the Add security roles pane, select Sync admin for FHIR App Reg User and then select Save.
You're redirected to the Create a new app user panel, which should appear as shown in the following screenshot. Select Create to add FHIRRelayIdentity as an application user and then assign it the Sync admin for FHIR App Reg User security role.


After you successfully added FHIRRelayIdentity as an application user in the Dataverse environment, it should appear as shown in the following screenshot.
Use the Dataverse Healthcare API upsert bundle with Azure Logic Apps
In this task, you modify the Azure Logic Apps application named FHIRRelayApp to add the steps to call Dataverse Healthcare APIs to send the Patient FHIR resource bundle to Dataverse and then retrieve the newly added record from Dataverse. Dataverse Healthcare APIs expose only two endpoints: msind_UpsertBundle and msind_RetrieveBundle. You can call both endpoints in Azure Logic Apps. In this task, you create a Patient FHIR bundle, which uses elements of other FHIR resource types. In this case, it's mandatory that you enable entity maps of all dependent entities in Data Integration Toolkit. If the dependent entities aren't enabled, then msind_UpsertBundle responds with a warning or an error regarding expanding the resource, though it will successfully create the patient record without including the elements with error or warning.
Important
Don't create new patients in Dataverse. Always add new patients in your FHIR servers and then let the Dataverse Healthcare API ingestion pipeline create the corresponding Dataverse records.
Patients are the core resource (entity) in FHIR. Every other resource (entity) in FHIR relates to the Patient resource or entity. FHIR servers automatically assign a unique ID when you add a new patient. That ID attribute is read-only. If you try to create a new patient record in Dataverse, Dataverse can't assign a value to the patient ID attribute in FHIR. Therefore, the Dataverse Healthcare Writeback feature can't write the data changes to your FHIR system.
When you add a new patient in your EMR system, the data change will flow to the Azure FHIR server and then to Dataverse. Then, you can add related records, such as encounters, appointments, and observations.
Switch back to the Azure portal.
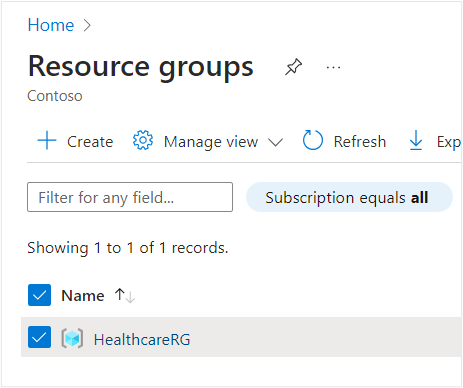
Search and select Resource Groups.

On the Resource groups page, select the resource group in which you created FHIRRelayApp.
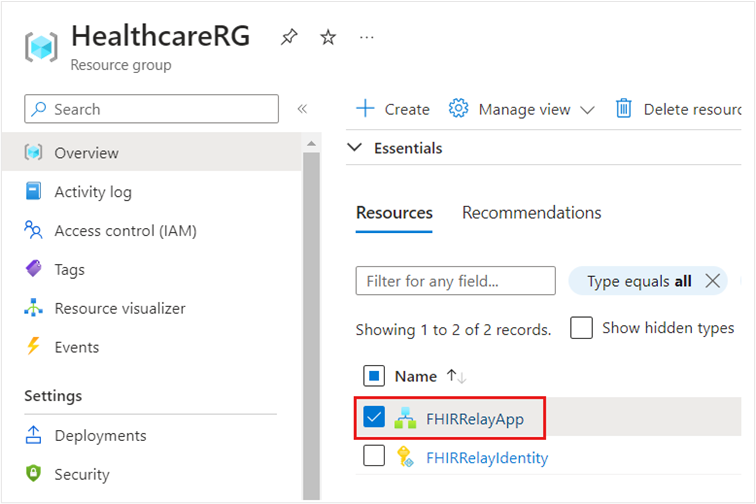
Select the FHIRRelayApp logic app.
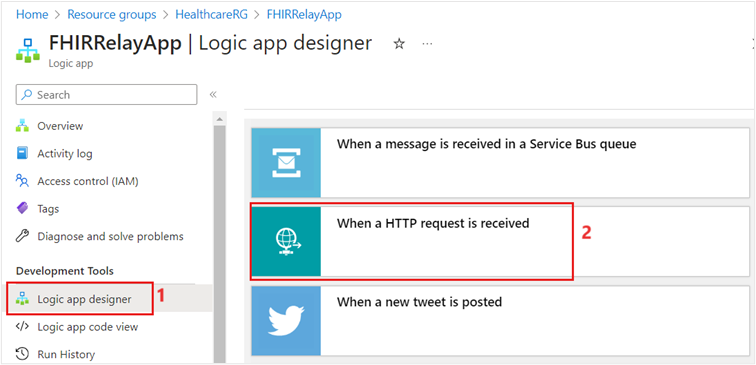
Under Development tools, select Logic app designer on the left navigation pane. You're redirected to the Logic Apps Designer page on the right panel.
Select the When a HTTP request is received trigger.
On the Logic Apps Designer canvas, select Save.
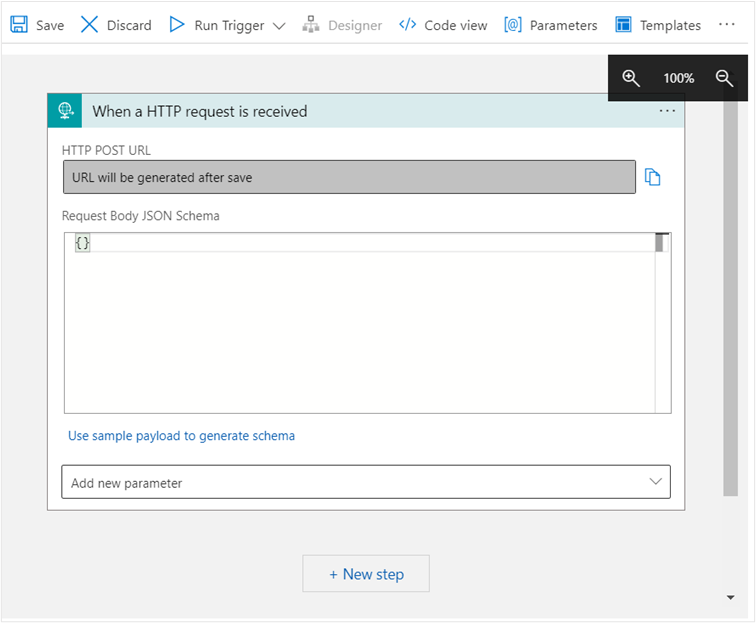
Note
The Request Body JSON Schema is left empty because the FHIR bundle in each incoming request can be unique.
Select Parameters and then select Add Parameter.
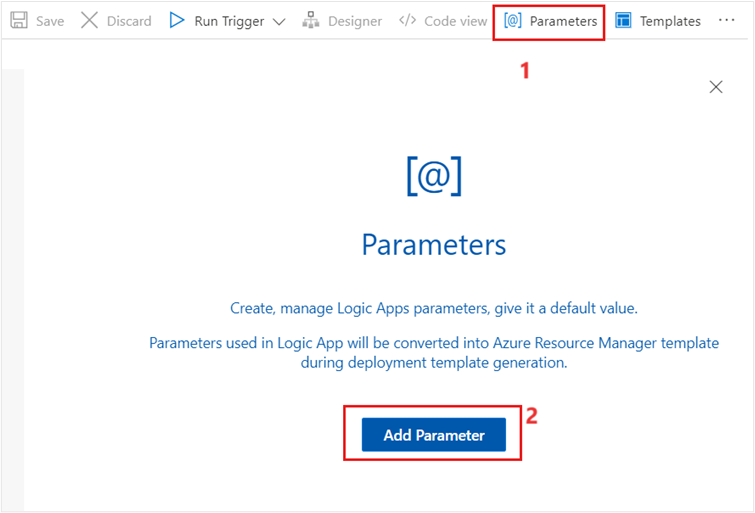
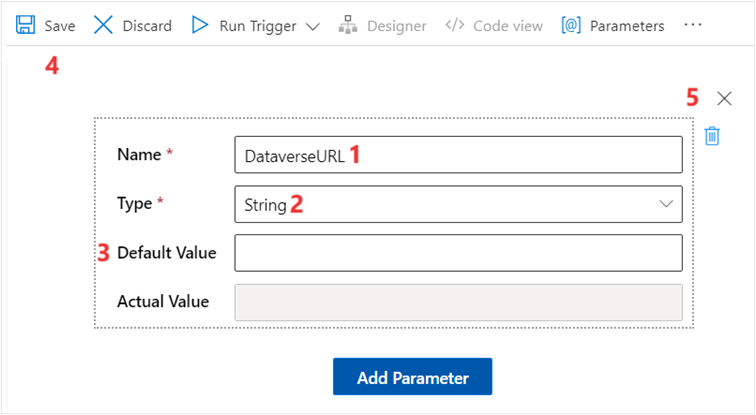
Add a new parameter by using the following values:
Name - DataverseURL
Type - String
Default Value - (Your Dataverse environment URL)
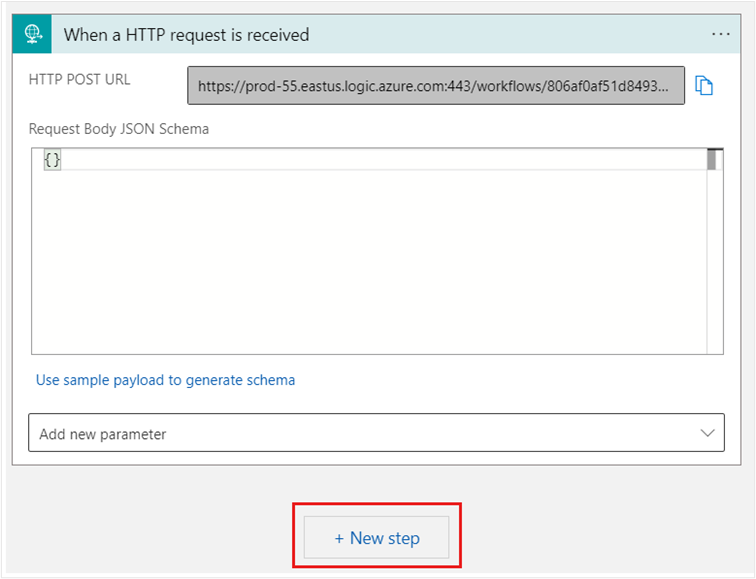
Select Save and then select X to close the page.
On the Logic Apps Designer canvas, select + New step.
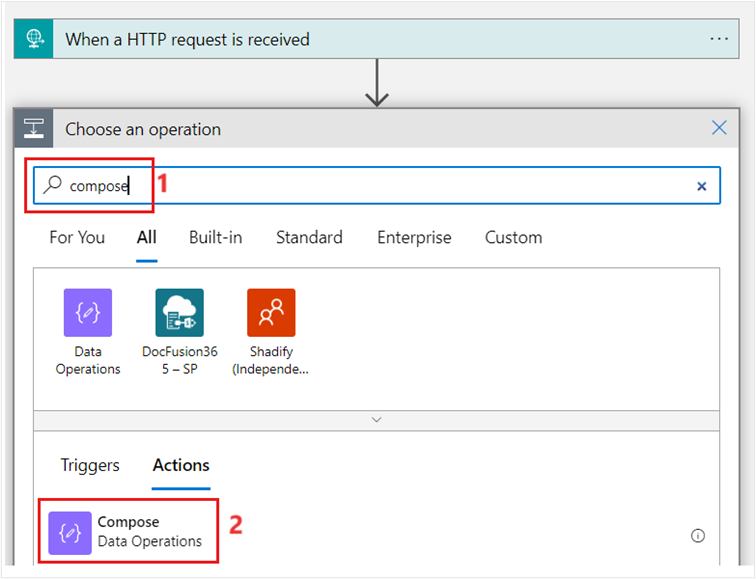
Use the search box in the Choose an operation card to search for the compose string.
Select the Compose action.
Select the ellipsis (...) on the Compose step and then select Rename.
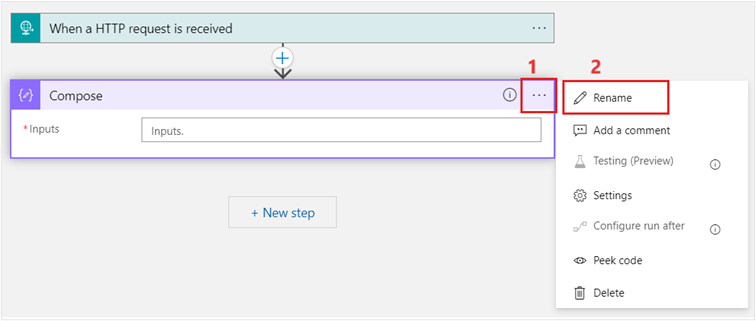
Rename the Compose step to Build Dataverse Request Body.
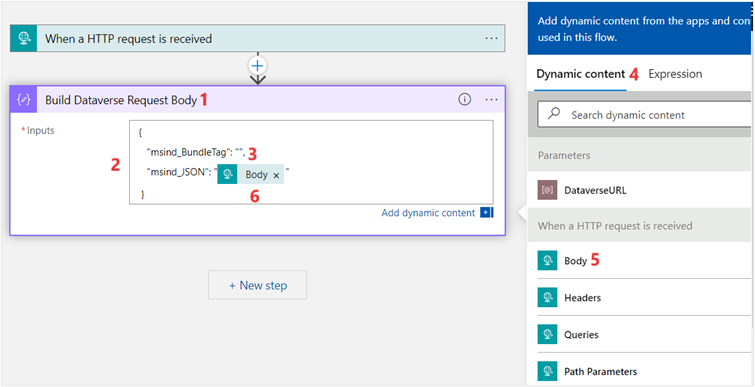
In the Inputs field, add the following JSON snippet:
 {
   "msind_BundleTag": "",
   "msind_JSON": ""
 }
In the empty quotes for the msind_JSON node, add the dynamic content for the When a HTTP request is received trigger Body value.
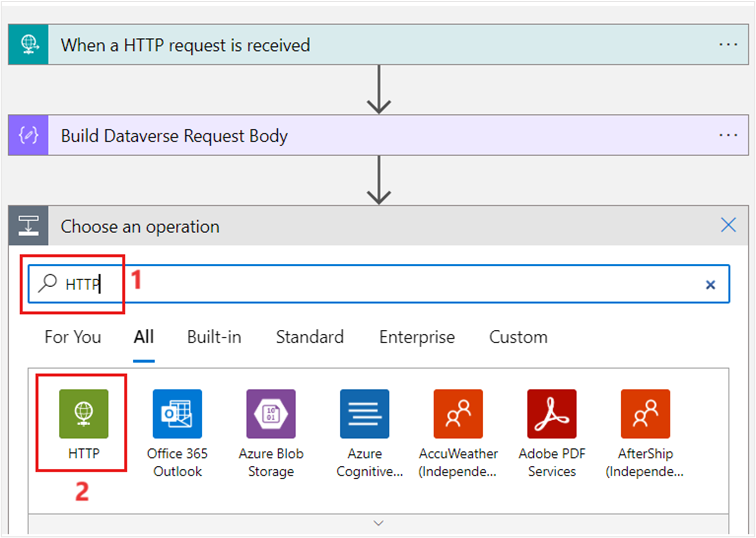
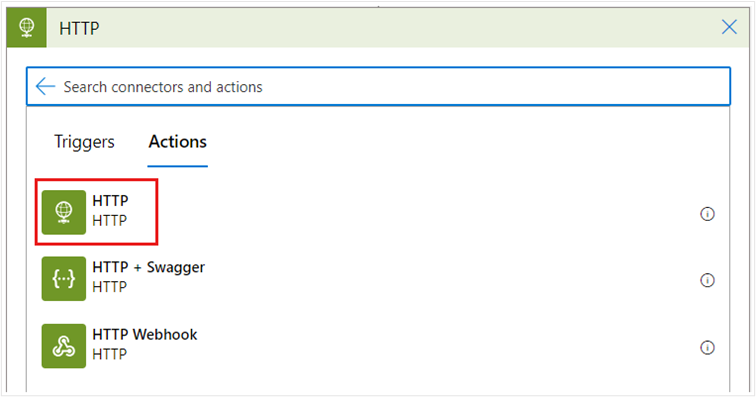
Select + New step to add an HTTP action.
In the Choose an operation card, enter HTTP. Select HTTP action as show in the below image.
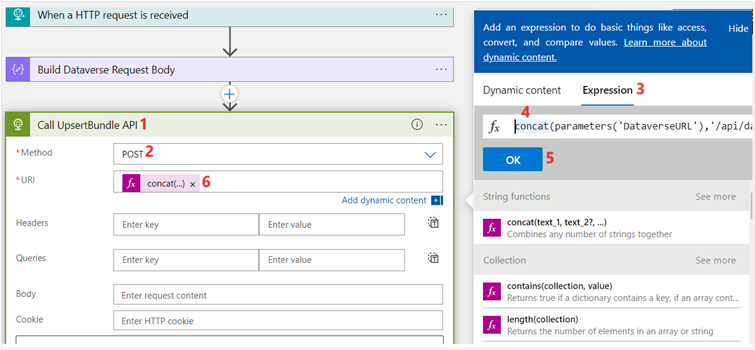
Rename the HTTP action to Call UpsertBundle API. Use the following values to set up the UpsertBundle API call:
Method - POST
URI - Set to the expression concat(parameters('DataverseURL'),'/api/data/v9.1/msind_UpsertBundle')
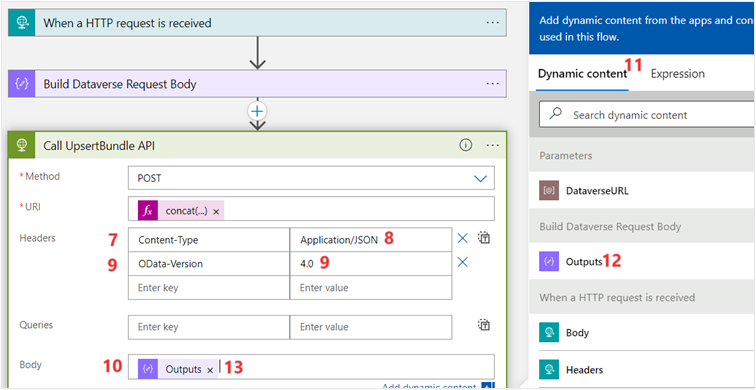
Headers
Content-Type - Application:JSON
OData-Version - 4
Body - Set to dynamic content Outputs (output of the Build Dataverse Request Body action)
Note
You can use the /api/data/v9.1/msind_UpsertBundle or the /api/data/v9.2/msind_UpsertBundle endpoint in your API call.
From the Add new parameter dropdown menu, select Authentication.
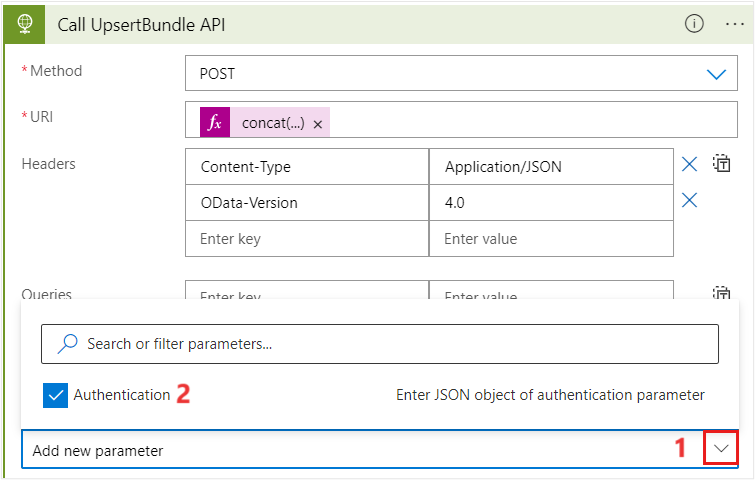
Select Managed identity as the Authentication type.

Under the Authentication section, select FHIRRelayIdentity from the Managed identity dropdown menu.
Select the DataverseURL parameter from dynamic content as the value for Audience.

Select + New step to add a Response action.
Use the search box in the Choose an operation card to search for the response string.
Select the Response action from the search result.
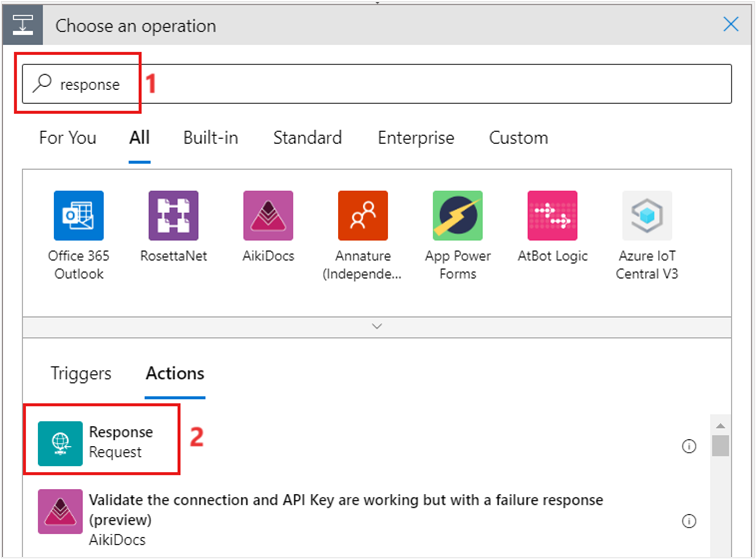
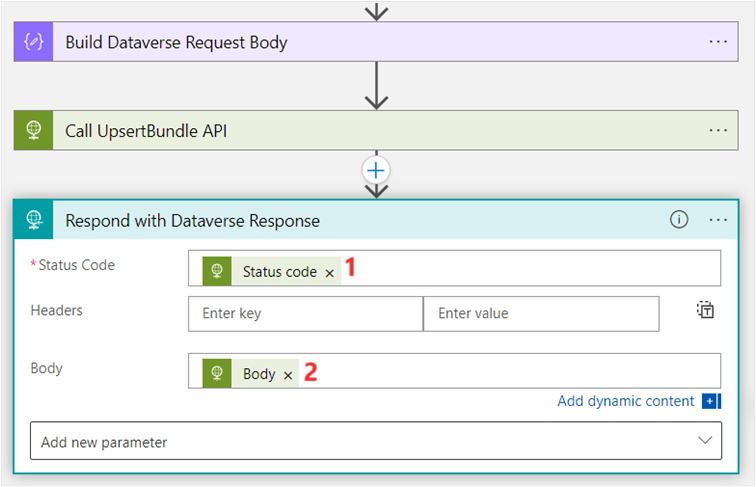
Rename the Response action card to Respond with Dataverse Response.
Fill in the Respond with Dataverse Response card with the following values:
Status Code - Set this value to Status code from Call UpsertBudle API dynamic content.
Body - Set it to Body from the Call UpsertBundle API dynamic content.
Select Save on the Logic Apps Designer canvas.


Test Dataverse Healthcare APIs in Azure Logic Apps
In this task, you test the FHIRRelayApp logic app that you created in the previous task by using the Run Trigger feature. In this test, you provide a Patient FHIR resource bundle with the Batch type as an input to the FHIRRelayApp, which in turn calls the msind_UpsertBundle Dataverse Healthcare API endpoint. This endpoint uses the FHIR bundle JSON payload to create a record in the corresponding Dataverse entity.
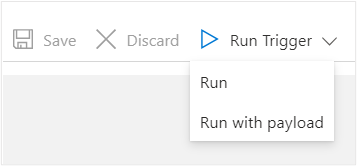
After saving the FHIRRelayApp logic app in the previous task, select the dropdown menu next to Run Trigger and then select Run with payload.
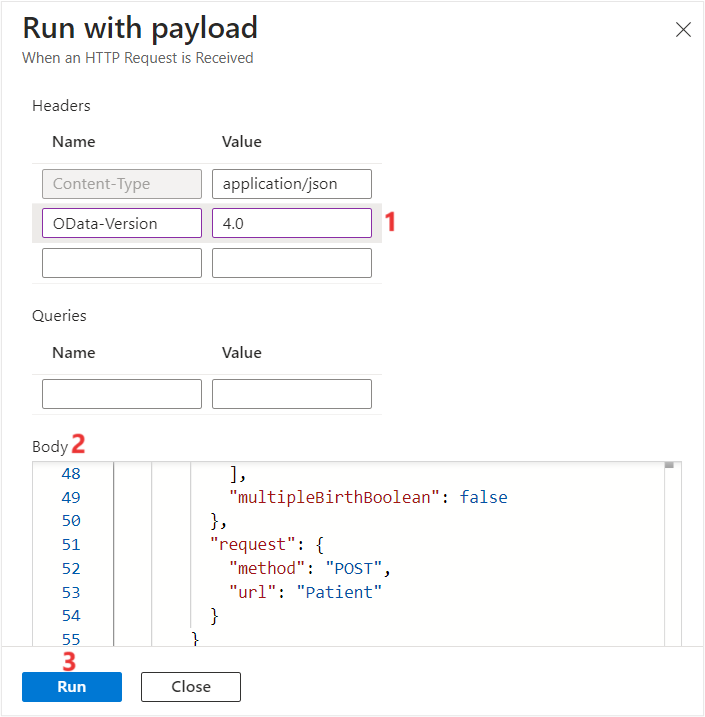
On the Run with payload panel, add the OData-Version header and then enter 4.0 as its value.
Enter the following Patient FHIR bundle JSON payload as the value for Body. This FHIR bundle contains only one Patient FHIR resource, which is mapped to the Contact entity in Dataverse.
Note
The FHIR bundle that's used in this illustration is from Synthea, the synthetic healthcare record generator; hence, it contains the FHIR resource ID.
{
    "resourceType": "Bundle",
    "type": "batch",
    "entry": [
        {
			"resource": {
			"resourceType": "Patient",
			"id": "d0000000-c7e2-408f-9652-c8c2bdd9d2bf",
			"text": {
			  "status": "generated"
			},
			"identifier": [
			  {
				"system": "https://github.com/synthetichealth/synthea",
				"value": "51978986-f824-43da-b69a-d2d17f49df70"
			  }
			],
			"name": [
			  {
				"use": "official",
				"family": "Contoso",
				"given": [
				  "Allen007"
				],
				"prefix": [
				  "Ms."
				]
			  }
			],
			"telecom": [
			  {
				"system": "phone",
				"value": "555-664-6121",
				"use": "home"
			  }
			],
			"gender": "female",
			"birthDate": "1965-11-04",
			"address": [
			  {
				"line": [
				  "165 Shanahan View"
				],
				"city": "North Reading",
				"state": "Massachusetts",
				"country": "US"
			  }
			],
			"multipleBirthBoolean": false
		  },
		  "request": {
			"method": "POST",
			"url": "Patient"
		  }
		}
	]
}
Select Run to trigger the logic app.
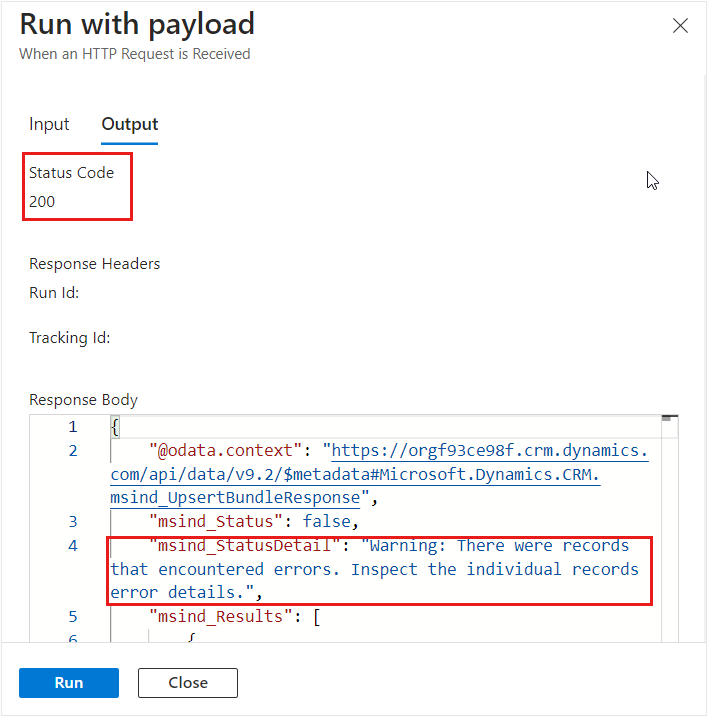
After successful implementation of the msind_UpsertBundle endpoint, the response from Dataverse will be Status Code 200.
Note
Status Code 200 indicates that the Dataverse Healthcare API has successfully created a new record for the FHIR resource in the corresponding Dataverse entity. In this example, a successful implementation of the logic app should create a new entry in the Contact entity in Dataverse.
Note
The preceding output shows Status Code 200 and warnings about errors that have occurred in records. This behavior is expected according to the configuration that you've done in Data Integration Toolkit.
The Response Body is as follows:
{
    "@odata.context": "https://lamnahealth.crm.dynamics.com/api/data/v9.1/$metadata#Microsoft.Dynamics.CRM.msind_UpsertBundleResponse",
    "msind_StatusDetail": "Warning: There were records that encountered errors. Inspect the individual records error details.",
    "msind_Status": false,
    "msind_Results": [
        {
            "@odata.type": "#Microsoft.Dynamics.CRM.msind_upsertfhirbundleresult",
            "msind_fhirresourceid": "d0000000-c7e2-408f-9652-c8c2bdd9d2bf",
            "msind_fhirresourcetype": "Patient",
            "msind_resultingrecordid": "b6fe91ee-5b9a-ed11-aad0-6045bd026d52",
            "msind_resultingrecordtype": "contact",
            "msind_requestactionperformed": 935000000,
            "msind_requeststatus": 935000002,
            "msind_requeststatusdetail": "The record was created successfully.\r\nError: The expansion for this resource failed. Expand Detail: Error: Expand failed. Resource Type: Patient, Resource Id: d0000000-c7e2-408f-9652-c8c2bdd9d2bf, Resource Element: link, Expand Table Name: msemr_contactlink, Expand Detail: The entity map look up on attribute map 5dc39e81-98d0-eb11-bacc-000d3a3ad182 either does not exist or has not been enabled.\r\nError: The expansion for this resource failed. Expand Detail: Error: Expand failed. Resource Type: Patient, Resource Id: d0000000-c7e2-408f-9652-c8c2bdd9d2bf, Resource Element: identifier, Expand Table Name: msemr_medicalidentifier, Expand Detail: The entity map look up on attribute map a8584750-98d0-eb11-bacc-000d3a3ad182 either does not exist or has not been enabled."
        },
        {
            "@odata.type": "#Microsoft.Dynamics.CRM.msind_upsertfhirbundleresult",
            "msind_requestactionperformed": 935000002,
            "msind_resultingrecordtype": "msemr_contactlink",
            "msind_fhirresourceid": "d0000000-c7e2-408f-9652-c8c2bdd9d2bf",
            "msind_fhirresourcetype": "Patient",
            "msind_requeststatus": 935000002,
            "msind_requeststatusdetail": "Error: Expand failed. Resource Type: Patient, Resource Id: d0000000-c7e2-408f-9652-c8c2bdd9d2bf, Resource Element: link, Expand Table Name: msemr_contactlink, Expand Detail: The entity map look up on attribute map 5dc39e81-98d0-eb11-bacc-000d3a3ad182 either does not exist or has not been enabled."
        },
        {
            "@odata.type": "#Microsoft.Dynamics.CRM.msind_upsertfhirbundleresult",
            "msind_requestactionperformed": 935000002,
            "msind_resultingrecordtype": "msemr_medicalidentifier",
            "msind_fhirresourceid": "d0000000-c7e2-408f-9652-c8c2bdd9d2bf",
            "msind_fhirresourcetype": "Patient",
            "msind_requeststatus": 935000002,
            "msind_requeststatusdetail": "Error: Expand failed. Resource Type: Patient, Resource Id: d0000000-c7e2-408f-9652-c8c2bdd9d2bf, Resource Element: identifier, Expand Table Name: msemr_medicalidentifier, Expand Detail: The entity map look up on attribute map a8584750-98d0-eb11-bacc-000d3a3ad182 either does not exist or has not been enabled."
        }
    ]
}


The following information explains the response sent by the msind_UpsertBundle API:
```
"msind_Status": "A Boolean (true/false) indicating whether the bundle was successfully processed and all valid resources were upserted into Dataverse. If there is any warning or error in upserting any of the dependent resources, then the value will be false.",
    "msind_StatusDetail": "It provides information about the msind_Status.",
    "msind_Results":
{
            "msind_fhirresourceid": "The FHIR ID of the resource in the bundle. If an entry in the result pertains to an expanded record, the value will be the FHIR ID of the root resource.",
            "msind_fhirresourcetype": "The FHIR resource type of the resource in the bundle. If an entry in the result pertains to an expanded record, the value will be the FHIR resource type of the root resource.",
            "msind_resultingrecordid": "The Dataverse ID after the record has been upserted. If an entry in the result pertains to an expanded record, the value will be the Dataverse ID of the root resource.",
            "msind_resultingrecordtype": "The name of the Dataverse entity that the record was upserted into. If an entry in the result pertains to an expanded record, the value will be the name of the Dataverse entity of the     expanded record.",
            "msind_requestactionperformed": "The type of action performed. Below block shows expected values and their description.",
{
	  935000000: “A root resource has been created”,
	  935000001: “A root resource already existing in Dataverse has been updated”,
	  935000002: “The action was performed on an expanded entity”
}
            "msind_requeststatus": "The status of the request. Below block shows expected values and their description.",
      {
935000000: “The resource upsert resulted in a success”,
935000001: “The resource upsert resulted in a warning”,
935000002: “The resource upsert resulted in an error”
      }
            "msind_requeststatusdetail": "The detailed information about the msind_requeststatus."
        }
```
Go to your Power Apps environment and select Tables on the left navigation pane.
Under the Recommended section on the right pane, select Contact.
Select Edit.
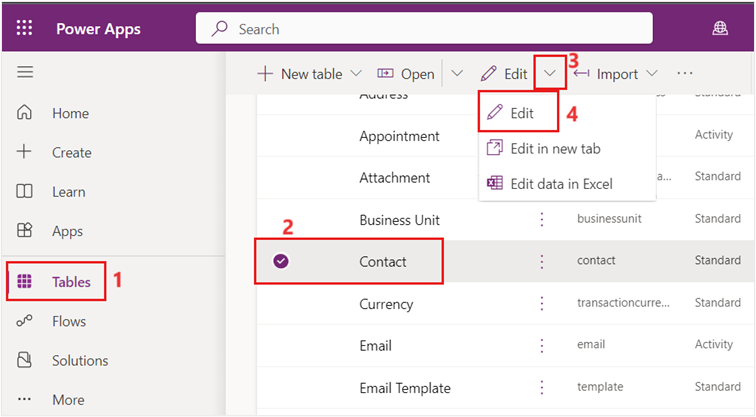

Patient Allen007 Contoso shows as recorded in Dataverse.

Task: Use the retrieve bundle Dataverse Healthcare API with Azure Logic Apps
In this task, you modify the FHIRRelayApp logic app to invoke the msind_RetrieveBundle Dataverse Healthcare API.
Open the FHIRRelayApp logic app that you created in the previous task.
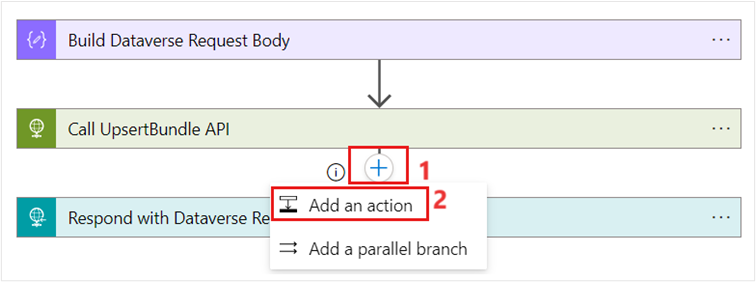
Select the plus (+) sign (Insert a new step) between the Call UpsertBundle API and Respond with Dataverse Response steps.
Select Add an action.
Select the Compose action.
Rename the Compose action card to Build RetrieveBundle Request Body.
Add the following expression to the Inputs field for the Build RetrieveBundle Request Body card.
{
  "msind_FHIRQuery": "@{outputs('Call_UpsertBundle_API')?['body']['msind_Results'][0]['msind_fhirresourcetype']}/@{outputs('Call_UpsertBundle_API')?['body']['msind_Results'][0]['msind_fhirresourceid']}"
}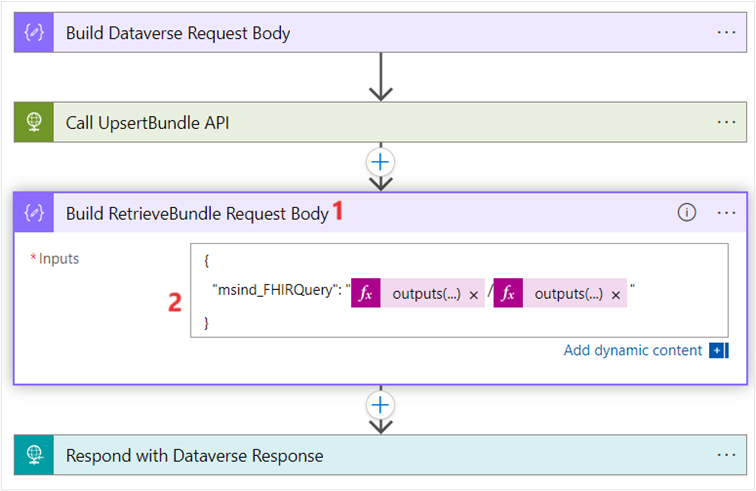
Select the + (Insert a new step) icon between the Build RetrieveBundle Request Body and Respond with Dataverse Response steps.
Select Add an action.
Select the HTTP action.
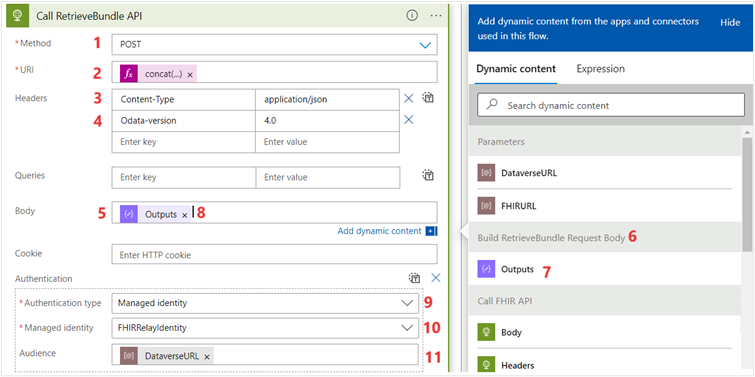
Rename the HTTP action card to Call RetrieveBundle API.
Populate the Call RetrieveBundle API card by using the following values:
Method - POST
URI - @{concat(parameters('DataverseURL'),'/api/data/v9.1/msind_RetrieveBundle')}
Headers - Content-Type: application/json; OData-Version: 4.0
Body - Set it to the dynamic content of the Build RetrieveBundle Request Body action
Authentication type - Managed identity
Managed identity - FHIRRelayIdentity (This value is the user-assigned managed identity that you created in the previous task)
Audience - DataverseURL (This value is the logic app parameter that you created in the previous task)
Note
You can use the /api/data/v9.1/msind_RetrieveBundle or the /api/data/v9.2/msind_RetrieveBundle endpoint in your API call.
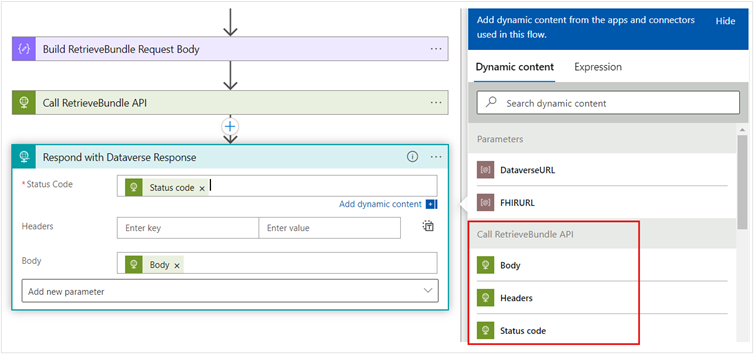
Modify the Respond with Dataverse Response card with the following values:
Status Code - Set it to the Status code dynamic content of the Call RetrieveBundle API action.
Body - Set it to the Body dynamic content of the Call RetrieveBundle API action.
Select Save.
Follow the steps outlined in the Test Dataverse Healthcare APIs in Azure Logic Apps task to test the modified logic app that calls the msind_UpsertBundle and msind_RetrieveBundle Dataverse Healthcare APIs.
Verify that the output appears as follows:
 {
     "@odata.context": "https://lamnahealth.crm.dynamics.com/api/data/v9.1/$metadata#Microsoft.Dynamics.CRM.msind_RetrieveBundleResponse",
     "msind_Status": true,
     "msind_StatusDetail": "{\r\n  \"Message\": \"Request processed successfully with the following warning/information.\",\r\n  \"Warning\": [\r\n    {\r\n      \"Time Stamp\": \"2/2/2023 2:57:20 PM\",\r\n      \"Message\": \"Unable locate entity map for FHIR Resource identifier. Ensure you have enabled the map for this resource. Once fixed resubmit the bundle to re - process this record.\"\r\n    },\r\n    {\r\n      \"Time Stamp\": \"2/2/2023 2:57:20 PM\",\r\n      \"Message\": \"Unable locate entity map for FHIR Resource link. Ensure you have enabled the map for this resource. Once fixed resubmit the bundle to re - process this record.\"\r\n    }\r\n  ]\r\n}",
     "msind_JSON": "{\r\n  \"resourceType\": \"Patient\",\r\n  \"name\": [\r\n    {\r\n      \"use\": \"official\",\r\n      \"family\": \"Contoso\",\r\n      \"given\": [\r\n        \"Allen007\"\r\n      ]\r\n    }\r\n  ],\r\n  \"id\": \"d0000000-c7e2-408f-9652-c8c2bdd9d2bf\",\r\n  \"telecom\": [\r\n    {\r\n      \"use\": \"home\",\r\n      \"system\": \"phone\",\r\n      \"value\": \"555-664-6121\"\r\n    }\r\n  ],\r\n  \"gender\": \"female\",\r\n  \"birthDate\": \"1965-11-04T00:00:00+00:00\",\r\n  \"address\": [\r\n    {\r\n      \"line\": [\r\n        \"165 Shanahan View\"\r\n      ],\r\n      \"city\": \"North Reading\",\r\n      \"state\": \"Massachusetts\",\r\n      \"postalCode\": \"x\",\r\n      \"country\": \"US\"\r\n    }\r\n  ]\r\n}"
 }


The response sent by the msind_RetrieveBundle API is as follows:
- msind_Status - A Boolean indicating whether the action was successfully processed or not.
- msind_StatusDetail - Provides detailed information about msind_Status.
- msind_JSON - Shows the retrieved FHIR resource data as JSON.
You successfully set up a logic app from Azure Logic Apps to call Dataverse Healthcare APIs to create a record in Dataverse and then retrieve the same record from Dataverse.