Tutorial: Visualización de un modelo representado de forma remota
En este tutorial, aprenderá a:
- Aprovisionar una instancia de Azure Remote Rendering (ARR)
- Crear y detener una sesión de representación
- Reutilizar una sesión de representación existente
- Conectarse a sesiones y desconectarse de ellas
- Cargar modelos en una sesión de representación
Requisitos previos
Para este tutorial, necesitará:
- Una suscripción de pago por uso activa a Azure. Consulte Creación de una cuenta.
- Windows SDK 10.0.18362.0 (descargar)
- La versión más reciente de Visual Studio 2022 (descargar)
- Git (descargar)
- Complemento de Git LFS (descargar)
- Unity (consulte los requisitos del sistema para versiones compatibles).
- Conocimientos intermedios de Unity y del lenguaje C# (por ejemplo, creación de scripts y objetos, uso de elementos prefabricados, configuración de eventos de Unity, etc.)
Aprovisionar una instancia de Azure Remote Rendering (ARR)
Para obtener acceso al servicio Azure Remote Rendering, primero debe crear una cuenta.
Creación de un proyecto de Unity
Sugerencia
El repositorio de muestras de ARR contiene un proyecto con todos los tutoriales completados, que se puede usar como referencia. Mire en Unity\Tutorial-Complete el proyecto de Unity completo.
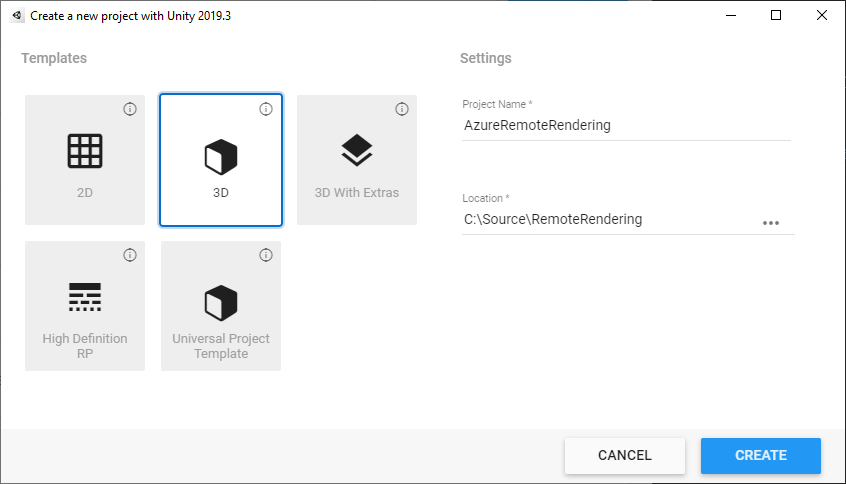
En Unity Hub, cree un proyecto. En este ejemplo, supondremos que el proyecto se crea en una carpeta denominada RemoteRendering.
Incluir los paquetes de Azure Remote Rendering y OpenXR
Siga las instrucciones sobre cómo agregar los paquetes de Azure Remote Rendering y OpenXR a un proyecto de Unity.
Nota
Si Unity muestra un cuadro de diálogo de advertencia después de importar el paquete OpenXR preguntando si desea habilitar los back-end de la plataforma nativa para el nuevo sistema de entrada, haga clic en No por ahora. Lo habilitará en otro paso más adelante.
Configuración de la cámara
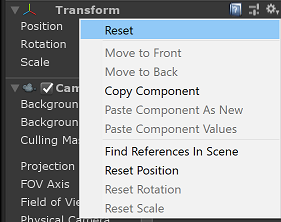
Seleccione el nodo Main Camera (Cámara principal).
Abra el menú contextual, para lo cual debe hacer clic con el botón derecho en el componente Transform (Transformación) y seleccionar la opción Reset (Restablecer):
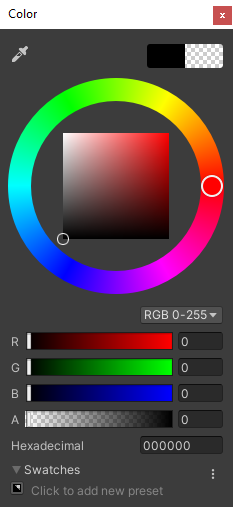
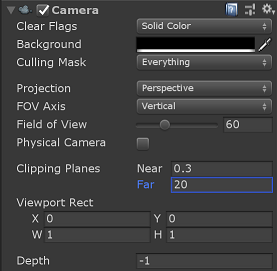
En Clear flags (Borrar marcas), seleccione Solid Color (Color sólido).
Establezca Fondo en Negro (#000000), con un alfa (A) totalmente transparente (0)
Establezca Clipping Planes (Planos de recorte) en Near = 0.1 (Cerca = 0,1) y Far = 20 (Lejos = 20). Esta configuración significa que la representación recortará la geometría que está a menos de 10 cm o a más de 20 m.
Ajuste de la configuración del proyecto
Abra Edit > Project Settings... (Editar > Configuración del proyecto).
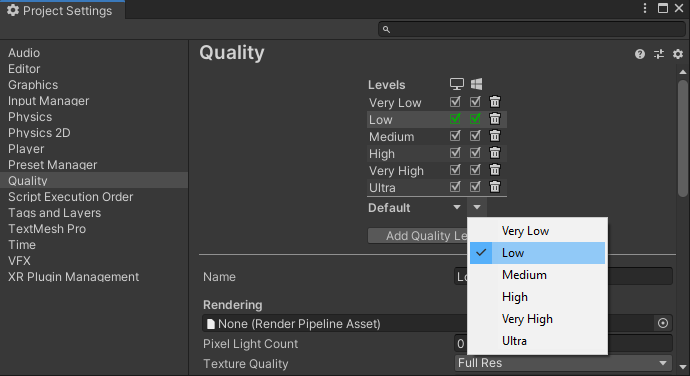
Seleccione Quality (Calidad) en el menú de lista izquierdo.
Cambie el valor de Default Quality Level (Nivel de calidad predeterminado) de todas las plataformas a Low (Bajo). Esta configuración permitirá una representación más eficaz del contenido local y no afectará a la calidad del contenido representado de forma remota.
Nota:
En el ámbito de este tutorial, nos quedamos con la canalización de representación integrada de Unity. Si quiere usar la canalización de representación universal, consulte Canalizaciones de representación de Unity para conocer los pasos de configuración adicionales.
Seleccione Administración de complementos de XR en el menú de la lista izquierda
- Haga clic en el botón Install XR Plugin Management (Instalar Administración de complementos de XR).
- Seleccione la pestaña Universal Windows Platform settings (Configuración de la Plataforma universal de Windows), representada como un icono de Windows.
- Seleccione la casilla Abrir XR en Proveedores de complementos
- Si se abre un cuadro de diálogo que le pide que habilite los back-end de la plataforma nativa para el nuevo sistema de entrada, seleccione No.
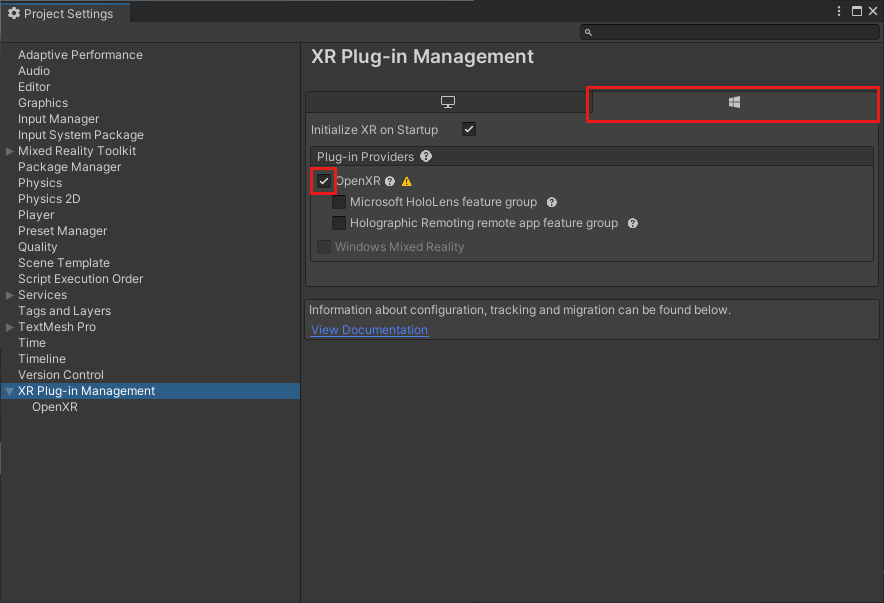
Nota:
Si el grupo de características de Microsoft HoloLens está deshabilitado, el complemento OpenXR de Windows Mixed Reality falta en el proyecto. Siga las instrucciones sobre cómo agregar los paquetes de Azure Remote Rendering y OpenXR para instalarlo.
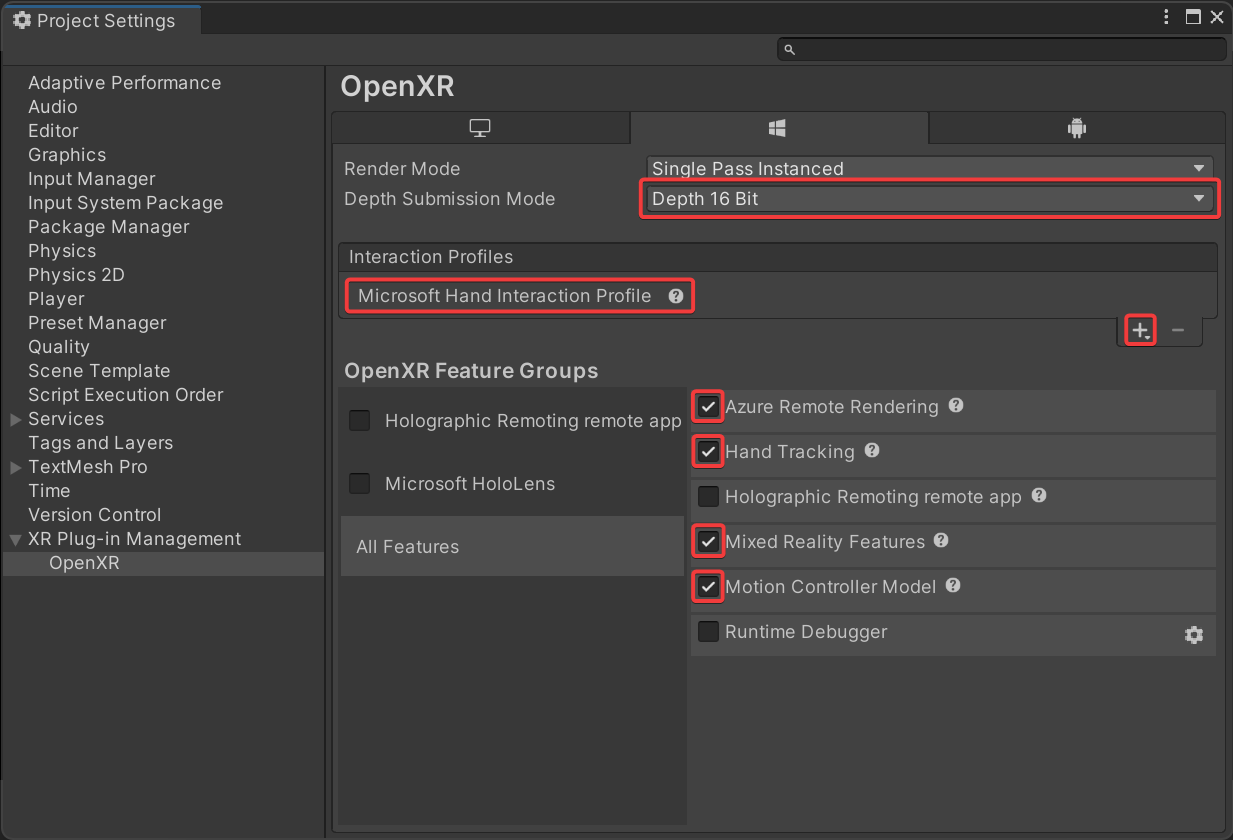
Seleccione OpenXR en el menú de la lista izquierda
- Establezca el modo de envío de profundidad en Profundidad 16 bits
- Agregue el perfil de interacción de Microsoft Hand a los perfiles de interacción.
- Habilite estas características de OpenXR:
- Azure Remote Rendering
- Seguimiento de manos
- Características de Mixed Reality
- Modelo de controlador de movimiento
Nota:
Si no ve las características necesarias de OpenXR en la lista, el complemento OpenXR de Windows Mixed Reality falta en el proyecto. Siga las instrucciones sobre cómo agregar los paquetes de Azure Remote Rendering y OpenXR para instalarlo.
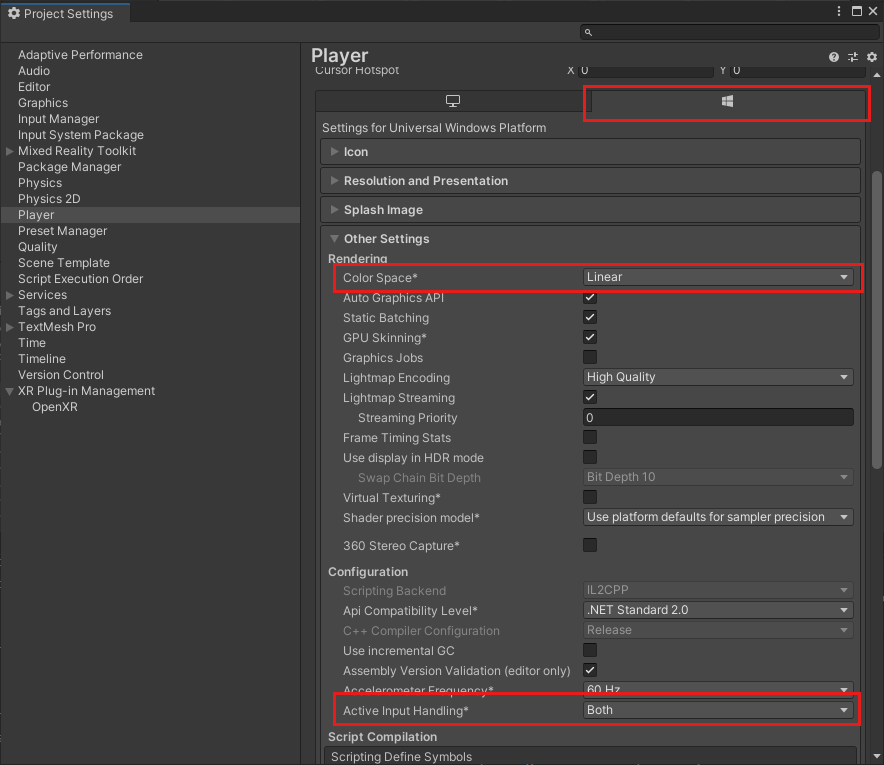
Seleccione Player (Reproductor) en el menú de lista izquierdo.
- Seleccione la pestaña Universal Windows Platform settings (Configuración de la Plataforma universal de Windows), representada como un icono de Windows.
- Expanda Otras configuraciones
- En Representación, cambie Espacio de colores a Lineal y reinicie Unity cuando se lo pida.
- En Configuración, cambie Control de entrada activo a Ambos y reinicie Unity cuando se lo pida.
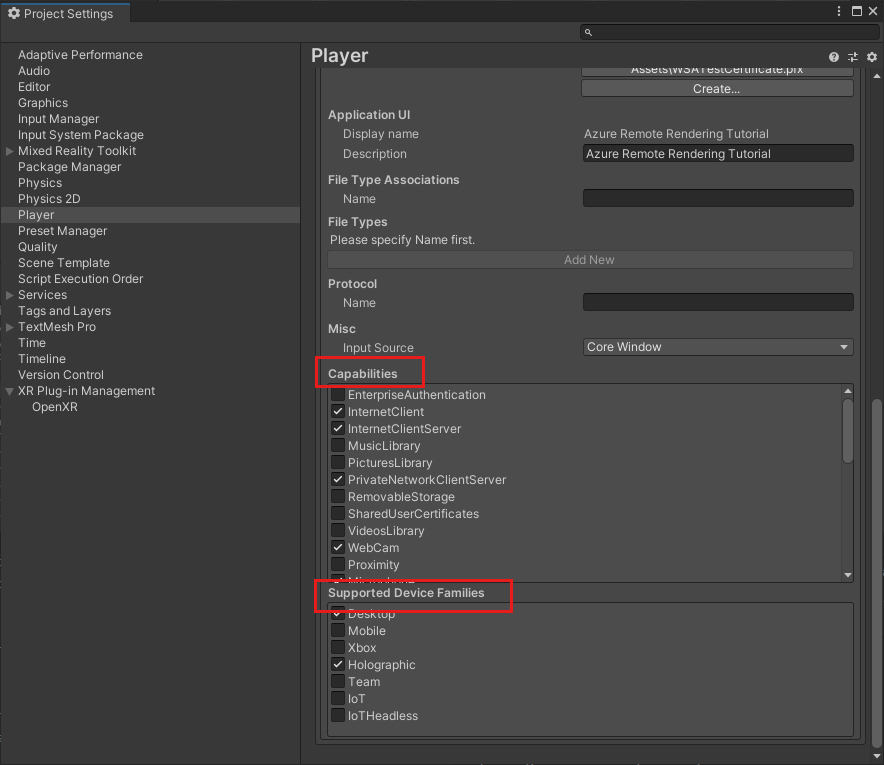
- Expanda Configuración de publicación
- Desplácese hacia abajo hasta Capabilities (Funcionalidades) y seleccione:
- InternetClient
- InternetClientServer
- SpatialPerception
- PrivateNetworkClientServer (opcional). Seleccione esta opción si quiere conectar el depurador remoto de Unity al dispositivo.
- En Familias de dispositivos admitidos, habilite Holográfico y Escritorio
Cierre o acople el panel Project Settings (Configuración del proyecto).
Abra File-> Build Settings (Archivo - Configuración de la compilación)
- Seleccione Universal Windows Platform (Plataforma universal de Windows).
- Configure los valores para que coincidan con los que se encuentran a continuación.
- Presione el botón Switch Platform (Cambiar plataforma).
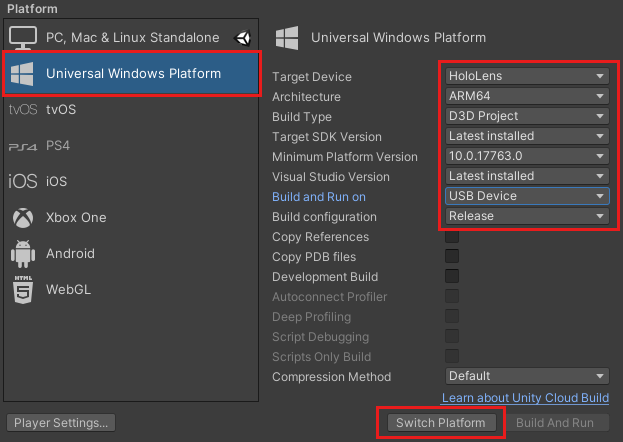
Después de que Unity cambie las plataformas, cierre el panel de compilación.
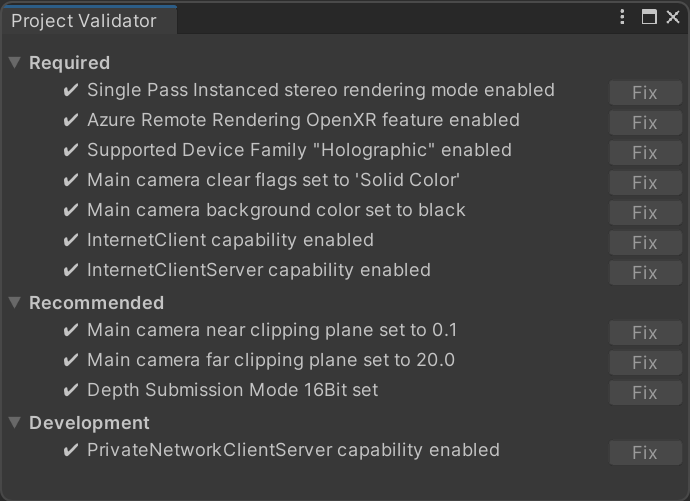
Validar la configuración del proyecto
Realice los siguientes pasos para validar que la configuración del proyecto es correcta.
Elija la entrada ValidateProject del menú RemoteRendering en la barra de herramientas del editor de Unity.
Revise la ventana Validador de proyectos para ver los errores y corregir la configuración del proyecto cuando sea necesario.
Nota:
Si usa MRTK en el proyecto y habilita el subsistema de la cámara, MRTK invalidará los cambios manuales que aplique a la cámara. Esto incluye las correcciones de la herramienta ValidateProject.
Creación de un script para coordinar la conexión y el estado de Azure Remote Rendering
Hay cuatro fases básicas para mostrar los modelos representados de forma remota, que se describen en el diagrama de flujo siguiente. Cada fase debe realizarse en orden. El siguiente paso consiste en crear un script que administre el estado de la aplicación y avance por las fases necesarias.

En el panel Project (Proyecto), en Assets (Recursos), cree una carpeta llamada RemoteRenderingCore. Luego, en RemoteRenderingCore, cree otra carpeta llamada Scripts.
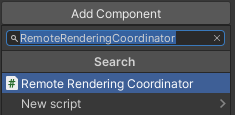
Cree un script de C# llamado RemoteRenderingCoordinator. El proyecto se parecerá a esta imagen:
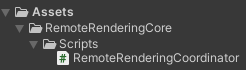
Este script de coordinador realizará un seguimiento del estado de representación remota y lo administrará. Tenga en cuenta que parte de este código se usa para mantener el estado, exponer la funcionalidad a otros componentes, desencadenar eventos y almacenar datos específicos de la aplicación que no están relacionados directamente con Azure Remote Rendering. Use el código siguiente como punto de partida; más adelante en el tutorial, abordaremos e implementaremos el código específico de Azure Remote Rendering.
Abra RemoteRenderingCoordinator en el editor de código y reemplace todo el contenido por el código siguiente:
// Copyright (c) Microsoft Corporation. All rights reserved.
// Licensed under the MIT License. See LICENSE in the project root for license information.

using Microsoft.Azure.RemoteRendering;
using Microsoft.Azure.RemoteRendering.Unity;
using System;
using System.Linq;
using System.Threading.Tasks;
using UnityEngine;
using UnityEngine.Events;

#if UNITY_WSA
using UnityEngine.XR.WSA;
#endif

/// <summary>
/// Remote Rendering Coordinator is the controller for all Remote Rendering operations.
/// </summary>

// Require the GameObject with a RemoteRenderingCoordinator to also have the ARRServiceUnity component
[RequireComponent(typeof(ARRServiceUnity))]
public class RemoteRenderingCoordinator : MonoBehaviour
{
    public enum RemoteRenderingState
    {
        NotSet,
        NotInitialized,
        NotAuthorized,
        NoSession,
        ConnectingToExistingRemoteSession,
        ConnectingToNewRemoteSession,
        RemoteSessionReady,
        ConnectingToRuntime,
        RuntimeConnected
    }

    public static RemoteRenderingCoordinator instance;

    // Account
    // RemoteRenderingDomain must be '<region>.mixedreality.azure.com' - if no '<region>' is specified, connections will fail
    // For most people '<region>' is either 'westus2' or 'westeurope'
    [SerializeField]
    private string remoteRenderingDomain = "westus2.mixedreality.azure.com";
    public string RemoteRenderingDomain
    {
        get => remoteRenderingDomain.Trim();
        set => remoteRenderingDomain = value;
    }

    [Header("Development Account Credentials")]
    [SerializeField]
    private string accountDomain = "<enter your account domain here>";
    public string AccountDomain
    {
        get => accountDomain.Trim();
        set => accountDomain = value;
    }

    [SerializeField]
    private string accountId = "<enter your account id here>";
    public string AccountId {
        get => accountId.Trim();
        set => accountId = value;
    }

    [SerializeField]
    private string accountKey = "<enter your account key here>";
    public string AccountKey {
        get => accountKey.Trim();
        set => accountKey = value;
    }

    // These settings are important. All three should be set as low as possible, while maintaining a good user experience
    // See the documentation around session management and the technical differences in session VM size
    [Header("New Session Defaults")]

    public RenderingSessionVmSize renderingSessionVmSize = RenderingSessionVmSize.Standard;
    public uint maxLeaseHours = 0;
    public uint maxLeaseMinutes = 20;

    [Header("Other Configuration")]

    [Tooltip("If you have a known active SessionID, you can fill it in here before connecting")]
    [SerializeField]
    private string sessionIDOverride;
    public string SessionIDOverride {
        get => sessionIDOverride.Trim();
        set => sessionIDOverride = value;
    }

    // When Automatic Mode is true, the coordinator will attempt to automatically proceed through the process of connecting and loading a model
    public bool automaticMode = true;

    public event Action RequestingAuthorization;
    public UnityEvent OnRequestingAuthorization = new UnityEvent();

    public event Action AuthorizedChanged;
    public UnityEvent OnAuthorizationChanged = new UnityEvent();
    private bool authorized;
    public bool Authorized
    {
        get => authorized;
        set
        {
            if (value == true) //This is a one-way value, once we're authorized it lasts until the app is shutdown.
            {
                authorized = value;
                AuthorizedChanged?.Invoke();
            }
        }
    }

    public delegate Task<SessionConfiguration> AccountInfoGetter();

    public static AccountInfoGetter ARRCredentialGetter
    {
        private get;
        set;
    }

    private RemoteRenderingState currentCoordinatorState = RemoteRenderingState.NotSet;
    public RemoteRenderingState CurrentCoordinatorState
    {
        get => currentCoordinatorState;
        private set
        {
            if (currentCoordinatorState != value)
            {
                currentCoordinatorState = value;
                Debug.LogFormat(LogType.Log, LogOption.NoStacktrace, null, "{0}", $"State changed to: {currentCoordinatorState}");
                CoordinatorStateChange?.Invoke(currentCoordinatorState);
            }
        }
    }

    public static event Action<RemoteRenderingState> CoordinatorStateChange;

    public static RenderingSession CurrentSession => instance?.ARRSessionService?.CurrentActiveSession;

    private ARRServiceUnity arrSessionService;

    private ARRServiceUnity ARRSessionService
    {
        get
        {
            if (arrSessionService == null)
                arrSessionService = GetComponent<ARRServiceUnity>();
            return arrSessionService;
        }
    }

    private async Task<SessionConfiguration> GetDevelopmentCredentials()
    {
        Debug.LogWarning("Using development credentials! Not recommended for production.");
        return await Task.FromResult(new SessionConfiguration(AccountDomain, RemoteRenderingDomain, AccountId, AccountKey));
    }

    /// <summary>
    /// Keep the last used SessionID, when launching, connect to this session if its available
    /// </summary>
    private string LastUsedSessionID
    {
        get
        {
            if (!string.IsNullOrEmpty(SessionIDOverride))
                return SessionIDOverride;

            if (PlayerPrefs.HasKey("LastUsedSessionID"))
                return PlayerPrefs.GetString("LastUsedSessionID");
            else
                return null;
        }
        set
        {
            PlayerPrefs.SetString("LastUsedSessionID", value);
        }
    }

    public void Awake()
    {
        //Forward events to Unity events
        RequestingAuthorization += () => OnRequestingAuthorization?.Invoke();
        AuthorizedChanged += () => OnAuthorizationChanged?.Invoke();

        //Attach to event
        AuthorizedChanged += RemoteRenderingCoordinator_AuthorizedChanged;

        if (instance == null)
            instance = this;
        else
            Destroy(this);

        CoordinatorStateChange += AutomaticMode;

        CurrentCoordinatorState = RemoteRenderingState.NotInitialized;
    }

    private void RemoteRenderingCoordinator_AuthorizedChanged()
    {
        if (CurrentCoordinatorState != RemoteRenderingState.NotAuthorized)
            return; //This isn't valid from any other state than NotAuthorized


        //We just became authorized to connect to Azure
        InitializeSessionService();
    }

    /// <summary>
    /// Automatic mode attempts to automatically progress through the connection and loading steps. Doesn't handle error states.
    /// </summary>
    /// <param name="currentState">The current state</param>
    private async void AutomaticMode(RemoteRenderingState currentState)
    {
        if (!automaticMode)
            return;

        //Add a small delay for visual effect
        await Task.Delay(1500);
        switch (currentState)
        {
            case RemoteRenderingState.NotInitialized:
                InitializeARR();
                break;
            case RemoteRenderingState.NotAuthorized:
                RequestAuthorization();
                break;
            case RemoteRenderingState.NoSession:
                JoinRemoteSession();
                break;
            case RemoteRenderingState.RemoteSessionReady:
                ConnectRuntimeToRemoteSession();
                break;
        }
    }

    /// <summary>
    /// Initializes ARR, associating the main camera
    /// Note: This must be called on the main Unity thread
    /// </summary>
    public void InitializeARR()
    {
        //Implement me
    }

    /// <summary>
    /// Create a new remote session manager
    /// If the ARRCredentialGetter is set, use it as it, otherwise use the development credentials
    /// </summary>
    public async void InitializeSessionService()
    {
        //Implement me
    }

    /// <summary>
    /// Trigger the event for checking authorization, respond to this event by prompting the user for authentication
    /// If authorized, set Authorized = true
    /// </summary>
    public void RequestAuthorization()
    {
        RequestingAuthorization?.Invoke();
    }

    public void BypassAuthorization()
    {
        Authorized = true;
    }

    /// <summary>
    /// Attempts to join an existing session or start a new session
    /// </summary>
    public async void JoinRemoteSession()
    {
        //Implement me
    }

    public async void StopRemoteSession()
    {
        //Implement me
    }

    private async Task<bool> IsSessionAvailable(string sessionID)
    {
        bool sessionAvailable = false;
        try
        {
            RenderingSessionPropertiesArrayResult result = await ARRSessionService.Client.GetCurrentRenderingSessionsAsync();
            if (result.ErrorCode == Result.Success)
            {
                RenderingSessionProperties[] properties = result.SessionProperties;
                if (properties != null)
                {
                    sessionAvailable = properties.Any(x => x.Id == sessionID && (x.Status == RenderingSessionStatus.Ready || x.Status == RenderingSessionStatus.Starting));
                }
            }
            else
            {
                Debug.LogError($"Failed to get current rendering sessions. Error: {result.Context.ErrorMessage}");
            }
        }
        catch (RRException ex)
        {
            Debug.LogError($"Failed to get current rendering sessions. Error: {ex.Message}");
        }
        return sessionAvailable;
    }

    /// <summary>
    /// Connects the local runtime to the current active session, if there's a session available
    /// </summary>
    public async void ConnectRuntimeToRemoteSession()
    {
        //Implement me
    }

    public void DisconnectRuntimeFromRemoteSession()
    {
        //Implement me
    }

    /// <summary>
    /// The session must have its runtime pump updated.
    /// The Connection.Update() will push messages to the server, receive messages, and update the frame-buffer with the remotely rendered content.
    /// </summary>
    private void LateUpdate()
    {
        ARRSessionService?.CurrentActiveSession?.Connection?.Update();
    }

    /// <summary>
    /// Loads a model into the remote session for rendering
    /// </summary>
    /// <param name="modelPath">The model's path</param>
    /// <param name="progress">A call back method that accepts a float progress value [0->1]</param>
    /// <param name="parent">The parent Transform for this remote entity</param>
    /// <returns>An awaitable Remote Rendering Entity</returns>
    public async Task<Entity> LoadModel(string modelPath, UnityEngine.Transform parent = null, Action<float> progress = null)
    {
        //Implement me
        return null;
    }

    private async void OnRemoteSessionStatusChanged(ARRServiceUnity caller, RenderingSession session)
    {
        var properties = await session.GetPropertiesAsync();

        switch (properties.SessionProperties.Status)
        {
            case RenderingSessionStatus.Error:
            case RenderingSessionStatus.Expired:
            case RenderingSessionStatus.Stopped:
            case RenderingSessionStatus.Unknown:
                CurrentCoordinatorState = RemoteRenderingState.NoSession;
                break;
            case RenderingSessionStatus.Starting:
                CurrentCoordinatorState = RemoteRenderingState.ConnectingToNewRemoteSession;
                break;
            case RenderingSessionStatus.Ready:
                CurrentCoordinatorState = RemoteRenderingState.RemoteSessionReady;
                break;
        }
    }

    private void OnLocalRuntimeStatusChanged(ConnectionStatus status, Result error)
    {
        switch (status)
        {
            case ConnectionStatus.Connected:
                CurrentCoordinatorState = RemoteRenderingState.RuntimeConnected;
                break;
            case ConnectionStatus.Connecting:
                CurrentCoordinatorState = RemoteRenderingState.ConnectingToRuntime;
                break;
            case ConnectionStatus.Disconnected:
                CurrentCoordinatorState = RemoteRenderingState.RemoteSessionReady;
                break;
        }
    }
}
Creación del elemento GameObject de Azure Remote Rendering
El coordinador de representación remota y su script necesario (ARRServiceUnity) son ambos elementos MonoBehaviour que se deben asociar a un elemento GameObject de la escena. El script ARRServiceUnity se proporciona a través de ARR para exponer gran parte de la funcionalidad de ARR para conectarse a las sesiones remotas y administrarlas.
- Cree un elemento GameObject en la escena (Ctrl+Mayús+N o GameObject->Crear vacío) y póngale de nombre RemoteRenderingCoordinator.
- Agregue el script RemoteRenderingCoordinator al elemento GameObject RemoteRenderingCoordinator.
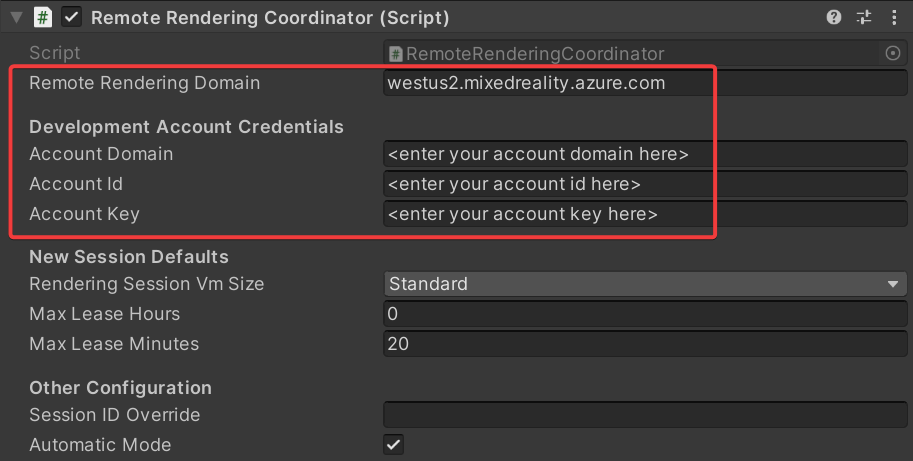
- Confirme que el script ARRServiceUnity, que aparece como Service (Servicio) en el inspector, se agrega automáticamente a GameObject. Por si se lo pregunta, este es el resultado de tener
[RequireComponent(typeof(ARRServiceUnity))]en la parte superior del script RemoteRenderingCoordinator. - Agregue las credenciales de Azure Remote Rendering, el dominio de la cuenta y el dominio de Remote Rendering en el script de coordinador:
Inicialización de Azure Remote Rendering
Ahora que tenemos el marco de trabajo de nuestro coordinador, implementaremos cada una de las cuatro fases empezando por Inicialización de Remote Rendering.

La acción Initialize (Inicializar) indica a Azure Remote Rendering el objeto de la cámara que se va a usar para la representación y lleva la máquina de estados a NotAuthorized. Este estado significa que se ha inicializado el servicio, pero aún no está autorizado para conectarse a una sesión. Dado que el inicio de una sesión de ARR conlleva un costo, es necesario confirmar que el usuario quiera continuar.
Al entrar en el estado NotAuthorized, se llama a CheckAuthorization, que invoca el evento RequestingAuthorization y determina las credenciales de cuenta que se usarán (AccountInfo se define cerca de la parte superior de la clase y usa las credenciales definidas mediante el inspector de Unity en el paso anterior).
Nota
ARR no admite la recompilación en tiempo de ejecución. Si el script se modifica y se guarda con el modo de reproducción activo, Unity podría bloquearse y para cerrarlo tendrá que usar el administrador de tareas. Asegúrese siempre de que ha detenido el modo de reproducción antes de modificar los scripts.
Reemplace el contenido de InitializeARR e InitializeSessionService por el siguiente código completado:
/// <summary>
/// Initializes ARR, associating the main camera
/// Note: This must be called on the main Unity thread
/// </summary>
public void InitializeARR()
{
    RemoteManagerUnity.InitializeManager(new RemoteUnityClientInit  (Camera.main));

    CurrentCoordinatorState = RemoteRenderingState.NotAuthorized;
}

/// <summary>
/// Create a new remote session manager
/// If the ARRCredentialGetter is set, use it as it, otherwise use  the development credentials
/// </summary>
public async void InitializeSessionService()
{
    if (ARRCredentialGetter == null)
        ARRCredentialGetter = GetDevelopmentCredentials;

    var sessionConfiguration = await ARRCredentialGetter.Invoke();

    ARRSessionService.OnSessionStatusChanged +=     OnRemoteSessionStatusChanged;

    try
    {
        ARRSessionService.Initialize(sessionConfiguration);
    }
    catch (ArgumentException argumentException)
    {
        Debug.LogError(argumentException.Message);
        CurrentCoordinatorState = RemoteRenderingState. NotAuthorized;
        return;
    }

    CurrentCoordinatorState = RemoteRenderingState.NoSession;
}
Para pasar de NotAuthorized a NoSession, normalmente presentaríamos al usuario un cuadro de diálogo modal para que pueda elegir (y eso haremos en otro capítulo). Por ahora, omitiremos automáticamente la comprobación de autorización mediante una llamada a ByPassAuthentication en cuanto se desencadene el evento RequestingAuthorization.
Seleccione el elemento GameObject RemoteRenderingCoordinator y busque el evento de Unity OnRequestingAuthorization expuesto en el inspector del componente RemoteRenderingCoordinator.
Para agregar un nuevo evento, presione el botón "+" en la parte inferior derecha.
Arrastre el componente a su propio evento para que se haga referencia a sí mismo.
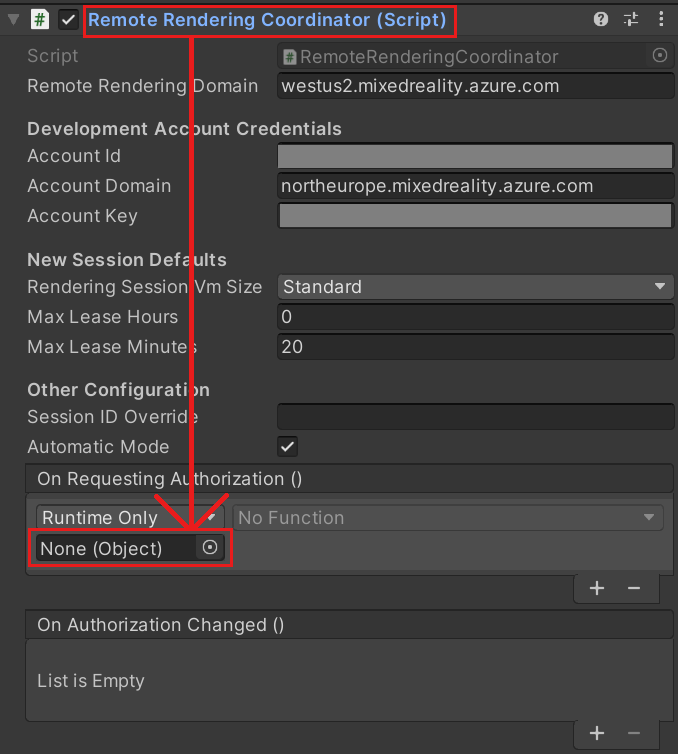
En el menú desplegable, seleccione RemoteRenderingCoordinator -> BypassAuthorization.

Creación de una sesión remota o unión a ella
La segunda fase consiste en crear una sesión de Remote Rendering o unirse a ella (consulte Sesiones de Remote Rendering para más información sobre las sesiones de representación).

La sesión remota es donde se representarán los modelos. El método JoinRemoteSession() intentará la unión a una sesión existente, a la que se realiza un seguimiento con la propiedad LastUsedSessionID o si hay un identificador de sesión activo asignado en sessionIDOverride. sessionIDOverride solo se usa en tareas de depuración y solo si sabe que la sesión existe y desea conectarse explícitamente a ella.
Si no hay ninguna sesión disponible, se crea una nueva. Sin embargo, la creación de una sesión es una operación muy laboriosa. Por lo tanto, debe intentar crear sesiones solo cuando sea necesario y reutilizarlas siempre que sea posible (consulte Preparación comercial: agrupación de sesiones, programación y prácticas recomendadas para más información sobre la administración de sesiones).
Sugerencia
StopRemoteSession() finalizará la sesión activa. Para evitar cargos innecesarios, siempre debe detener las sesiones cuando ya no se necesiten.
La máquina de estados pasará ahora a ConnectingToNewRemoteSession o ConnectingToExistingRemoteSession, en función de las sesiones disponibles. Si se abre una sesión existente o se crea una sesión, se desencadenará el evento ARRSessionService.OnSessionStatusChanged, y se ejecutará el método OnRemoteSessionStatusChanged. Lo normal es que la máquina de estados avance a RemoteSessionReady.
- Para unirse a una nueva sesión, modifique el código para reemplazar los métodos JoinRemoteSession() y StopRemoteSession() por los ejemplos completados siguientes:
/// <summary>
/// Attempts to join an existing session or start a new session
/// </summary>
public async void JoinRemoteSession()
{
    //If there's a session available that previously belonged to us, and it's ready, use it. Otherwise start a new session.
    RenderingSessionProperties joinResult;
    if (await IsSessionAvailable(LastUsedSessionID))
    {
        CurrentCoordinatorState = RemoteRenderingState.ConnectingToExistingRemoteSession;
        joinResult = await ARRSessionService.OpenSession(LastUsedSessionID);
    }
    else
    {
        CurrentCoordinatorState = RemoteRenderingState.ConnectingToNewRemoteSession;
        joinResult = await ARRSessionService.StartSession(new RenderingSessionCreationOptions(renderingSessionVmSize, (int)maxLeaseHours, (int)maxLeaseMinutes));
    }

    if (joinResult.Status == RenderingSessionStatus.Ready || joinResult.Status == RenderingSessionStatus.Starting)
    {
        LastUsedSessionID = joinResult.Id;
    }
    else
    {
        //The session should be ready or starting, if it's not, something went wrong
        await ARRSessionService.StopSession();
        if(LastUsedSessionID == SessionIDOverride)
            SessionIDOverride = "";
        CurrentCoordinatorState = RemoteRenderingState.NoSession;
    }
}

public async void StopRemoteSession()
{
    if (ARRSessionService.CurrentActiveSession != null)
    {
        await ARRSessionService.CurrentActiveSession.StopAsync();
    }
}
Si quiere reutilizar las sesiones para ahorrar tiempo, asegúrese de desactivar la opción Auto-Stop Session (Detener sesión automáticamente) en el componente ARRServiceUnity. Tenga en cuenta que, en esta situación, las sesiones quedarán en ejecución, aunque no haya nadie conectado a ellas. La sesión se puede ejecutar durante el tiempo que se indique en MaxLeaseTime antes de que la cierre el servidor (el valor de MaxLeaseTime se puede modificar en el coordinador de Remote Rendering, en New Session Defaults [Nuevos valores predeterminados de sesión]). Por otro lado, si apaga automáticamente cada sesión durante la desconexión, tendrá que esperar a que se inicie una nueva sesión cada vez, lo que puede ser un proceso largo.
Nota:
La acción de detener una sesión tendrá un efecto inmediato y no se puede deshacer. Una vez que se haya detenido, tiene que crear una sesión con la misma sobrecarga de inicio.
Conexión del entorno de ejecución local a la sesión remota
A continuación, la aplicación debe conectar su entorno de ejecución local a la sesión remota.

La aplicación también debe escuchar eventos sobre la conexión entre el entorno de ejecución y la sesión actual; esos cambios de estado se administran en OnLocalRuntimeStatusChanged. Con este código el estado avanzará a ConnectingToRuntime. Una vez conectado en OnLocalRuntimeStatusChanged, el estado avanzará a RuntimeConnected. La conexión al entorno de ejecución es el último estado que concierne al coordinador, lo que significa que la aplicación se crea con toda la configuración común y está lista para comenzar el trabajo específico de la sesión de carga y representación de los modelos.
- Reemplace los métodos ConnectRuntimeToRemoteSession() y DisconnectRuntimeFromRemoteSession() por las versiones completadas siguientes.
- Es importante observar el método de Unity LateUpdate y ver que está actualizando la sesión activa actual. De esta forma, la sesión actual puede enviar y recibir mensajes y actualizar el búfer de fotogramas con los fotogramas recibidos de la sesión remota. Ese proceso es fundamental para que ARR funcione correctamente.
/// <summary>
/// Connects the local runtime to the current active session, if there's a session available
/// </summary>
public async void ConnectRuntimeToRemoteSession()
{
    if (ARRSessionService == null || ARRSessionService.CurrentActiveSession == null)
    {
        Debug.LogError("Not ready to connect runtime");
        return;
    }

    // Connect the local runtime to the currently connected session
    // This session is set when connecting to a new or existing session

    ARRSessionService.CurrentActiveSession.ConnectionStatusChanged += OnLocalRuntimeStatusChanged;
    await ARRSessionService.CurrentActiveSession.ConnectAsync(new RendererInitOptions());
}

public void DisconnectRuntimeFromRemoteSession()
{
    if (ARRSessionService == null || ARRSessionService.CurrentActiveSession == null || ARRSessionService.CurrentActiveSession.ConnectionStatus != ConnectionStatus.Connected)
    {
        Debug.LogError("Runtime not connected!");
        return;
    }

    ARRSessionService.CurrentActiveSession.Disconnect();
    ARRSessionService.CurrentActiveSession.ConnectionStatusChanged -= OnLocalRuntimeStatusChanged;
    CurrentCoordinatorState = RemoteRenderingState.RemoteSessionReady;
}
Nota
La conexión del entorno de ejecución local a una sesión remota depende de que se llame a la opción Update (Actualizar) en la sesión activa en ese momento. Si observa que la aplicación no progresa nunca más allá del estado ConnectingToRuntime, asegúrese de llamar a Update (Actualizar) de forma periódica en la sesión activa.
Carga de un modelo
Con la base ya establecida, está listo para cargar un modelo en la sesión remota y comenzar a recibir fotogramas.

El método LoadModel está diseñado para aceptar una ruta de acceso de modelo, un controlador de progreso y una transformación principal. Estos argumentos se usarán para cargar un modelo en la sesión remota, actualizar el usuario durante el progreso de la carga y orientar el modelo representado de forma remota en función de la transformación principal.
Reemplace todo el método LoadModel por el código siguiente:
/// <summary>
/// Loads a model into the remote session for rendering
/// </summary>
/// <param name="modelName">The model's path</param>
/// <param name="parent">The parent Transform for this remote entity</param>
/// <param name="progress">A call back method that accepts a float progress value [0->1]</param>
/// <returns>An awaitable Remote Rendering Entity</returns>
public async Task<Entity> LoadModel(string modelPath, UnityEngine.Transform parent = null, Action<float> progress = null)
{
    //Create a root object to parent a loaded model to
    var modelEntity = ARRSessionService.CurrentActiveSession.Connection.CreateEntity();

    //Get the game object representation of this entity
    var modelGameObject = modelEntity.GetOrCreateGameObject(UnityCreationMode.DoNotCreateUnityComponents);

    //Ensure the entity will sync its transform with the server
    var sync = modelGameObject.GetComponent<RemoteEntitySyncObject>();
    sync.SyncEveryFrame = true;

    //Parent the new object under the defined parent
    if (parent != null)
    {
        modelGameObject.transform.SetParent(parent, false);
        modelGameObject.name = parent.name + "_Entity";
    }

    //Load a model that will be parented to the entity
    var loadModelParams = new LoadModelFromSasOptions(modelPath, modelEntity);
    var loadModelAsync = ARRSessionService.CurrentActiveSession.Connection.LoadModelFromSasAsync(loadModelParams, progress);
    var result = await loadModelAsync;
    return modelEntity;
}
El código anterior está realizando los pasos siguientes:
- Crear una entidad remota
- Crear un elemento GameObject local para representar la entidad remota
- Configurar el elemento GameObject local para sincronizar su estado (es decir, transformarlo) con la entidad remota con cada fotograma
- Cargar los datos del modelo de Blob Storage en la entidad remota
- Devolver la entidad primaria, para hacer referencia a ella posteriormente
Visualización del modelo de prueba
Ahora tenemos todo el código necesario para ver un modelo representado de forma remota, y se han completado las cuatro fases necesarias para la representación remota. Lo siguiente es agregar algo de código para iniciar el proceso de carga del modelo.

Agregue el código siguiente a la clase RemoteRenderingCoordinator justo debajo del método LoadModel:
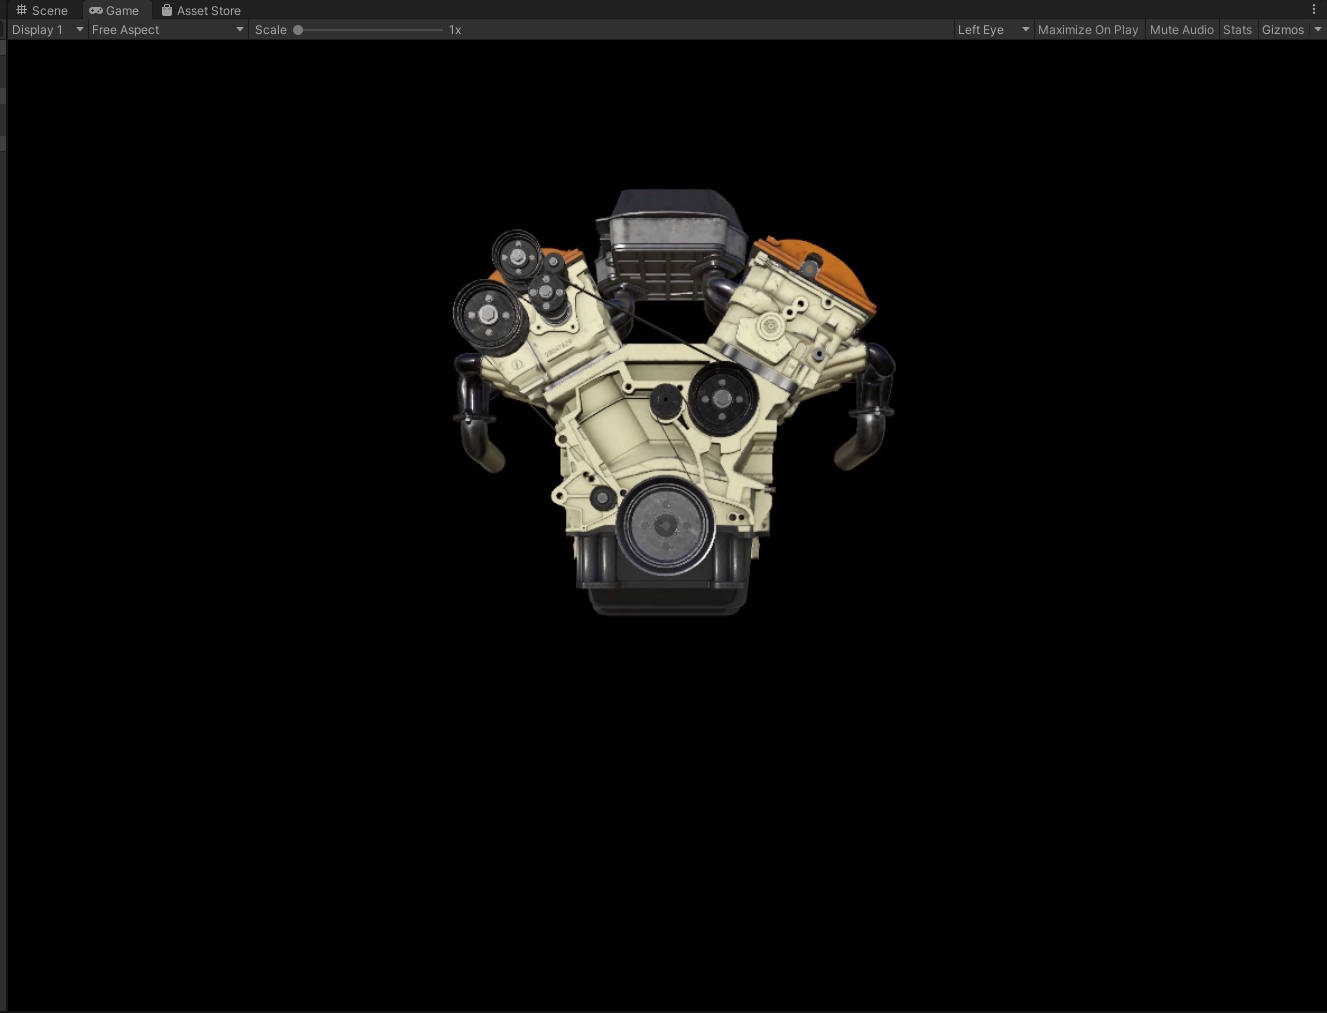
private bool loadingTestModel = false;
[ContextMenu("Load Test Model")]
public async void LoadTestModel()
{
    if(CurrentCoordinatorState != RemoteRenderingState.RuntimeConnected)
    {
        Debug.LogError("Please wait for the runtime to connect before loading the test model. Try again later.");
        return;
    }
    if(loadingTestModel)
    {
        Debug.Log("Test model already loading or loaded!");
        return;
    }
    loadingTestModel = true;

    // Create a parent object to use for positioning
    GameObject testParent = new GameObject("TestModelParent");
    testParent.transform.position = new Vector3(0f, 0f, 3f);

    // The 'built in engine path' is a special path that references a test model built into Azure Remote Rendering.
    await LoadModel("builtin://Engine", testParent.transform, (progressValue) => Debug.Log($"Loading Test Model progress: {Math.Round(progressValue * 100, 2)}%"));
}
Este código crea un elemento GameObject para que funcione como elemento primario del modelo de prueba. Luego, llama al método LoadModel para cargar el modelo "builtin://Engine", que es un recurso integrado en Azure Remote Rendering para probar la representación.
Guarde el código.
Presione el botón de reproducción en el editor de Unity para iniciar el proceso de conectarse a Azure Remote Rendering y crear una sesión.
Aunque no verá mucho en la vista de juego, en la consola se muestra cómo la aplicación va cambiando de estado. Probablemente llegará a
ConnectingToNewRemoteSessiony es posible que permanezca hasta cinco minutos.Seleccione el elemento GameObject RemoteRenderingCoordinator para ver sus scripts asociados en el inspector. Examine la actualización del componente Service (Servicio) a medida que avanza por los pasos de inicialización y conexión.
Supervise la salida de la consola, en espera de que el estado cambie a RuntimeConnected.
Una vez conectado el entorno de ejecución, haga clic con el botón derecho en RemoteRenderingCoordinator en el inspector para exponer el menú contextual. Luego, seleccione la opción Cargar modelo de prueba en el menú contextual, agregado por la parte
[ContextMenu("Load Test Model")]del código anterior.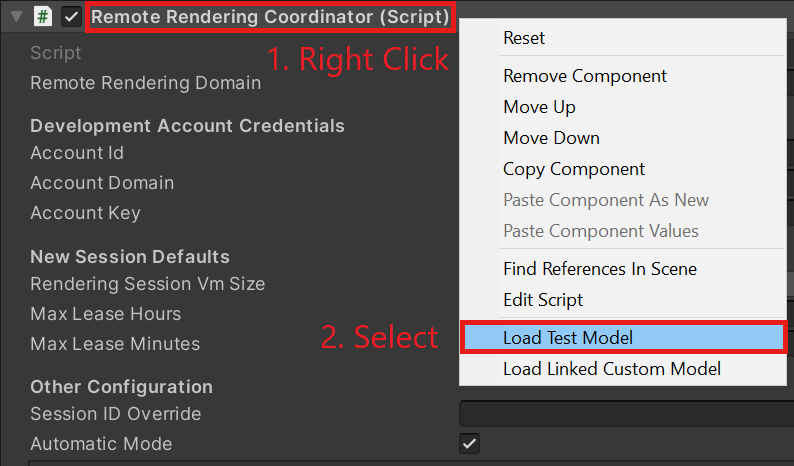
Examine en la consola la salida de ProgressHandler que hemos pasado al método LoadModel.
Ya puede ver el modelo representado de forma remota.
Nota
El modelo remoto nunca será visible en la vista de escena, solo en la vista de juego. El motivo es que ARR está representando los fotogramas de forma remota en concreto para la perspectiva de la cámara de vista de juego y no tiene en cuenta la cámara del editor (que se usa para representar la vista de escena).
Pasos siguientes
¡Enhorabuena! Ha creado una aplicación básica capaz de ver los modelos representados de forma remota mediante Azure Remote Rendering. En el siguiente tutorial, integraremos MRTK e importaremos nuestros propios modelos.