Migrate normalized database schema from Azure SQL Database to Azure Cosmos DB denormalized container
This guide explains how to take an existing normalized database schema in Azure SQL Database and convert it into an Azure Cosmos DB denormalized schema for loading into Azure Cosmos DB.
SQL schemas are typically modeled using third normal form, resulting in normalized schemas that provide high levels of data integrity and fewer duplicate data values. Queries can join entities together across tables for reading. Azure Cosmos DB is optimized for super-quick transactions and querying within a collection or container via denormalized schemas with data self-contained inside a document.
Using Azure Data Factory, we build a pipeline that uses a single Mapping Data Flow to read from two Azure SQL Database normalized tables that contain primary and foreign keys as the entity relationship. Data factory will join those tables into a single stream using the data flow Spark engine, collect joined rows into arrays and produce individual cleansed documents for insert into a new Azure Cosmos DB container.
This guide builds a new container on the fly called "orders" that will use the SalesOrderHeader and SalesOrderDetail tables from the standard SQL Server Adventure Works sample database. Those tables represent sales transactions joined by SalesOrderID. Each unique detail record has its own primary key of SalesOrderDetailID. The relationship between header and detail is 1:M. We join on SalesOrderID in ADF and then roll each related detail record into an array called "detail".
The representative SQL query for this guide is:
  SELECT
  o.SalesOrderID,
  o.OrderDate,
  o.Status,
  o.ShipDate,
  o.SalesOrderNumber,
  o.ShipMethod,
  o.SubTotal,
  (select SalesOrderDetailID, UnitPrice, OrderQty from SalesLT.SalesOrderDetail od where od.SalesOrderID = o.SalesOrderID for json auto) as OrderDetails
FROM SalesLT.SalesOrderHeader o;
The resulting Azure Cosmos DB container embeds the inner query into a single document and looks like this:

Create a pipeline
Select +New Pipeline to create a new pipeline.
Add a data flow activity
In the data flow activity, select New mapping data flow.
We construct this data flow graph:

Define the source for "SourceOrderDetails". For dataset, create a new Azure SQL Database dataset that points to the
SalesOrderDetailtable.Define the source for "SourceOrderHeader". For dataset, create a new Azure SQL Database dataset that points to the
SalesOrderHeadertable.On the top source, add a Derived Column transformation after "SourceOrderDetails". Call the new transformation "TypeCast". We need to round the
UnitPricecolumn and cast it to a double data type for Azure Cosmos DB. Set the formula to:toDouble(round(UnitPrice,2)).Add another derived column and call it "MakeStruct". This is where we create a hierarchical structure to hold the values from the details table. Remember, details is a
M:1relation to header. Name the new structureorderdetailsstructand create the hierarchy in this way, setting each subcolumn to the incoming column name:
Now, let's go to the sales header source. Add a Join transformation. For the right-side select "MakeStruct". Leave it set to inner join and choose
SalesOrderIDfor both sides of the join condition.Select the Data Preview tab in the new join that you added so that you can see your results up to this point. You should see all of the header rows joined with the detail rows. This is the result of the join being formed from the
SalesOrderID. Next, we combine the details from the common rows into the details struct and aggregate the common rows.
Before we can create the arrays to denormalize these rows, we first need to remove unwanted columns and make sure the data values match Azure Cosmos DB data types.
Add a Select transformation next and set the field mapping to look like this:

Now let's again cast a currency column, this time
TotalDue. Like we did above in step 7, set the formula to:toDouble(round(TotalDue,2)).Here's where we denormalize the rows by grouping by the common key
SalesOrderID. Add an Aggregate transformation and set the group by toSalesOrderID.In the aggregate formula, add a new column called "details" and use this formula to collect the values in the structure that we created earlier called
orderdetailsstruct:collect(orderdetailsstruct).The aggregate transformation will only output columns that are part of aggregate or group by formulas. So, we need to include the columns from the sales header as well. To do that, add a column pattern in that same aggregate transformation. This pattern includes all other columns in the output, excluding the columns listed below (OrderQty, UnitPrice, SalesOrderID):
instr(name,'OrderQty')==0&&instr(name,'UnitPrice')==0&&instr(name,'SalesOrderID')==0
Use the "this" syntax ($$) in the other properties so that we maintain the same column names and use the
first()function as an aggregate. This tells ADF to keep the first matching value found:
We're ready to finish the migration flow by adding a sink transformation. Select "new" next to dataset and add an Azure Cosmos DB dataset that points to your Azure Cosmos DB database. For the collection, we call it "orders" and it has no schema and no documents because it will be created on the fly.
In Sink Settings, Partition Key to
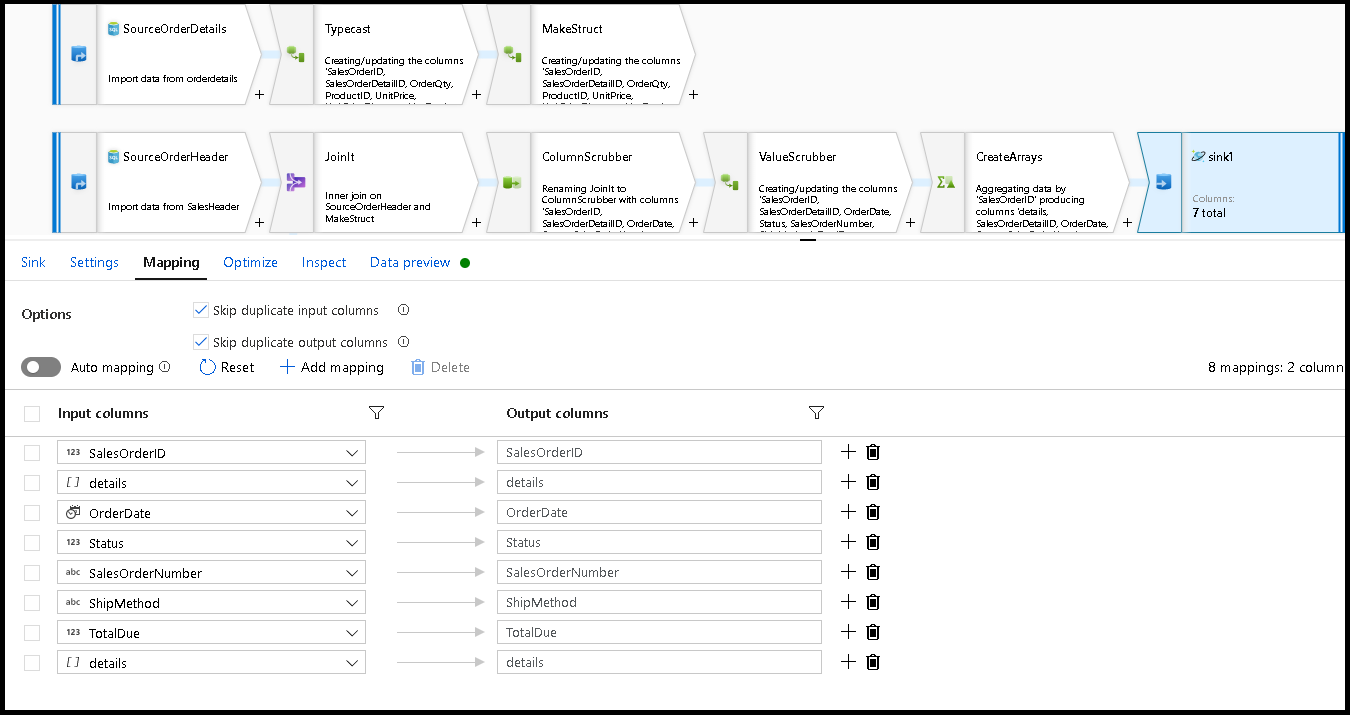
/SalesOrderIDand collection action to "recreate". Make sure your mapping tab looks like this:
Select data preview to make sure that you're seeing these 32 rows set to insert as new documents into your new container:

If everything looks good, you're now ready to create a new pipeline, add this data flow activity to that pipeline and execute it. You can execute from debug or a triggered run. After a few minutes, you should have a new denormalized container of orders called "orders" in your Azure Cosmos DB database.
Related content
- Build the rest of your data flow logic by using mapping data flows transformations.
- Download the completed pipeline template for this tutorial and import the template into your factory.