Upload files from your devices to the cloud
IoT Central lets you upload media and other files from connected devices to cloud storage. You configure the file upload capability in your IoT Central application, and then implement file uploads in your device code.
Optionally, you can manage and preview files uploaded by your devices inside your IoT Central application.
To learn how to configure file uploads by using the IoT Central REST API, see Add a file upload storage account configuration.
Prerequisites
You must be an administrator in your IoT Central application to configure file uploads.
You need an Azure storage account and container to store the uploaded files. If you don't have an existing storage account and container to use, create a new storage account in the Azure portal.
Configure device file uploads
To configure device file uploads:
Navigate to the Application section in your application.
Select Device file storage.
Select the storage account and container to use. If the storage account is in a different Azure subscription from your application, enter a storage account connection string.
If necessary, adjust the upload timeout that sets how long an upload request remains valid for. Valid values are from 1 to 24 hours.
To enable users to view and manage uploaded files inside IoT Central, set Enable access to On.
Select Save. When the status shows Configured, you're ready to upload files from devices.

Disable device file uploads
If you want to disable device file uploads to your IoT Central application:
Navigate to the Application section in your application.
Select Device file storage.
Select Delete.
Control access to uploaded files
Use roles and permissions to control who can view and delete uploaded files. To learn more, see Manage users and roles in your IoT Central application > Managing devices.
Upload a file from a device
IoT Central uses IoT Hub's file upload capability to enable devices to upload files. For sample code that shows you how to upload files from a device, see the IoT Central file upload device sample.
View and manage uploaded files
If you enabled access to files in the file upload configuration, users with the correct permissions can view and delete uploaded files.
Important
All the files in the blob container folder associated with a device are visible in the Files view for that device. This includes any files that weren't uploaded by the device.
To view and delete uploaded files, navigate to the Files view for a device. On this page, you can see thumbnails of the uploaded files and toggle between a gallery and list view. Each file has options to download or delete it:

Tip
The file type is determined by the mime type assigned to the file when it was uploaded to blob storage. The default type is binary/octet-stream.
You can customize the list view by filtering based on file name and choosing the columns to display.
To preview the content of the file and get more information about the file, select it. IoT Central supports previews of common file types such as text and images:

Test file upload
After you configure file uploads in your IoT Central application, you can test it with the sample code. If you haven't already cloned the file upload sample repository, use the following commands to clone it to a suitable location on your local machine and install the dependent packages:
git clone https://github.com/azure-Samples/iot-central-file-upload-device
cd iotc-file-upload-device
npm i
npm build
Create the device template and import the model
To test the file upload, you run a sample device application. Create a device template for the sample device to use.
Open your application in IoT Central UI.
Navigate to the Device Templates tab in the left pane, select + New:
Choose IoT device as the template type.
On the Customize page of the wizard, enter a name such as File Upload Device Sample for the device template.
On the Review page, select Create.
Select Import a model and upload the FileUploadDeviceDcm.json model file from the folder
iotc-file-upload-device\setupin the repository you downloaded previously.Select Publish to publish the device template.
Add a device
To add a device to your Azure IoT Central application:
Choose Devices on the left pane.
Select the File Upload Device Sample device template that you created earlier.
Select + New and select Create.
Select the device that you created and Select Connect
Copy the values for ID scope, Device ID, and Primary key. You use these values in the device sample code.
Run the sample code
Open the git repository you downloaded in VS Code. Create an ".env" file at the root of your project and add the values you copied previously. The file should look like the following sample with the values you made a note of previously.
scopeId=<YOUR_SCOPE_ID>
deviceId=<YOUR_DEVICE_ID>
deviceKey=<YOUR_PRIMARY_KEY>
modelId=dtmi:IoTCentral:IotCentralFileUploadDevice;1
Open the git repository you downloaded in VS Code. Press F5 to run/debug the sample. In your terminal window you see that the device is registered and is connected to IoT Central:
Starting IoT Central device...
 > Machine: Windows_NT, 8 core, freemem=6674mb, totalmem=16157mb
Starting device registration...
DPS registration succeeded
Connecting the device...
IoT Central successfully connected device: 7z1xo26yd8
Sending telemetry: {
    "TELEMETRY_SYSTEM_HEARTBEAT": 1
}
Sending telemetry: {
    "TELEMETRY_SYSTEM_HEARTBEAT": 1
}
Sending telemetry: {
    "TELEMETRY_SYSTEM_HEARTBEAT": 1
}
The sample project comes with a sample file named datafile.json. This file is uploaded when you use the Upload File command in your IoT Central application.
To test the upload, open your application and select the device you created. Select the Command tab and you see a button named Run. When you select that button the IoT Central app calls a direct method on your device to upload the file. You can see this direct method in the sample code in the /device.ts file. The method is named uploadFileCommand.
Select the Raw data tab to verify the file upload status.
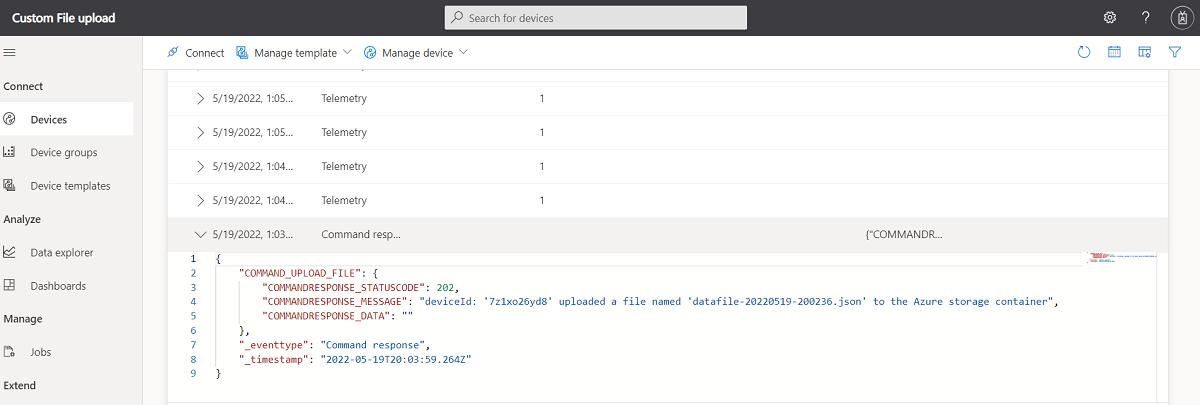
You can also make a REST API call to verify the file upload status in the storage container.
Tagasiside
Varsti tulekul: 2024. aasta jooksul tühistame GitHubi probleemide funktsiooni sisutagasiside mehhanismina ja asendame selle uue tagasisidesüsteemiga. Lisateabe saamiseks vt https://aka.ms/ContentUserFeedback.
Esita ja vaata tagasisidet