Tutorial: Model development on a cloud workstation
Learn how to develop a training script with a notebook on an Azure Machine Learning cloud workstation. This tutorial covers the basics you need to get started:
- Set up and configuring the cloud workstation. Your cloud workstation is powered by an Azure Machine Learning compute instance, which is pre-configured with environments to support your various model development needs.
- Use cloud-based development environments.
- Use MLflow to track your model metrics, all from within a notebook.
Prerequisites
To use Azure Machine Learning, you'll first need a workspace. If you don't have one, complete Create resources you need to get started to create a workspace and learn more about using it.
Start with compute
The Compute section in your workspace allows you to create compute resources. A compute instance is a cloud-based workstation fully managed by Azure Machine Learning. This tutorial series uses a compute instance. You can also use it to run your own code, and to develop and test models.
- Sign in to Azure Machine Learning studio.
- Select your workspace if it isn't already open.
- On the left navigation, select Compute.
- If you don't have a compute instance, you'll see New in the middle of the screen. Select New and fill out the form. You can use all the defaults.
- If you have a compute instance, select it from the list. If it's stopped, select Start.
Open Visual Studio Code (VS Code)
Once you have a running compute instance, you can access it in various ways. This tutorial shows using the compute instance from VS Code. VS Code gives you a full integrated development environment (IDE) with the power of Azure Machine Learning resources.
In the compute instance list, select the VS Code (Web) or VS Code (Desktop) link for the compute instance you want to use. If you choose VS Code (Desktop), you might see a pop-up asking if you want to open the application.

This VS Code instance is attached to your compute instance and your workspace file system. Even if you open it on your desktop, the files you see are files in your workspace.
Set up a new environment for prototyping (optional)
In order for your script to run, you need to be working in an environment configured with the dependencies and libraries the code expects. This section helps you create an environment tailored to your code. To create the new Jupyter kernel your notebook connects to, you'll use a YAML file that defines the dependencies.
Upload a file.
Files you upload are stored in an Azure file share, and these files are mounted to each compute instance and shared within the workspace.
Download this conda environment file, workstation_env.yml to your computer by using the Download raw file button at the top right.
Drag the file from your computer to the VS Code window. The file is uploaded to your workspace.
Move the file under your username folder.
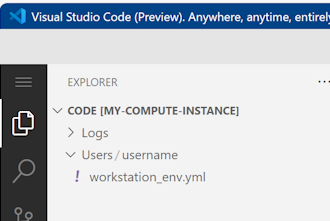
Select this file to preview it, and see what dependencies it specifies. You'll see contents like this:
name: workstation_env
# This file serves as an example - you can update packages or versions to fit your use case
dependencies:
  - python=3.8
  - pip=21.2.4
  - scikit-learn=0.24.2
  - scipy=1.7.1
  - pandas>=1.1,<1.2
  - pip:
    - mlflow-skinny
    - azureml-mlflow
    - psutil>=5.8,<5.9
    - ipykernel~=6.0
    - matplotlib
Create a kernel.
Now use the terminal to create a new Jupyter kernel, based on the workstation_env.yml file.
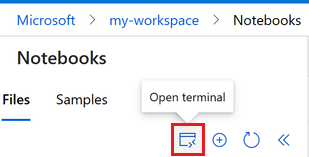
On the top menu bar, select Terminal > New Terminal.
View your current conda environments. The active environment is marked with a *.
conda env listcdto the folder where you uploaded the workstation_env.yml file. For example, if you uploaded it to your user folder:cd Users/myusernameMake sure the workstation_env.yml is in this folder.
lsCreate the environment based on the conda file provided. It takes a few minutes to build this environment.
conda env create -f workstation_env.ymlActivate the new environment.
conda activate workstation_envNote
If you see a CommandNotFoundError, follow instructions to run
conda init bash, close the terminal, and open a new one. Then retry theconda activate workstation_envcommand.Validate the correct environment is active, again looking for the environment marked with a *.
conda env listCreate a new Jupyter kernel based on your active environment.
python -m ipykernel install --user --name workstation_env --display-name "Tutorial Workstation Env"Close the terminal window.
You now have a new kernel. Next you'll open a notebook and use this kernel.
Create a notebook
- On the top menu bar, select File > New File.
- Name your new file develop-tutorial.ipynb (or enter your preferred name). Make sure you use the .ipynb extension.
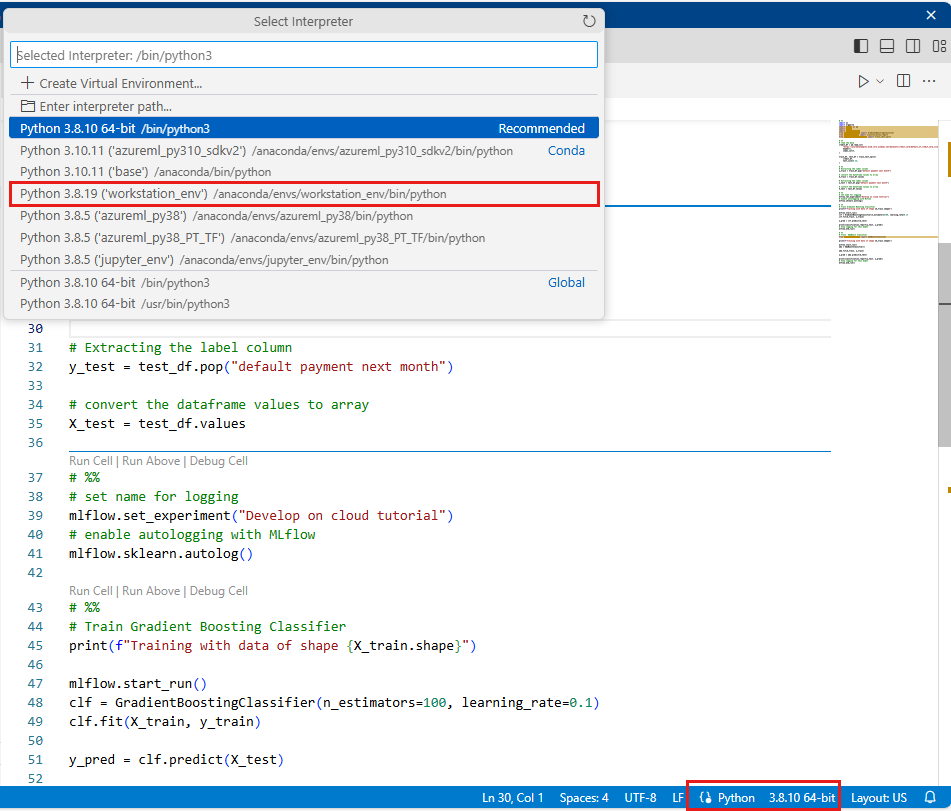
Set the kernel
- On the top right, select Select kernel.
- Select Azure ML compute instance (computeinstance-name).
- Select the kernel you created, Tutorial Workstation Env. If you don't see it, select the Refresh tool at the top right.
Develop a training script
In this section, you develop a Python training script that predicts credit card default payments, using the prepared test and training datasets from the UCI dataset.
This code uses sklearn for training and MLflow for logging the metrics.
Start with code that imports the packages and libraries you'll use in the training script.
import os
import argparse
import pandas as pd
import mlflow
import mlflow.sklearn
from sklearn.ensemble import GradientBoostingClassifier
from sklearn.metrics import classification_report
from sklearn.model_selection import train_test_split
Next, load and process the data for this experiment. In this tutorial, you read the data from a file on the internet.
# load the data
credit_df = pd.read_csv(
    "https://azuremlexamples.blob.core.windows.net/datasets/credit_card/default_of_credit_card_clients.csv",
    header=1,
    index_col=0,
)

train_df, test_df = train_test_split(
    credit_df,
    test_size=0.25,
)
Get the data ready for training:
# Extracting the label column
y_train = train_df.pop("default payment next month")

# convert the dataframe values to array
X_train = train_df.values

# Extracting the label column
y_test = test_df.pop("default payment next month")

# convert the dataframe values to array
X_test = test_df.values
Add code to start autologging with
MLflow, so that you can track the metrics and results. With the iterative nature of model development,MLflowhelps you log model parameters and results. Refer back to those runs to compare and understand how your model performs. The logs also provide context for when you're ready to move from the development phase to the training phase of your workflows within Azure Machine Learning.# set name for logging mlflow.set_experiment("Develop on cloud tutorial") # enable autologging with MLflow mlflow.sklearn.autolog()Train a model.
# Train Gradient Boosting Classifier
print(f"Training with data of shape {X_train.shape}")

mlflow.start_run()
clf = GradientBoostingClassifier(n_estimators=100, learning_rate=0.1)
clf.fit(X_train, y_train)

y_pred = clf.predict(X_test)

print(classification_report(y_test, y_pred))
# Stop logging for this model
mlflow.end_run()
Note
You can ignore the mlflow warnings. You'll still get all the results you need tracked.
Iterate
Now that you have model results, you might want to change something and try again. For example, try a different classifier technique:
# Train  AdaBoost Classifier
from sklearn.ensemble import AdaBoostClassifier

print(f"Training with data of shape {X_train.shape}")

mlflow.start_run()
ada = AdaBoostClassifier()

ada.fit(X_train, y_train)

y_pred = ada.predict(X_test)

print(classification_report(y_test, y_pred))
# Stop logging for this model
mlflow.end_run()
Note
You can ignore the mlflow warnings. You'll still get all the results you need tracked.
Examine results
Now that you've tried two different models, use the results tracked by MLFfow to decide which model is better. You can reference metrics like accuracy, or other indicators that matter most for your scenarios. You can dive into these results in more detail by looking at the jobs created by MLflow.
Return to your workspace in the Azure Machine Learning studio.
On the left navigation, select Jobs.

Select the link for Develop on cloud tutorial.
There are two different jobs shown, one for each of the models you tried. These names are autogenerated. As you hover over a name, use the pencil tool next to the name if you want to rename it.
Select the link for the first job. The name appears at the top. You can also rename it here with the pencil tool.
The page shows details of the job, such as properties, outputs, tags, and parameters. Under Tags, you'll see the estimator_name, which describes the type of model.
Select the Metrics tab to view the metrics that were logged by
MLflow. (Expect your results to differ, as you have a different training set.)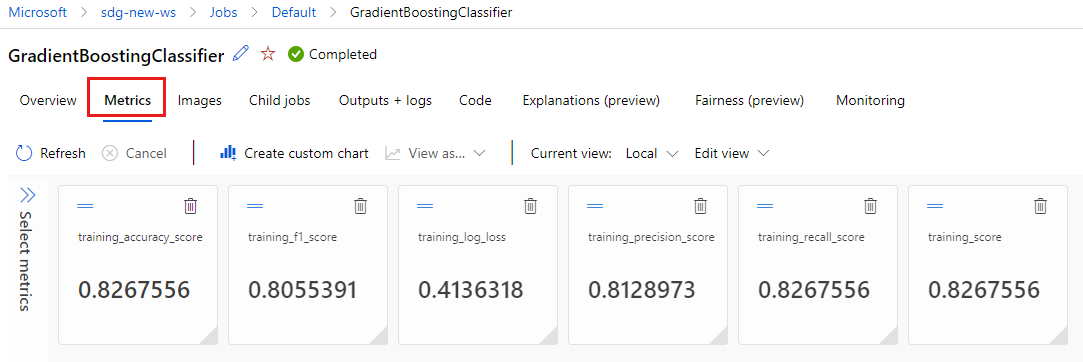
Select the Images tab to view the images generated by
MLflow.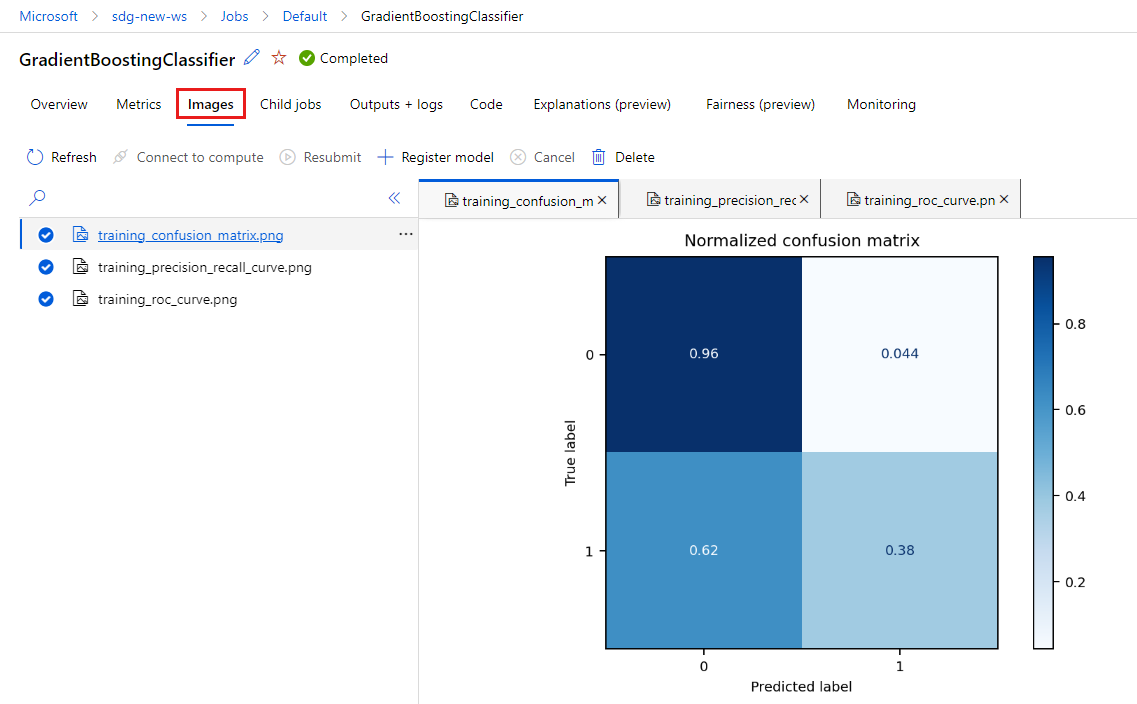
Go back and review the metrics and images for the other model.
Create a Python script
Now create a Python script from your notebook for model training.
In your VS Code window, right-click on the notebook filename and select Import Notebook to Script.
Use the menu File > Save to save this new script file. Call it train.py.
Look through this file and delete the code you don't want in the training script. For example, keep the code for the model you wish to use, and delete code for the model you don't want.
- Make sure you keep the code that starts autologging (
mlflow.sklearn.autolog()). - When you run the Python script interactively (as you're doing here), you can keep the line that defines the experiment name (
mlflow.set_experiment("Develop on cloud tutorial")). Or even give it a different name to see it as a different entry in the Jobs section. But when you prepare the script for a training job, that line doesn't apply and should be omitted - the job definition includes the experiment name. - When you train a single model, the lines to start and end a run (
mlflow.start_run()andmlflow.end_run()) are also not necessary (they'll have no effect), but can be left in if you wish.
- Make sure you keep the code that starts autologging (
When you're finished with your edits, save the file.
You now have a Python script to use for training your preferred model.
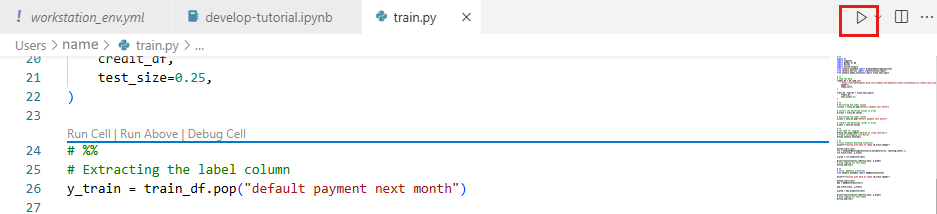
Run the Python script
For now, you're running this code on your compute instance, which is your Azure Machine Learning development environment. Tutorial: Train a model shows you how to run a training script in a more scalable way on more powerful compute resources.
Select the environment you created earlier in this tutorial as your Python version (workstations_env). In the lower right corner of the notebook, you'll see the environment name. Select it, then select the environment in the middle of the screen.
Now run the Python script. Use the Run Python File tool on the top right.
Note
You can ignore the mlflow warnings. You'll still get all the metrics and images from autologging.
Examine script results
Go back to Jobs in your workspace in Azure Machine Learning studio to see the results of your training script. Keep in mind that the training data changes with each split, so the results differ between runs as well.
Clean up resources
If you plan to continue now to other tutorials, skip to Next steps.
Stop compute instance
If you're not going to use it now, stop the compute instance:
- In the studio, in the left navigation area, select Compute.
- In the top tabs, select Compute instances
- Select the compute instance in the list.
- On the top toolbar, select Stop.
Delete all resources
Important
The resources that you created can be used as prerequisites to other Azure Machine Learning tutorials and how-to articles.
If you don't plan to use any of the resources that you created, delete them so you don't incur any charges:
In the Azure portal, select Resource groups on the far left.
From the list, select the resource group that you created.
Select Delete resource group.
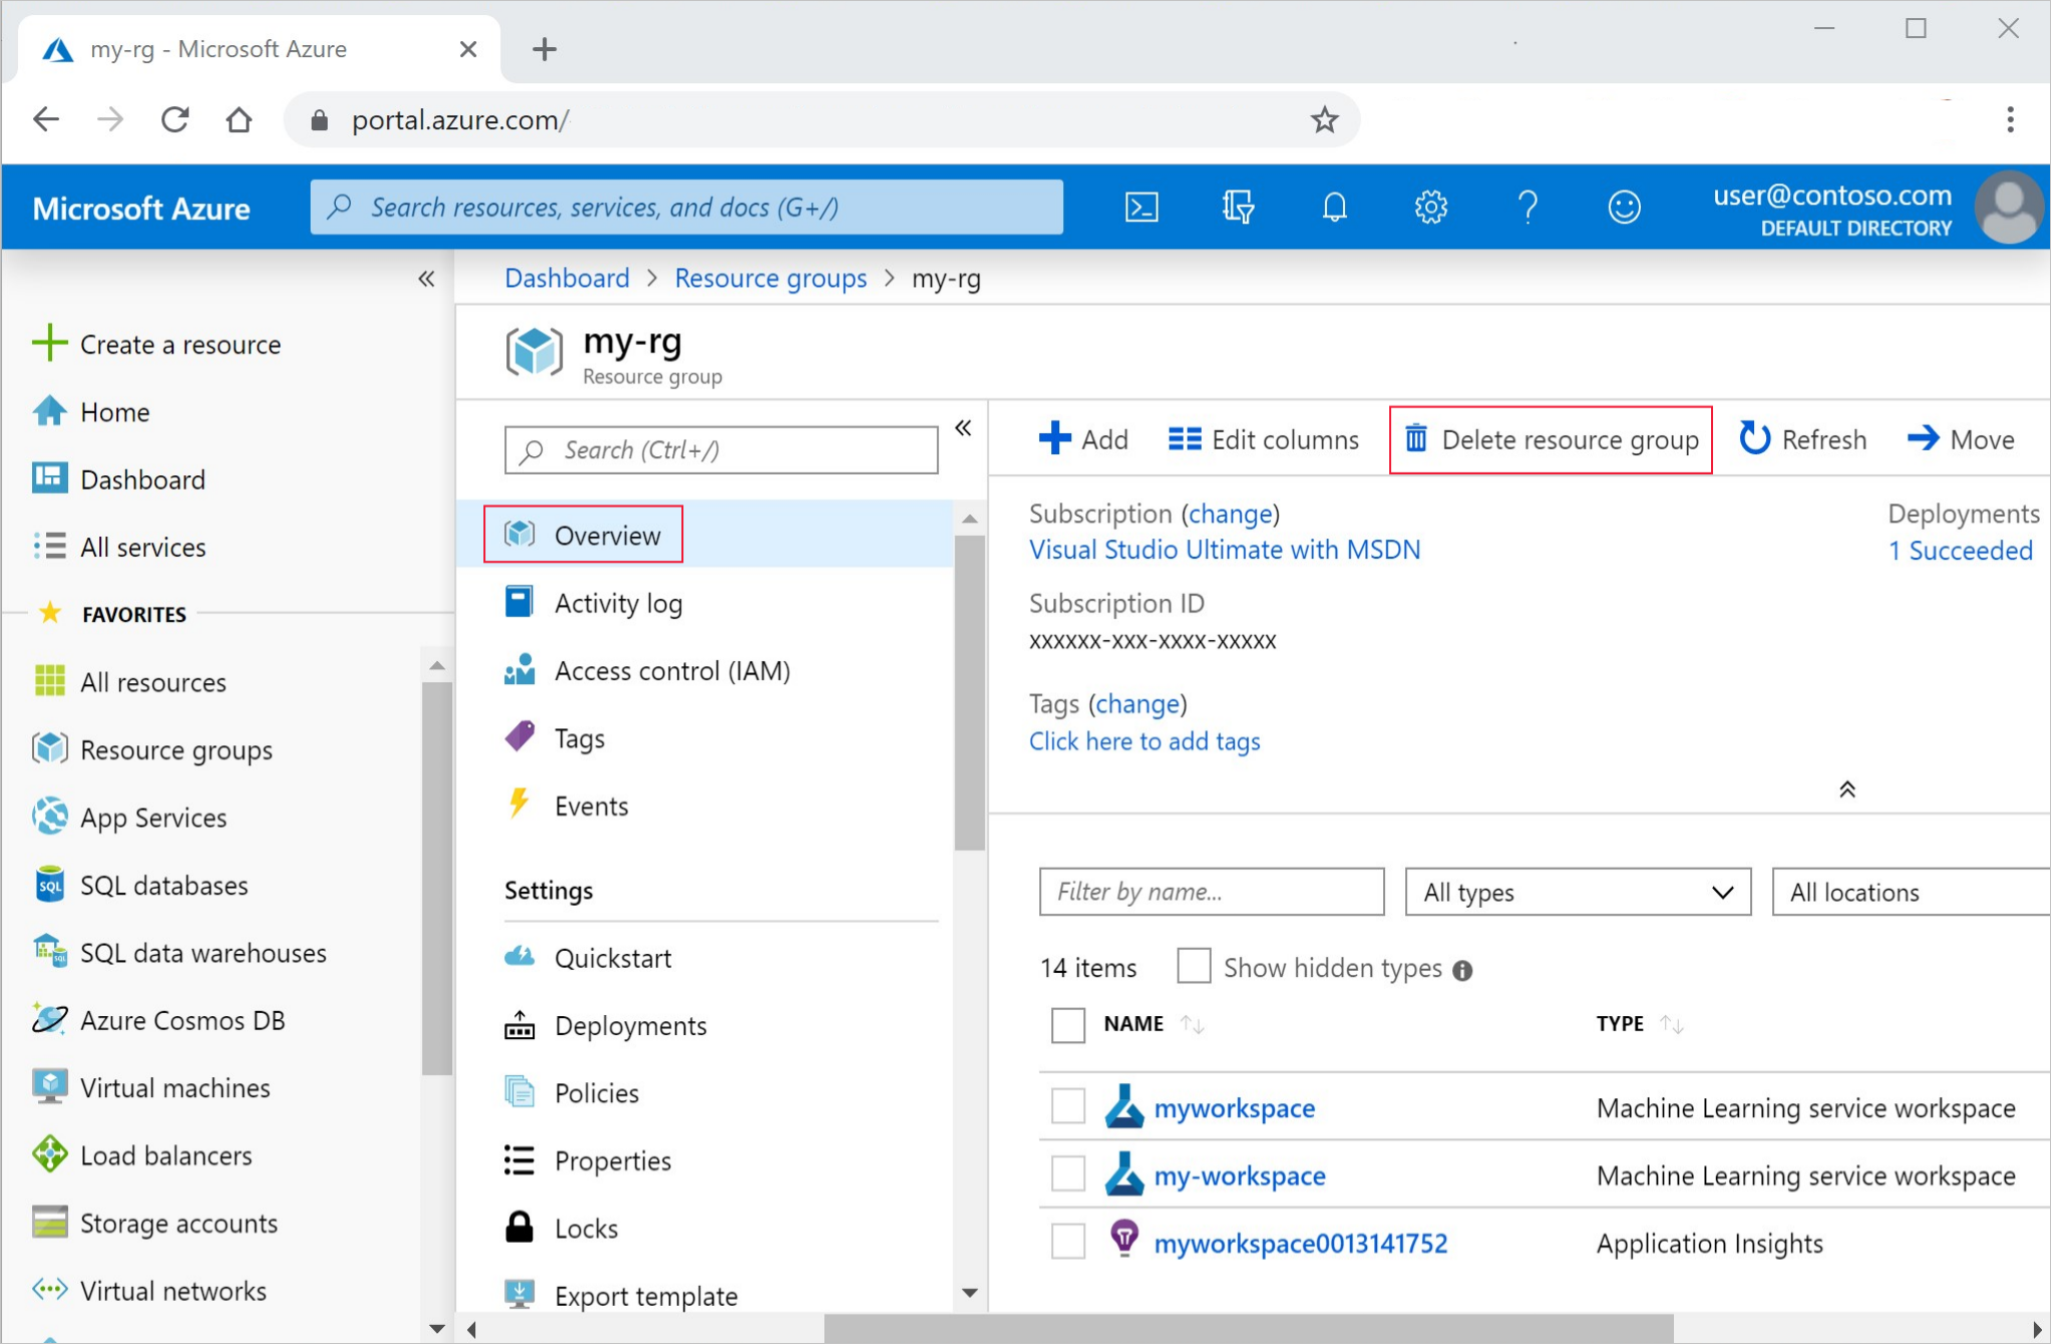
Enter the resource group name. Then select Delete.
Next steps
Learn more about:
- From artifacts to models in MLflow
- Using Git with Azure Machine Learning
- Running Jupyter notebooks in your workspace
- Working with a compute instance terminal in your workspace
- Manage notebook and terminal sessions
This tutorial showed you the early steps of creating a model, prototyping on the same machine where the code resides. For your production training, learn how to use that training script on more powerful remote compute resources: