Applies to: ✔️ Linux VM ✔️ Windows VM ✔️ Generation 2 VM
Azure Virtual Machines supports enabling Azure Trusted Launch on existing Azure Generation 2 virtual machines (VMs) by upgrading to the Trusted Launch security type.
Trusted Launch is a way to enable foundational compute security on Azure Generation 2 VMs VMs and protects against advanced and persistent attack techniques like boot kits and rootkits. It does so by combining infrastructure technologies like Secure Boot, virtual Trusted Platform Module (vTPM), and boot integrity monitoring on your VM.
Important
Support for enabling Trusted Launch on existing Azure Generation 1 VMs is currently in private preview. You can gain access to preview by using the registration form.
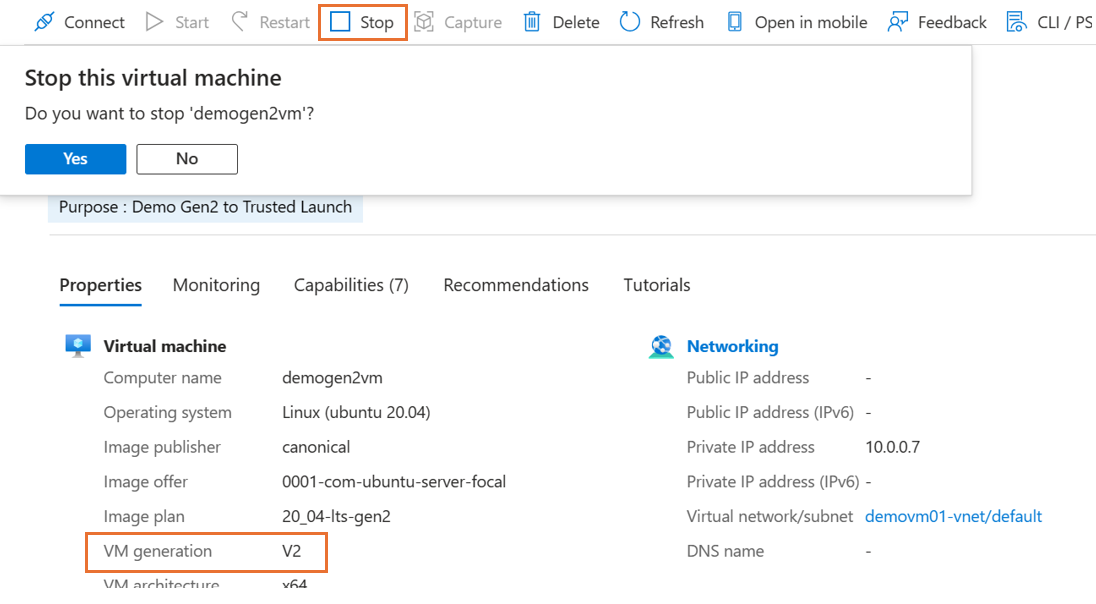
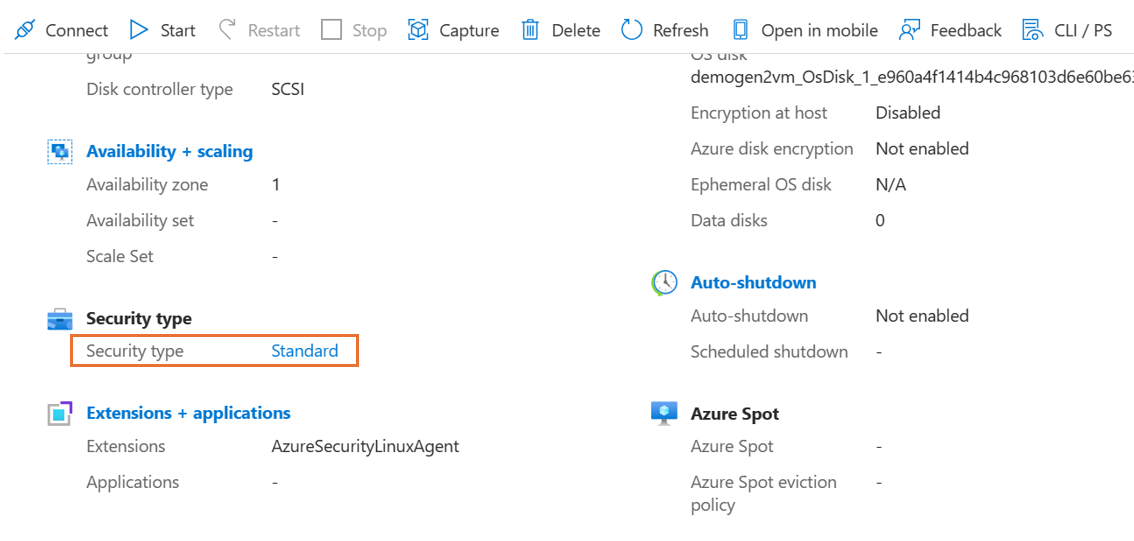
Azure Generation 2 VMs should be stopped and deallocated before you enable the Trusted Launch security type.
Azure Backup, if enabled, for VMs should be configured with the Enhanced Backup policy. The Trusted Launch security type can't be enabled for Generation 2 VMs configured with Standard policy backup protection.
Enable Trusted Launch on a test Generation 2 VM and determine if any changes are required to meet the prerequisites before you enable Trusted Launch on Generation 2 VMs associated with production workloads.
Create restore points for Azure Generation 2 VMs associated with production workloads before you enable the Trusted Launch security type. You can use the restore points to re-create the disks and Generation 2 VM with the previous well-known state.
Enable Trusted Launch on an existing VM
Note
After you enable Trusted Launch, currently VMs can't be rolled back to the Standard security type (non-Trusted Launch configuration).
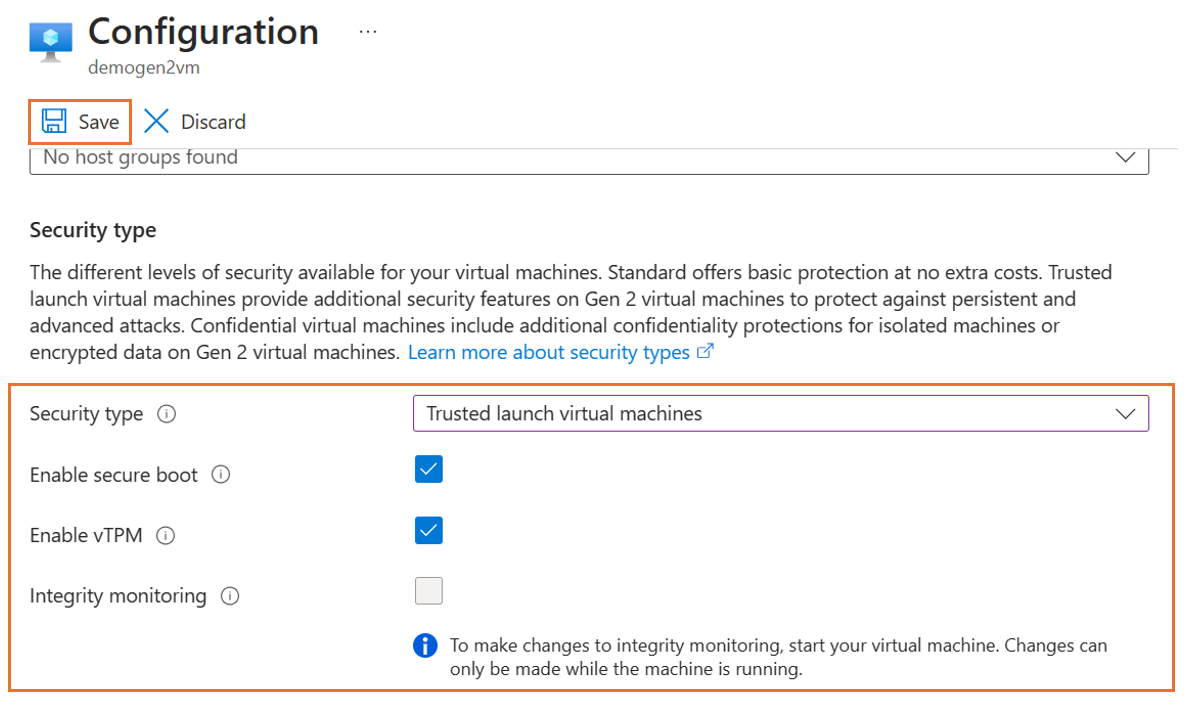
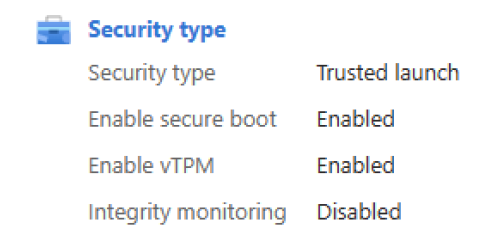
vTPM is enabled by default.
We recommend that you enable Secure Boot, if you aren't using custom unsigned kernel or drivers. It's not enabled by default. Secure Boot preserves boot integrity and enables foundational security for VMs.
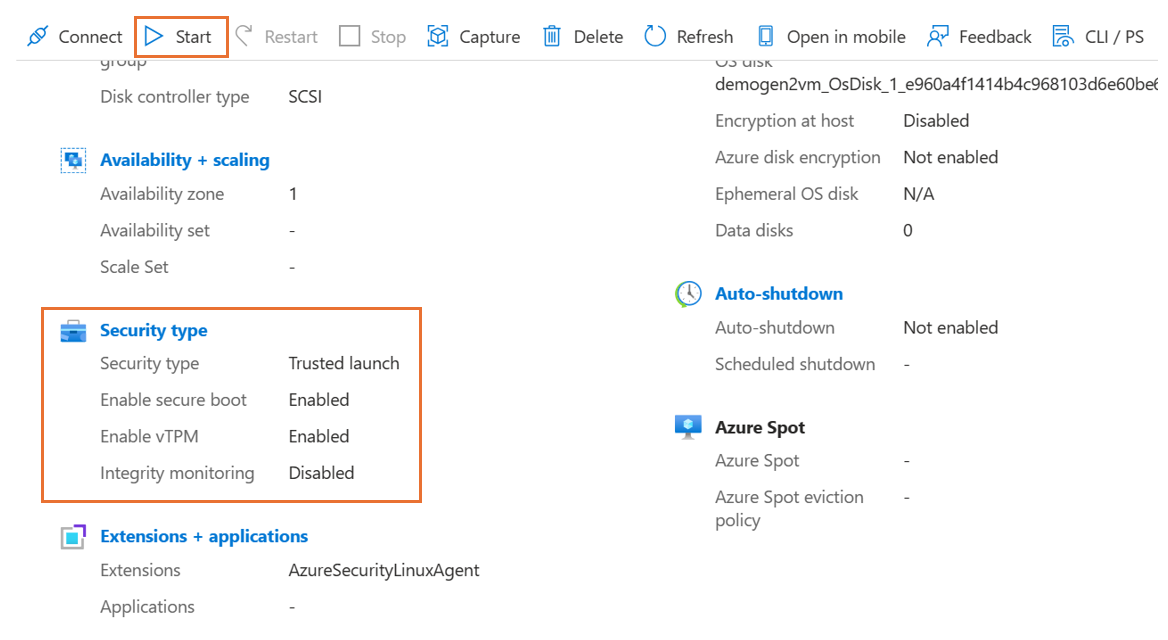
After the update successfully finishes, close the Configuration page. On the Overview page in the VM properties, confirm the Security type settings.
Start the upgraded Trusted Launch VM. Verify that you can sign in to the VM by using either the Remote Desktop Protocol (RDP) for Windows VMs or the Secure Shell Protocol (SSH) for Linux VMs.
Follow the steps to enable Trusted Launch on an existing Azure Generation 2 VM by using the Azure CLI.
Make sure that you install the latest Azure CLI and are signed in to an Azure account with az login.
Sign in to the VM Azure subscription.
az login

az account set --subscription 00000000-0000-0000-0000-000000000000
Deallocate the VM.
Enable Trusted Launch by setting --security-type to TrustedLaunch.
az vm deallocate \
    --resource-group myResourceGroup --name myVm
Validate the output of the previous command. Ensure that the securityProfile configuration is returned with the command output.
az vm update \
    --resource-group myResourceGroup --name myVm \
    --security-type TrustedLaunch \
    --enable-secure-boot true --enable-vtpm true
Validate the output of the previous command. Ensure that the securityProfile configuration is returned with the command output.
Start the upgraded Trusted Launch VM. Verify that you can sign in to the VM by using either RDP (for Windows VMs) or SSH (for Linux VMs).
Follow the steps to enable Trusted Launch on an existing Azure Generation 2 VM by using an ARM template.
An Azure Resource Manager template is a JavaScript Object Notation (JSON) file that defines the infrastructure and configuration for your project. The template uses declarative syntax. You describe your intended deployment without writing the sequence of programming commands to create the deployment.
Review the template.
{
    "$schema": "https://schema.management.azure.com/schemas/2019-04-01/deploymentTemplate.json#",
    "contentVersion": "1.0.0.0",
    "parameters": {
        "vmsToUpgrade": {
            "type": "object",
            "metadata": {
                "description": "Specifies the list of Gen2 virtual machines to be upgraded to Trusted launch."
            }
        },
        "vTpmEnabled": {
            "type": "bool",
            "defaultValue": true,
            "metadata": {
                "description": "Specifies whether vTPM should be enabled on the virtual machine."
            }
        }
    },
    "resources": [
        {
            "type": "Microsoft.Compute/virtualMachines",
            "apiVersion": "2022-11-01",
            "name": "[parameters('vmsToUpgrade').virtualMachines[copyIndex()].vmName]",
            "location": "[parameters('vmsToUpgrade').virtualMachines[copyIndex()].location]",
            "properties": {
                "securityProfile": {
                    "uefiSettings": {
                        "secureBootEnabled": "[parameters('vmsToUpgrade').virtualMachines[copyIndex()].secureBootEnabled]",
                        "vTpmEnabled": "[parameters('vTpmEnabled')]"
                    },
                    "securityType": "TrustedLaunch"
                }
            },
            "copy": {
                "name": "vmCopy",
                "count": "[length(parameters('vmsToUpgrade').virtualMachines)]"
            }
        }
    ]
}
Edit the parameters JSON file with VMs to be updated with the TrustedLaunch security type.
Varsti tulekul: 2024. aasta jooksul tühistame GitHubi probleemide funktsiooni sisutagasiside mehhanismina ja asendame selle uue tagasisidesüsteemiga. Lisateabe saamiseks vt https://aka.ms/ContentUserFeedback.