Assign data to objects in Data Activator
Important
Data Activator is currently in preview.
Once you get data into Data Activator, the next step is to assign your events to objects. You assign events to objects in Data Mode, which you can access from the tab at the bottom of the screen.
Note
If you started from Power BI, then Data Activator automatically creates an object for you and assign your Power BI data to it. You can skip this section unless you wish to combine your Power BI data with other events coming from Eventstreams.
Assign data to a new object
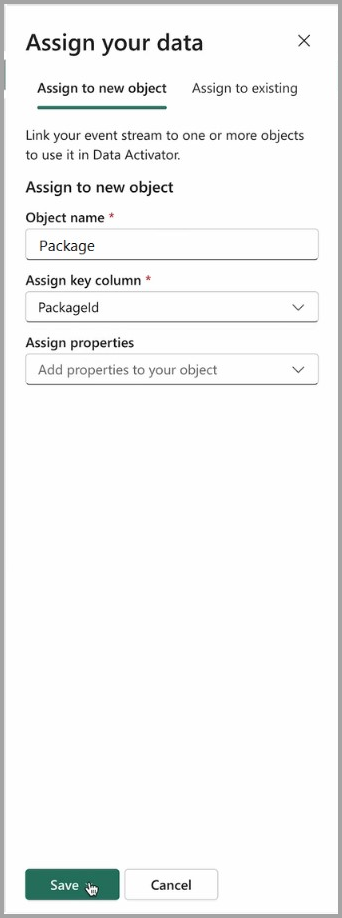
To create an object, pick the events that you wish to monitor, then select Assign your data in the ribbon in the data pane. Data Activator prompts you for an Object name and a Key Column. Choose an object name that reflects the type of object to which your events refer. The Key Column must be a column in your events that uniquely identifies the objects being monitored. Optionally, you can use Assign Properties to import other columns from your event stream and convert them into properties on your objects. Refer to create properties for more information on properties.
The example below is based on the sample Packages data that comes with Data Activator. Since this data is monitoring packages, we choose Package as our object name. We choose Package ID as our key column because it uniquely identifies packages.
When you create an object, you're switched to Design mode with the event stream for the new object selected. The preview in the following image shows you the events that were received split out by the unique values from the ID column.
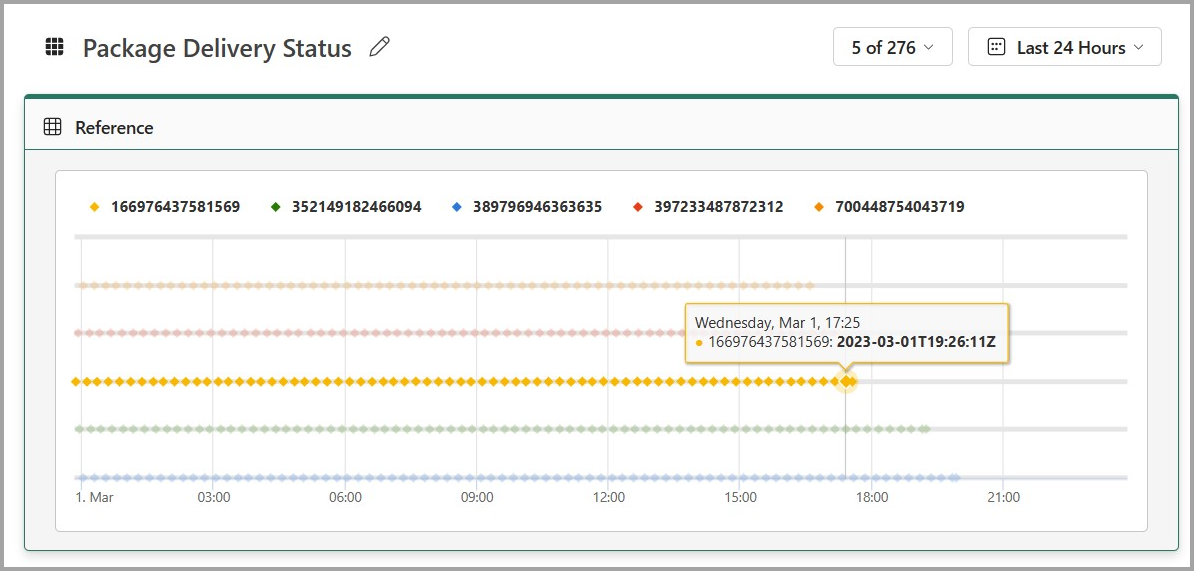
By default the events for five random instances for the previous 24 hours are displayed in the chart. You can change this using the population selector and time selectors above the card.
Assign data to an existing object
You can assign multiple data streams to a single object, which can be useful if data about an object is spread across multiple streams. A typical reason is that you have slowly changing reference data about an object in one event stream, and fast-moving updates about an object in another event stream.
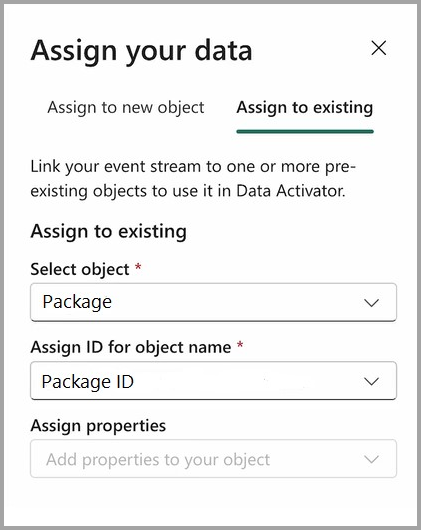
You achieve this using the Assign to Existing option in the Assign Data pane. The process is the same as for assigning data to a new object, except that you select an existing object to assign the events to.
Note
When assigning to an existing object, it is essential that you choose a key column that references the same object IDs that you used when creating the object in the first place, otherwise you will get unexpected results from your properties and triggers.
Assign data to multiple objects
You can assign a single event source to multiple objects, which is useful if your event source references multiple object types. The sample Packages event streams used in the tutorial reference both a Package ID and a City, so it can be useful to create both a Package and a City object from the packages streams. Since there are multiple packages in each City, this lets you create aggregate measures at the City level, such as the number of packages currently in transit for a given City.
To assign an event stream to multiple objects, you follow the procedures described in the previous two sections, for each object to which you want to assign the event stream.
Related content
- What is Data Activator?
- Get started with Data Activator
- Get data for Data Activator from Power BI
- Get data for Data Activator from Eventstreams
- Create Data Activator triggers in design mode
- Detection conditions in Data Activator
- Use Custom Actions to trigger Power Automate Flows
- Data Activator tutorial using sample data
You can also learn more about Microsoft Fabric:
Feedback
Coming soon: Throughout 2024 we will be phasing out GitHub Issues as the feedback mechanism for content and replacing it with a new feedback system. For more information see: https://aka.ms/ContentUserFeedback.
Submit and view feedback for