ATA:n asentaminen - vaihe 5
Koskee: Advanced Threat Analytics -versio 1.9
Vaihe 5: ATA-yhdyskäytäväasetusten määrittäminen
Kun ATA-yhdyskäytävä on asennettu, määritä ATA-yhdyskäytävän asetukset seuraavasti.
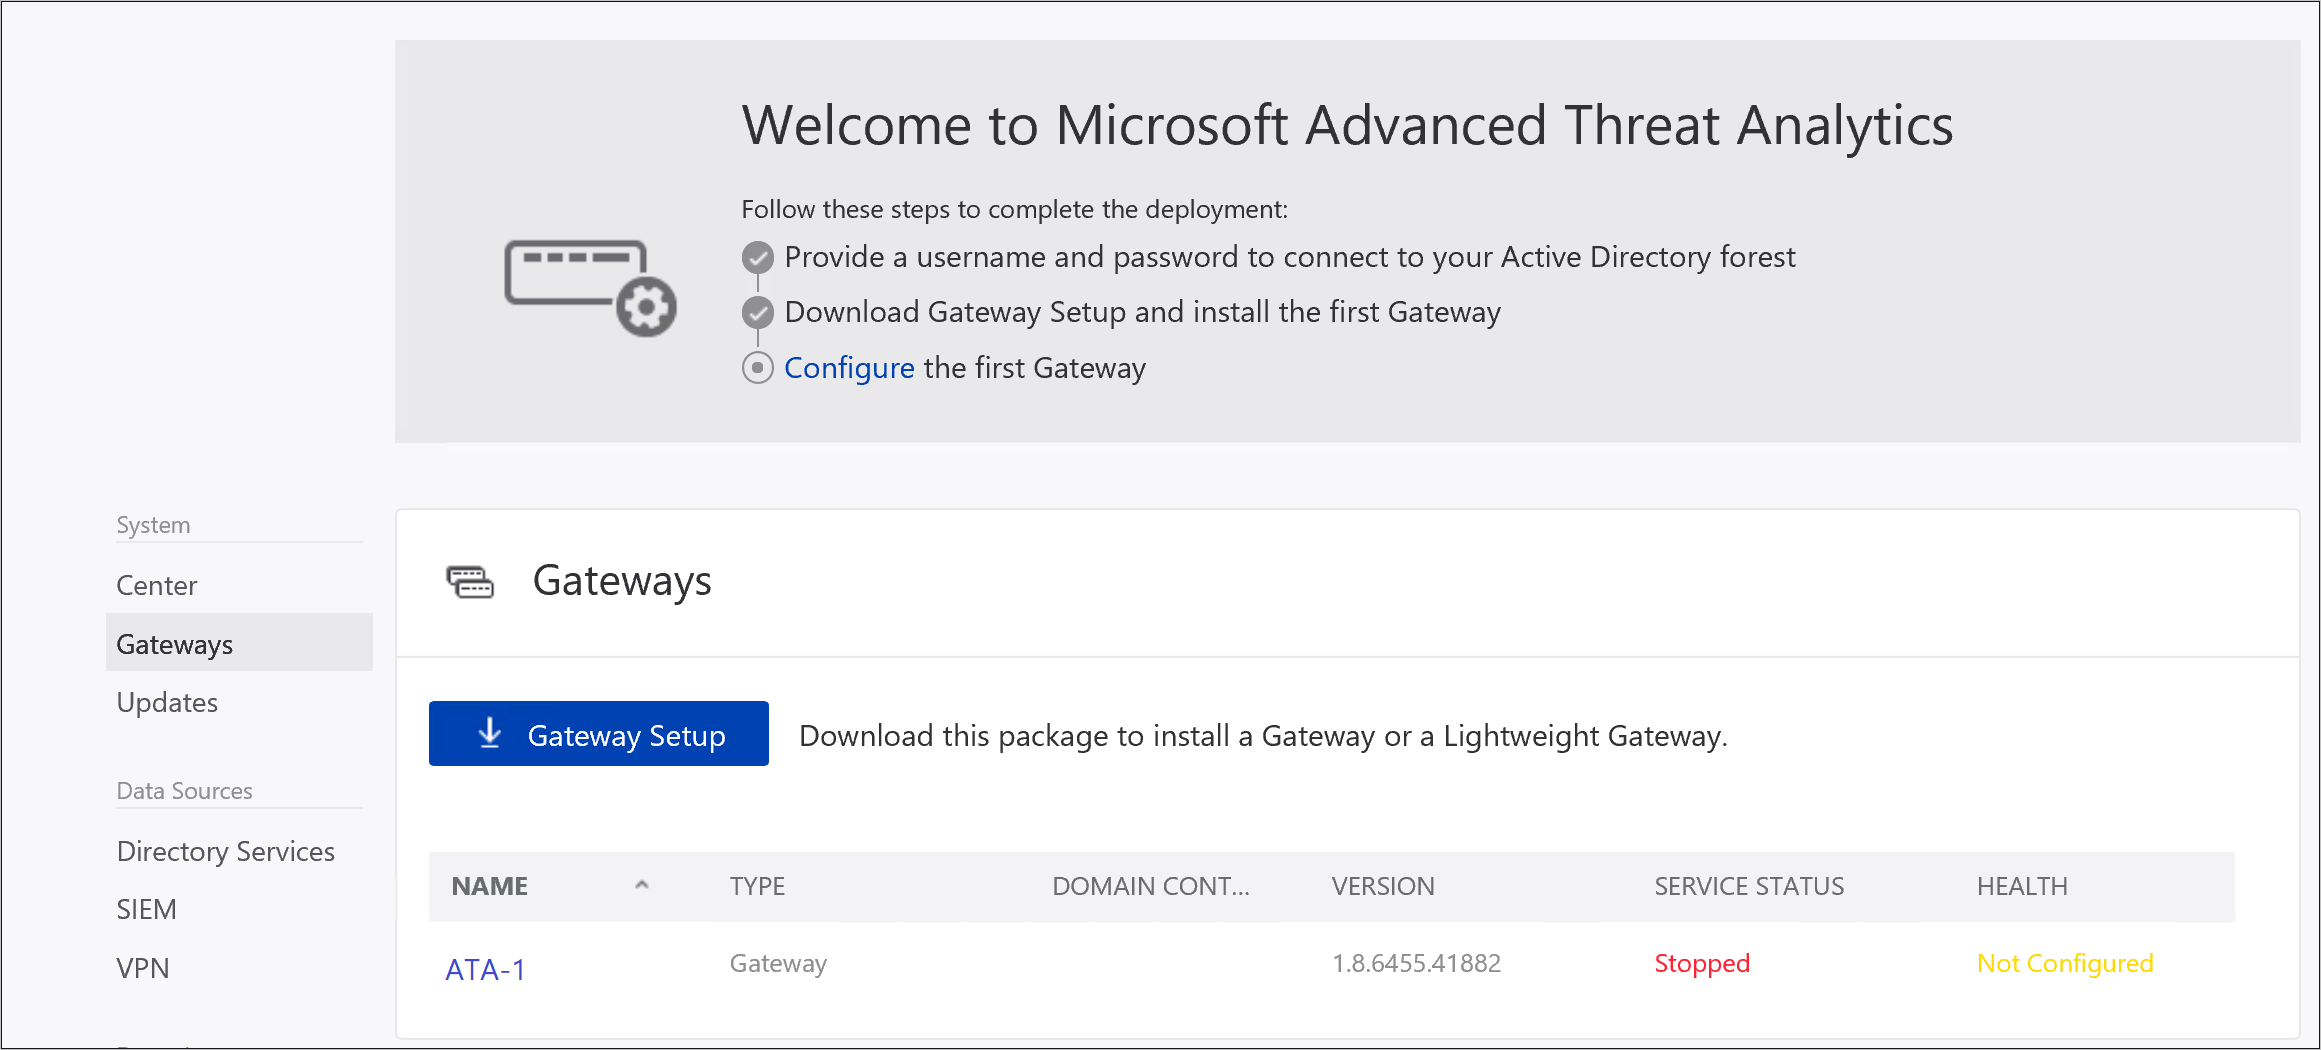
Siirry ATA-konsolissa kohtaan Määritys ja valitse Järjestelmä-kohdastaYhdyskäytävät.

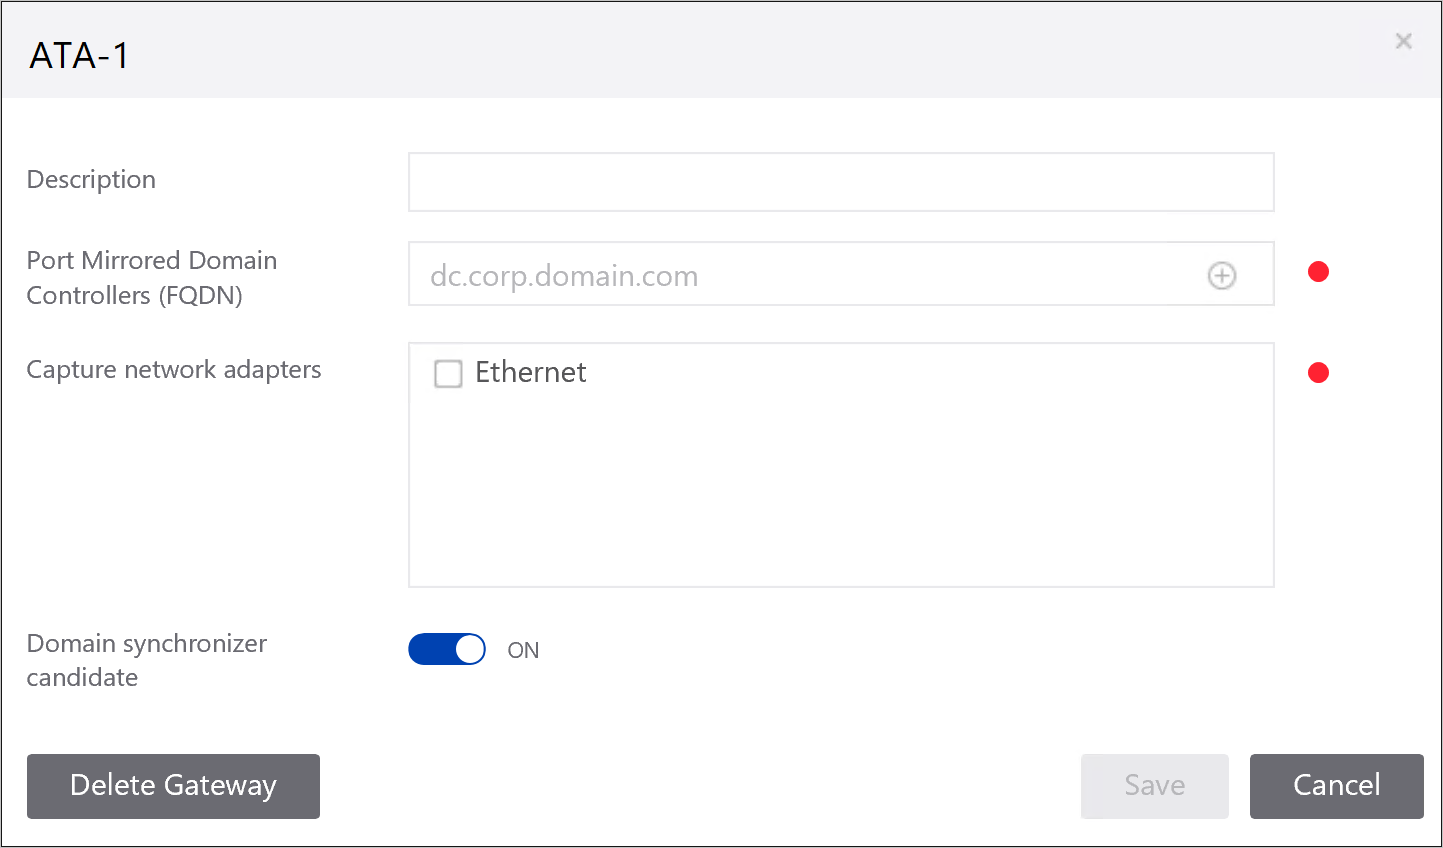
Napsauta määritettävää yhdyskäytävää ja anna seuraavat tiedot:

- Kuvaus: Kirjoita ATA-yhdyskäytävän kuvaus (valinnainen).
- Port Mirrored Domain Controllers (FQDN) (pakollinen ATA-yhdyskäytävälle, tätä ei voi muuttaa ATA:n kevyessä yhdyskäytävässä): Anna toimialueen ohjauskoneen täydellinen täydellinen täydellinen toimialueen ohjauskone ja lisää se luetteloon napsauttamalla plusmerkkiä. Esimerkiksi dc01.contoso.com
Seuraavat tiedot koskevat palvelimia, jotka kirjoitat toimialueen ohjauskoneiden luetteloon:
Kaikki toimialueen ohjauskoneet, joiden liikennettä ATA-yhdyskäytävä valvoo porttien peilauksen kautta, on lueteltava toimialueen ohjauskoneiden luettelossa. Jos toimialueen ohjauskonetta ei ole lueteltu toimialueen ohjauskoneiden luettelossa, epäilyttävän toiminnan havaitseminen ei ehkä toimi odotetulla tavalla.
Vähintään yhden luettelon toimialueen ohjauskoneen on oltava yleinen luettelo. Tämän avulla ATA voi ratkaista puuryhmän muiden toimialueiden tietokone- ja käyttäjäobjektit.
Sieppaa verkkosovittimet (pakollinen):
Jos käytät ATA-yhdyskäytävää erillisessä palvelimessa, valitse verkkosovittimet, jotka on määritetty kohdepelausportiksi. Nämä vastaanottavat peilatun toimialueen ohjauskoneen liikenteen.
ATA:n kevyessä yhdyskäytävässä tämän tulee olla kaikki verkkosovittimet, joita käytetään viestintään organisaatiosi muiden tietokoneiden kanssa.
Toimialueen synkronointiohjelman ehdokas: Mikä tahansa ATA-yhdyskäytävä, joka on määritetty toimialueen synkronointiohjelmaksi, voi olla vastuussa ATA:n ja Active Directory -toimialueen välisestä synkronoinnista. Toimialueen koosta riippuen ensimmäinen synkronointi voi kestää jonkin aikaa ja vaatii paljon resursseja. Oletusarvoisesti vain ATA-yhdyskäytävät määritetään toimialueen synkronointiohjelman ehdotuksiksi. On suositeltavaa, että poistat kaikki etäsivuston ATA-yhdyskäytävät käytöstä toimialueen synkronointiohjelman ehdotuksina. Jos toimialueen ohjauskone on vain luku -tilassa, älä määritä sitä toimialueen synkronointiohjelman hakijaksi. Lisätietoja on artikkelissa ATA-arkkitehtuuri.
Huomautus
ATA-yhdyskäytäväpalvelun käynnistyminen ensimmäisen kerran asennuksen jälkeen kestää muutaman minuutin, koska se muodostaa verkkosieppaus jäsentäjien välimuistin. Määritysmuutokset otetaan käyttöön ATA-yhdyskäytävässä seuraavassa ajoitetussa synkronoinnissa ATA-yhdyskäytävän ja ATA-keskuksen välillä.
Vaihtoehtoisesti voit määrittää Syslog-kuuntelutoiminnon ja Windowsin tapahtumien edelleenlähetyskokoelman.
Ota ATA-yhdyskäytävän päivitys käyttöön automaattisesti , jotta tämä ATA-yhdyskäytävä päivittyy automaattisesti tulevissa versiojulkaisuissa, kun päivität ATA-keskuksen.
Valitse Tallenna.
Tarkista asennukset
Jos haluat varmistaa, että ATA-yhdyskäytävä on otettu käyttöön, tarkista seuraavat vaiheet:
Tarkista, että Palvelu nimeltä Microsoft Advanced Threat Analytics Gateway on käynnissä. Kun olet tallentanut ATA-yhdyskäytävän asetukset, palvelun käynnistyminen voi kestää muutaman minuutin.
Jos palvelu ei käynnisty, katso lisätietoja Microsoft.Tri.Gateway-Errors.log-tiedostosta, joka sijaitsee seuraavassa oletuskansiossa: %programfiles%\Microsoft Advanced Threat Analytics\Gateway\Logs. Lisätietoja on ATA-vianmäärityksessä .
Jos tämä on ensimmäinen ATA-yhdyskäytävä, joka on asennettu muutaman minuutin kuluttua, kirjaudu ATA-konsoliin ja avaa ilmoitusruutu pyyhkäisemällä näytön oikeaa reunaa auki. Näet luettelon viimeksi opituista entiteeteistä konsolin oikeassa reunassa olevassa ilmoituspalkissa.
Muodosta yhteys ATA-konsoliin napsauttamalla työpöydällä Microsoft Advanced Threat Analytics -pikakuvaketta. Kirjaudu sisään samoilla käyttäjän tunnistetiedoilla, joita käytit ATA-keskuksen asentamiseen.
Etsi konsolista hakupalkista jotakin, kuten käyttäjää tai toimialueen ryhmää.
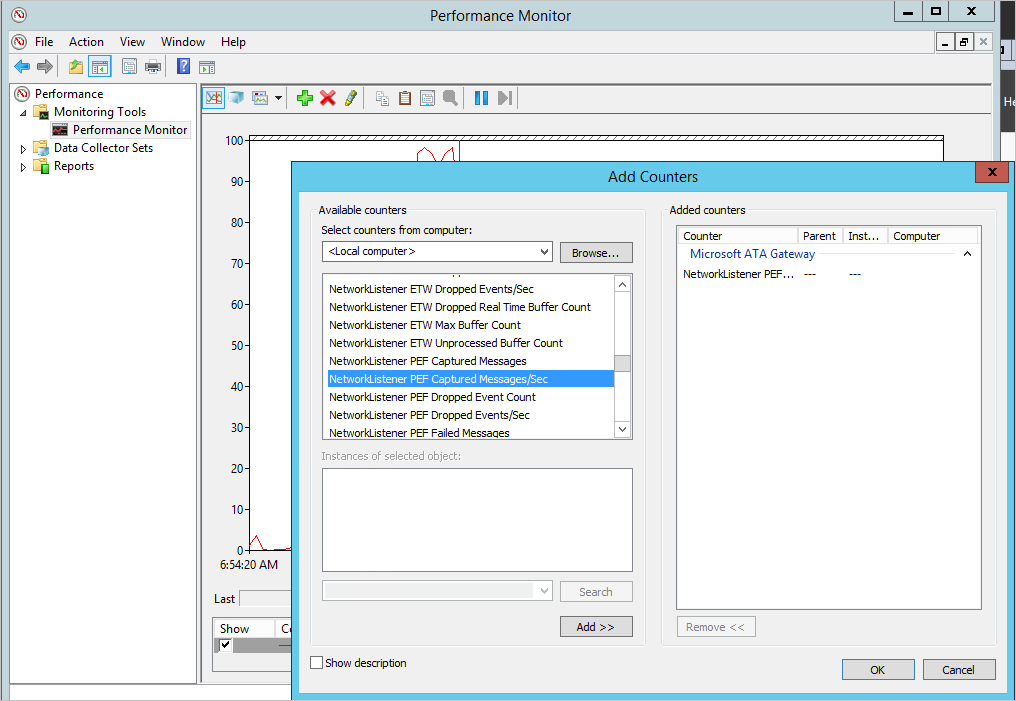
Avaa suorituskyvyn valvonta. Napsauta Suorituskyky-puussa Suorituskyvyn valvonta ja napsauta sitten plus-kuvaketta, kun haluat lisätä laskurin. Laajenna Microsoft ATA Gateway ja vieritä alaspäin kohtaan Verkon kuuntelutoiminnon PEF-siepatut viestit/sek ja lisää se. Varmista sitten, että näet kaaviossa toiminnan.

Määritä virustentorjuntapoikkeukset
Kun olet asentanut ATA-yhdyskäytävän, jätä ATA-hakemisto pois virustentorjuntasovelluksesi jatkuvasta tarkistuksesta. Tietokannan oletussijainti on: **C:\Program Files\Microsoft Advanced Threat Analytics**.
Muista myös jättää seuraavat prosessit pois AV-skannauksesta:
Vuorokausi
Microsoft.Tri.Gateway.exe
Microsoft.Tri.Gateway.Updater.exe
Jos asensit ATA:n eri hakemistoon, muista muuttaa kansiopolkuja asennuksen mukaan.