Tutorial: Enable anomaly notification in Metrics Advisor
Important
Starting on the 20th of September, 2023 you won’t be able to create new Metrics Advisor resources. The Metrics Advisor service is being retired on the 1st of October, 2026.
In this tutorial, you learn how to:
- Create a hook in Metrics Advisor
- Send Notifications with Azure Logic Apps
- Send Notifications to Microsoft Teams
- Send Notifications via SMTP server
Prerequisites
Create a Metrics Advisor resource
To explore capabilities of Metrics Advisor, you might need to create a Metrics Advisor resource in the Azure portal to deploy your Metrics Advisor instance.
Create a hook in Metrics Advisor
A hook in Metrics Advisor is a bridge that enables customer to subscribe to metrics anomalies and send notifications through different channels. There are four types of hooks in Metrics Advisor:
- Email hook
- Webhook
- Teams hook
- Azure DevOps hook
Each hook type corresponds to a specific channel that anomaly will be notified through.
Send notifications with Azure Logic Apps, Teams, and SMTP
Send email notification by using Azure Logic Apps
There are two common options to send email notifications that are supported in Metrics Advisor. One is to use webhooks and Azure Logic Apps to send email alerts, the other is to set up an SMTP server and use it to send email alerts directly. This section will focus on the first option, which is easier for customers who don't have an available SMTP server.
Step 1: Create a webhook in Metrics Advisor
A webhook is the entry point for all the information available from the Metrics Advisor service, and calls a user-provided API when an alert is triggered. All alerts can be sent through a webhook.
Select the Hooks tab in your Metrics Advisor workspace, and select the Create hook button. Choose a hook type of web hook. Fill in the required parameters and select OK. For detailed steps, refer to create a webhook.
There's one extra parameter of Endpoint that needs to be filled out, this could be done after completing Step 3 below.
Step 2: Create a Consumption logic app resource
In the Azure portal, create a Consumption logic app resource with a blank workflow by following the instructions in Create an example Consumption logic app workflow. When you see the workflow designer opens, return to this tutorial.
Step 3: Add a trigger of When an HTTP request is received
Azure Logic Apps uses various actions to trigger workflows that are defined. For this use case, it uses the trigger named When an HTTP request is received.
In the dialog for When an HTTP request is received, select Use sample payload to generate schema.

Copy the following sample JSON into the textbox and select Done.
{
"properties": {
    "value": {
        "items": {
            "properties": {
                "alertInfo": {
                    "properties": {
                        "alertId": {
                            "type": "string"
                        },
                        "anomalyAlertingConfigurationId": {
                            "type": "string"
                        },
                        "createdTime": {
                            "type": "string"
                        },
                        "modifiedTime": {
                            "type": "string"
                        },
                        "timestamp": {
                            "type": "string"
                        }
                    },
                    "type": "object"
                },
                "alertType": {
                    "type": "string"
                },
                "callBackUrl": {
                    "type": "string"
                },
                "hookId": {
                    "type": "string"
                }
            },
            "required": [
                "hookId",
                "alertType",
                "alertInfo",
                "callBackUrl"
            ],
            "type": "object"
        },
        "type": "array"
    }
},
"type": "object"
 }
Choose the method as 'POST' and select Save. You can now see the URL of your HTTP request trigger. Select the copy icon to copy it and fill it back in the Endpoint in Step 1.

Step 4: Add a next step using 'HTTP' action
Signals that are pushed through the webhook only contain limited information like timestamp, alertID, configurationID, etc. Detailed information needs to be queried using the callback URL provided in the signal. This step is to query detailed alert info.
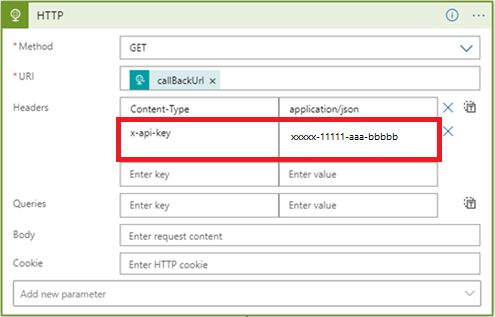
Choose a method of 'GET'
Select 'callBackURL' from 'Dynamic content' list in 'URI'.
Enter a key of 'Content-Type' in 'Headers' and input a value of 'application/json'
Enter a key of 'x-api-key' in 'Headers' and get this by the clicking 'API keys' tab in your Metrics Advisor workspace. This step is to ensure the workflow has sufficient permissions for API calls.

Step 5: Add a next step to ‘parse JSON’
You need to parse the response of the API for easier formatting of email content.
Note
This tutorial only shares a quick example, the final email format needs to be further designed.
- Select 'Body' from 'Dynamic content' list in 'Content'
- select Use sample payload to generate schema. Copy the following sample JSON into the textbox and select Done.
{
    "properties": {
        "@@nextLink": {},
        "value": {
            "items": {
                "properties": {
                    "properties": {
                        "properties": {
                            "IncidentSeverity": {
                                "type": "string"
                            },
                            "IncidentStatus": {
                                "type": "string"
                            }
                        },
                        "type": "object"
                    },
                    "rootNode": {
                        "properties": {
                            "createdTime": {
                                "type": "string"
                            },
                            "detectConfigGuid": {
                                "type": "string"
                            },
                            "dimensions": {
                                "properties": {
                                },
                                "type": "object"
                            },
                            "metricGuid": {
                                "type": "string"
                            },
                            "modifiedTime": {
                                "type": "string"
                            },
                            "properties": {
                                "properties": {
                                    "AnomalySeverity": {
                                        "type": "string"
                                    },
                                    "ExpectedValue": {}
                                },
                                "type": "object"
                            },
                            "seriesId": {
                                "type": "string"
                            },
                            "timestamp": {
                                "type": "string"
                            },
                            "value": {
                                "type": "number"
                            }
                        },
                        "type": "object"
                    }
                },
                "required": [
                    "rootNode",
                    "properties"
                ],
                "type": "object"
            },
            "type": "array"
        }
    },
    "type": "object"
}
Step 6: Add a next step to ‘create HTML table’
A bunch of information has been returned from the API call, however, depending on your scenarios not all of the information may be useful. Choose the items that you care about and would like included in the alert email.
Below is an example of an HTML table that chooses 'timestamp', 'metricGUID' and 'dimension' to be included in the alert email.

Step 7: Add the final step to ‘send an email’
There are several options to send email, both Microsoft hosted and 3rd-party offerings. Customer may need to have a tenant/account for their chosen option. For example, when choosing ‘Office 365 Outlook’ as the server. Sign in process will be pumped for building connection and authorization. An API connection will be established to use email server to send alert.
Fill in the content that you'd like to include to 'Body', 'Subject' in the email and fill in an email address in 'To'.

Next steps
Advance to the next article to learn how to create.


