Buy an App Service domain and configure an app with it
App Service domains are custom domains that are managed directly in Azure. They make it easy to manage custom domains for Azure App Service. This article shows you how to buy an App Service domain and configure an App Service app with it.
Prerequisites
- Create an App Service app, or use an app that you created for another tutorial. The app should be in an Azure Public region. At this time, Azure national clouds are not supported.
- To use an App Service domain, the app's App Service plan must be a paid tier, not a Free (F1) tier. See Scale up an app to update the tier.
- Remove the spending limit on your subscription.
Note
For some subscriptions types, before you can create an App Service domain, the subscription needs to have sufficient history on Azure. App Service domains aren't supported on free trial or credit-based subscriptions.
Buy and map an App Service domain
For pricing information on App Service domains, visit the App Service Pricing page and scroll down to App Service Domain.
In the Azure portal, navigate to your app's management page.
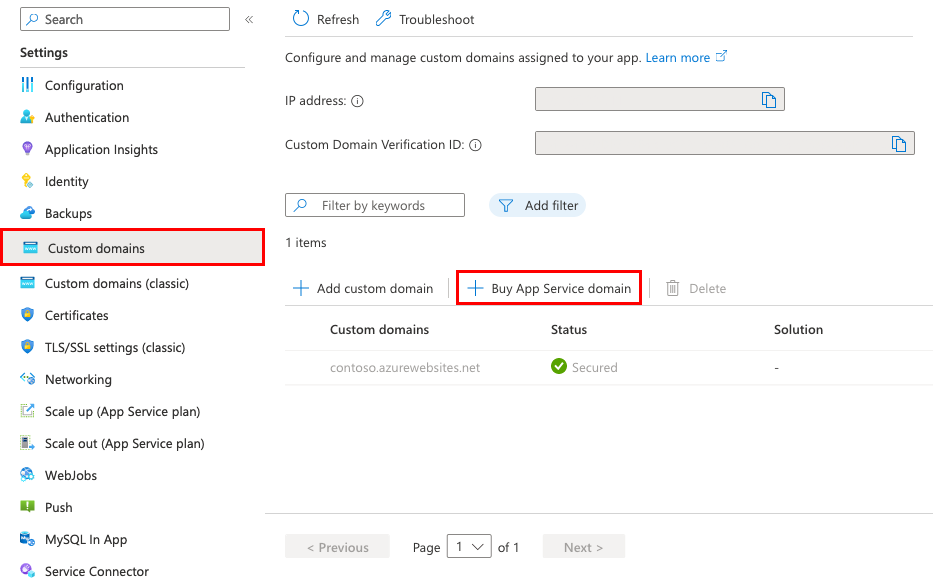
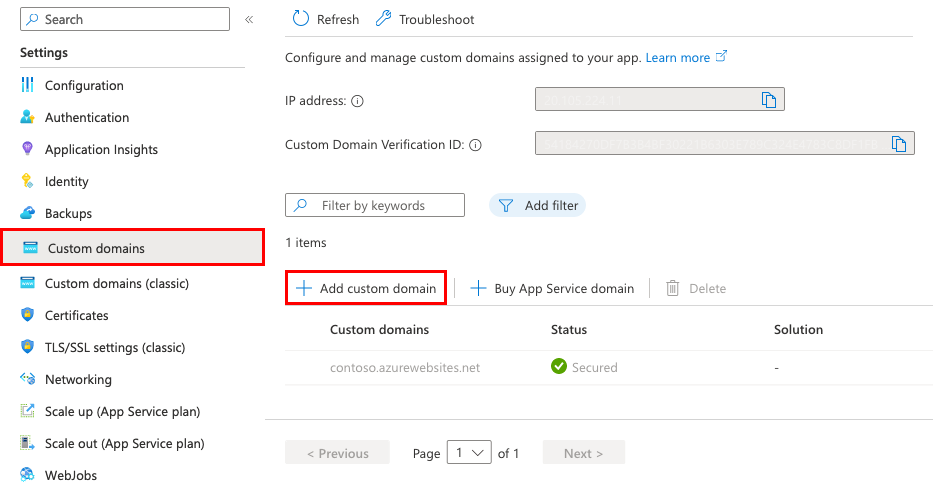
In the left menu for your app, select Custom domains.
Select Buy App Service domain.
Note
You can also create an App Service domain independently of an app by going to the App Service Domains view and selecting Create, or by navigating to the create page directly. But since the domain is independent from your app, you won't be able to assign hostnames like
wwwto your app, which you can do if you create the domain from your app's Custom domains page.In the Basics tab, configure the following settings:
Setting Description Subscription The subscription to use to buy the domain. Resource Group The resource group to put the domain in. For example, the resource group your app is in. Domain The domain you want. For example, contoso.com. If the domain you want isn't available, you can select from a list of suggested available domains or try a different domain. Note
The following top-level domains are supported by App Service domains: com, net, co.uk, org, nl, in, biz, org.uk, and co.in.
Select Next: Contact information and supply your information as required by ICANN for the domain registration.
It's important that you fill out all required fields with as much accuracy as possible. Incorrect data for contact information can result in failure to buy the domain.
Note
Make sure you have access to the email address on your contact information. GoDaddy will send emails directly to your contact information from a "@secureserver.net" email; these will only be important transactional emails.
Select Next: Hostname assignment and verify the default hostnames to map to your app:
Hostname Description root (@) The root or apex subdomain. If you buy the contoso.comdomain, that's the root domain. Select No if you don't want to map the hostname to your app.'www' subdomain If you buy the contoso.comdomain, thewwwsubdomain would bewww.contoso.com. Select No if you don't want to map the hostname to your app.Note
If you didn't launch the App Service domain wizard from an app's Custom domains page, you won't see this tab. You can still add the hostnames later by following the steps at Map a hostname manually.
Select Next: Advanced and configure the optional settings:
Setting Description Auto renewal Your App Service domain is registered to you at one-year increments. Enable auto renewal so that your domain registration doesn't expire and you retain ownership of the domain. Your Azure subscription is automatically charged the yearly domain registration fee at the time of renewal. If you leave this option disabled, you must renew the domain manually. Privacy protection Enabled by default. Privacy protection hides your domain registration contact information from the WHOIS database and is already included in the yearly domain registration fee. To opt out, select Disable. Privacy protection isn't supported in following top-level domains (TLDs): co.uk, in, org.uk, co.in, and nl. Select Next: Tags and set the tags you want for your App Service domain. Tagging isn't required. It's a feature in Azure that helps you manage your resources.
Select Next: Review + create and review your domain order. When finished, select Create.
Note
App Service domains use GoDaddy for domain registration and Azure DNS to host the domains. In addition to the yearly domain registration fee, usage charges for Azure DNS apply. For information, see Azure DNS Pricing.
When the domain registration is complete, you see a Go to resource button. Select it to see the management page.
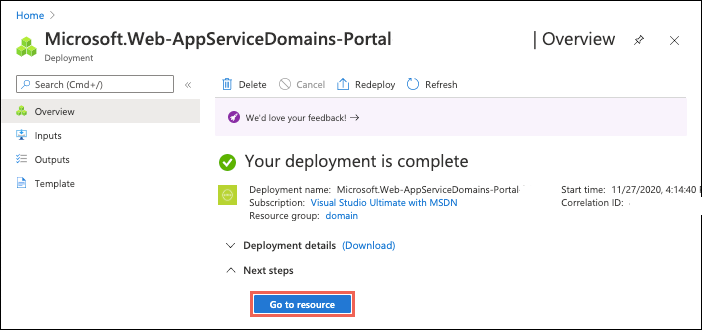
You're now ready to assign an App Service app to this custom domain.
Note
For some subscriptions types, before you can create an App Service domain, the subscription needs to have sufficient history on Azure. App Service domains aren't supported on free trial or credit-based subscriptions.
Map a hostname manually
If launched from an app's Custom domains page, the App Service domain wizard already lets you map the root domain (like contoso.com) and the www subdomain (like www.contoso.com) to your app. You can map any other subdomain to your app, like shoppingcart (as in shoppingcart.contoso.com).
In the Azure portal, navigate to your app's management page.
In the left menu for your app, select Custom domains.
Select Add custom domain.
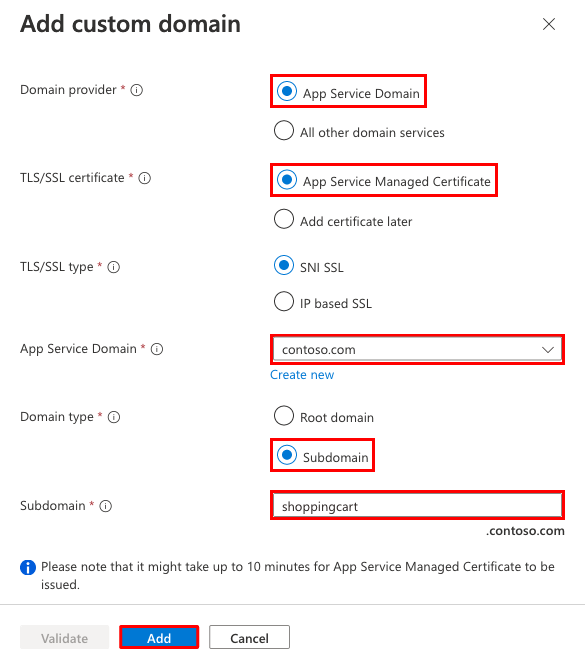
For Domain provider, select App Service Domain.
For TLS/SSL certificate, select App Service Managed Certificate if your app is in the Basic tier or higher. If you want to remain in the Shared tier, or if you want to use your own certificate, select Add certificate later.
For TLS/SSL type, select the binding type you want.
Setting Description Custom domain The domain name to add the TLS/SSL binding for. Private Certificate Thumbprint The certificate to bind. TLS/SSL Type - SNI SSL: Multiple SNI SSL bindings may be added. This option allows multiple TLS/SSL certificates to secure multiple domains on the same IP address. Most modern browsers (including Internet Explorer, Chrome, Firefox, and Opera) support SNI (for more information, see Server Name Indication).
- IP SSL: Only one IP SSL binding may be added. This option allows only one TLS/SSL certificate to secure a dedicated public IP address. After you configure the binding, follow the steps in Remap records for IP based SSL.
IP SSL is supported only in Standard tier or above.In App Service Domain, select an App Service domain in your subscription.
Note
To map to an App Service domain in a different subscription, see Map an externally purchased domain. In this case, Azure DNS is the external domain provider, and you need to add the required DNS records manually.
In Domain type, configure the domain type you want to map:
Domain type Description Root domain The root or apex subdomain. If you buy the contoso.comdomain, that's the root domain.Subdomain In the Subdomain box, specify a subdomain like wwworshoppingcart.Select Add.
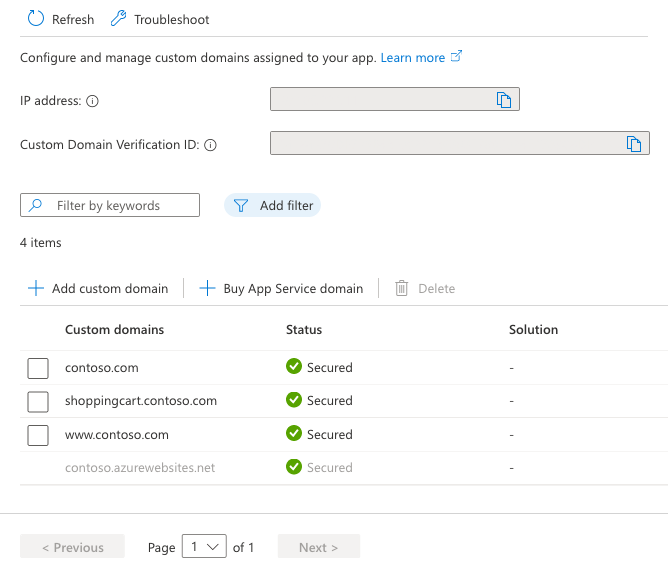
You should see the custom domain added to the list. You might also see a red X and the text No binding.
If you selected App Service Managed Certificate earlier, wait a few minutes for App Service to create the managed certificate for your custom domain. When the process is complete, the red X becomes a green check mark with the word Secured. If you selected Add certificate later, the red X will remain until you add a private certificate for the domain and configure the binding.
Note
Unless you configure a certificate binding for your custom domain, any HTTPS request from a browser to the domain will receive an error or warning, depending on the browser.
Test the mapping by navigating to it in a browser. (For example, go to
shoppingcart.contoso.com.)
Renew the domain
The App Service domain you bought is valid for one year from the time of purchase. You can configure your domain to renew automatically, or you can manually renew your domain name up to 90 days ahead of domain expiration. Upon successful automatic or manual renewal, you'll be billed for the cost of the domain, and your domain expiration will be extended for another year.
Note
For .nl domains, you can only manually renew the domain starting 90 days ahead of domain expiration and up to the 20th of the month before the expiration date. You won't be able to renew the domain after this period even if the domain hasn't yet expired.
If you want to configure automatic renewal, or if you want to manually renew your domain, follow these steps:
In the search bar, search for and select App Service Domains.
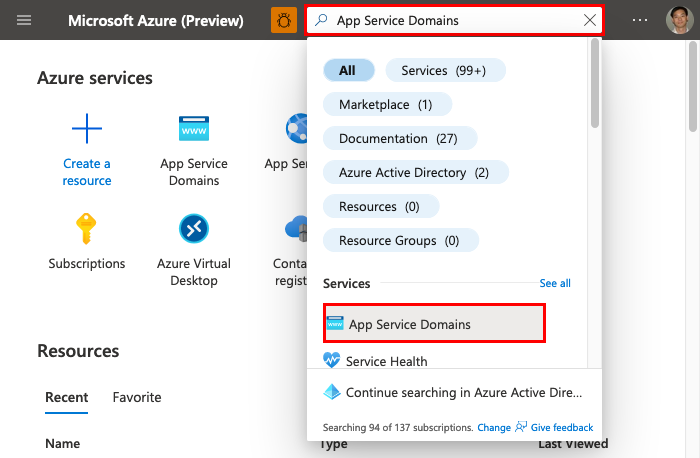
Select the domain you want to configure.
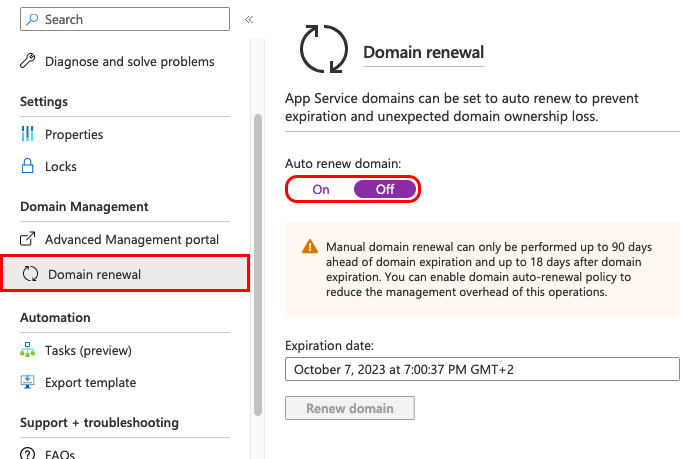
From the left navigation of the domain, select Domain renewal. To start renewing your domain automatically, select On. Otherwise select Off. The setting takes effect immediately. If automatic renewal is enabled, on the day after your domain expiration date, Azure attempts to bill you for the domain name renewal.
Note
When navigating away from the page, disregard the "Your unsaved edits will be discarded" error by selecting OK.
To manually renew your domain, select Renew domain. However, this button isn't active until 90 days before the domain's expiration date.
If your domain renewal is successful, you receive an email notification within 24 hours.
Manage custom DNS records
In Azure, DNS records for an App Service domain are managed using Azure DNS. You can add, remove, and update DNS records just as you would for an externally purchased domain. To manage custom DNS records:
In the search bar, search for and select App Service Domains.

Select the domain you want to configure.
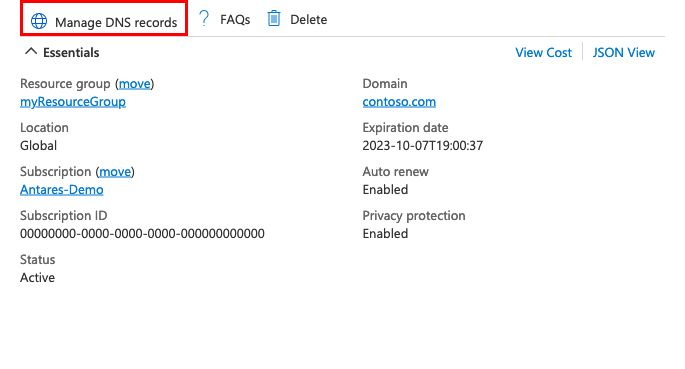
From the Overview page, select Manage DNS records.
For information on how to edit DNS records, see How to manage DNS Zones in the Azure portal.
Update contact information
After you purchase the App Service domain, you can update the domain contact information if you need to. It's important to keep this contact information up to date so that you can receive notifications about your domain and receive verification emails if you decide to transfer out your domain. To update your contact information:
In the search bar, search for and select App Service Domains.

Select the domain you want to configure.
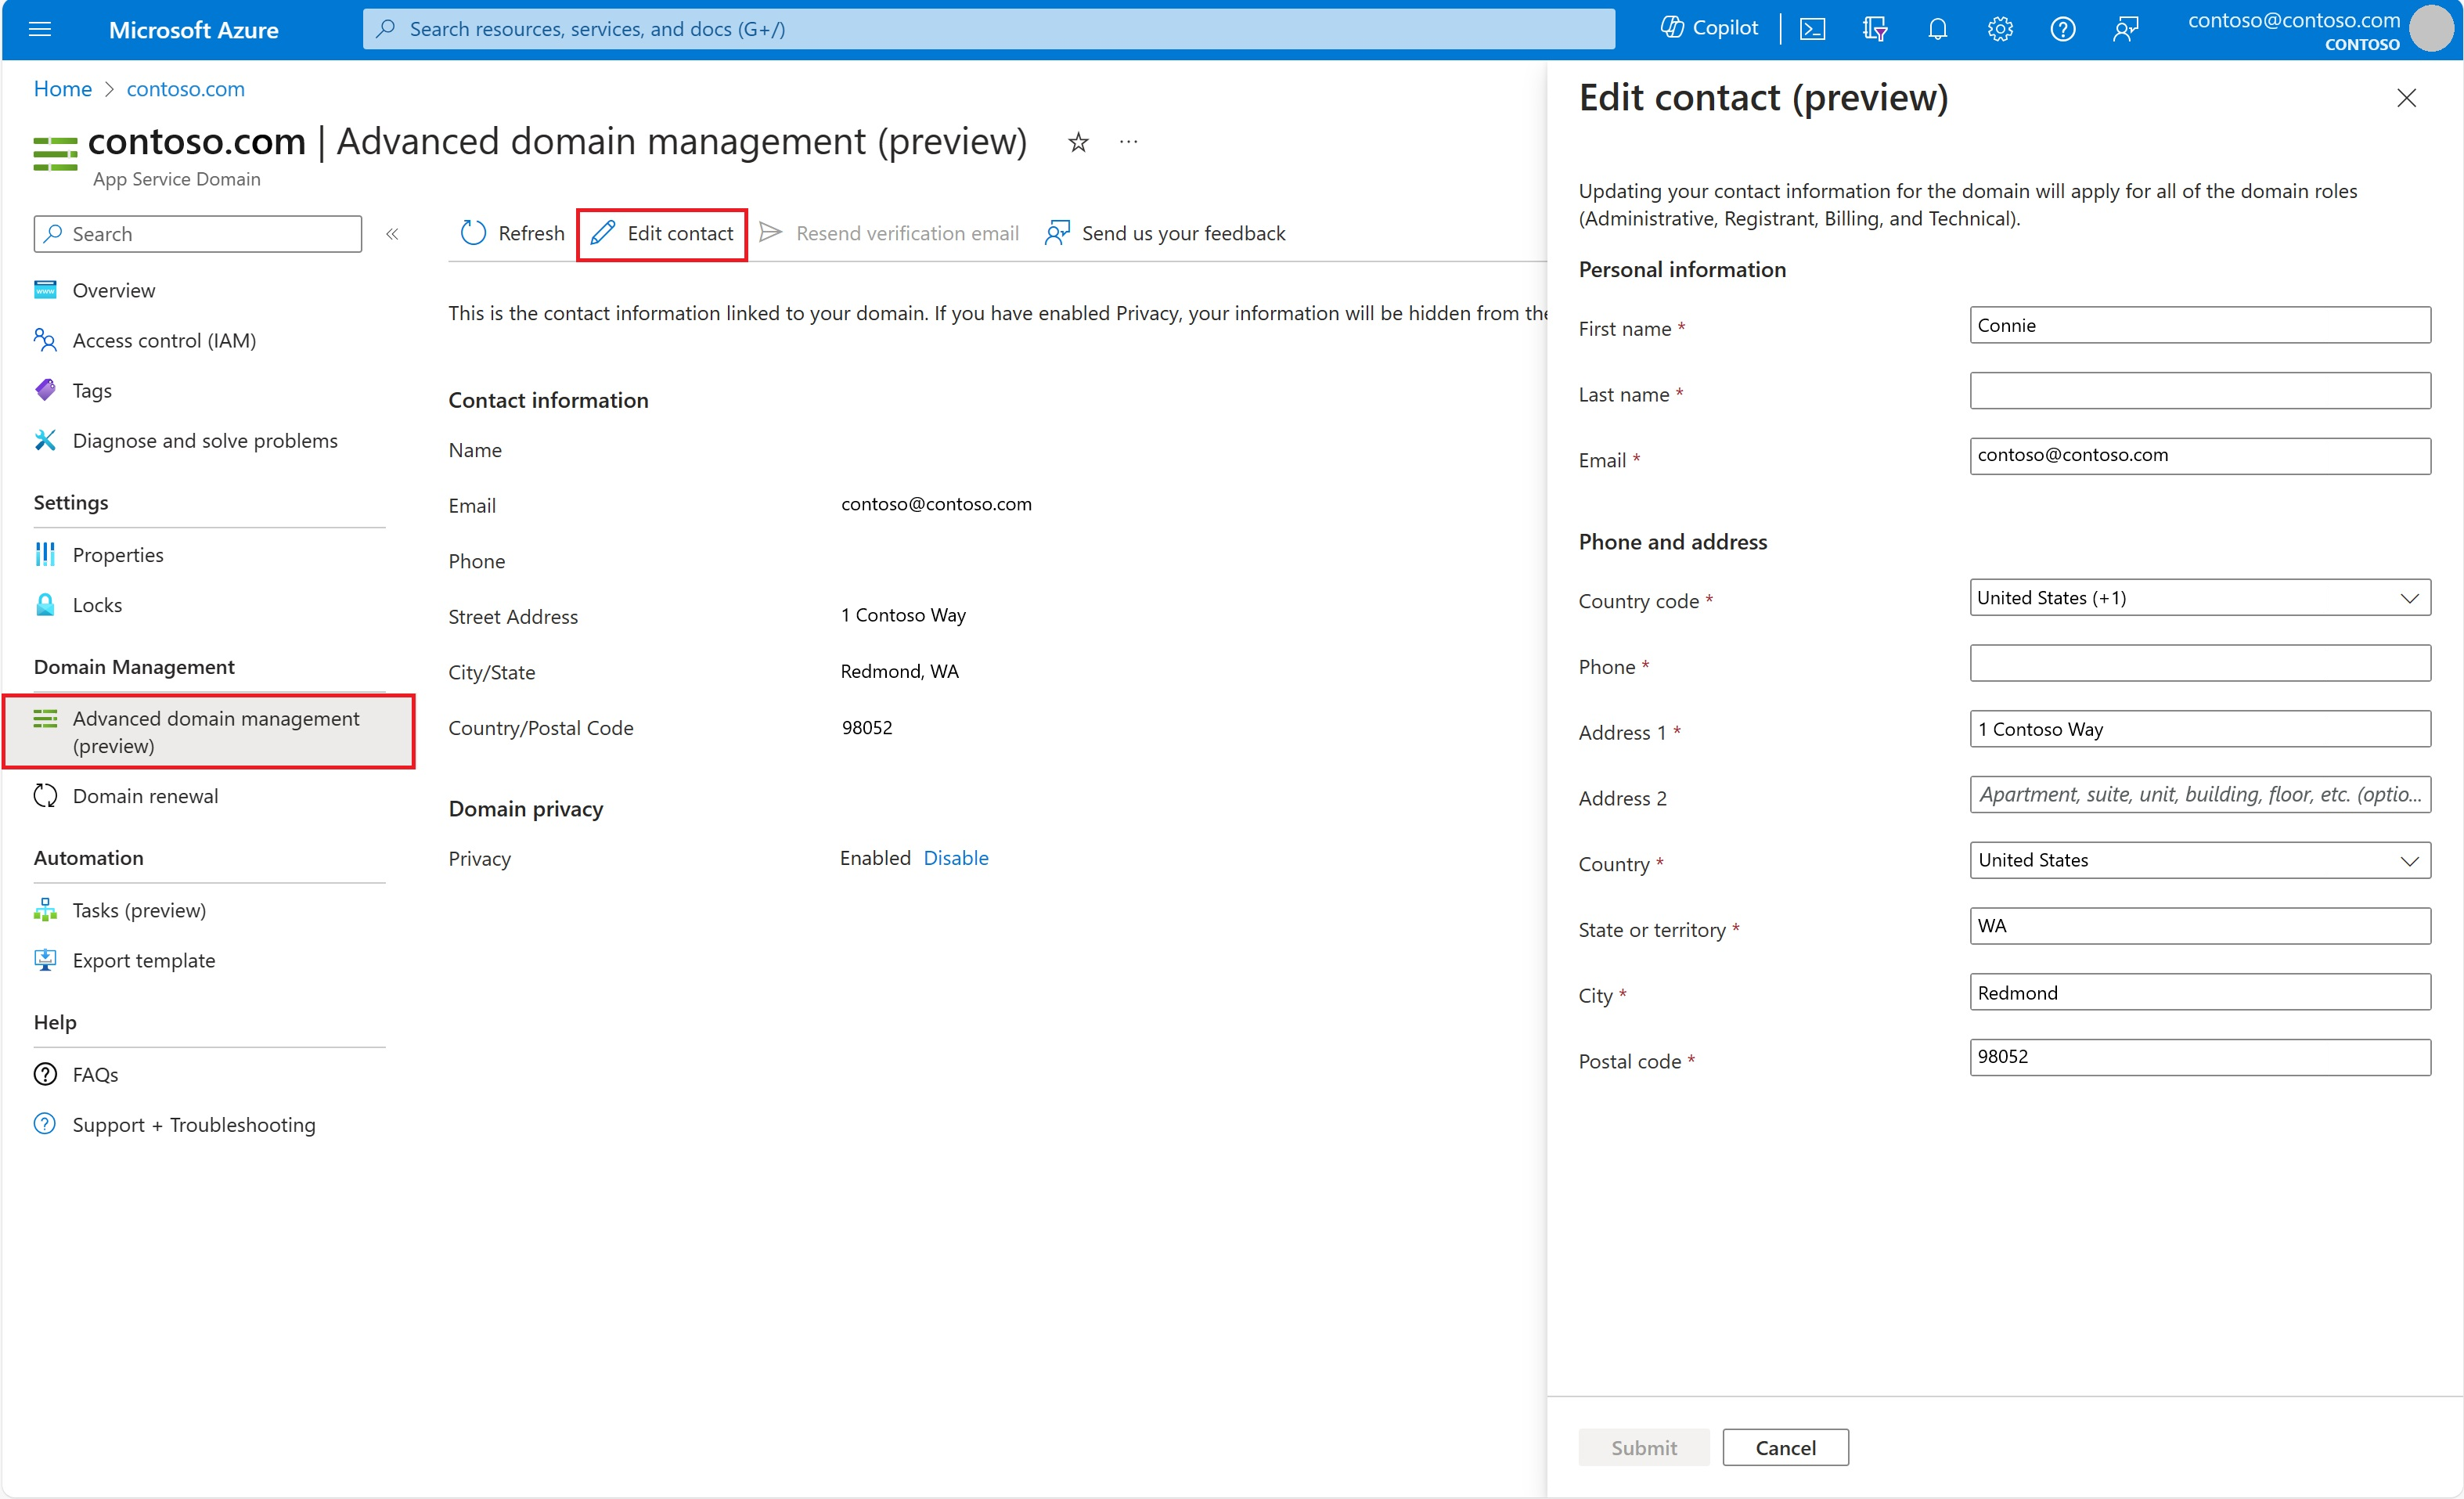
From the left navigation of the domain, select Advanced domain management (preview). To update your contact information, select Edit contact.
In the pane that appears, update the necessary fields and then select Submit.
Once you submit the request, it might take some time for your contact information to update.
Note
If you have privacy protection disabled and update name or organization information, an email verification is sent to the email address on file for confirmation. Additionally, if you update your email address, a verification email is sent first to the previous email on file for confirmation. Once that's completed, another email is sent to the new email on file for confirmation. The contact information won't update until after you have confirmed via email.
Disable privacy protection
Important
Once you disable privacy protection, you can no longer re-enable privacy protection again.
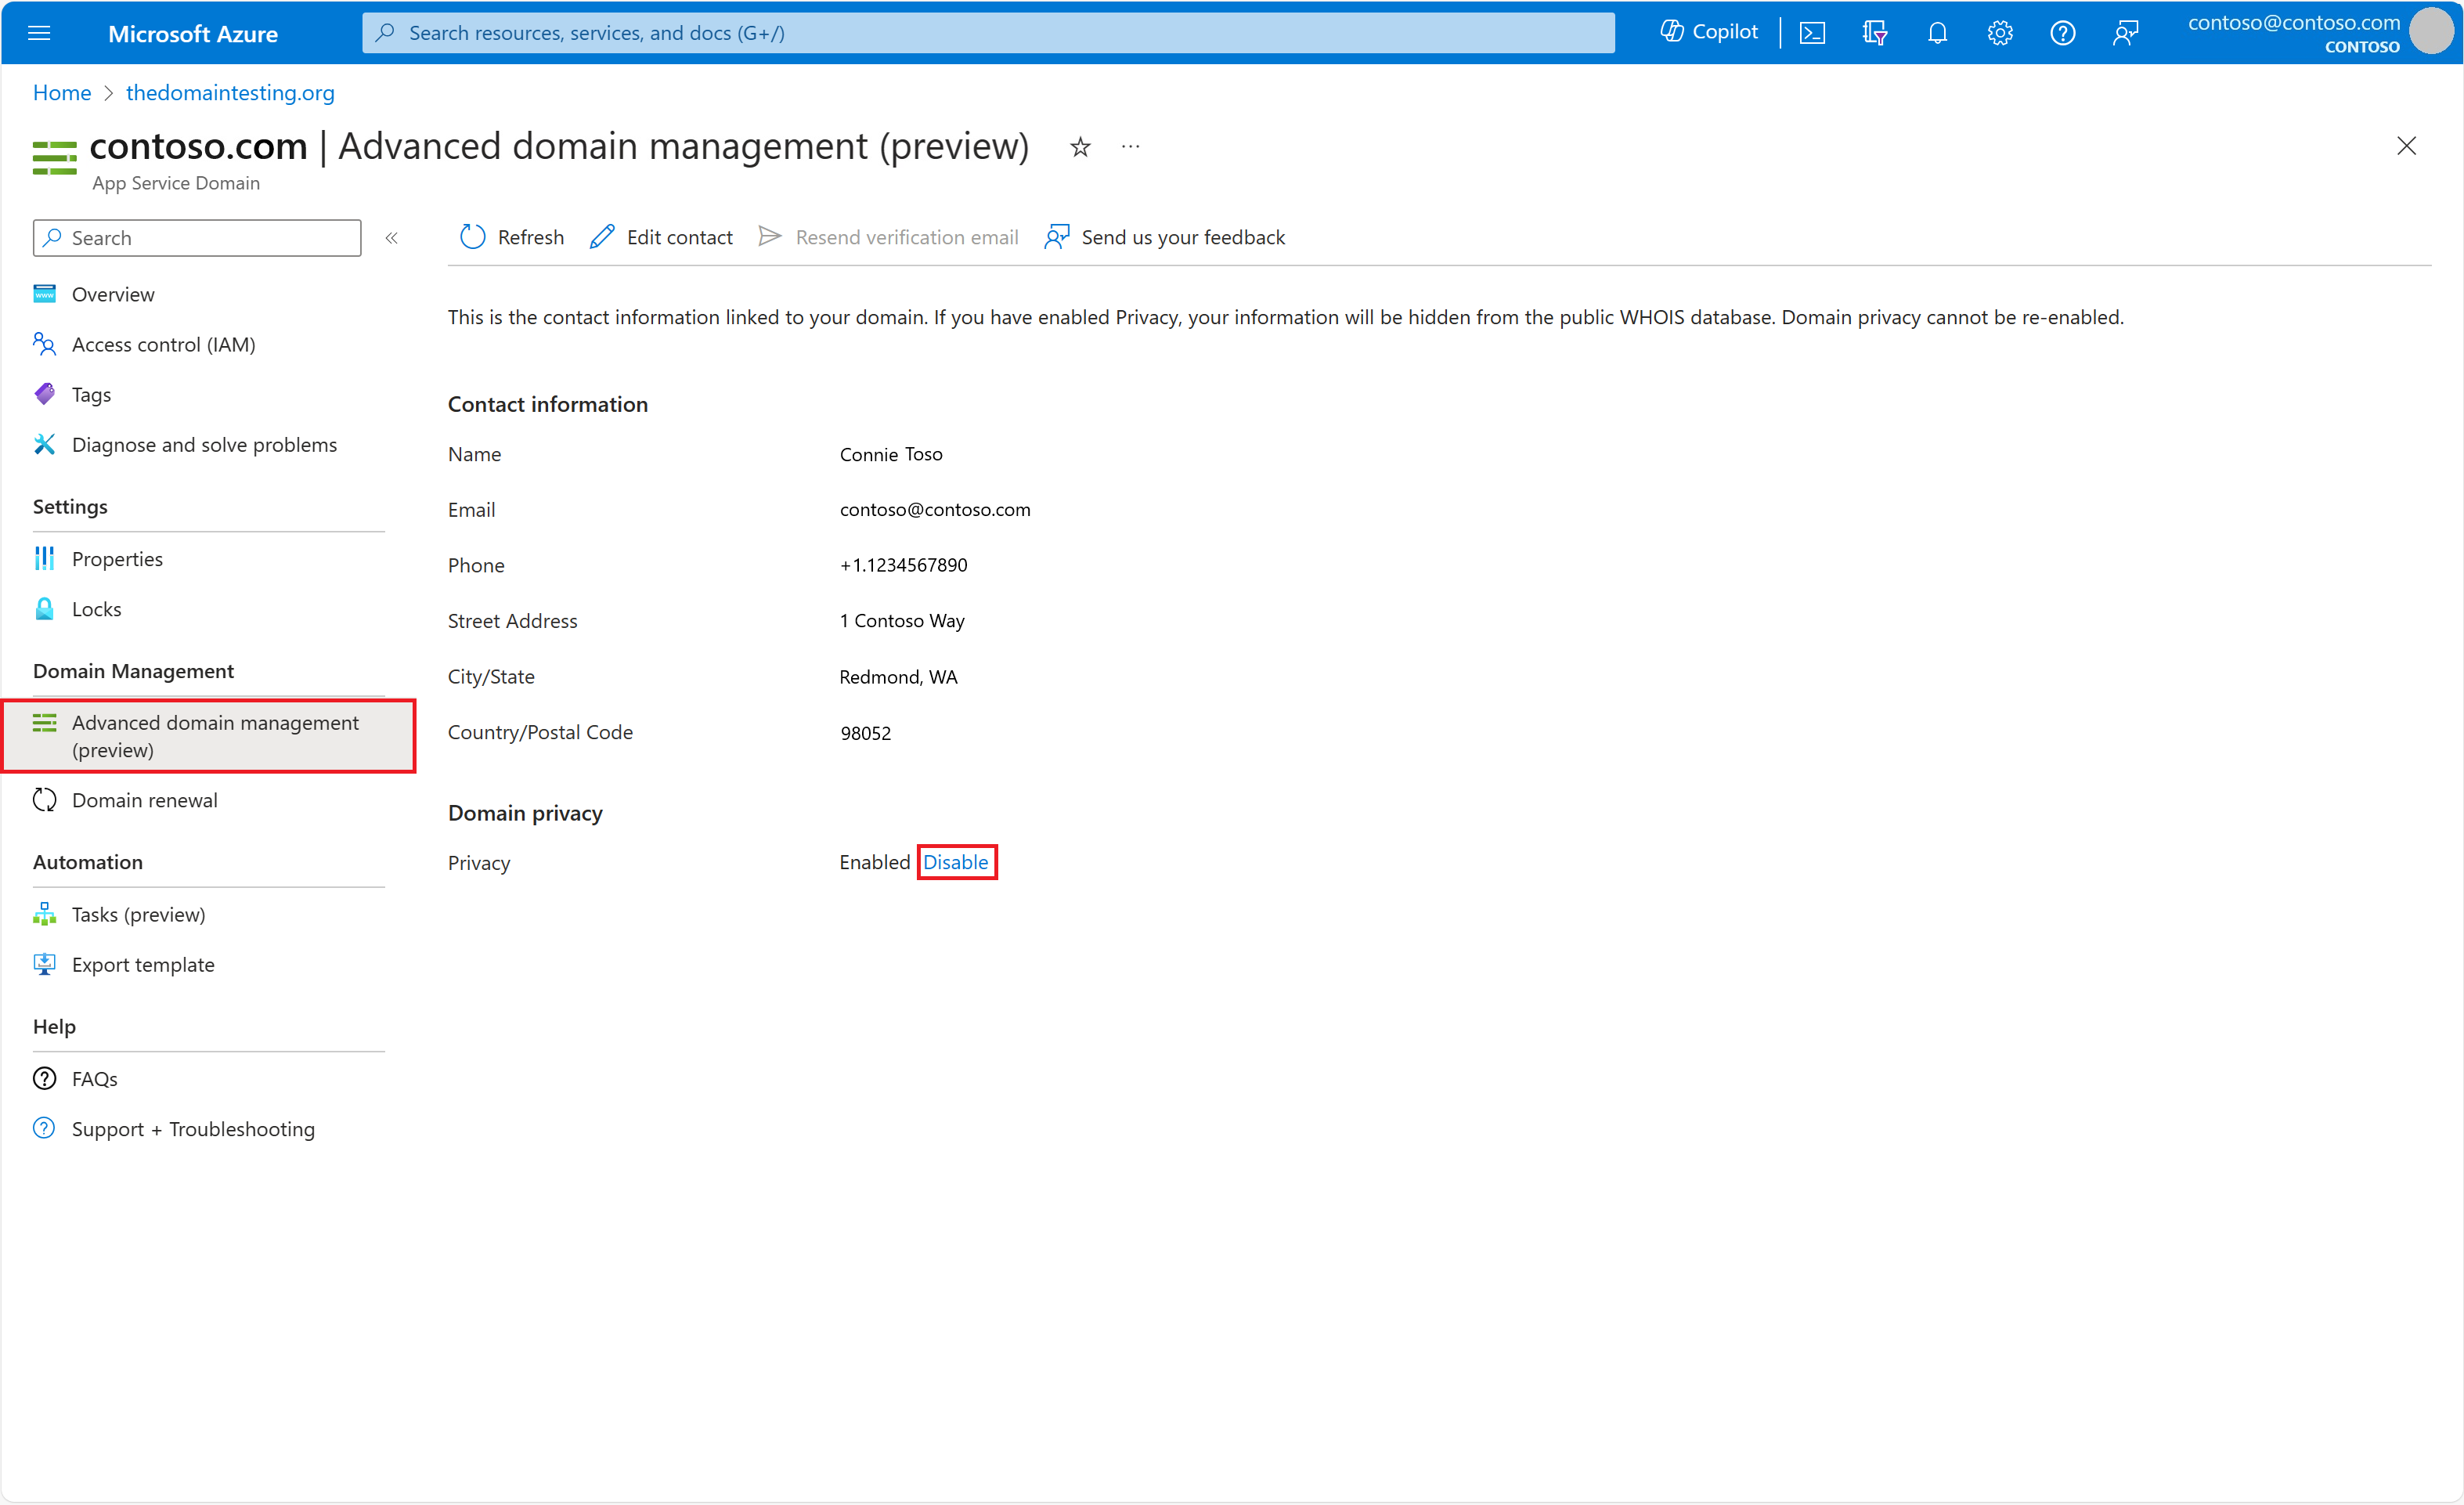
Privacy protection hides your domain registration contact information from the WHOIS database. If it's enabled during domain creation, privacy protection is already included in the yearly domain registration fee for no additional cost. However, there are some scenarios, such as transferring the domain out, where you need to disable privacy protection, you can do that by:
In the search bar, search for and select App Service Domains.

Select the domain you want to configure.
From the left navigation of the domain, select Advanced domain management (preview). To disable privacy protection, select Disable in the Domain Privacy section.
Cancel the purchase
After you purchase the App Service domain, you have five days to cancel your purchase and get a full refund. After five days, you can delete the App Service domain but can't receive a refund.
In the search bar, search for and select App Service Domains.

Select the domain you want to configure.
In the domain's left navigation, select Locks.
A delete lock has been created for your domain. As long as a delete lock exists, you can't delete the App Service domain.
Select Delete to remove the lock.
In the domain's left navigation, select Overview.
If the cancellation period on the purchased domain hasn't elapsed, select Cancel purchase. Otherwise, you see a Delete button instead. To delete the domain without a refund, select Delete.

Confirm the operation by selecting Yes.
After the operation is complete, the domain is released from your subscription and available for anyone to purchase again.
Frequently asked questions
- Why do I see "This subscription does not have the billing support to purchase an App Service domain"?
- Why do I get a SubscriptionExceededMaxDomainLimit error when creating an App Service domain?
- How do I direct the default URL to a custom directory?
Why do I see "This subscription does not have the billing support to purchase an App Service domain"?
Free subscriptions, which don't require a confirmed credit card, don't have the permissions to buy App Service domains in Azure.
Why do I get a SubscriptionExceededMaxDomainLimit error when creating an App Service domain?
The number of App Service domains a subscription can have depends on the subscription type. Subscriptions that have a monthly credit allotment, like the Visual Studio Enterprise subscription, have a limit of one App Service domain. To increase your limit, convert to a pay-per-use subscription.
How do I direct the default URL to a custom directory?
This is not a DNS resolution scenario. By default, App Service directs web requests to the root directory of your app code. To direct them to a subdirectory, such as public, see Redirect to a custom directory.
Next step
Learn how to bind a custom TLS/SSL certificate to help secure App Service.
