Add a symbol layer (Android SDK)
This article shows you how to render point data from a data source as a symbol layer on a map using the Azure Maps Android SDK. Symbol layers render points as an image and text on the map.
Note
Azure Maps Android SDK retirement
The Azure Maps Native SDK for Android is now deprecated and will be retired on 3/31/25. To avoid service disruptions, migrate to the Azure Maps Web SDK by 3/31/25. For more information, see The Azure Maps Android SDK migration guide.
Tip
Symbol layers by default will render the coordinates of all geometries in a data source. To limit the layer so that it only renders point geometry features, set the filter option of the layer to eq(geometryType(), "Point"). If you want to include MultiPoint features as well, set the filter option of the layer to any(eq(geometryType(), "Point"), eq(geometryType(), "MultiPoint")).
Prerequisites
Be sure to complete the steps in the Quickstart: Create an Android app document. Code blocks in this article can be inserted into the maps onReady event handler.
Add a symbol layer
Before you can add a symbol layer to the map, you need to take a couple of steps. First, create a data source, and add it to the map. Create a symbol layer. Then, pass in the data source to the symbol layer, to retrieve the data from the data source. Finally, add data into the data source, so that there's something to be rendered.
The following code demonstrates what should be added to the map after it has loaded. This sample renders a single point on the map using a symbol layer.
//Create a data source and add it to the map.
DataSource source = new DataSource();
map.sources.add(source);

//Create a point and add it to the data source.
source.add(Point.fromLngLat(0, 0));

//Create a symbol layer to render icons and/or text at points on the map.
SymbolLayer layer = new SymbolLayer(source);

//Add the layer to the map.
map.layers.add(layer);
//Create a data source and add it to the map.
val source = DataSource()
map.sources.add(source)

//Create a point and add it to the data source.
source.add(Point.fromLngLat(0, 0))

//Create a symbol layer to render icons and/or text at points on the map.
val layer = SymbolLayer(source)

//Add the layer to the map.
map.layers.add(layer)
There are three different types of point data that can be added to the map:
- GeoJSON Point geometry - This object only contains a coordinate of a point and nothing else. The
Point.fromLngLatstatic method can be used to easily create these objects. - GeoJSON MultiPoint geometry - This object contains the coordinates of multiple points and nothing else. Pass an array of points into the
MultiPointclass to create these objects. - GeoJSON Feature - This object consists of any GeoJSON geometry and a set of properties that contain metadata associated to the geometry.
For more information, see the Create a data source document on creating and adding data to the map.
The following code sample creates a GeoJSON Point geometry and passes it into the GeoJSON Feature and has a title value added to its properties. The title property is displayed as text above the symbol icon on the map.
//Create a data source and add it to the map.
DataSource source = new DataSource();
map.sources.add(source);

//Create a point feature.
Feature feature = Feature.fromGeometry(Point.fromLngLat(0, 0));

//Add a property to the feature.
feature.addStringProperty("title", "Hello World!");

//Add the feature to the data source.
source.add(feature);

//Create a symbol layer to render icons and/or text at points on the map.
SymbolLayer layer = new SymbolLayer(source,
    //Get the title property of the feature and display it on the map.
    textField(get("title"))
);

//Add the layer to the map.
map.layers.add(layer);
//Create a data source and add it to the map.
val source = DataSource()
map.sources.add(source)

//Create a point feature.
val feature = Feature.fromGeometry(Point.fromLngLat(0, 0))

//Add a property to the feature.
feature.addStringProperty("title", "Hello World!")

//Add the feature to the data source.
source.add(feature)

//Create a symbol layer to render icons and/or text at points on the map.
val layer = SymbolLayer(
    source,  //Get the title property of the feature and display it on the map.
    textField(get("title"))
)

//Add the layer to the map.
map.layers.add(layer)
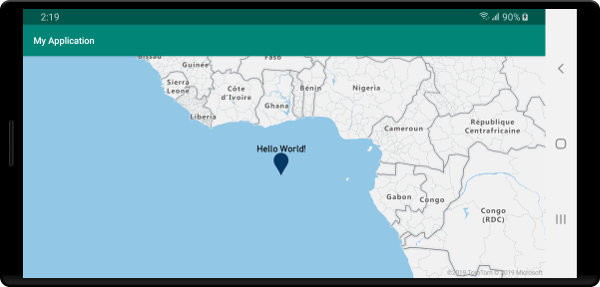
The following screenshot shows the above code rendering a point feature using an icon and text label with a symbol layer.

Tip
By default, symbol layers optimize the rendering of symbols by hiding symbols that overlap. As you zoom in, the hidden symbols become visible. To disable this feature and render all symbols at all times, set the iconAllowOverlap and textAllowOverlap options to true.
Add a custom icon to a symbol layer
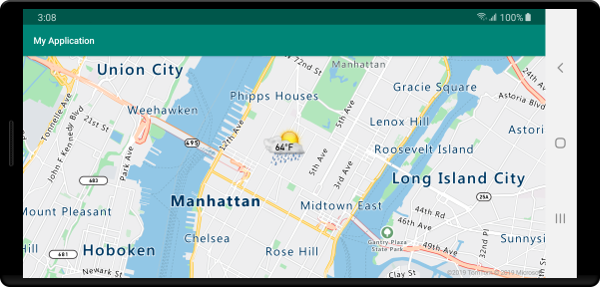
Symbol layers are rendered using WebGL. As such all resources, such as icon images, must be loaded into the WebGL context. This sample shows how to add a custom icon to the map resources. This icon is then used to render point data with a custom symbol on the map. The textField property of the symbol layer requires an expression to be specified. In this case, we want to render the temperature property. Since temperature is a number, it needs to be converted to a string. Additionally we want to append "°F" to it. An expression can be used to do this concatenation; concat(Expression.toString(get("temperature")), literal("°F")).
//Load a custom icon image into the image sprite of the map.
map.images.add("my-custom-icon", R.drawable.showers);

//Create a data source and add it to the map.
DataSource source = new DataSource();
map.sources.add(source);

//Create a point feature.
Feature feature = Feature.fromGeometry(Point.fromLngLat(-73.985708, 40.75773));

//Add a property to the feature.
feature.addNumberProperty("temperature", 64);

//Add the feature to the data source.
source.add(feature);

//Create a symbol layer to render icons and/or text at points on the map.
SymbolLayer layer = new SymbolLayer(source,
    iconImage("my-custom-icon"),
    iconSize(0.5f),

    //Get the title property of the feature and display it on the map.
    textField(concat(Expression.toString(get("temperature")), literal("°F"))),
    textOffset(new Float[]{0f, -1.5f})
);
//Load a custom icon image into the image sprite of the map.
map.images.add("my-custom-icon", R.drawable.showers)

//Create a data source and add it to the map.
val source = DataSource()
map.sources.add(source)

//Create a point feature.
val feature = Feature.fromGeometry(Point.fromLngLat(-73.985708, 40.75773))

//Add a property to the feature.
feature.addNumberProperty("temperature", 64)

//Add the feature to the data source.
source.add(feature)

//Create a symbol layer to render icons and/or text at points on the map.
val layer = SymbolLayer(
    source,
    iconImage("my-custom-icon"),
    iconSize(0.5f),  //Get the title property of the feature and display it on the map.
    textField(concat(Expression.toString(get("temperature")), literal("°F"))),
    textOffset(arrayOf(0f, -1.5f))
)
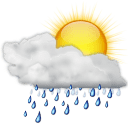
For this sample, the following image is loaded into the drawable folder of the app.
 |
|---|
| showers.png |
The following screenshot shows the above code rendering a point feature using a custom icon and formatted text label with a symbol layer.

Tip
When you want to render only text with a symbol layer, you can hide the icon by setting the iconImage property of the icon options to "none".
Modify symbol colors
The Azure Maps Android SDK comes with a set of predefined color variations of the default marker icon. For example, marker-red can be passed into the iconImage option of a symbol layer to render a red version of the marker icon in that layer.
SymbolLayer layer = new SymbolLayer(source,
    iconImage("marker-red")
);
val layer = SymbolLayer(source,
    iconImage("marker-red")
)
The table below lists all of the built-in icon image names available. These markers pull their colors from color resources that can be overridden. However, overriding the color of one of these markers would apply to all layers that use that icon image.
| Icon image name | Color resource name |
|---|---|
marker-default |
azure_maps_marker_default |
marker-black |
azure_maps_marker_black |
marker-blue |
azure_maps_marker_blue |
marker-darkblue |
azure_maps_marker_darkblue |
marker-red |
azure_maps_marker_red |
marker-yellow |
azure_maps_marker_yellow |
You can also override the border color of all markers using the azure_maps_marker_border color resource name. The colors of these markers can be overridden by adding a color with the same name in the colors.xml file of your app. For example, the following colors.xml file would make the default marker color bright green.
<?xml version="1.0" encoding="utf-8"?>
<resources>
    <color name="azure_maps_marker_default">#00FF00</color>
</resources>
The following code is a modified version of the default marker vector XML that you can modify to create custom versions of the default marker. The modified version can be added to the drawable folder of your app and added to the maps image sprite using map.images.add, then used with a symbol layer.
<vector xmlns:android="http://schemas.android.com/apk/res/android"
    android:width="24.5dp"
    android:height="36.5dp"
    android:viewportWidth="24.5"
    android:viewportHeight="36.5">
    <path
        android:pathData="M12.25,0.25a12.2543,12.2543 0,0 0,-12 12.4937c0,6.4436 6.4879,12.1093 11.059,22.5641 0.5493,1.2563 1.3327,1.2563 1.882,0C17.7621,24.8529 24.25,19.1857 24.25,12.7437A12.2543,12.2543 0,0 0,12.25 0.25Z"
        android:strokeWidth="0.5"
        android:fillColor="@color/azure_maps_marker_default"
        android:strokeColor="@color/azure_maps_marker_border"/>
</vector>
Next steps
See the following articles for more code samples to add to your maps: